Project Overview
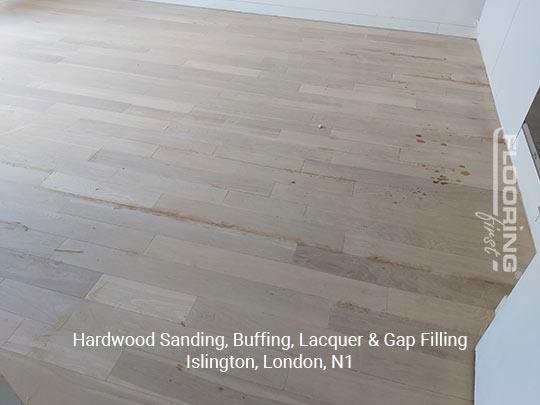
This hardwood floor sanding, gap filling, and lacquering project was completed at a Victorian terraced property in Islington, North London. The original pine floorboards were in poor condition: the lacquer had worn through in the main traffic routes, the surface was scratched and stained, and the gaps between boards had grown wide enough to cause draughts and let dust collect. The client wanted the floor restored to a smart, practical condition that would work well for a busy family home. Hardwood floor sanding in London typically runs between £25 and £45 per square metre, inclusive of gap filling and a standard lacquer finish.
The Challenge
Older Victorian pine boards can be tricky to work with. The boards in this property were around 19 millimetres thick and had clearly been sanded at least once before, leaving less material to work with than a virgin floor. Some boards also had significant gaps, not just the standard seasonal movement gaps but wider ones caused by boards shrinking as the central heating dried the timber out over decades. The gap filling needed to be done properly, with a flexible material that would move slightly with the wood rather than cracking out within a couple of years. The surface also had a few deep scratches and dark staining around one area that would need extra passes to remove fully.
Our Approach
- Preparation: We punched all nail heads below the surface to protect the sanding belts, then swept and vacuumed the floor thoroughly before starting.
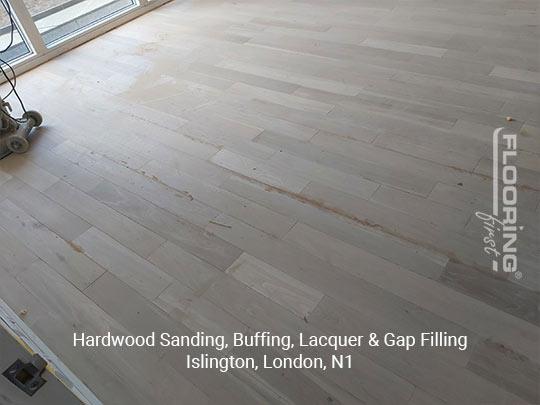
- Coarse sanding: An initial pass with a coarse belt on the drum sander removed the bulk of the old finish and surface imperfections, including most of the staining.
- Gap filling: Once the first sanding pass was complete and sawdust was available, we mixed dust with a flexible resin binder and worked the filler into every gap. This ensures the fill is colour-matched to the actual floor and provides some flexibility to accommodate seasonal wood movement.
- Medium and fine sanding: After the filler had cured, we completed medium and fine sanding passes across the whole floor, including a careful edge-sanding run along the skirting boards.
- Buffing: A buffing machine with a fine pad completed the surface preparation, leaving the wood clean, smooth, and open-pored for the lacquer.
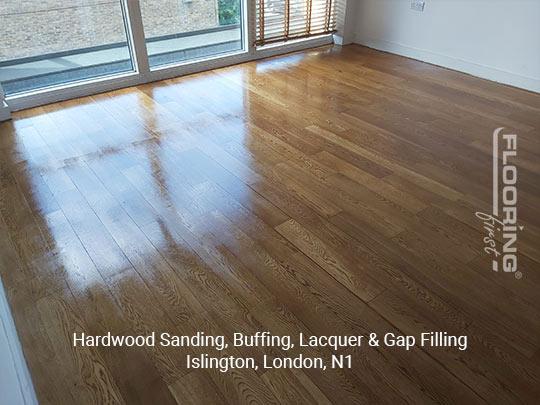
- Three-coat lacquering: We applied three coats of a hard-wearing water-based lacquer in a satin finish, lightly abrading between coats to ensure good adhesion and a consistent sheen level throughout.
The Result
The floor went from looking tired and patchy to genuinely smart. The gaps were filled, the staining was gone, and the satin lacquer gave the old pine a warm, natural appearance that suited the period character of the house. The client was particularly pleased with the gap filling, which had stopped the draught that had been coming through the floor in winter. A well-maintained lacquer finish on pine can last eight to fifteen years before it needs refreshing, and the floor will be far easier to clean and keep looking good in the meantime.
Frequently Asked Questions
Is gap filling always necessary when sanding a hardwood floor?
It depends on the size and number of the gaps. Small seasonal movement gaps of one to two millimetres are normal and do not necessarily need filling. Larger gaps that collect dirt, cause draughts, or create a spongy feel underfoot benefit significantly from being filled. We assess this during the initial inspection and advise accordingly.
What causes the gaps between floorboards to get wider over time?
The most common cause is low humidity, usually from central heating drying out the air during winter. Wood is hygroscopic and will shrink when it loses moisture. Improving indoor humidity levels, ideally keeping relative humidity between 45 and 65 per cent, helps reduce this effect.
How long will a lacquered pine floor last before it needs re-sanding?
A pine floor with a good lacquer finish and normal domestic traffic can go ten to twenty years between full sanding jobs. In high-traffic areas such as hallways, the finish will wear first, and a maintenance coat applied before it wears through completely can extend the time between full sanding jobs considerably.
Have a similar project? Call us on 020 88309782 or Book a Free Site Visit
Close