Floor Sanding & Fitting
Book Free Visit Price Guide 020 88309782
Monday - Friday 07:30 - 17:30, Saturday 07:30 - 16:00
cs@flooringfirst.co.uk
020 88309782
Monday - Friday 07:30 - 17:30, Saturday 07:30 - 16:00
cs@flooringfirst.co.uk
  • Book Free Visit
  • Home
  • Floor Sanding
  • Floor Fitting
  • Floor Repairs
  • Aftercare
    • Wooden Floors
    • Cleaning & Polishing
    • Re-Oiling Wooden Floors
    • Vinyls & Linoleum
    • Vinyl Floor Polishing
    • Get a Quote...
  • For Businesses
  • Gallery
  • Service Guide
  • Shop
  • Book Free Visit

See Few Examples of Our Works

Floor Sanding, Solid, Parquet & Laminate Floor Fitting

Gallery

See Our Floor Works

WHY CHOOSE US
CASE STUDIES
PRICE GUIDE
OFFERS
GALLERY
ASK EXPERT
WHY CHOOSE US
CASE STUDIES
PRICE GUIDE
OFFERS
GALLERY
ASK EXPERT

Floor Sanding & Fitting Project Gallery

All Projects Renovations Installations

6  |   Clapton  |   1 December 2025

A complete floor sanding and restoration at a Victorian property in Clapton, E5. The project covered multiple rooms of pine floorboards, sanded, buffed and lacquered to a durable finish, along with full stair sanding and sealing. Loose boards were refitted before sanding, wider gaps closed with timber slivers, and the fireplace hearth removed. From survey to completion the work was handled in full by our East London team, bringing the original character of the floors back to life.

Case studies

Project Overview

This project at a Victorian terraced property in Clapton, E5 involved a full floor sanding and restoration across multiple rooms and the main staircase. The work included sanding, buffing and lacquering the existing pine floorboards, sealing the stairs, closing wider board gaps with timber slivers, refitting loose boards, replacing a section of damaged floorboards, and removing the fireplace hearth. The job was surveyed and completed by our East London team from start to finish.

Floorboards before sanding, Clapton E5Floorboards before sanding, Clapton E5Floorboards before sanding, Clapton E5

The Challenge

Victorian pine floors take a long time to get into poor condition, and they take careful preparation to bring back properly. At 182 Rushmore Road the main challenges were:

  • Multiple loose boards creaking underfoot, which needed securing before any sanding could begin — sanding over a moving board splits the finish and causes it to crack within months
  • Wider gaps between boards throughout the property, some significant enough to cause draughts from below
  • A section of floorboards that were too damaged to sand and needed replacing with matching timber
  • A fireplace hearth that had to be removed before the surrounding floor area could be treated evenly
  • Stairs that were worn through to bare timber and needed sanding and sealing to match the quality of the floors below

None of these are unusual in an E5 Victorian terrace, but getting the sequence right matters. The prep work has to come first, or the finish will not hold.

Our Approach

The work was carried out in a logical sequence to protect each completed stage:

  • Loose board refitting: All creaking and loose boards were identified, lifted where necessary and re-secured to the joists before any sanding equipment came onto the floor.
  • Floorboard replacement: A section of boards that were beyond sanding were replaced with matching timber, fitted flush and left to settle.
  • Gap closing with slivers: Wider gaps across the floors were packed with fitted timber slivers, which were planed level once dry. This removes draughts and gives the floor a much cleaner finish under lacquer.
  • Fireplace hearth removal: The hearth was taken out cleanly, with surrounding boards trimmed and fitted to close the area before sanding.
  • Floor sanding and buffing: The floors were sanded in passes from coarse through to fine grade, removing the old finish, surface damage and any inconsistency left from the prep stages. The boards were then buffed to a smooth, even surface ready for finishing.
  • Lacquering: Multiple coats of lacquer were applied with sanding between coats to achieve a hard, consistent finish that will stand up to daily use.
  • Stair sanding and sealing: The staircase treads and risers were sanded back and sealed to a finish that complements the lacquered floors below.

Restored floorboards after sanding and lacquering, Clapton E5Restored floorboards after sanding and lacquering, Clapton E5Restored floorboards after sanding and lacquering, Clapton E5

The Result

The floors throughout the property are now solid, smooth and properly finished. The loose boards no longer move, the gaps are closed, and the lacquer gives the timber a clean, consistent look that works with the age of the building. The staircase holds its own alongside the restored floors below. This is the kind of job where the before and after photos do the talking — the boards were always good, they just needed the right treatment to show it.

Frequently Asked Questions

How long does floor sanding take for a whole house?
For a property of this size in Clapton or East London, a full sand, buff and lacquer typically takes three to five days depending on the number of rooms, the condition of the boards and how many prep stages are required. Stairs add half a day to a day on top. We always carry out a survey first so we can give an accurate programme before work starts.

How much does floor sanding cost in London?
Floor sanding in London generally runs at £25 to £45 per square metre for sand, buff and lacquer. A typical whole-house job tends to fall between £2,000 and £6,000. The final figure depends on floor area, board condition, the finish specified and any prep work needed — loose boards, gap filling, replacements and hearth removal all add to the scope. We provide itemised quotes so there are no surprises.

Can you sand floors without moving all the furniture?
Large items need to come out of each room before we start. We work room by room where possible to limit disruption, but the sanding equipment needs clear access to the full floor area to produce an even finish. We will always discuss the programme with you at the survey stage so you can plan ahead.

Have a similar project? Call us on 020 88309782 or Book a Free Site Visit

Close
5  |   Fulham  |   1 October 2025

How we transformed severely scratched engineered flooring, including areas deeply gouged by heavy piano legs. Using professional-grade restoration techniques, we removed surface blemishes and expertly blended in deeper damage to bring the floor back to life.

Case studies
  • Newly Restored Engineered Oak Flooring
  • All piano marks on the floor are gone. Thank you FlooringFirst
  • Deep marks from piano wheels, fixed by FlooringFirst
  • Deep Scratches on Oak Engineered Flooring Fixed by FlooringFirst
  • Engineered Oak Flooring with scratches for Restoration

Project Overview

This project involved restoring a solid engineered oak floor in a London living room. The floor had accumulated years of daily wear — surface scratches across the main walking routes, and deeper structural damage in one concentrated spot where a large piano had stood for an extended period. The client wanted to avoid a full replacement and was keen to see how much of the original character could be saved.

Engineered Oak Flooring with scratches for Restoration

The Challenge

Upon inspection, the floor displayed a combination of superficial scuffs and deep gouges in high-traffic and load-bearing areas. The most significant damage was located beneath the piano, where the legs had left visible, concentrated indentations over time.

Engineered flooring comes with a wear layer of varying thickness — typically between 3mm and 6mm on quality boards. Before any sanding begins, that wear layer has to be measured carefully. Sand too aggressively and you risk breaking through to the core. The piano indentations added a further complication: simple sanding alone would not be enough to level them out.

Deep Scratches on Oak Engineered Flooring Fixed by FlooringFirst

Our Approach

We started with a detailed inspection under raking light to map every scratch, scuff, and indentation. This let us prioritise areas that needed filler work before sanding started.

The piano leg depressions were treated first. We applied a two-part wood filler, colour-matched to the oak, building it slightly proud of the surface so that subsequent sanding could bring it flush. The filler was left to cure fully — rushing this step leads to shrinkage and a visible repair. Once set, we feathered the edges with a detail sander so the repair blended into the surrounding grain.

With the deep repairs done, we moved to the main floor. We used a Bona belt sander with a fine-to-medium sequence, working with the grain throughout. Because engineered wear layers are thinner than solid wood, we kept passes controlled and checked depth regularly. The surface scratches came out cleanly through this process.

After sanding, we buffed the entire floor with a fine mesh pad to create a consistent surface ready for finishing. The client opted for a mid-sheen water-based lacquer, which was applied in three coats with light sanding between each. Water-based products dry quickly, have low odour, and do not yellow over time — a practical choice for a frequently used living room.

Newly Restored Engineered Oak Flooring

The Result

Following the restoration, the floor exhibited a dramatic improvement in both appearance and feel underfoot. All surface scratches were eliminated, and the areas previously damaged by the piano legs were expertly filled and blended to match the surrounding finish.

The client commented that the floor looked better than it had in years. Total project time was two days: one for repairs and sanding, one for the three lacquer coats. The floor was ready for light use 24 hours after the final coat.

Frequently Asked Questions

How many times can engineered flooring be sanded?
That depends on the thickness of the wear layer. Most quality engineered boards have a 3mm to 6mm layer, which allows between one and three full sandings. Boards with a 2mm layer can usually only be lightly buffed rather than properly sanded. We always check wear layer depth before quoting, so there are no surprises.

Can piano or heavy furniture indentations be repaired without replacing boards?
In most cases, yes. If the indentation has not cracked the board or compressed the wood fibres beyond repair, a two-part filler approach works well. The repair is not invisible under close inspection, but at standing height and in normal light it is not noticeable. If the board is severely crushed, board replacement is the cleaner option.

What does engineered floor restoration cost in London?
For a standard living room, floor sanding and restoration typically runs between £25 and £45 per square metre in London, depending on the condition, finish choice, and whether any board repairs are needed. Repair work such as filler treatment for deep marks is usually quoted as a separate fixed cost on top of the sanding rate.

Have a similar project? Call us on 020 88309782 or Book a Free Site Visit

Close
7  |   Kensington  |   1 October 2025

Watch us how we transformed these Versailles Oak Panels to their perfection and how we restored Walnut Mosaic Fingers to their original look

Case studies
  • Walnut Mosaic Fingers Before Restoration
  • Scratches on Versailles Panels
  • Deep Scratch on Versaille Oak Flooring Before Restoration
  • Amazing Result after FlooringFirst brought new life to this floor
  • The Richest Colours You Can Get Out Of Walnut Mosaic Fingers Flooring
  • Freshly Restored Floors by Flooring First
  • 5 Star Flooring Restoration by FlooringFirst

Project Overview

This restoration project covered two distinct and historically significant parquet styles in a single property: Versailles oak panels and walnut mosaic finger parquet. Both required careful, sympathetic treatment to bring them back to the standard the client expected. Projects combining different parquet formats are less common and require switching approach mid-job, so planning was essential before work began.

Worn Walnut Mosaic Fingers Before Restoration

The Challenge

The original flooring comprised two distinct styles: a classic walnut mosaic finger parquet and elegant Versailles oak panels. Over time, both had suffered noticeable wear and tear, diminishing their visual appeal and structural integrity.

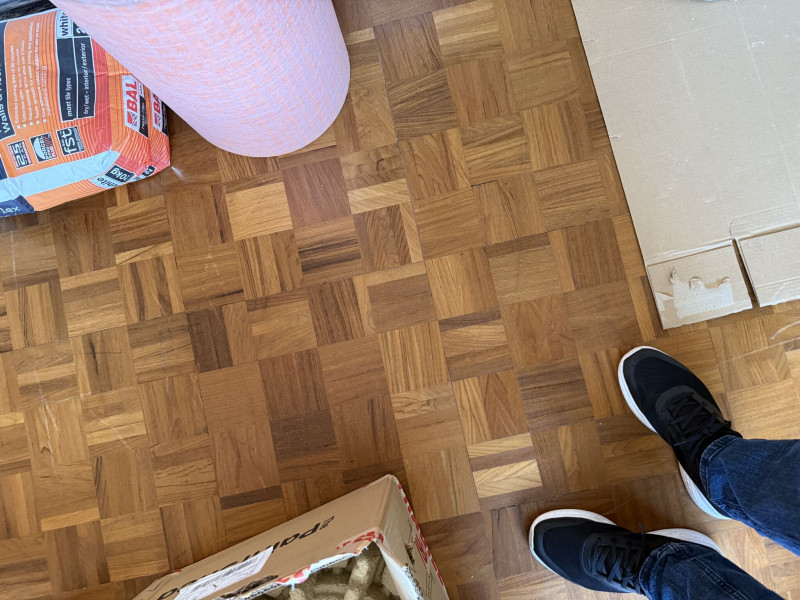
In the walnut mosaic area, the surface showed multiple scuff marks and scratches, with visible dullness due to accumulated grime and fading finish. The parquet blocks had shifted slightly in places, and some sections were uneven or loose, clear signs of age and prolonged use.

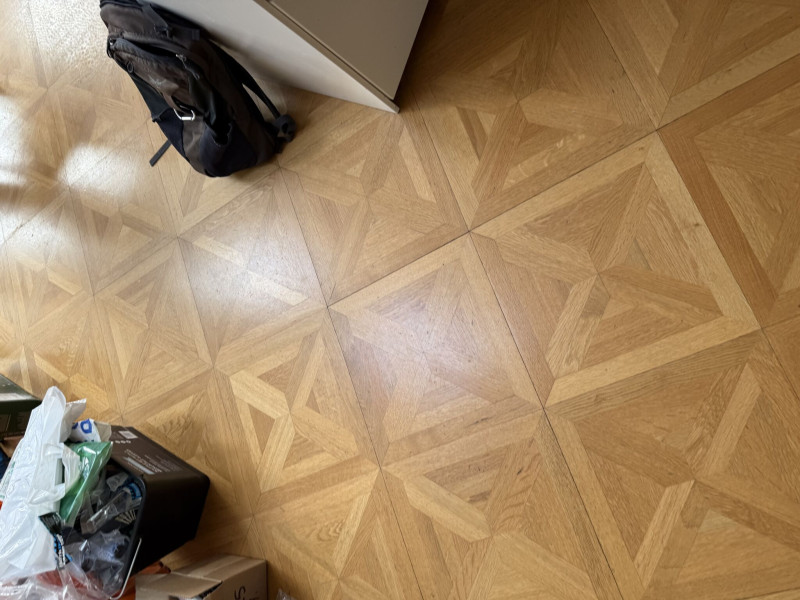
The Versailles panels presented a different set of problems. The geometric pattern of these panels means that sanding must follow the grain of each section separately, or cross-grain scratches become visible in the finish. Previous coats of finish had also darkened unevenly, making some sections appear blotchy.

Scratches on Versailles Panels before Restoration

Our Approach

We began with the walnut mosaic area. Loose and shifted blocks were lifted, cleaned, and re-glued with a suitable parquet adhesive before anything else happened. Trying to sand over a loose or uneven block risks catching the sander and damaging the block edge, so this preparation step was not optional.

Once the blocks were secure and adhesive cured, we sanded the walnut mosaic using a rotary machine fitted with fine abrasive, working in the direction that best followed the finger pattern. Walnut is a dense hardwood and holds its grain well, so it responds cleanly to careful sanding. The surface came up with good colour contrast and natural depth.

The Versailles panels were handled differently. We used a combination of a drum sander along the main grain direction and a detail sander for the internal mitre sections of each panel. This takes longer than sanding a straight-run floor, but it is the only way to avoid visible scratch patterns across the grain. Each panel was treated individually and checked before moving on.

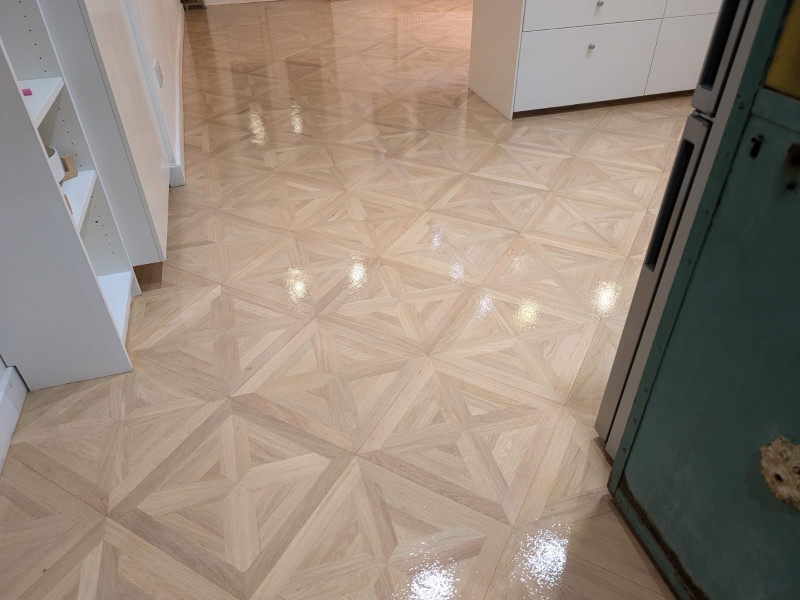
Both floor areas were finished with a hard-wax oil chosen to complement the different tones of oak and walnut without making one look artificially darker than the other. Two coats were applied, with a light buff between coats.

Amazing Result after FlooringFirst brought new life to this floor

The Result

Following a complete restoration process, the transformation of both the Walnut Mosaic Finger Parquet and the Versailles Oak Panels is nothing short of remarkable. The walnut mosaic flooring has been revived with renewed depth and richness. Each individual finger block was cleaned, re-secured, and refinished, restoring the natural warmth and contrast of the walnut grain. The surface is now smooth, even, and finished with a durable, low-sheen protective coat that improves both appearance and longevity.

The Versailles panels, meanwhile, regained their geometric clarity and the warm honey tones that define good-quality oak. The client described it as looking "the way it must have looked when it was first laid."

Frequently Asked Questions

Can walnut parquet and oak Versailles panels be finished with the same product?
It depends on the desired result. Walnut is naturally darker than oak, so the same oil or lacquer will read differently on each. We typically choose a neutral or lightly tinted finish that works across both species, then adjust by applying an additional coat to the lighter areas if needed to balance the tones.

How do you handle loose parquet blocks before sanding?
Loose blocks are lifted, the old adhesive is cleaned from both the block and the subfloor, and they are re-glued with a specialist parquet adhesive. We then weight them and allow full cure time before sanding. Sanding over loose blocks causes uneven results and can crack the block edges.

What does parquet restoration cost in London?
Parquet sanding and finishing runs from around £30 to £50 per square metre in London, depending on species, pattern complexity, and condition. Versailles panels and other geometric formats typically fall at the higher end because of the time required to sand them correctly without cross-grain marks.

Have a similar project? Call us on 020 88309782 or Book a Free Site Visit

Close
6  |   Chiswick  |   29 January 2025

Professional floor sanding and restoration in Chiswick, W4. Our team restored this parquet floor using dustless sanding equipment and quality finishes. The result is a clean, smooth surface that will last for years.

Case studies

Project Overview

This project involved the professional sanding and restoration of an existing wood floor at a property in Chiswick, W4. The floor had seen years of daily wear and was in need of attention to bring it back to a quality finish. Our team carried out a full assessment before starting work, checking for any boards that needed attention alongside the main sanding and finishing work.

Before the Work

Before work began, the floor showed typical signs of wear. Surface scratches, dull patches, and general finish deterioration were present. A thorough survey was carried out to plan the correct sanding depth, assess board condition, and choose the most appropriate finish for the space.

Survey photos showing the floor condition before work:

Floor condition before work at W4 Floor condition before work at W4 Floor condition before work at W4

Our Approach

The following services were carried out as part of this project:

  • Beading Installation (incl. materials)
  • Doors Plus Frame Trimming (per door)
  • Engineered - Sand, Buff & Lacquer
  • Lift & Dispose Carpets or Laminates
  • Parquet Floor Fitting - No Border
  • Subfloor Preparation (ply 9 mm)
  • Thresholds & Fitting (inc. materials)

The Result

Once the sanding and finishing process was complete, the floor was transformed. The wood grain was opened up and brought back to life, the surface was smooth and even, and the new finish provided lasting protection. The client was left with a floor that looked, and performed, as good as new.

Photos of the completed work:

Parquet floor after sanding work in W4 Parquet floor after sanding work in W4 Parquet floor after sanding work in W4

Frequently Asked Questions

How long does floor sanding take?
Most residential sanding jobs are completed in one to two days, depending on floor size and condition. Lacquering or oiling adds further drying and curing time, which we factor into the job schedule.

Do I need to vacate the property during sanding?
Modern dustless sanding equipment keeps dust to a minimum, but we recommend keeping pets and young children clear of the area during the work. Most clients remain in their property throughout.

How much does floor sanding cost in London?
Prices typically range from £25 to £45 per square metre depending on floor condition, finish type, and any repair work required. Gap filling and board replacement are priced separately if needed.

Have a similar project? Call us on 020 88309782 or Book a Free Site Visit

Close
3  |   Battersea, Clapham Junction  |   9 December 2024

Professional floor sanding and restoration in Battersea, SW11. Our team restored this wood floor floor using dustless sanding equipment and quality finishes. The result is a clean, smooth surface that will last for years.

Case studies

Project Overview

This project involved the professional sanding and restoration of an existing wood floor at a property in Battersea, SW11. The floor had seen years of daily wear and was in need of attention to bring it back to a quality finish. Our team carried out a full assessment before starting work, checking for any boards that needed attention alongside the main sanding and finishing work.

Before the Work

Before work began, the floor showed typical signs of wear. Surface scratches, dull patches, and general finish deterioration were present. A thorough survey was carried out to plan the correct sanding depth, assess board condition, and choose the most appropriate finish for the space.

Our Approach

The following services were carried out as part of this project:

  • Stairs - Sand & Seal

The Result

Once the sanding and finishing process was complete, the floor was transformed. The wood grain was opened up and brought back to life, the surface was smooth and even, and the new finish provided lasting protection. The client was left with a floor that looked, and performed, as good as new.

Photos of the completed work:

Wood Floor floor after sanding work in SW11 Wood Floor floor after sanding work in SW11 Wood Floor floor after sanding work in SW11

Frequently Asked Questions

How long does floor sanding take?
Most residential sanding jobs are completed in one to two days, depending on floor size and condition. Lacquering or oiling adds further drying and curing time, which we factor into the job schedule.

Do I need to vacate the property during sanding?
Modern dustless sanding equipment keeps dust to a minimum, but we recommend keeping pets and young children clear of the area during the work. Most clients remain in their property throughout.

How much does floor sanding cost in London?
Prices typically range from £25 to £45 per square metre depending on floor condition, finish type, and any repair work required. Gap filling and board replacement are priced separately if needed.

Have a similar project? Call us on 020 88309782 or Book a Free Site Visit

Close
3  |   Battersea, Clapham Junction  |   23 November 2024

Professional floor sanding and restoration in Battersea, SW11. Our team restored this wood floor using dustless sanding equipment and quality finishes. The result is a clean, smooth surface that will last for years.

Case studies

Project Overview

This project involved the professional sanding and restoration of an existing wood floor at a property in Battersea, SW11. The floor had seen years of daily wear and needed attention to restore its quality finish. Our team carried out a full assessment before starting work, checking for any boards that needed attention alongside the main sanding and finishing work.

Before the Work

Before work began, the floor showed typical signs of wear. Surface scratches, dull patches, and general finish deterioration were present. A thorough survey was carried out to plan the correct sanding depth, assess board condition, and choose the most appropriate finish for the space.

Our Approach

The following services were carried out as part of this project:

  • Skirting Board Removal

The Result

Once the sanding and finishing process was complete, the floor was transformed. The wood grain was opened up and brought back to life, the surface was smooth and even, and the new finish provided lasting protection. The client was left with a floor that looked, and performed, as good as new.

Photos of the completed work:

Wood Floor floor after sanding work in SW11 Wood Floor floor after sanding work in SW11 Wood Floor floor after sanding work in SW11

Frequently Asked Questions

How long does floor sanding take?
Most residential sanding jobs are completed in one to two days, depending on floor size and condition. Lacquering or oiling adds further drying and curing time, which we factor into the job schedule.

Do I need to vacate the property during sanding?
Modern dustless sanding equipment keeps dust to a minimum, but we recommend keeping pets and young children clear of the area during the work. Most clients remain in their property throughout.

How much does floor sanding cost in London?
Prices typically range from £25 to £45 per square metre depending on floor condition, finish type, and any repair work required. Gap filling and board replacement are priced separately if needed.

Have a similar project? Call us on 020 88309782 or Book a Free Site Visit

Close
4  |   South Norwood  |   23 October 2024

Discover the transformation of our client’s flooring in South Norwood through professional restoration services. See how we revitalised a worn-out floor into a beautiful, cohesive space that enhances any home.

Case studies

Project Overview

This South Norwood project covered a full floorboard restoration in a residential property. The scope included replacing damaged boards, gap filling throughout, sanding, and applying a lacquer finish. New thresholds were fitted at doorways, and the boards were staggered during installation to improve both the look and the structural performance of the floor.

Floorboards before restoration in South Norwood

The Challenge

The client's floor was showing significant signs of damage, with several floorboards cracked or warped. Gaps were evident, and the overall appearance was dull. The flooring did not have the cohesive look the client was after, and it required a comprehensive restoration to address both function and appearance.

South Norwood properties of this age often have Victorian-era softwood floorboards that have moved and dried out considerably over the decades. Gaps between boards are common and can be considerable. A floor in this condition is draughty, collects dirt easily, and does not look good once a finish is applied because the gaps read as dark lines across the surface.

Floorboards before restoration showing gaps

Our Approach

The first step was a thorough assessment of which boards could be saved and which needed replacing. Cracked and warped boards were lifted and set aside. Replacement boards were sourced to match the existing dimensions and were fitted with the boards staggered, which distributes any movement more evenly across the floor and looks better once finished.

Once the new boards were in, the entire floor was sanded using a drum sander, working along the grain from one end of the room to the other. This process removed the surface layer of old finish, grime, and minor imperfections, leaving a clean and even timber surface throughout.

Gap filling came next. We used a mixed-wood filler, which is made by combining fine sanding dust from the floor with a flexible filler compound. This produces a colour-matched fill that moves slightly with the boards through seasonal changes. Rigid fillers tend to crack in gaps over time. The mixed approach is more durable and blends into the floor more naturally.

After the filler dried, we buffed the surface smooth and applied a hard-wearing lacquer in three coats. Each coat was allowed to dry and then lightly abraded before the next was applied. New thresholds were fitted at all doorways to complete the work.

Floorboards after restoration in South Norwood

The Result

The transformation was substantial. The newly installed and lacquered floorboards exude warmth and character, with a consistent finish throughout. The gaps are filled, creating a much more cohesive surface, while the new thresholds add a neat finish at doorways. Staggering the replacement boards improved the visual balance of the floor and reinforced its durability. The client now has a floor that looks well-kept and will be easier to maintain going forward.

Frequently Asked Questions

What is the best gap-filling method for old floorboards?
The most durable approach is a flexible, mixed filler made using fine sanding dust from the actual floor. This creates a colour-matched fill that can flex slightly as the boards move with changes in humidity. Rigid fillers, including some off-the-shelf products, tend to crack and fall out over time, particularly in older floors where movement is greater.

Do all damaged floorboards need replacing, or can they be repaired?
Many can be salvaged. Light cracks, cupping, and surface damage can usually be addressed through sanding. Boards with deep splits, severe warping, or structural damage are better replaced. We assess each board individually rather than assuming replacement is needed, because matching old timber is not always straightforward and avoiding unnecessary work keeps costs down.

What does floorboard sanding and restoration cost in South Norwood?
A full restoration covering sanding, gap filling, and two or three coats of lacquer typically runs between £25 and £40 per square metre in South Norwood and the wider South London area. Board replacement is charged separately based on the number of boards and sourcing difficulty.

Have a similar project? Call us on 020 88309782 or Book a Free Site Visit

Close
3  |   Crystal Palace  |   17 October 2024

Professional floor sanding and restoration in Crystal Palace, SE19. Our team restored this laminate floor using dustless sanding equipment and quality finishes. The result is a clean, smooth surface that will last for years.

Case studies

Project Overview

This project involved the professional sanding and restoration of an existing wood floor at a property in Crystal Palace, SE19. The floor had seen years of daily wear and was in need of attention to bring it back to a quality finish. Our team carried out a full assessment before starting work, checking for any boards that needed attention alongside the main sanding and finishing work.

Before the Work

Before work began, the floor showed typical signs of wear. Surface scratches, dull patches, and general finish deterioration were present. A thorough survey was carried out to plan the correct sanding depth, assess board condition, and choose the most appropriate finish for the space.

Our Approach

The following services were carried out as part of this project:

  • Floorboards - Sand, Buff & Lacquer
  • Gap Filling
  • Lift Carpets or Laminates
  • Thresholds & Fitting (inc. materials)
  • Slivers for Wider Gaps Closing
  • Floorboards for Repairs/ Replacement

The Result

Once the sanding and finishing process was complete, the floor was transformed. The wood grain was opened up and brought back to life, the surface was smooth and even, and the new finish provided lasting protection. The client was left with a floor that looked, and performed, as good as new.

Photos of the completed work:

Laminate floor after sanding work in SE19 Laminate floor after sanding work in SE19 Laminate floor after sanding work in SE19

Frequently Asked Questions

How long does floor sanding take?
Most residential sanding jobs are completed in one to two days, depending on floor size and condition. Lacquering or oiling adds further drying and curing time, which we factor into the job schedule.

Do I need to vacate the property during sanding?
Modern dustless sanding equipment keeps dust to a minimum, but we recommend keeping pets and young children clear of the area during the work. Most clients remain in their property throughout.

How much does floor sanding cost in London?
Prices typically range from £25 to £45 per square metre depending on floor condition, finish type, and any repair work required. Gap filling and board replacement are priced separately if needed.

Have a similar project? Call us on 020 88309782 or Book a Free Site Visit

Close
3  |   Watford  |   30 September 2024

Professional floor sanding and restoration in Watford, WD25. Our team restored this parquet floor using dustless sanding equipment and quality finishes. The result is a clean, smooth surface that will last for years.

Case studies

Project Overview

This project involved the professional sanding and restoration of an existing wood floor at a property in Watford, WD25. The floor had seen years of daily wear and was in need of attention to bring it back to a quality finish. Our team carried out a full assessment before starting work, checking for any boards that needed attention alongside the main sanding and finishing work.

Before the Work

Before work began, the floor showed typical signs of wear. Surface scratches, dull patches, and general finish deterioration were present. A thorough survey was carried out to plan the correct sanding depth, assess board condition, and choose the most appropriate finish for the space.

Our Approach

The following services were carried out as part of this project:

  • Beading Installation (incl. materials)
  • Gap Filling
  • Parquet - Sand, Buff & Lacquer
  • Loose Blocks Refitting
  • Install Parquet Blocks

The Result

Once the sanding and finishing process was complete, the floor was transformed. The wood grain was opened up and brought back to life, the surface was smooth and even, and the new finish provided lasting protection. The client was left with a floor that looked, and performed, as good as new.

Photos of the completed work:

Parquet floor after sanding work in WD25 Parquet floor after sanding work in WD25 Parquet floor after sanding work in WD25

Frequently Asked Questions

How long does floor sanding take?
Most residential sanding jobs are completed in one to two days, depending on floor size and condition. Lacquering or oiling adds further drying and curing time, which we factor into the job schedule.

Do I need to vacate the property during sanding?
Modern dustless sanding equipment keeps dust to a minimum, but we recommend keeping pets and young children clear of the area during the work. Most clients remain in their property throughout.

How much does floor sanding cost in London?
Prices typically range from £25 to £45 per square metre depending on floor condition, finish type, and any repair work required. Gap filling and board replacement are priced separately if needed.

Have a similar project? Call us on 020 88309782 or Book a Free Site Visit

Close
3  |   South Norwood  |   9 September 2024

Professional floor sanding and restoration in South Norwood, SE25. Our team restored this floor using dustless sanding equipment and quality finishes. The result is a clean, smooth surface that will last for years.

Case studies

Project Overview

This project involved the professional sanding and restoration of an existing wood floor at a property in South Norwood, SE25. The floor had seen years of daily wear and was in need of attention to bring it back to a quality finish. Our team carried out a full assessment before starting work, checking for any boards that needed attention alongside the main sanding and finishing work.

Before the Work

Before work began, the floor showed typical signs of wear. Surface scratches, dull patches, and general finish deterioration were present. A thorough survey was carried out to plan the correct sanding depth, assess board condition, and choose the most appropriate finish for the space.

Our Approach

The following services were carried out as part of this project:

  • Floorboards - Replacement (incl. materials)
  • Floorboards - Sand, Buff & Lacquer
  • Gap Filling
  • Thresholds & Fitting (inc. materials)
  • Floorboards Staggering ( 2 sqm)

The Result

Once the sanding and finishing process was complete, the floor was transformed. The wood grain was opened up and brought back to life, the surface was smooth and even, and the new finish provided lasting protection. The client was left with a floor that looked, and performed, as good as new.

Photos of the completed work:

Floorboards floor after sanding work in SE25 Floorboards floor after sanding work in SE25 Floorboards floor after sanding work in SE25

Frequently Asked Questions

How long does floor sanding take?
Most residential sanding jobs are completed in one to two days, depending on floor size and condition. Lacquering or oiling adds further drying and curing time, which we factor into the job schedule.

Do I need to vacate the property during sanding?
Modern dustless sanding equipment keeps dust to a minimum, but we recommend keeping pets and young children clear of the area during the work. Most clients remain in their property throughout.

How much does floor sanding cost in London?
Prices typically range from £25 to £45 per square metre depending on floor condition, finish type, and any repair work required. Gap filling and board replacement are priced separately if needed.

Have a similar project? Call us on 020 88309782 or Book a Free Site Visit

Close

  • 1
  • 2
  • 3
  • 4
  • 5
  • 6
  • 7
  • 8
  • 9
  • 10
  • 11
  • 12
  • 13
  • 14
  • 15
  • 16
  • 17
  • 18
  • 19
  • 20
  • 21
  • 22
  • 23
  • 24
  • 25
  • 26
  • 27
  • 28
  • 29
  • 30
  • 31
  • 32
  • 33
  • 34
  • 35
  • 36
  • 37
  • 38
  • 39
  • 40
  • 41
  • 42
  • 43
  • 44
  • 45
  • 46
  • 47
  • 48
  • 49
  • 50
  • 51
  • 52
  • 53
  • 54
  • 55
  • 56
  • 57
  • 58
  • 59

Have a similar project?

Call us on 020 88309782 or book a free site visit

Book Free Site Visit

Our Flooring Company

Contacts & Showroom Book Free Site Survey About Our Flooring Company Join Our Team Work as a Contractor

Service Information

Terms of Service Terms of Sales Deliveries & Charges Cookie Settings Returns Policy Privacy Policy

Help

FAQs Case Studies Sitemap Glossary
𝕏
FlooringFirst! Services
158 Coles Green Road
London, NW2 7HW
T: 020 88309782
Floor Sanding Services: Central London, East London, Near London, North London, Northwest London, Southeast London, Southwest London, West London
Wood Floor Installation Service: Central London, East London, Near London, North London, Northwest London, Southeast London, Southwest London, West London

  • Flooring Services
  • Floor Sanding
    • Wood Floor Staining
    • Wood Floor Gap Filling
    • Commercial Floor Sanding
    • Engineered Floor Sanding & Refinishing
  • Wood Floor Fitting
    • Parquet Floor Installation
    • Laminate Floor Installation
    • Engineered Wood Floor Installation - Supply & Fit
    • Solid Wood Floor Fitting - Supply & Fit
    • LVT Floor Installation - Supply & Fit
  • Floor Repairs
    • Parquet Floor Repair and Restoration
    • Engineered Wood Floor Repairs
    • Wood Floor Scratch Repair
    • Floorboards Replacement
  • Care & Maintenance
    • Re-Oiling & Recoating Oiled Floors
    • Vinyl & Linoleum Cleaning
    • Hardwood Floor Buffing
    • Wood Floor Polishing
  • Shop
  • Shop
  • Gallery
  • Service Guide
  • Bookings
  • Book Free Survey
  • Service Advice
  • Product Advice