Floor Sanding & Fitting
Book Free Visit Price Guide 020 88309782
Monday - Friday 07:30 - 17:30, Saturday 07:30 - 16:00
cs@flooringfirst.co.uk
020 88309782
Monday - Friday 07:30 - 17:30, Saturday 07:30 - 16:00
cs@flooringfirst.co.uk
  • Book Free Visit
  • Home
  • Floor Sanding
  • Floor Fitting
  • Floor Repairs
  • Aftercare
    • Wooden Floors
    • Cleaning & Polishing
    • Re-Oiling Wooden Floors
    • Vinyls & Linoleum
    • Vinyl Floor Polishing
    • Get a Quote...
  • For Businesses
  • Gallery
  • Service Guide
  • Shop
  • Book Free Visit

See Few Examples of Our Works

Floor Sanding, Solid, Parquet & Laminate Floor Fitting

Gallery

See Our Floor Works

WHY CHOOSE US
CASE STUDIES
PRICE GUIDE
OFFERS
GALLERY
ASK EXPERT
WHY CHOOSE US
CASE STUDIES
PRICE GUIDE
OFFERS
GALLERY
ASK EXPERT

Floor Sanding & Fitting Project Gallery

All Projects Renovations Installations

9  |   Elephant & Castle  |   December 2021

A completed project in Elephant & Castle required us to take professional help for a beautiful engineered wood floor and wooden stairs and sand off all imperfections while improving their appearance and condition with a high-quality lacquer finish.

Case studies
  • Engineered floor and stairs sanding and refinishing in Elephant & Castle 8
  • Engineered floor and stairs sanding and refinishing in Elephant & Castle
  • Engineered floor and stairs sanding and refinishing in Elephant & Castle 2
  • Engineered floor and stairs sanding and refinishing in Elephant & Castle 3
  • Engineered floor and stairs sanding and refinishing in Elephant & Castle 4
  • Engineered floor and stairs sanding and refinishing in Elephant & Castle 5
  • Engineered floor and stairs sanding and refinishing in Elephant & Castle 6
  • Engineered floor and stairs sanding and refinishing in Elephant & Castle 7
  • Engineered floor and stairs sanding and refinishing in Elephant & Castle 9

Project Overview

This project at a residential property in Elephant and Castle covered the sanding and refinishing of an engineered wood floor and a wooden staircase. Both had been in daily use for several years and were showing the expected signs of wear — the lacquer had dulled and worn through in high-traffic areas, the stairs were scuffed on the treads and nosings, and the overall colour had faded and greyed. The client wanted both surfaces looking consistent and fresh again without the disruption and expense of replacing either. Sanding and refinishing an engineered floor and stairs in London typically costs between £25 and £40 per square metre equivalent, making it a practical option at this stage of wear.

Engineered floor and stairs before sanding in Elephant and Castle

The Challenge

Engineered wood has a real hardwood wear layer on top, but that layer is thinner than on solid boards — typically 3 to 6 mm depending on the product. This limits how aggressively you can sand. Too coarse a grit or too many passes in any one area risks cutting through the wear layer into the plywood beneath, at which point the board needs replacing rather than refinishing. The stairs presented a different challenge: treads, risers and nosings all need different sanding approaches, and the detailing around spindles and stringer boards requires hand tools and care. Getting a consistent finish across both surfaces — flat floor and stair profile — demands good equipment and technique.

Our Approach

Inspection and assessment: Before starting, we checked the wear layer thickness on the engineered boards and confirmed there was enough material to sand. The stairs were checked for any loose treads or fixings, which were tightened before sanding began.

Sanding work in progress on floor and stairs

Engineered floor sanding: We used a random orbital sander rather than a heavy drum sander on the engineered floor to avoid removing too much material in a single pass. Working from medium to fine grit, the old finish and surface marks were removed evenly across the whole area. Edging tools worked the perimeter and corners.

Stair sanding: Treads were sanded along the grain with a detail sander, paying particular attention to the nosings where wear was heaviest. Risers and the areas around spindles were done by hand with appropriate grit papers for a clean result into every corner.

Lacquering both surfaces: Two coats of hard-wearing water-based lacquer were applied to the floor with light abrading between coats. The same lacquer was used on the stairs for a consistent colour and sheen level across both surfaces. The result is a fresh, durable finish with no visible join between floor and staircase.

The Result

Both the engineered floor and the wooden stairs came out looking clean, consistent and well-protected. The colour is even throughout and the satin lacquer gives a smart but not overly shiny appearance. Regular sanding and refinishing at intervals of around eight to ten years keeps engineered floors and stairs in good condition and extends their useful life considerably. This Elephant and Castle project shows what a professional treatment can achieve without any replacement work.

Engineered floor and stairs fully sanded and lacquered

FAQ

How many times can an engineered wood floor be sanded?
This depends on the thickness of the wear layer. A 4 mm wear layer can typically be sanded twice, while a 6 mm layer may allow three or four sandings. We always check this before starting — if the wear layer is too thin, we will tell you rather than proceed and risk damaging the floor.

Can stairs be sanded and lacquered to the same standard as a flat floor?
Yes, with the right tools and enough time. Stairs take longer per square metre than flat floor because of the profiled edges and the detailing around spindles. The result is worth the effort — a well-finished staircase makes a significant difference to the look of a hallway.

Does lacquering stairs make them slippery?
A satin or matt lacquer finish provides reasonable grip underfoot. If slip resistance is a concern — particularly on stairs used by older family members or young children — we can add a small amount of anti-slip additive to the final coat, which is barely visible but reduces the risk of slipping.

Have a similar project? Call us on 020 88309782 or Book a Free Site Visit

Close
9  |   Barnet  |   December 2021

Check out the amazing results achieved by our skilful and experienced team for this Barnet project. Here is now even a very worn and damaged wooden floor and stairs can look amazing again with the help of renovation, sanding, refinishing and staining.

Case studies

Project Overview

This Barnet project brought together several different trades under one visit: floorboard replacement for the most damaged sections of a hardwood floor, gap filling throughout, full sanding and staining of the floor, plus re-sanding and staining of the wooden staircase to match. When a client wants a complete renovation of both floor and stairs in one go, careful sequencing and clear communication between the team working on each area are important. The goal here was a consistent stain colour across both surfaces and a finished result that looked purposeful rather than patched. Sanding and staining projects of this scale in North London typically run from £30 to £45 per square metre.

Barnet hardwood floor and stairs before renovation

The Challenge

The main challenge was achieving a consistent stain result across surfaces in different conditions. Some sections of the floor had very worn boards, some had new replacement boards, and the staircase had a different finish depth and grain profile to the floor. New boards absorb stain at a different rate to aged timber. Stair nosings and treads also take stain differently to flat boards. Getting a uniform colour result across all these different surfaces requires preparation work at each stage — pre-conditioning in some areas, test patches before committing — rather than simply applying stain and hoping for the best.

Our Approach

Board replacement: Boards too far gone for sanding to help were lifted and replaced with matching timber. We sourced boards close in species, width and thickness to the existing floor to minimise visible joins. Where small gaps remained at the joints with surrounding boards after fitting, these were addressed in the gap-filling stage.

Sanding work in progress on floor and stairs in Barnet

Gap filling: All gaps across the floor — between original boards and around the replacements — were filled with a resin and sawdust mix appropriate to the gap width. Wider gaps received pine slivers first. The stairs were also checked for loose treads and any flexing was fixed before sanding began.

Sanding floor and stairs: The floor was sanded in three passes from coarse through to fine, following the grain throughout. The stairs were sanded on treads, risers and nosings, with hand tools used where machine access was limited around spindles and the stringer. A consistent fine-grit finish across both surfaces was achieved before any stain was applied.

Staining and finishing: A mid-tone stain was applied to floor and stairs in careful sequence, allowing the stain to cure fully between coats. Two coats of lacquer were applied over the stained surfaces to protect the colour and give a durable finish in line with what a busy household needs.

The Result

The floor and stairs came out with a consistent colour and finish throughout. The new replacement boards are not distinguishable from the originals under the stain and lacquer. The client now has a cohesive look from the hallway floor up the staircase, achieved within a single project visit rather than spreading work across multiple contractor visits. This Barnet renovation shows what is achievable when floor and stair work is planned and executed as a single coordinated job.

Barnet floor and stairs after sanding, staining and lacquering

FAQ

Is it better to do the floor and stairs in one visit or separately?
Doing both together is almost always better. You get a consistent finish across both surfaces because they are sanded and stained in the same session with the same materials. It also reduces the disruption to the household — one period of upheaval rather than two. The sequencing needs care (stairs typically after the floor for access reasons) but a well-organised team handles this without difficulty.

Can the stain colour be changed entirely from the original floor colour?
Yes. Sanding takes the floor back to bare wood, at which point any stain colour can be applied. Going significantly lighter than the original colour is more straightforward than going darker, but in both cases we do test patches to confirm the result before committing to the full floor.

How long will the stain and lacquer last on a busy staircase?
Staircases are high-traffic areas and lacquer on treads and nosings will wear faster than on a flat floor. In a busy household, expect the stair finish to need a refresh every five to seven years. The floor in normal domestic use will typically last ten to twelve years before needing re-sanding. We advise on a maintenance schedule when completing the job.

Have a similar project? Call us on 020 88309782 or Book a Free Site Visit

Close
4  |   Peckham  |   November 2021

Outdated flooring in Peckham, SE15 was removed and replaced with newly laid parquet, arranged with careful attention to pattern and spacing. The finished result delivers a crisp, structured look with a durable surface suited for everyday use.

Case studies

Project Overview

This project involved the professional installation of parquet flooring at a property in Peckham, SE15. The client required a quality floor that would stand up to daily use and complement their interior. Our fitting team assessed the subfloor condition, carried out any necessary preparation work, and fitted the new floor to a high standard.

Before the Work

Prior to installation, the existing floor covering was inspected and the subfloor was prepared to ensure it was flat, dry, and suitable for the new parquet. Any existing floor covering was lifted and disposed of cleanly before the fitting work began.

Survey photos showing the floor condition before work:

Floor condition before work at SE15 Floor condition before work at SE15 Floor condition before work at SE15

Our Approach

The following services were carried out as part of this project:

  • Lift & Dispose Carpets or Laminates
  • Thresholds & Fitting (inc. materials)
  • Lift & Dispose Tiles
  • Engineered Parquet Floor Fitting - No Border

The Result

The completed parquet installation looked clean and finished throughout. Joins are tight, edges are neat, and the floor sits flat and stable. Beading and threshold strips were fitted where required to complete the job properly. The client was pleased with both the quality of the work and the appearance of the new floor.

Photos of the completed work:

Parquet floor after fitting work in SE15 Parquet floor after fitting work in SE15 Parquet floor after fitting work in SE15

Frequently Asked Questions

How long does parquet installation take?
Most fitting jobs are completed within one to two days. Larger areas or more detailed layouts such as herringbone patterns take longer due to the additional cutting and positioning involved.

Do I need underlay?
Yes, underlay is required for most floor types and helps with insulation, sound deadening, and levelling minor subfloor imperfections. We can supply and fit appropriate underlay as part of the installation.

How much does floor fitting cost in London?
Fitting costs typically range from £70 to £100 per square metre depending on floor type and complexity. We provide a full written quote before starting any work.

Have a similar project? Call us on 020 88309782 or Book a Free Site Visit

Close
3  |   Westminster  |   November 2021

Sanding work in Westminster, W1B removed worn finishes and surface marks from this hardwood floor. The boards now display a smooth, even finish with a clean appearance and lasting durability for everyday use.

Case studies

Project Overview

This project involved the professional sanding and restoration of an existing wood floor at a property in Westminster, W1B. The floor had seen years of daily wear and was in need of attention to bring it back to a quality finish. Our team carried out a full assessment before starting work, checking for any boards that needed attention alongside the main sanding and finishing work.

Before the Work

Before work began, the floor showed typical signs of wear. Surface scratches, dull patches, and general finish deterioration were present. A thorough survey was carried out to plan the correct sanding depth, assess board condition, and choose the most appropriate finish for the space.

Our Approach

The following services were carried out as part of this project:

  • Hardwood - Sand, Buff & Lacquer

The Result

Once the sanding and finishing process was complete, the floor was transformed. The wood grain was opened up and brought back to life, the surface was smooth and even, and the new finish provided lasting protection. The client was left with a floor that looked, and performed, as good as new.

Photos of the completed work:

Hardwood floor after sanding work in W1B Hardwood floor after sanding work in W1B Hardwood floor after sanding work in W1B

Frequently Asked Questions

How long does floor sanding take?
Most residential sanding jobs are completed in one to two days, depending on floor size and condition. Lacquering or oiling adds further drying and curing time, which we factor into the job schedule.

Do I need to vacate the property during sanding?
Modern dustless sanding equipment keeps dust to a minimum, but we recommend keeping pets and young children clear of the area during the work. Most clients remain in their property throughout.

How much does floor sanding cost in London?
Prices typically range from £25 to £45 per square metre depending on floor condition, finish type, and any repair work required. Gap filling and board replacement are priced separately if needed.

Have a similar project? Call us on 020 88309782 or Book a Free Site Visit

Close
5  |   Northwest London  |   November 2021

Work carried out in Northwest London, NW10 involved sanding back these floorboards to remove old coatings and visible wear. The surface now looks more even and refined, finished with a smooth layer that supports long-term use.

Case studies

Project Overview

This project involved the professional sanding and restoration of an existing wood floor at a property in Northwest London, NW10. The floor had seen years of daily wear and was in need of attention to bring it back to a quality finish. Our team carried out a full assessment before starting work, checking for any boards that needed attention alongside the main sanding and finishing work.

Before the Work

Before work began, the floor showed typical signs of wear. Surface scratches, dull patches, and general finish deterioration were present. A thorough survey was carried out to plan the correct sanding depth, assess board condition, and choose the most appropriate finish for the space.

Survey photos showing the floor condition before work:

Floor condition before work at NW10 Floor condition before work at NW10

Our Approach

The following services were carried out as part of this project:

  • Floorboards - Replacement (incl. materials)
  • Floorboards - Sand, Buff & Lacquer
  • Furniture Moving
  • Gap Filling
  • Gap Filling - Pine Slivers

The Result

Once the sanding and finishing process was complete, the floor was transformed. The wood grain was opened up and brought back to life, the surface was smooth and even, and the new finish provided lasting protection. The client was left with a floor that looked, and performed, as good as new.

Photos of the completed work:

Floorboards floor after sanding work in NW10 Floorboards floor after sanding work in NW10 Floorboards floor after sanding work in NW10

Frequently Asked Questions

How long does floor sanding take?
Most residential sanding jobs are completed in one to two days, depending on floor size and condition. Lacquering or oiling adds further drying and curing time, which we factor into the job schedule.

Do I need to vacate the property during sanding?
Modern dustless sanding equipment keeps dust to a minimum, but we recommend keeping pets and young children clear of the area during the work. Most clients remain in their property throughout.

How much does floor sanding cost in London?
Prices typically range from £25 to £45 per square metre depending on floor condition, finish type, and any repair work required. Gap filling and board replacement are priced separately if needed.

Have a similar project? Call us on 020 88309782 or Book a Free Site Visit

Close
4  |   Chelsea, Brompton  |   November 2021

In Chelsea, SW3, this hardwood floor was reworked to remove worn layers and surface marks. The boards now show a smooth, even finish with a clean, natural look and reliable durability for everyday use.

Case studies

Project Overview

This project involved the professional sanding and restoration of an existing wood floor at a property in Chelsea, SW3. The floor had seen years of daily wear and was in need of attention to bring it back to a quality finish. Our team carried out a full assessment before starting work, checking for any boards that needed attention alongside the main sanding and finishing work.

Before the Work

Before work began, the floor showed typical signs of wear. Surface scratches, dull patches, and general finish deterioration were present. A thorough survey was carried out to plan the correct sanding depth, assess board condition, and choose the most appropriate finish for the space.

Survey photos showing the floor condition before work:

Floor condition before work at SW3

Our Approach

The following services were carried out as part of this project:

  • Furniture Moving
  • Hardwood - Sand, Buff & Lacquer

The Result

Once the sanding and finishing process was complete, the floor was transformed. The wood grain was opened up and brought back to life, the surface was smooth and even, and the new finish provided lasting protection. The client was left with a floor that looked, and performed, as good as new.

Photos of the completed work:

Hardwood floor after sanding work in SW3 Hardwood floor after sanding work in SW3 Hardwood floor after sanding work in SW3

Frequently Asked Questions

How long does floor sanding take?
Most residential sanding jobs are completed in one to two days, depending on floor size and condition. Lacquering or oiling adds further drying and curing time, which we factor into the job schedule.

Do I need to vacate the property during sanding?
Modern dustless sanding equipment keeps dust to a minimum, but we recommend keeping pets and young children clear of the area during the work. Most clients remain in their property throughout.

How much does floor sanding cost in London?
Prices typically range from £25 to £45 per square metre depending on floor condition, finish type, and any repair work required. Gap filling and board replacement are priced separately if needed.

Have a similar project? Call us on 020 88309782 or Book a Free Site Visit

Close
3  |   Blackheath  |   November 2021

We carried out parquet sanding in Blackheath, SE3, removing worn finishes and evening out the surface with our dust-controlled equipment. The floor now has a smooth, refined look, with the pattern clearly defined and ready for everyday use.

Case studies

Project Overview

This project involved the professional sanding and restoration of an existing wood floor at a property in Blackheath, SE3. The floor had seen years of daily wear and was in need of attention to bring it back to a quality finish. Our team carried out a full assessment before starting work, checking for any boards that needed attention alongside the main sanding and finishing work.

Before the Work

Before work began, the floor showed typical signs of wear. Surface scratches, dull patches, and general finish deterioration were present. A thorough survey was carried out to plan the correct sanding depth, assess board condition, and choose the most appropriate finish for the space.

Our Approach

The following services were carried out as part of this project:

  • Doors Plus Frame Trimming (per door)
  • Gap Filling
  • Parquet - Sand, Buff & Oil
  • Parquet Floor Fitting - No Border
  • Mosaic Oak Flooring (Fingers Panels), Prime, 480x480 mm

The Result

Once the sanding and finishing process was complete, the floor was transformed. The wood grain was opened up and brought back to life, the surface was smooth and even, and the new finish provided lasting protection. The client was left with a floor that looked, and performed, as good as new.

Photos of the completed work:

Parquet floor after sanding work in SE3 Parquet floor after sanding work in SE3 Parquet floor after sanding work in SE3

Frequently Asked Questions

How long does floor sanding take?
Most residential sanding jobs are completed in one to two days, depending on floor size and condition. Lacquering or oiling adds further drying and curing time, which we factor into the job schedule.

Do I need to vacate the property during sanding?
Modern dustless sanding equipment keeps dust to a minimum, but we recommend keeping pets and young children clear of the area during the work. Most clients remain in their property throughout.

How much does floor sanding cost in London?
Prices typically range from £25 to £45 per square metre depending on floor condition, finish type, and any repair work required. Gap filling and board replacement are priced separately if needed.

Have a similar project? Call us on 020 88309782 or Book a Free Site Visit

Close
3  |   Cricklewood  |   November 2021

Our team restored these floorboards in Cricklewood, NW2, sanding back old finishes and addressing surface wear. The boards now have a smooth, even feel with a clean, natural appearance built for everyday durability.

Case studies

Project Overview

This project involved the professional sanding and restoration of an existing wood floor at a property in Cricklewood, NW2. The floor had seen years of daily wear and was in need of attention to bring it back to a quality finish. Our team carried out a full assessment before starting work, checking for any boards that needed attention alongside the main sanding and finishing work.

Before the Work

Before work began, the floor showed typical signs of wear. Surface scratches, dull patches, and general finish deterioration were present. A thorough survey was carried out to plan the correct sanding depth, assess board condition, and choose the most appropriate finish for the space.

Our Approach

The following services were carried out as part of this project:

  • Floorboards - Sand, Buff & Lacquer
  • Gap Filling

The Result

Once the sanding and finishing process was complete, the floor was transformed. The wood grain was opened up and brought back to life, the surface was smooth and even, and the new finish provided lasting protection. The client was left with a floor that looked, and performed, as good as new.

Photos of the completed work:

Floorboards floor after sanding work in NW2 Floorboards floor after sanding work in NW2 Floorboards floor after sanding work in NW2

Frequently Asked Questions

How long does floor sanding take?
Most residential sanding jobs are completed in one to two days, depending on floor size and condition. Lacquering or oiling adds further drying and curing time, which we factor into the job schedule.

Do I need to vacate the property during sanding?
Modern dustless sanding equipment keeps dust to a minimum, but we recommend keeping pets and young children clear of the area during the work. Most clients remain in their property throughout.

How much does floor sanding cost in London?
Prices typically range from £25 to £45 per square metre depending on floor condition, finish type, and any repair work required. Gap filling and board replacement are priced separately if needed.

Have a similar project? Call us on 020 88309782 or Book a Free Site Visit

Close
8  |   Norbury  |   October 2021

A recent wood floor renovation, sanding and refinishing project we undertook in Norbury illustrates how much of a difference a professional service can make for the appearance, but mostly for the condition and durability of every wooden floor.

Case studies
  • Wood floor repair, gap filling and floor sanding in Norbury 6
  • Wood floor repair, gap filling and floor sanding in Norbury
  • Wood floor repair, gap filling and floor sanding in Norbury 1
  • Wood floor repair, gap filling and floor sanding in Norbury 2
  • Wood floor repair, gap filling and floor sanding in Norbury 3
  • Wood floor repair, gap filling and floor sanding in Norbury 4
  • Wood floor repair, gap filling and floor sanding in Norbury 5
  • Wood floor repair, gap filling and floor sanding in Norbury 7

Project Overview

This Norbury job covered the repair, gap filling, full sanding and oil finishing of a hardwood floor and wooden staircase. The floor had a number of boards that were too worn and distressed to save through sanding alone, wide gaps throughout, and a finish that had worn through to bare wood in the heaviest traffic areas. The stairs were in a similar state — scuffed treads, peeling finish and a general air of tiredness. Rather than replace either, the client chose professional renovation, which was the right call: solid hardwood floors and staircases of this quality are worth saving. Sanding and oil finishing of this scope typically runs at £28 to £40 per square metre.
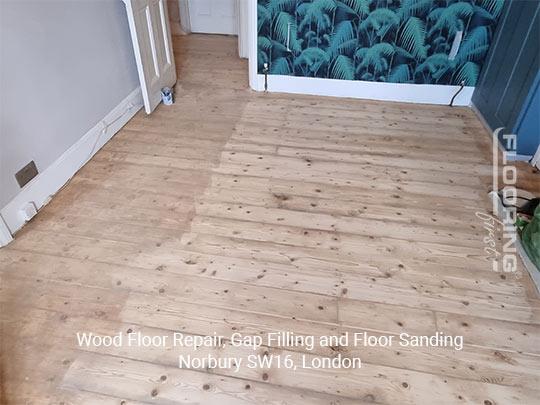
Norbury hardwood floor and stairs before renovation

The Challenge

When boards are too far gone for sanding to help, selecting appropriate replacements requires care. Width and thickness need to match exactly — a board that is even slightly thicker than its neighbours will create a trip hazard and will be immediately noticeable. Getting the species and colour close enough that the replacement boards disappear under the finish is also important, though this is easier to manage with stain or oil than with lacquer, which tends to be more transparent. The wide gaps in this floor needed pine slivers rather than resin alone, and the stairs had areas around the spindles and nosings where hand tools were the only practical option.

Our Approach

Board replacement: Boards identified during inspection as beyond repair were lifted and replaced with closely matched hardwood cut to the correct length, width and thickness. All replacements were fitted and fixed down securely before any sanding began.
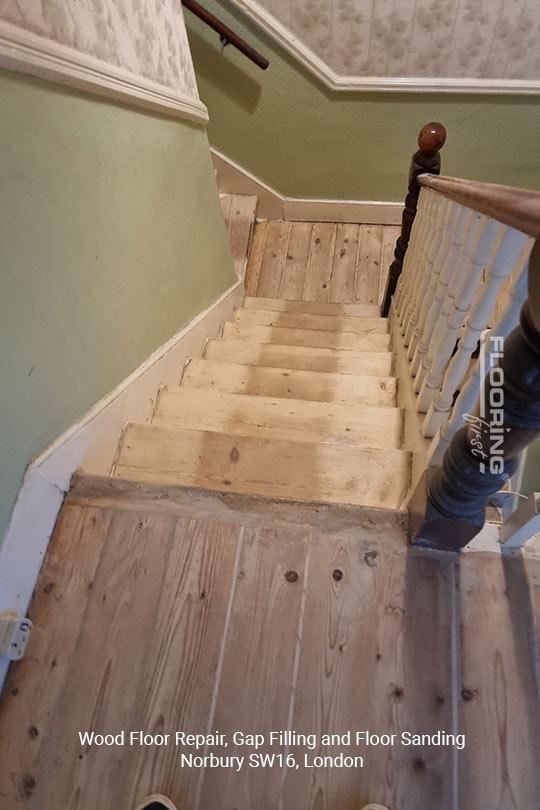
Sanding in progress on Norbury floor and stairs

Gap filling: Wide gaps were filled with pine slivers tapped in and trimmed flush, then covered with a resin and sawdust mix for a tight, even joint. Narrower gaps received the resin mix alone. Once the filler had cured, it was sanded flush in the first sanding pass.

Sanding floor and stairs: The floor was sanded through three grit levels, following the grain throughout. The staircase was tackled separately: drum sander on the larger treads, detail machines and hand tools for nosings, risers and the areas around spindles. Getting the stairs consistent with the floor surface quality takes time but is necessary for a uniform finish result.

Oil finishing: A hard-wearing penetrating oil was applied to both floor and stairs. Oil finishes give a natural close-to-the-wood look that suits solid hardwood well, and they allow individual sections to be re-oiled if they become worn without needing to sand the whole surface. This is particularly useful for stairs where one or two treads may wear faster than the rest.

The Result

The floor and stairs both came out looking consistent in colour and texture, with all gaps filled, all surface damage removed and a fresh oil finish throughout. The replacement boards are barely distinguishable from the originals. This Norbury project is a clear example of what professional maintenance can achieve on a hardwood floor and staircase that had been left without professional care for too long.
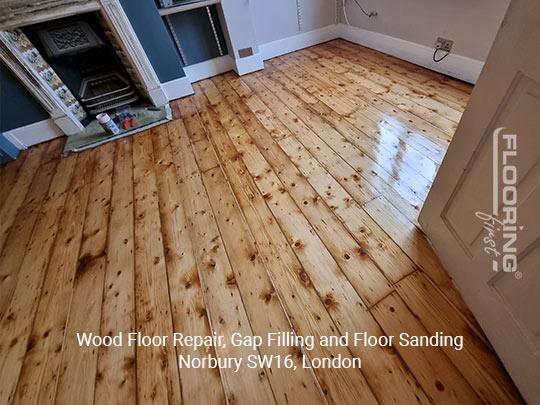
Norbury floor and stairs after sanding and oil finishing

FAQ

When is it not worth repairing boards and better to replace the floor entirely?
If more than around 30 to 40 per cent of the boards are damaged or the subfloor beneath has suffered serious structural issues, replacement may work out more cost-effective than repair. For most floors we see, however, repair and renovation is perfectly viable and far cheaper than replacement. We give an honest assessment at the quoting stage.

How are pine slivers used in gap filling and do they show?
Pine slivers are thin wedges of timber tapped into wide gaps to fill them structurally. They are then sanded flush and covered with the resin and sawdust mix used for finer gaps. Once sanded and finished, they are generally invisible to the eye. The result is a tight, stable floor without draught gaps.

How often should a hardwood floor and staircase be professionally maintained?
In normal domestic use, a full sand and refinish every eight to twelve years is a reasonable guide. Stairs can need more frequent attention because treads are essentially point-loaded with every step. Oil finishes allow spot maintenance more easily than lacquer, which extends the time between full sandings. We advise on the right maintenance schedule for your specific floor and level of use when completing a job.

Have a similar project? Call us on 020 88309782 or Book a Free Site Visit

Close
4  |   Croydon  |   October 2021

Pine floorboards in Croydon, SW16 were sanded back to remove worn coatings and surface marks. The boards now have a smooth, even finish with a clean, natural look built for everyday use.

Case studies

Project Overview

This project involved the professional sanding and restoration of an existing wood floor at a property in Croydon, SW16. The floor had seen years of daily wear and was in need of attention to bring it back to a quality finish. Our team carried out a full assessment before starting work, checking for any boards that needed attention alongside the main sanding and finishing work.

Before the Work

Before work began, the floor showed typical signs of wear. Surface scratches, dull patches, and general finish deterioration were present. A thorough survey was carried out to plan the correct sanding depth, assess board condition, and choose the most appropriate finish for the space.

Survey photos showing the floor condition before work:

Floor condition before work at SW16

Our Approach

The following services were carried out as part of this project:

  • Floorboards - Replacement (incl. materials)
  • Floorboards - Sand, Buff & Oil
  • Gap Filling
  • Gap Filling - Pine Slivers
  • Lift & Dispose Carpets or Laminates
  • Stairs Sanding & Preparing Fof Finish

The Result

Once the sanding and finishing process was complete, the floor was transformed. The wood grain was opened up and brought back to life, the surface was smooth and even, and the new finish provided lasting protection. The client was left with a floor that looked, and performed, as good as new.

Photos of the completed work:

Laminate floor after sanding work in SW16 Laminate floor after sanding work in SW16 Laminate floor after sanding work in SW16

Frequently Asked Questions

How long does floor sanding take?
Most residential sanding jobs are completed in one to two days, depending on floor size and condition. Lacquering or oiling adds further drying and curing time, which we factor into the job schedule.

Do I need to vacate the property during sanding?
Modern dustless sanding equipment keeps dust to a minimum, but we recommend keeping pets and young children clear of the area during the work. Most clients remain in their property throughout.

How much does floor sanding cost in London?
Prices typically range from £25 to £45 per square metre depending on floor condition, finish type, and any repair work required. Gap filling and board replacement are priced separately if needed.

Have a similar project? Call us on 020 88309782 or Book a Free Site Visit

Close

  • 1
  • 2
  • 3
  • 4
  • 5
  • 6
  • 7
  • 8
  • 9
  • 10
  • 11
  • 12
  • 13
  • 14
  • 15
  • 16
  • 17
  • 18
  • 19
  • 20
  • 21
  • 22
  • 23
  • 24
  • 25
  • 26
  • 27
  • 28
  • 29
  • 30
  • 31
  • 32
  • 33
  • 34
  • 35
  • 36
  • 37
  • 38
  • 39
  • 40
  • 41
  • 42
  • 43
  • 44
  • 45
  • 46
  • 47
  • 48
  • 49
  • 50
  • 51
  • 52
  • 53
  • 54
  • 55

Have a similar project?

Call us on 020 88309782 or book a free site visit

Book Free Site Visit

Our Flooring Company

Contacts & Showroom Book Free Site Survey About Our Flooring Company Join Our Team Work as a Contractor

Service Information

Terms of Service Terms of Sales Deliveries & Charges Cookie Settings Returns Policy Privacy Policy

Help

FAQs Case Studies Sitemap Glossary
𝕏
FlooringFirst! Services
158 Coles Green Road
London, NW2 7HW
T: 020 88309782
Floor Sanding Services: Central London, East London, Near London, North London, Northwest London, Southeast London, Southwest London, West London
Wood Floor Installation Service: Central London, East London, Near London, North London, Northwest London, Southeast London, Southwest London, West London

  • Flooring Services
  • Floor Sanding
    • Wood Floor Staining
    • Wood Floor Gap Filling
    • Commercial Floor Sanding
    • Engineered Floor Sanding & Refinishing
  • Wood Floor Fitting
    • Parquet Floor Installation
    • Laminate Floor Installation
    • Engineered Wood Floor Installation - Supply & Fit
    • Solid Wood Floor Fitting - Supply & Fit
    • LVT Floor Installation - Supply & Fit
  • Floor Repairs
    • Parquet Floor Repair and Restoration
    • Engineered Wood Floor Repairs
    • Wood Floor Scratch Repair
    • Floorboards Replacement
  • Care & Maintenance
    • Re-Oiling & Recoating Oiled Floors
    • Vinyl & Linoleum Cleaning
    • Hardwood Floor Buffing
    • Wood Floor Polishing
  • Shop
  • Shop
  • Gallery
  • Service Guide
  • Bookings
  • Book Free Survey
  • Service Advice
  • Product Advice