Floor Sanding & Fitting
Book Free Visit Price Guide 020 88309782
Monday - Friday 07:30 - 17:30, Saturday 07:30 - 16:00
cs@flooringfirst.co.uk
020 88309782
Monday - Friday 07:30 - 17:30, Saturday 07:30 - 16:00
cs@flooringfirst.co.uk
  • Book Free Visit
  • Home
  • Floor Sanding
  • Floor Fitting
  • Floor Repairs
  • Aftercare
    • Wooden Floors
    • Cleaning & Polishing
    • Re-Oiling Wooden Floors
    • Vinyls & Linoleum
    • Vinyl Floor Polishing
    • Get a Quote...
  • For Businesses
  • Gallery
  • Service Guide
  • Shop
  • Book Free Visit

See Few Examples of Our Works

Floor Sanding, Solid, Parquet & Laminate Floor Fitting

Gallery

See Our Floor Works

WHY CHOOSE US
CASE STUDIES
PRICE GUIDE
OFFERS
GALLERY
ASK EXPERT
WHY CHOOSE US
CASE STUDIES
PRICE GUIDE
OFFERS
GALLERY
ASK EXPERT

Floor Sanding & Fitting Project Gallery

All Projects Renovations Installations

11  |   Dalston  |   May 2021

Do you want to ensure your home is in perfect condition? Start taking care of your floor, just like our clients of this engineered wood floor and stairs sanding and refinishing project in Dalston.

Case studies
  • Engineered wood floor & stairs sanding and refinishing in Dalston 10
  • Engineered wood floor & stairs sanding and refinishing in Dalston
  • Engineered wood floor & stairs sanding and refinishing in Dalston 1
  • Engineered wood floor & stairs sanding and refinishing in Dalston 2
  • Engineered wood floor & stairs sanding and refinishing in Dalston 3
  • Engineered wood floor & stairs sanding and refinishing in Dalston 4
  • Engineered wood floor & stairs sanding and refinishing in Dalston 5
  • Engineered wood floor & stairs sanding and refinishing in Dalston 6
  • Engineered wood floor & stairs sanding and refinishing in Dalston 7
  • Engineered wood floor & stairs sanding and refinishing in Dalston 8
  • Engineered wood floor & stairs sanding and refinishing in Dalston 9

Project Overview

This Dalston property had engineered wood flooring throughout the main rooms and a wooden staircase connecting the floors. Both had reached a state where the finish was worn, scratches were visible across most of the surface, and the overall appearance let down an otherwise well-presented home. The owners wanted everything done in a single job to get a consistent result and avoid the disruption of two separate visits. Combining floor and stair sanding is the most practical approach and ensures the finish matches across the whole property.

Engineered wood floor and stairs before sanding in Dalston

The Challenge

Engineered wood floors have a real hardwood top layer over a plywood core, which means the number of times they can be sanded is limited by the thickness of that layer. This floor had been sanded once previously, so care was needed to ensure we did not go through the wear layer during this second sand. The staircase presented additional challenges: the treads were heavily worn in the centre, particularly on the landing and the three steps immediately below it. Sanding these areas down to match the worn but less-used edges required careful grading to avoid creating a concave shape across the tread surface.

Worn staircase treads before sanding in Dalston

Our Approach

Assessment and grit selection. We measured the remaining wear layer on the engineered floor and confirmed that a medium-grit approach was appropriate. Going in with coarser grit would have been unnecessarily aggressive given the condition of the floor.

Floor sanding. The floor was sanded across multiple passes with progressively finer grits to remove the old finish and surface marks without taking more material than necessary. Edges and corners were hand-finished to match.

Stair sanding. Each tread was sanded individually using appropriate equipment for the tread width. The worn centres of the busiest treads were brought down gradually using medium grit to blend with the less-worn areas, creating an even surface across each tread without any obvious dip.

Lacquer application. The floor and stairs were both finished with two coats of lacquer, applied in the correct sequence to avoid walking over freshly finished surfaces during application. Lacquer was the right choice for both because of its hard-wearing properties in high-traffic conditions.

Floor and staircase during restoration in Dalston

The Result

The finished floor and staircase were consistent in appearance and well-protected. The lacquer gave both surfaces the same clear, clean finish, and the scratches and worn areas that had been so visible before were completely gone. The owners commented that the staircase in particular looked better than they had expected, given how heavy the wear had been. The property as a whole looked noticeably smarter once the floor and stairs were in good condition.

Frequently Asked Questions

How many times can an engineered wood floor be sanded?
This depends entirely on the thickness of the top hardwood layer. A 6mm wear layer can typically support three or four full sanding cycles. A 3mm layer may only allow one or two. Each time the floor is sanded, a professional should assess how much material remains before proceeding.

How are heavily worn stair treads repaired during sanding?
Worn treads are sanded progressively to reduce the high spots around the edges down to the level of the worn centre. The key is to work gradually and check frequently to avoid creating a dip in the tread surface. In extreme cases, a filler or levelling compound may be used before sanding begins.

Is it possible to use the stairs during a floor sanding job?
During the sanding and lacquering process, access is usually restricted for periods to allow the finish to cure. The sequence of work is planned so that the stairs remain accessible for at least one direction of travel until the lacquer is dry enough for foot traffic.

Have a similar project? Call us on 020 88309782 or Book a Free Site Visit

Close
9  |   Harrow  |   May 2021

An engineered wood floor sanding and refinishing project can be really beneficial for every domestic and commercial setting. Our team has recently worked on this engineered floor sanding and lacquering project in Harrow.

Case studies
  • Engineered wood floor sanding and lacquer in Harrow 8
  • Engineered wood floor sanding and lacquer in Harrow
  • Engineered wood floor sanding and lacquer in Harrow 1
  • Engineered wood floor sanding and lacquer in Harrow 2
  • Engineered wood floor sanding and lacquer in Harrow 3
  • Engineered wood floor sanding and lacquer in Harrow 4
  • Engineered wood floor sanding and lacquer in Harrow 5
  • Engineered wood floor sanding and lacquer in Harrow 6
  • Engineered wood floor sanding and lacquer in Harrow 7

Project Overview

This engineered wood floor in Harrow was in need of a professional sanding and refinishing service after years of daily use had taken their toll on the finish. The floor itself was structurally sound; the issue was entirely cosmetic and protective, with the old lacquer worn through in places and the surface showing scratches and dull patches throughout. The owners had done their research and understood that engineered wood floors, unlike laminate, are made from real wood and can be sanded and refinished to restore them. We were asked to sand the floor and apply a high-quality lacquer appropriate for the level of traffic in the property.

Engineered wood floor before sanding in Harrow

The Challenge

The primary challenge on this job was the choice of finishing product. The property had a busy household with children and pets, meaning the floor needed a lacquer that could genuinely handle the demands placed on it. Standard lacquers vary considerably in hardness and durability, and not all of them are suitable for very high traffic conditions. Choosing the wrong product would mean the finish showing wear again within a year, which would be a waste of the sanding work. We also needed to ensure the sanding was thorough enough to remove all traces of the old finish, because any remaining old lacquer under the new coat creates a weak bond that causes the new finish to peel or flake prematurely.

Worn lacquer visible on engineered floor before sanding in Harrow

Our Approach

Surface preparation check. We tested whether the existing finish had fully failed or just worn in patches. Where old lacquer remained, the sand had to be deep enough to remove it completely before the new finish was applied.

Progressive sanding. Starting at medium grit to cut through the old finish and bring the entire surface back to bare wood, we progressed through finer grits to achieve a smooth, consistent finish ready for coating. Edge sanding and hand scraping completed the perimeter.

Product selection. For this project we used Bona Traffic HD matt, a commercial-grade lacquer designed specifically for floors subject to high traffic. It is harder than standard domestic lacquers and maintains its protective properties for considerably longer under heavy use.

Lacquer application. Two coats were applied in full accordance with the manufacturer's guidelines, with the recommended interval between coats to allow proper curing before the second coat was laid on top.

Sanding the engineered wood floor in Harrow

The Result

The floor looked outstanding once completed. The Bona Traffic HD matt gave a clean, low-sheen finish that showed the natural beauty of the wood without the high-gloss appearance some people find too formal. The surface was smooth and uniform throughout, and the hardness of the lacquer means this floor will stand up to the demands of a busy household for several years before needing any further treatment. The owners were very happy with both the appearance and the practical durability of the result.

Frequently Asked Questions

What makes Bona Traffic HD different from standard lacquer?
Bona Traffic HD is a two-component commercial lacquer that is significantly harder than most single-component domestic lacquers. It is designed for use in commercial and high-traffic residential settings where standard finishes would show wear too quickly. The main practical difference is that it maintains its protective properties for much longer under heavy daily use.

Can all engineered wood floors be sanded regardless of thickness?
No. The number of sanding cycles available depends on the thickness of the hardwood top layer. Floors with a 2mm or thinner wear layer cannot be sanded without risk of breaking through to the plywood core. A professional assessment of the remaining thickness is always the first step.

How long does Bona Traffic HD take to fully cure?
The floor can take light foot traffic within about 24 hours, but full hardness is not reached for five to seven days. During this curing period, furniture should not be placed back on the floor and the surface should not be cleaned with water or cleaning products.

Have a similar project? Call us on 020 88309782 or Book a Free Site Visit

Close
7  |   Chelsea, Brompton  |   May 2021

Hardwood floor sanding is beneficial and you can see its abilities to improve every distressed wooden floor and make it look brand-new and super durable by looking at this wood floor sanding and lacquering project we have worked on recently in Chelsea.

Case studies
  • Hardwood floor sanding and lacquer in Chelsea 6
  • Hardwood floor sanding and lacquer in Chelsea
  • Hardwood floor sanding and lacquer in Chelsea 1
  • Hardwood floor sanding and lacquer in Chelsea 2
  • Hardwood floor sanding and lacquer in Chelsea 3
  • Hardwood floor sanding and lacquer in Chelsea 4
  • Hardwood floor sanding and lacquer in Chelsea 5

Project Overview

This hardwood floor in Chelsea covered the main living areas of a well-appointed residential property. The floor was original to the building, made from quality timber that simply needed proper attention after years of use. In addition to the main floor, the kitchen had solid wood worktops that had also deteriorated and needed refinishing. Both the floor and the worktops were treated in the same visit, using different products appropriate for each surface. Hardwood floor sanding in London is priced from around £25 to £45 per square metre for standard work, with additional elements like worktop refinishing quoted separately based on the scope involved.

Hardwood floor before sanding in Chelsea

The Challenge

The kitchen worktops presented a particular challenge because they required a different product to the floor. Floor lacquers are formulated for horizontal foot traffic; worktops need a food-safe, heat-resistant and water-resistant finish that can handle the specific demands of food preparation and kitchen use. The existing worktop finish had failed significantly, with water damage visible around the sink area and heat marks near the hob. The floor itself was in moderately poor condition with deep scratches in the highest-traffic areas and a finish that had completely worn through in several places, exposing bare wood that was starting to absorb dirt and staining.

Worn hardwood floor in Chelsea before restoration

Our Approach

Floor inspection and planning. The full extent of the finish failure was mapped across the floor before sanding. The deeply worn areas near doorways required slightly more passes to ensure all traces of the old lacquer were removed down to bare wood.

Floor sanding sequence. The floor was sanded in three stages: initial medium-grit passes to remove the old finish and deep scratches, then progressively finer grits to refine the surface. Edging and corners were completed by hand.

Lacquer application to floor. Two coats of a quality clear lacquer were applied to the floor, with curing time between coats and a light buff before the final coat to ensure the best possible surface.

Worktop refinishing. The kitchen worktops were sanded back individually using hand and detail sanders, then finished with Osmo Oil Clear matt, which is food-safe, water-resistant and designed specifically for use on wood surfaces that come into contact with food and liquids.

Chelsea hardwood floor before sanding showing extent of wear

The Result

Both the floor and the worktops came up to a very high standard. The floor had a clean, even lacquer finish that brought out the depth and character of the hardwood, and every scratch and worn patch from the previous years of use had been completely removed. The worktops looked as good as they did when new, with the Osmo oil giving a natural, low-sheen finish that suited the kitchen perfectly. The whole property benefited from the work, and the owners now have a floor and worktops that are properly protected and easy to maintain.

Frequently Asked Questions

Can solid wood kitchen worktops be refinished in the same way as floors?
Yes, but they require a different product. Floor lacquers are not appropriate for worktops because they are not food-safe. Wood worktops are best refinished with a specialist food-safe oil such as Osmo Oil, which penetrates the grain and provides water and heat resistance without creating a surface film that can chip or peel.

How many times can a hardwood floor be sanded over its lifetime?
A solid hardwood floor of typical 20mm thickness can usually be sanded eight to ten times, removing approximately 1mm to 2mm of wood per full sanding cycle. This means a well-maintained hardwood floor can last well over a century with periodic professional care.

What is the best finish for a hardwood floor in a busy Chelsea property?
Lacquer is the most practical choice for properties where the floor receives heavy use and where a durable, easy-to-clean surface is a priority. For a more natural look and feel, an oil finish is an excellent alternative, though it requires more frequent maintenance.

Have a similar project? Call us on 020 88309782 or Book a Free Site Visit

Close
6  |   Peckham  |   May 2021

This parquet floor in Peckham, SE5 was brought back to its original look using modern dustless sanding systems. The wood blocks were carefully reworked and refinished, creating a smooth, clean surface with a well-presented and durable finish ready for daily use.

Case studies

Project Overview

This project involved the professional sanding and restoration of an existing wood floor at a property in Peckham, SE5. The floor had seen years of daily wear and was in need of attention to bring it back to a quality finish. Our team carried out a full assessment before starting work, checking for any boards that needed attention alongside the main sanding and finishing work.

Before the Work

Before work began, the floor showed typical signs of wear. Surface scratches, dull patches, and general finish deterioration were present. A thorough survey was carried out to plan the correct sanding depth, assess board condition, and choose the most appropriate finish for the space.

Survey photos showing the floor condition before work:

Floor condition before work at SE5 Floor condition before work at SE5 Floor condition before work at SE5

Our Approach

The following services were carried out as part of this project:

  • Beading Installation (incl. materials)
  • Door Frame Trimming
  • Doors Plus Frame Trimming (per door)
  • Joist Repair Works
  • Parquet - Sand, Buff & Lacquer
  • Parquet Floor Fitting - With Border
  • Staining
  • Subfloor Preparation (ply 12 mm)
  • Thresholds & Fitting (inc. materials)
  • Fireplace Remove & Dispose

The Result

Once the sanding and finishing process was complete, the floor was transformed. The wood grain was opened up and brought back to life, the surface was smooth and even, and the new finish provided lasting protection. The client was left with a floor that looked, and performed, as good as new.

Photos of the completed work:

Parquet floor after sanding work in SE5 Parquet floor after sanding work in SE5 Parquet floor after sanding work in SE5

Frequently Asked Questions

How long does floor sanding take?
Most residential sanding jobs are completed in one to two days, depending on floor size and condition. Lacquering or oiling adds further drying and curing time, which we factor into the job schedule.

Do I need to vacate the property during sanding?
Modern dustless sanding equipment keeps dust to a minimum, but we recommend keeping pets and young children clear of the area during the work. Most clients remain in their property throughout.

How much does floor sanding cost in London?
Prices typically range from £25 to £45 per square metre depending on floor condition, finish type, and any repair work required. Gap filling and board replacement are priced separately if needed.

Have a similar project? Call us on 020 88309782 or Book a Free Site Visit

Close
3  |   Canonbury  |   May 2021

This engineered wood floor in Canonbury, N1 was carefully reworked using modern dustless sanding methods. Surface wear was removed and the floor was refinished to achieve a smooth, clean look with a balanced, durable finish ready for everyday use.

Case studies

Project Overview

This project involved the professional sanding and restoration of an existing wood floor at a property in Canonbury, N1. The floor had seen years of daily wear and was in need of attention to bring it back to a quality finish. Our team carried out a full assessment before starting work, checking for any boards that needed attention alongside the main sanding and finishing work.

Before the Work

Before work began, the floor showed typical signs of wear. Surface scratches, dull patches, and general finish deterioration were present. A thorough survey was carried out to plan the correct sanding depth, assess board condition, and choose the most appropriate finish for the space.

Our Approach

The following services were carried out as part of this project:

  • Engineered - Sand, Buff & Lacquer
  • Stairs - Sand & Seal
  • Thresholds & Fitting (inc. materials)
  • Silicone Application Around Perimeter

The Result

Once the sanding and finishing process was complete, the floor was transformed. The wood grain was opened up and brought back to life, the surface was smooth and even, and the new finish provided lasting protection. The client was left with a floor that looked, and performed, as good as new.

Photos of the completed work:

Engineered Wood floor after sanding work in N1 Engineered Wood floor after sanding work in N1 Engineered Wood floor after sanding work in N1

Frequently Asked Questions

How long does floor sanding take?
Most residential sanding jobs are completed in one to two days, depending on floor size and condition. Lacquering or oiling adds further drying and curing time, which we factor into the job schedule.

Do I need to vacate the property during sanding?
Modern dustless sanding equipment keeps dust to a minimum, but we recommend keeping pets and young children clear of the area during the work. Most clients remain in their property throughout.

How much does floor sanding cost in London?
Prices typically range from £25 to £45 per square metre depending on floor condition, finish type, and any repair work required. Gap filling and board replacement are priced separately if needed.

Have a similar project? Call us on 020 88309782 or Book a Free Site Visit

Close
6  |   Westminster  |   May 2021

An engineered wood floor in Westminster, SW1V was given a new lease of life using modern dustless sanding techniques. Surface damage was carefully removed, and the floor was refinished to create a smooth, clean appearance with a consistent, durable finish ready for everyday use.

Case studies

Project Overview

This project involved the professional sanding and restoration of an existing wood floor at a property in Westminster, SW1V. The floor had seen years of daily wear and was in need of attention to bring it back to a quality finish. Our team carried out a full assessment before starting work, checking for any boards that needed attention alongside the main sanding and finishing work.

Before the Work

Before work began, the floor showed typical signs of wear. Surface scratches, dull patches, and general finish deterioration were present. A thorough survey was carried out to plan the correct sanding depth, assess board condition, and choose the most appropriate finish for the space.

Survey photos showing the floor condition before work:

Floor condition before work at SW1V Floor condition before work at SW1V Floor condition before work at SW1V

Our Approach

The following services were carried out as part of this project:

  • Engineered - Sand, Buff & Oil
  • Furniture Moving
  • Single Plank Repair ( top layer & gap filling)
  • Congestion & ULEZ Charge (per day)

The Result

Once the sanding and finishing process was complete, the floor was transformed. The wood grain was opened up and brought back to life, the surface was smooth and even, and the new finish provided lasting protection. The client was left with a floor that looked, and performed, as good as new.

Photos of the completed work:

Engineered Wood floor after sanding work in SW1V Engineered Wood floor after sanding work in SW1V Engineered Wood floor after sanding work in SW1V

Frequently Asked Questions

How long does floor sanding take?
Most residential sanding jobs are completed in one to two days, depending on floor size and condition. Lacquering or oiling adds further drying and curing time, which we factor into the job schedule.

Do I need to vacate the property during sanding?
Modern dustless sanding equipment keeps dust to a minimum, but we recommend keeping pets and young children clear of the area during the work. Most clients remain in their property throughout.

How much does floor sanding cost in London?
Prices typically range from £25 to £45 per square metre depending on floor condition, finish type, and any repair work required. Gap filling and board replacement are priced separately if needed.

Have a similar project? Call us on 020 88309782 or Book a Free Site Visit

Close
11  |   Pimlico  |   May 2021

Engineered wood floors are easy to maintain in perfect condition. A few small repairs, thorough sanding and a couple of layer of oil finish, turned this worn engineered wood floor in Pimlico into something suitable for a magazine cover.

Case studies
  • Engineered wood floor sanding, repair and re-oiling in Pimlico 10
  • Engineered wood floor sanding, repair and re-oiling in Pimlico
  • Engineered wood floor sanding, repair and re-oiling in Pimlico 1
  • Engineered wood floor sanding, repair and re-oiling in Pimlico 2
  • Engineered wood floor sanding, repair and re-oiling in Pimlico 3
  • Engineered wood floor sanding, repair and re-oiling in Pimlico 4
  • Engineered wood floor sanding, repair and re-oiling in Pimlico 5
  • Engineered wood floor sanding, repair and re-oiling in Pimlico 6
  • Engineered wood floor sanding, repair and re-oiling in Pimlico 7
  • Engineered wood floor sanding, repair and re-oiling in Pimlico 8
  • Engineered wood floor sanding, repair and re-oiling in Pimlico 9

Project Overview

This engineered wood floor in Pimlico had been in place for several years and was beginning to show a range of problems: a handful of damaged boards, gaps opening between others, and a finish that no longer offered any meaningful protection. The owner wanted the floor restored to a standard fit for a Pimlico flat, and the combination of targeted board repairs, gap filling and a full sand and re-oil achieved exactly that. The total scope of work was larger than a straightforward refinish but smaller than a full floor replacement, and the result justified the decision to restore.

Engineered wood floor before repair and sanding in Pimlico

The Challenge

The combination of repairs, gap filling and refinishing on an engineered floor is more technically demanding than any one of those tasks in isolation. The repaired boards need to sit perfectly flush with the surrounding floor before sanding, or the sanding machine will either leave a ridge at the junction or sand through the new board more quickly than the surrounding original material. The gap filling compound also needed to be applied carefully to avoid contaminating the surface of the boards on either side of the gap, which would show up as patchy discolouration under the oil finish. Getting all three elements right in the correct sequence is the difference between a tidy, professional result and one that looks patchwork.

Damaged boards identified before repair in Pimlico

Our Approach

Board repairs first. Damaged boards were removed and replaced with matching engineered boards. Any boards that were simply loose or squeaking were re-secured with flooring adhesive and left to cure before sanding began.

Gap filling. Gaps between boards were filled with a flexible resin compound mixed with wood dust to match the floor colour. The filler was applied, allowed to cure, and then lightly sanded flush with the surface.

Sanding. The floor was sanded using a controlled sequence of grits appropriate for engineered wood. Starting with a medium grit to remove the old finish and flatten all repairs, progressing to fine grits for a smooth, consistent surface throughout. Edge sanding completed the perimeter.

Oil finish application. An oil finish was applied in two coats. Oil was chosen because it penetrates into the wood's structure rather than sitting on top, providing protection from within and giving a natural, warm appearance that suits the character of the property.

Sanding the engineered wood floor in Pimlico

The Result

The repaired and refinished floor looked clean, uniform and well-maintained. The replacement boards blended effectively after sanding, the gaps were eliminated, and the oil finish gave the whole surface a warm, natural appearance. The owner now has a floor that is structurally sound, properly protected and considerably more attractive than it was when we arrived. Oil finishes do need re-applying periodically, but maintenance is straightforward and does not require any sanding between top-up coats.

Frequently Asked Questions

Can damaged engineered boards be replaced without replacing the entire floor?
Yes, in most cases. As long as matching boards can be sourced, individual damaged boards can be removed and replaced. The whole floor is then sanded, which ensures a uniform appearance across old and new boards.

What is the difference between oil and lacquer for engineered floors?
Lacquer sits on top of the wood as a hard film, while oil penetrates into the grain. Lacquer is more scratch-resistant in the short term; oil looks more natural and is easier to maintain and spot-repair. Both are suitable finishes depending on the use and preference of the owner.

How often does an oiled engineered floor need maintenance?
In a well-used residential property, an oiled floor usually benefits from a maintenance oil coat every one to two years. This does not require sanding; the existing oil is lightly buffed and a new coat applied on top.

Have a similar project? Call us on 020 88309782 or Book a Free Site Visit

Close
7  |   Walthamstow  |   April 2021

Oil finishes enhance the natural beauty of wood’s colour and texture. Our Walthamstow clients have chosen to hire us for a re-oiling and gap filling service, putting trust into our experience, knowledge and skills.

Case studies
  • Parquet re-oiling and gap filling in Walthamstow 6
  • Parquet re-oiling and gap filling in Walthamstow
  • Parquet re-oiling and gap filling in Walthamstow 1
  • Parquet re-oiling and gap filling in Walthamstow 2
  • Parquet re-oiling and gap filling in Walthamstow 3
  • Parquet re-oiling and gap filling in Walthamstow 4
  • Parquet re-oiling and gap filling in Walthamstow 5

Project Overview

This parquet floor in Walthamstow had an oil finish that had not been maintained for several years and was showing the typical signs of a depleted oil coat: the surface had become dry and dull, the wood had lost its natural warmth, and minor gaps had opened between some of the blocks. Rather than a full sand, which would not have been necessary given the condition of the underlying wood, the right treatment was a targeted gap fill followed by a re-oil. This approach preserved the existing surface, required no heavy machinery, and was completed with far less disruption than a full sanding job. Re-oiling costs considerably less per visit than a full sanding cycle, making it a cost-effective part of any regular parquet maintenance programme.

Parquet floor before re-oiling and gap filling in Walthamstow

The Challenge

The gaps in this parquet floor were relatively minor but distributed across a large area of the floor. Filling them required care because the gap fill had to sit flush with the surface of the blocks rather than proud of them, and the colour had to be a reasonable match for the existing wood. On an oiled floor where the surface is not being sanded down to bare wood, the filler cannot be matched by mixing it with fresh sanding dust, so the colour match relies entirely on selecting the right resin product. The re-oiling also needed to be done in stages rather than all at once, to allow each coat to be absorbed properly by the wood rather than pooling on the surface.

Parquet floor showing minor gaps before treatment in Walthamstow

Our Approach

Initial inspection. We inspected the full floor to confirm that no blocks were loose and that the wood itself was in good condition beneath the depleted oil finish. No blocks required re-gluing, and no deeper sanding was needed.

Gap filling. The gaps between parquet blocks were filled with a natural resin compound selected for compatibility with an oiled finish. The filler was pressed into the gaps, allowed to cure, then lightly sanded flush with a fine abrasive pad to ensure a level surface before the oil was applied.

Surface preparation. The whole floor was lightly buffed with a fine pad to remove any surface contamination and open the wood's pores slightly, which helps the oil absorb evenly.

Oil application. Two coats of Osmo Polyx Hardwax Oil were applied, working in the direction of the block grain where possible. This product was selected for its combination of oil and wax, which gives a natural, lustrous finish and provides both penetrating protection from within the wood and a light surface hardness from the wax component.

Applying oil finish to parquet floor in Walthamstow

The Result

The floor came back to life after the re-oiling. The natural warmth and colour of the parquet wood returned fully once the Osmo oil was applied, the gaps were closed and invisible, and the surface had a consistent, healthy sheen throughout. The owners now have a parquet floor that is properly protected and will remain in good condition with a re-oil every year or two. On a well-maintained oiled parquet floor, the need for a full sand can be pushed back considerably by keeping up with regular re-oiling, making this a practical long-term maintenance strategy.

Frequently Asked Questions

How often does an oiled parquet floor need re-oiling?
In a busy household, re-oiling every one to two years is usually appropriate. Lightly used rooms may go three years between treatments. The floor itself gives clear signals when re-oiling is due: the surface looks dry, the colour becomes flat, and water no longer beads on the surface as it should on a well-oiled floor.

Does re-oiling require sanding the parquet first?
Not for a routine maintenance re-oil. A light buff with a fine pad to remove surface contamination and open the pores is usually all that is needed. Sanding is only necessary if the floor has scratches that have gone through the oil finish into the bare wood, or if the surface needs significant correction.

What is Osmo Polyx Hardwax Oil and why is it used on parquet floors?
Osmo Polyx is a combination of natural oils and hard waxes that penetrates the grain of the wood while leaving a light protective layer on the surface. It is popular for parquet floors because it gives a natural appearance that enhances the character of the wood pattern, it is hard-wearing for a penetrating oil, and it can be re-applied without stripping the old finish.

Have a similar project? Call us on 020 88309782 or Book a Free Site Visit

Close
18  |   Bromley  |   April 2021

This Bromley large-scale church parquet floor restoration project did not challenge our experienced professionals. Resulting in 5,000 square feet of perfectly sanded and refinished floor with no imperfections and strong commercial-grade protection.

Case studies
  • Restoration of exotic wood flooring at St. Johns the Evangelist Church in Bromley 1
  • Restoration of exotic wood flooring at St. Johns the Evangelist Church in Bromley 2
  • Restoration of exotic wood flooring at St. Johns the Evangelist Church in Bromley 3
  • Restoration of exotic wood flooring at St. Johns the Evangelist Church in Bromley 4
  • Restoration of exotic wood flooring at St. Johns the Evangelist Church in Bromley 18
  • Restoration of exotic wood flooring at St. Johns the Evangelist Church in Bromley 5
  • Restoration of exotic wood flooring at St. Johns the Evangelist Church in Bromley 6
  • Restoration of exotic wood flooring at St. Johns the Evangelist Church in Bromley 7
  • Restoration of exotic wood flooring at St. Johns the Evangelist Church in Bromley 8
  • Restoration of exotic wood flooring at St. Johns the Evangelist Church in Bromley 9
  • Restoration of exotic wood flooring at St. Johns the Evangelist Church in Bromley 10
  • Restoration of exotic wood flooring at St. Johns the Evangelist Church in Bromley 11
  • Restoration of exotic wood flooring at St. Johns the Evangelist Church in Bromley 12
  • Restoration of exotic wood flooring at St. Johns the Evangelist Church in Bromley 13
  • Restoration of exotic wood flooring at St. Johns the Evangelist Church in Bromley 14
  • Restoration of exotic wood flooring at St. Johns the Evangelist Church in Bromley 15
  • Restoration of exotic wood flooring at St. Johns the Evangelist Church in Bromley 16
  • Restoration of exotic wood flooring at St. Johns the Evangelist Church in Bromley 17

Project Overview

St Johns the Evangelist Church in Bromley approached us for a large-scale parquet floor restoration covering 5,000 square feet of original wood block flooring. The church had been planning the project for some time, wanting experienced contractors who could handle the scale without disrupting services. We were commissioned to sand, gap fill, and refinish the entire floor to commercial-grade standard.
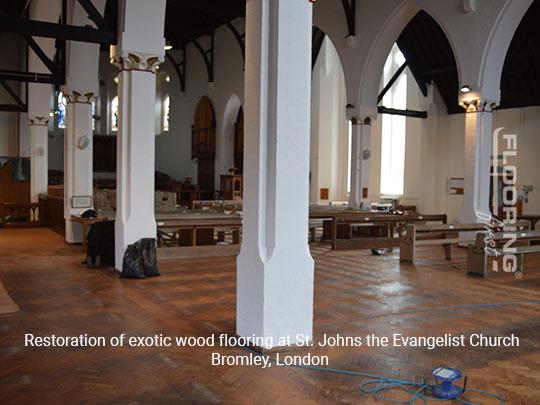
Parquet floor before sanding at St Johns the Evangelist Church, Bromley

The Challenge

A project of this size in a public building brings its own set of difficulties. The floor had years of accumulated wear from daily foot traffic, regular events, and general use. Gaps had opened up between the blocks, the finish was dull and flaking in patches, and the surface had lost the consistency you want to see across a floor of this quality. Because parquet blocks are laid in a herringbone pattern at 45 degrees, sanding against the grain would have caused damage rather than resolved it. Planning the correct sanding sequence across 5,000 square feet, while keeping disruption to the church to a minimum, required careful scheduling and a clear method from the start.
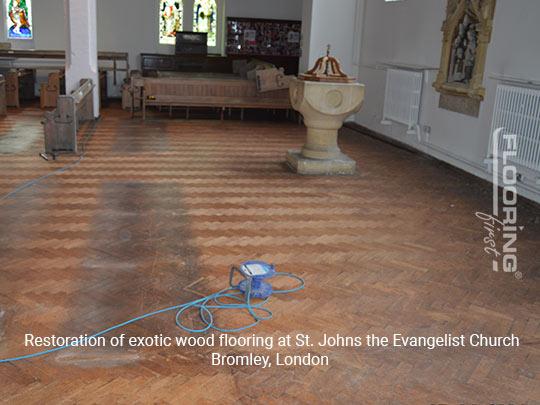
Worn parquet before treatment, Bromley church

Our Approach

Floor Inspection

Before any machinery was brought in, we carried out a thorough inspection of the full floor. Every section was assessed for loose blocks, significant gaps, and areas of more serious surface damage. This stage determined exactly what preparation work was needed before sanding could begin.

Gap Filling

All gaps between the parquet blocks were filled using a mixture of natural resin and wood dust. This method is the preferred approach for gap filling on wood floors because the resin remains slightly flexible when cured, meaning it will not crack or shrink back over time. The filled surface was left to fully harden before we moved on.

Multi-Stage Sanding

We worked through a multi-stage sanding programme, starting with coarser grits to remove the old finish and surface damage, then working progressively finer to achieve a smooth, even surface across the full 5,000 square feet. For parquet, the direction of each sanding pass is critical, so we carefully followed the grain of each section rather than working in a single direction across the floor.
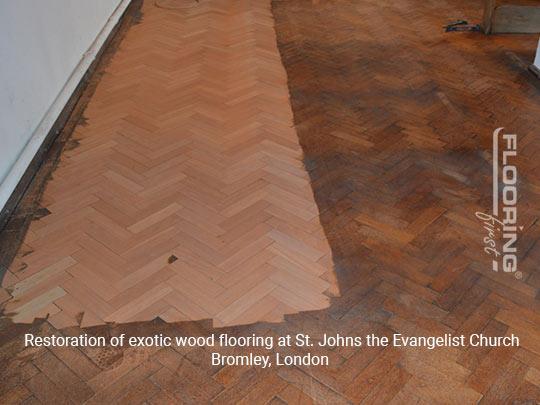
Sanding in progress at St Johns Church, Bromley

Refinishing with Commercial-Grade Lacquer

Once sanding was complete, the floor was coated with Pallmann Pal-X Trend, a two-component lacquer designed specifically for heavy-traffic environments. It provides hard-wearing protection that is appropriate for a building used by the public on a daily basis. Multiple coats were applied, with light buffing between each one, to achieve a consistent and durable finish.

The Result

The finished floor looks completely different from how it appeared when we started. All surface imperfections were removed, the gaps are no longer visible, and the parquet pattern reads clearly across the whole space. The church now has a floor that is protected for years of continued heavy use. For commercial sanding projects of this kind in the Bromley area, pricing typically runs from around £25 to £45 per square metre depending on the condition of the floor and the finish specified.

Frequently Asked Questions

How long does a commercial floor sanding project of this scale take?
A 5,000 square foot project requires several days of continuous work. We plan the schedule to minimise the number of sessions needed and to allow each coat of finish to cure properly before the next one is applied. The total duration depends on the condition of the floor and the number of coats required.

Can parquet floors be sanded as many times as solid wood floors?
Parquet blocks are generally shallower than solid timber planks, so the number of times they can be fully sanded is more limited. However, a professional assessment will confirm how much material remains and what sanding approach is appropriate. Many parquet floors can be fully restored without reaching that limit.

What finish is best for a church or public building floor?
A two-component oil-based or water-based commercial lacquer is the standard choice for public premises. Products like Pallmann Pal-X Trend are designed for exactly this kind of environment and provide the durability needed to withstand daily foot traffic without requiring frequent maintenance.

Have a similar project? Call us on 020 88309782 or Book a Free Site Visit

Close
6  |   Dartford  |   April 2021

An engineered wood floor in Dartford, DA13 was brought back into great condition through dust-free sanding and premium-quality finishing systems. The surface was carefully restored, leaving a smooth, elegant appearance with refreshed appeal and dependable long-term durability.

Case studies

Project Overview

This project involved the professional sanding and restoration of an existing wood floor at a property in Dartford, DA13. The floor had seen years of daily wear and was in need of attention to bring it back to a quality finish. Our team carried out a full assessment before starting work, checking for any boards that needed attention alongside the main sanding and finishing work.

Before the Work

Before work began, the floor showed typical signs of wear. Surface scratches, dull patches, and general finish deterioration were present. A thorough survey was carried out to plan the correct sanding depth, assess board condition, and choose the most appropriate finish for the space.

Survey photos showing the floor condition before work:

Floor condition before work at DA13 Floor condition before work at DA13 Floor condition before work at DA13

Our Approach

The following services were carried out as part of this project:

  • Damp Proofing - Liquid DPM
  • Door Frame Trimming
  • Engineered - Sand, Buff & Oil
  • Engineered Flooring Installation
  • Thresholds & Fitting (inc. materials)
  • Solid Oak Scotia Beading, Lacquered, 19x19 mm, 2.0 m
  • Cut LED Lights

The Result

Once the sanding and finishing process was complete, the floor was transformed. The wood grain was opened up and brought back to life, the surface was smooth and even, and the new finish provided lasting protection. The client was left with a floor that looked, and performed, as good as new.

Photos of the completed work:

Engineered Wood floor after sanding work in DA13 Engineered Wood floor after sanding work in DA13 Engineered Wood floor after sanding work in DA13

Frequently Asked Questions

How long does floor sanding take?
Most residential sanding jobs are completed in one to two days, depending on floor size and condition. Lacquering or oiling adds further drying and curing time, which we factor into the job schedule.

Do I need to vacate the property during sanding?
Modern dustless sanding equipment keeps dust to a minimum, but we recommend keeping pets and young children clear of the area during the work. Most clients remain in their property throughout.

How much does floor sanding cost in London?
Prices typically range from £25 to £45 per square metre depending on floor condition, finish type, and any repair work required. Gap filling and board replacement are priced separately if needed.

Have a similar project? Call us on 020 88309782 or Book a Free Site Visit

Close

  • 1
  • 2
  • 3
  • 4
  • 5
  • 6
  • 7
  • 8
  • 9
  • 10
  • 11
  • 12
  • 13
  • 14
  • 15
  • 16
  • 17
  • 18
  • 19
  • 20
  • 21
  • 22
  • 23
  • 24
  • 25
  • 26
  • 27
  • 28
  • 29
  • 30
  • 31
  • 32
  • 33
  • 34
  • 35
  • 36
  • 37
  • 38
  • 39
  • 40
  • 41
  • 42
  • 43
  • 44
  • 45
  • 46
  • 47
  • 48
  • 49
  • 50
  • 51
  • 52
  • 53
  • 54
  • 55

Have a similar project?

Call us on 020 88309782 or book a free site visit

Book Free Site Visit

Our Flooring Company

Contacts & Showroom Book Free Site Survey About Our Flooring Company Join Our Team Work as a Contractor

Service Information

Terms of Service Terms of Sales Deliveries & Charges Cookie Settings Returns Policy Privacy Policy

Help

FAQs Case Studies Sitemap Glossary
𝕏
FlooringFirst! Services
158 Coles Green Road
London, NW2 7HW
T: 020 88309782
Floor Sanding Services: Central London, East London, Near London, North London, Northwest London, Southeast London, Southwest London, West London
Wood Floor Installation Service: Central London, East London, Near London, North London, Northwest London, Southeast London, Southwest London, West London

  • Flooring Services
  • Floor Sanding
    • Wood Floor Staining
    • Wood Floor Gap Filling
    • Commercial Floor Sanding
    • Engineered Floor Sanding & Refinishing
  • Wood Floor Fitting
    • Parquet Floor Installation
    • Laminate Floor Installation
    • Engineered Wood Floor Installation - Supply & Fit
    • Solid Wood Floor Fitting - Supply & Fit
    • LVT Floor Installation - Supply & Fit
  • Floor Repairs
    • Parquet Floor Repair and Restoration
    • Engineered Wood Floor Repairs
    • Wood Floor Scratch Repair
    • Floorboards Replacement
  • Care & Maintenance
    • Re-Oiling & Recoating Oiled Floors
    • Vinyl & Linoleum Cleaning
    • Hardwood Floor Buffing
    • Wood Floor Polishing
  • Shop
  • Shop
  • Gallery
  • Service Guide
  • Bookings
  • Book Free Survey
  • Service Advice
  • Product Advice