Floor Sanding & Fitting
Book Free Visit Price Guide 020 88309782
Monday - Friday 07:30 - 17:30, Saturday 07:30 - 16:00
cs@flooringfirst.co.uk
020 88309782
Monday - Friday 07:30 - 17:30, Saturday 07:30 - 16:00
cs@flooringfirst.co.uk
  • Book Free Visit
  • Home
  • Floor Sanding
  • Floor Fitting
  • Floor Repairs
  • Aftercare
    • Wooden Floors
    • Cleaning & Polishing
    • Re-Oiling Wooden Floors
    • Vinyls & Linoleum
    • Vinyl Floor Polishing
    • Get a Quote...
  • For Businesses
  • Gallery
  • Service Guide
  • Shop
  • Book Free Visit

See Few Examples of Our Works

Floor Sanding, Solid, Parquet & Laminate Floor Fitting

Gallery

See Our Floor Works

WHY CHOOSE US
CASE STUDIES
PRICE GUIDE
OFFERS
GALLERY
ASK EXPERT
WHY CHOOSE US
CASE STUDIES
PRICE GUIDE
OFFERS
GALLERY
ASK EXPERT

Floor Sanding & Fitting Project Gallery

All Projects Renovations Installations

5  |   Fulham  |   1 September 2025

How we transformed severely scratched engineered flooring in Fulham, including areas deeply gouged by heavy piano legs. Using professional-grade restoration techniques, we removed surface blemishes and expertly blended in deeper damage to bring the floor back to life.

Case studies
  • Newly Restored Engineered Oak Flooring
  • All piano marks on the floor are gone. Thank you FlooringFirst
  • Deep marks from piano wheels, fixed by FlooringFirst
  • Deep Scratches on Oak Engineered Flooring Fixed by FlooringFirst
  • Engineered Oak Flooring with scratches for Restoration

Project Overview

This project involved restoring a solid engineered oak floor in a London living room. The floor had accumulated years of daily wear — surface scratches across the main walking routes, and deeper structural damage in one concentrated spot where a large piano had stood for an extended period. The client wanted to avoid a full replacement and was keen to see how much of the original character could be saved.

Engineered Oak Flooring with scratches for Restoration

The Challenge

Upon inspection, the floor displayed a combination of superficial scuffs and deep gouges in high-traffic and load-bearing areas. The most significant damage was located beneath the piano, where the legs had left visible, concentrated indentations over time.

Engineered flooring comes with a wear layer of varying thickness — typically between 3mm and 6mm on quality boards. Before any sanding begins, that wear layer has to be measured carefully. Sand too aggressively and you risk breaking through to the core. The piano indentations added a further complication: simple sanding alone would not be enough to level them out.

Deep Scratches on Oak Engineered Flooring Fixed by FlooringFirst

Our Approach

We started with a detailed inspection under raking light to map every scratch, scuff, and indentation. This let us prioritise areas that needed filler work before sanding started.

The piano leg depressions were treated first. We applied a two-part wood filler, colour-matched to the oak, building it slightly proud of the surface so that subsequent sanding could bring it flush. The filler was left to cure fully — rushing this step leads to shrinkage and a visible repair. Once set, we feathered the edges with a detail sander so the repair blended into the surrounding grain.

With the deep repairs done, we moved to the main floor. We used a Bona belt sander with a fine-to-medium sequence, working with the grain throughout. Because engineered wear layers are thinner than solid wood, we kept passes controlled and checked depth regularly. The surface scratches came out cleanly through this process.

After sanding, we buffed the entire floor with a fine mesh pad to create a consistent surface ready for finishing. The client opted for a mid-sheen water-based lacquer, which was applied in three coats with light sanding between each. Water-based products dry quickly, have low odour, and do not yellow over time — a practical choice for a frequently used living room.

Newly Restored Engineered Oak Flooring

The Result

Following the restoration, the floor exhibited a dramatic improvement in both appearance and feel underfoot. All surface scratches were eliminated, and the areas previously damaged by the piano legs were expertly filled and blended to match the surrounding finish.

The client commented that the floor looked better than it had in years. Total project time was two days: one for repairs and sanding, one for the three lacquer coats. The floor was ready for light use 24 hours after the final coat.

Frequently Asked Questions

How many times can engineered flooring be sanded?
That depends on the thickness of the wear layer. Most quality engineered boards have a 3mm to 6mm layer, which allows between one and three full sandings. Boards with a 2mm layer can usually only be lightly buffed rather than properly sanded. We always check wear layer depth before quoting, so there are no surprises.

Can piano or heavy furniture indentations be repaired without replacing boards?
In most cases, yes. If the indentation has not cracked the board or compressed the wood fibres beyond repair, a two-part filler approach works well. The repair is not invisible under close inspection, but at standing height and in normal light it is not noticeable. If the board is severely crushed, board replacement is the cleaner option.

What does engineered floor restoration cost in Fulham?
For a standard living room, floor sanding and restoration typically runs between £25 and £45 per square metre in London, depending on the condition, finish choice, and whether any board repairs are needed. Repair work such as filler treatment for deep marks is usually quoted as a separate fixed cost on top of the sanding rate.

Have a similar project? Call us on 020 88309782 or Book a Free Site Visit

Close
7  |   Kensington  |   1 September 2025

Watch us how we transformed these Versailles Oak Panels in Kensington to their perfection and how we restored Walnut Mosaic Fingers to their original look

Case studies
  • Walnut Mosaic Fingers Before Restoration
  • Scratches on Versailles Panels
  • Deep Scratch on Versaille Oak Flooring Before Restoration
  • Amazing Result after FlooringFirst brought new life to this floor
  • The Richest Colours You Can Get Out Of Walnut Mosaic Fingers Flooring
  • Freshly Restored Floors by Flooring First
  • 5 Star Flooring Restoration by FlooringFirst

Project Overview

This restoration project covered two distinct and historically significant parquet styles in a single property: Versailles oak panels and walnut mosaic finger parquet. Both required careful, sympathetic treatment to bring them back to the standard the client expected. Projects combining different parquet formats are less common and require switching approach mid-job, so planning was essential before work began.

Worn Walnut Mosaic Fingers Before Restoration

The Challenge

The original flooring comprised two distinct styles: a classic walnut mosaic finger parquet and elegant Versailles oak panels. Over time, both had suffered noticeable wear and tear, diminishing their visual appeal and structural integrity.

In the walnut mosaic area, the surface showed multiple scuff marks and scratches, with visible dullness due to accumulated grime and fading finish. The parquet blocks had shifted slightly in places, and some sections were uneven or loose, clear signs of age and prolonged use.

The Versailles panels presented a different set of problems. The geometric pattern of these panels means that sanding must follow the grain of each section separately, or cross-grain scratches become visible in the finish. Previous coats of finish had also darkened unevenly, making some sections appear blotchy.

Scratches on Versailles Panels before Restoration

Our Approach

We began with the walnut mosaic area. Loose and shifted blocks were lifted, cleaned, and re-glued with a suitable parquet adhesive before anything else happened. Trying to sand over a loose or uneven block risks catching the sander and damaging the block edge, so this preparation step was not optional.

Once the blocks were secure and adhesive cured, we sanded the walnut mosaic using a rotary machine fitted with fine abrasive, working in the direction that best followed the finger pattern. Walnut is a dense hardwood and holds its grain well, so it responds cleanly to careful sanding. The surface came up with good colour contrast and natural depth.

The Versailles panels were handled differently. We used a combination of a drum sander along the main grain direction and a detail sander for the internal mitre sections of each panel. This takes longer than sanding a straight-run floor, but it is the only way to avoid visible scratch patterns across the grain. Each panel was treated individually and checked before moving on.

Both floor areas were finished with a hard-wax oil chosen to complement the different tones of oak and walnut without making one look artificially darker than the other. Two coats were applied, with a light buff between coats.

Amazing Result after FlooringFirst brought new life to this floor

The Result

Following a complete restoration process, the transformation of both the Walnut Mosaic Finger Parquet and the Versailles Oak Panels is nothing short of remarkable. The walnut mosaic flooring has been revived with renewed depth and richness. Each individual finger block was cleaned, re-secured, and refinished, restoring the natural warmth and contrast of the walnut grain. The surface is now smooth, even, and finished with a durable, low-sheen protective coat that improves both appearance and longevity.

The Versailles panels, meanwhile, regained their geometric clarity and the warm honey tones that define good-quality oak. The client described it as looking "the way it must have looked when it was first laid."

Frequently Asked Questions

Can walnut parquet and oak Versailles panels be finished with the same product?
It depends on the desired result. Walnut is naturally darker than oak, so the same oil or lacquer will read differently on each. We typically choose a neutral or lightly tinted finish that works across both species, then adjust by applying an additional coat to the lighter areas if needed to balance the tones.

How do you handle loose parquet blocks before sanding?
Loose blocks are lifted, the old adhesive is cleaned from both the block and the subfloor, and they are re-glued with a specialist parquet adhesive. We then weight them and allow full cure time before sanding. Sanding over loose blocks causes uneven results and can crack the block edges.

What does parquet restoration cost in Kensington?
Parquet sanding and finishing runs from around £30 to £50 per square metre in Kensington, depending on species, pattern complexity, and condition. Versailles panels and other geometric formats typically fall at the higher end because of the time required to sand them correctly without cross-grain marks.

Have a similar project? Call us on 020 88309782 or Book a Free Site Visit

Close
6  |   Aldgate  |   1 March 2025

Professional engineered wood floor fitting in Aldgate, E1. Our experienced fitters completed this installation to a high standard with clean edges and quality finishing throughout.

Case studies

Project Overview

This project involved the professional installation of engineered wood flooring at a property in Aldgate, E1. The client required a quality floor that would stand up to daily use and complement their interior. Our fitting team assessed the subfloor condition, carried out any necessary preparation work, and fitted the new floor to a high standard.

Before the Work

Prior to installation, the existing floor covering was inspected and the subfloor was prepared to ensure it was flat, dry, and suitable for the new engineered wood. Any existing floor covering was lifted and disposed of cleanly before the fitting work began.

Survey photos showing the floor condition before work:

Floor condition before work at E1 Floor condition before work at E1 Floor condition before work at E1

Our Approach

The following services were carried out as part of this project:

  • Engineered Flooring Installation
  • Lift Existing Flooring
  • Skirting Supply & Delivery

The Result

The completed engineered wood installation looked clean and finished throughout. Joins are tight, edges are neat, and the floor sits flat and stable. Beading and threshold strips were fitted where required to complete the job properly. The client was pleased with both the quality of the work and the appearance of the new floor.

Photos of the completed work:

Engineered Wood floor after fitting work in E1 Engineered Wood floor after fitting work in E1 Engineered Wood floor after fitting work in E1

Frequently Asked Questions

How long does engineered wood installation take?
Most fitting jobs are completed within one to two days. Larger areas or more detailed layouts such as herringbone patterns take longer due to the additional cutting and positioning involved.

Do I need underlay?
Yes, underlay is required for most floor types and helps with insulation, sound deadening, and levelling minor subfloor imperfections. We can supply and fit appropriate underlay as part of the installation.

How much does floor fitting cost in London?
Fitting costs typically range from £35 to £60 per square metre depending on floor type and complexity. We provide a full written quote before starting any work.

Have a similar project? Call us on 020 88309782 or Book a Free Site Visit

Close
5  |   Camden Town, Regents Park  |   1 March 2025

Experience the transformation of a space with expert engineered flooring installation in Camden Town. See how seamless craftsmanship creates a stylish, durable, and elegant finish.

Case studies
  • Engineered Wood Floor Installation 1
  • Engineered Wood Floor Installation 2
  • Engineered Wood Floor Installation 3
  • Engineered Wood Floor Installation 4
  • Engineered Wood Floor Installation 5

Project Overview

A residential property in Camden Town needed new flooring throughout several rooms. The existing floor was outdated and in poor condition, and the client had selected an engineered wood product to replace it. The brief included removing the old floor, preparing the subfloor, fitting the engineered boards, and completing all the finishing details: door frame trimming, beading along the walls, and thresholds at room transitions.

Engineered Wood Floor Installation 1

The Challenge

The rooms originally had an outdated and worn floor that no longer matched the desired aesthetic. The space lacked a smooth transition between areas, and the doors and frames required adjustments to accommodate the newly engineered flooring. Additionally, without proper beading and thresholds, the edges of the room felt unfinished.

To begin the transformation, we carefully assessed the space, ensuring the subfloor was suitable for engineered flooring installation. The door frames and doors needed trimming to ensure a perfect fit once the new floor was in place. Without these adjustments, the new flooring would not have lain flat, leading to an uneven and impractical finish.

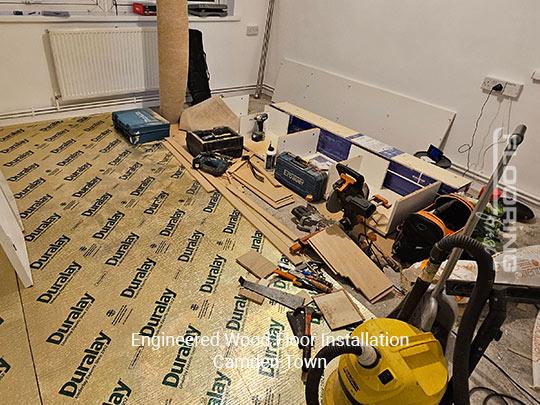
Camden Town properties are often older period buildings with subfloors that have settled unevenly over time. This one was no exception. Before any boards could go down, the subfloor had to be checked with a long straight-edge and any high spots ground back and low spots filled with a self-levelling compound.

Engineered Wood Floor Installation 2

Our Approach

Old flooring was carefully lifted and removed first. We checked for any damaged or soft sections in the subfloor and made repairs before proceeding. The self-levelling compound was mixed and poured, then left to set overnight.

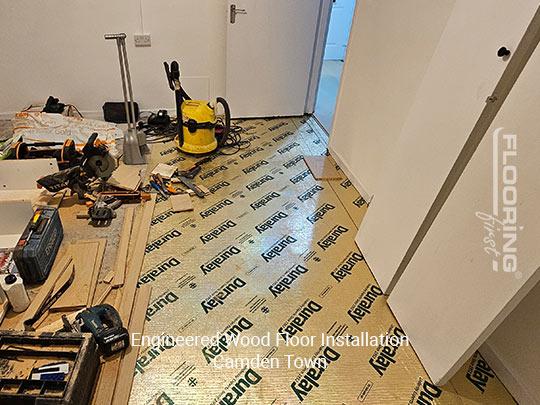
Door frames were undercut using a multi-tool with a flush-cut blade, with a spare board offcut used as a depth guide. This ensures the board slides neatly under the frame rather than butting against it, which gives a much cleaner look at doorways. The doors themselves were also trimmed to account for the new floor height.

Engineered boards were then laid floating over a foam underlay, starting from the most prominent wall and working across the room. Each row was staggered at least 300mm from the previous to avoid any H-joint pattern forming. Expansion gaps were maintained at all walls and fixed points.

Once the boards were down, Scotia beading was fitted around the perimeter to cover the expansion gaps. At doorways, transition thresholds were fitted to bridge the level change between rooms. All trims were colour-matched to the floor where possible.
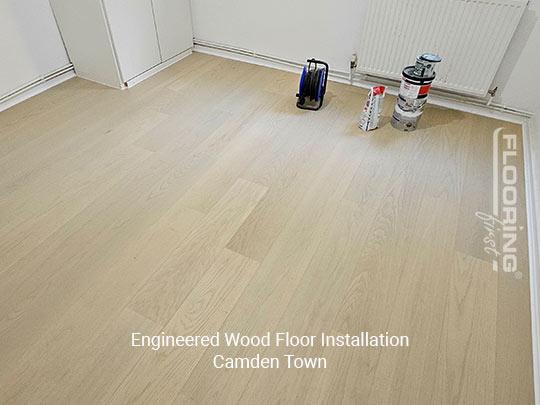
Engineered Wood Floor Installation 5

The Result

The engineered flooring installation completely revitalised the space. Each plank was carefully placed, ensuring a smooth and uniform appearance that improved the room's warmth and feel underfoot. The engineered wood provides a durable, practical foundation that suits everyday life while still looking good.

The doors and frames were trimmed to align perfectly with the new flooring height, creating clean transitions between rooms. Beading was installed along the edges, covering expansion gaps with a neat finish. Thresholds at room boundaries completed the job, giving a consistent and well-finished result throughout.

Frequently Asked Questions

How long does engineered floor installation take in a typical Camden Town flat?
A two-to-three bedroom flat typically takes two to three days: one day for subfloor preparation and one to two days for fitting, depending on the complexity of the layout and how many doorways, alcoves, or obstacles need working around.

Do door frames always need trimming when fitting new flooring?
Almost always, yes. Adding a new floor raises the height by the thickness of the board plus underlay, usually around 12 to 15mm. Without trimming the frames, you either leave an ugly gap at the doorway or the board cannot slide under and you lose the expansion gap. Undercutting the frames is standard practice and a clean way to handle it.

What does engineered floor fitting cost in Camden Town?
Fitting rates in North London typically run between £35 and £55 per square metre for labour only, not including materials. That covers subfloor preparation, laying, door trimming, beading, and thresholds. The board itself is a separate cost and varies widely by product.

Have a similar project? Call us on 020 88309782 or Book a Free Site Visit

Close
3  |   Wood Green  |   1 January 2025

Professional engineered wood floor fitting in Wood Green, N22. Our experienced fitters completed this installation to a high standard with clean edges and quality finishing throughout.

Case studies

Project Overview

This project involved the professional installation of engineered wood flooring at a property in Wood Green, N22. The client required a quality floor that would stand up to daily use and complement their interior. Our fitting team assessed the subfloor condition, carried out any necessary preparation work, and fitted the new floor to a high standard.

Before the Work

Prior to installation, the existing floor covering was inspected and the subfloor was prepared to ensure it was flat, dry, and suitable for the new engineered wood. Any existing floor covering was lifted and disposed of cleanly before the fitting work began.

Our Approach

The following services were carried out as part of this project:

  • Beading Installation (incl. materials)
  • Door Frame Trimming
  • Engineered Flooring Installation
  • Lift & Dispose Carpets or Laminates
  • Thresholds & Fitting (inc. materials)

The Result

The completed engineered wood installation looked clean and finished throughout. Joins are tight, edges are neat, and the floor sits flat and stable. Beading and threshold strips were fitted where required to complete the job properly. The client was pleased with both the quality of the work and the appearance of the new floor.

Photos of the completed work:

Engineered Wood floor after fitting work in N22 Engineered Wood floor after fitting work in N22 Engineered Wood floor after fitting work in N22

Frequently Asked Questions

How long does engineered wood installation take?
Most fitting jobs are completed within one to two days. Larger areas or more detailed layouts such as herringbone patterns take longer due to the additional cutting and positioning involved.

Do I need underlay?
Yes, underlay is required for most floor types and helps with insulation, sound deadening, and levelling minor subfloor imperfections. We can supply and fit appropriate underlay as part of the installation.

How much does floor fitting cost in London?
Fitting costs typically range from £35 to £60 per square metre depending on floor type and complexity. We provide a full written quote before starting any work.

Have a similar project? Call us on 020 88309782 or Book a Free Site Visit

Close
6  |   Chiswick  |   1 January 2025

Professional floor sanding and restoration in Chiswick, W4. Our team restored this parquet floor using dustless sanding equipment and quality finishes. The result is a clean, smooth surface that will last for years.

Case studies

Project Overview

This project involved the professional sanding and restoration of an existing wood floor at a property in Chiswick, W4. The floor had seen years of daily wear and was in need of attention to bring it back to a quality finish. Our team carried out a full assessment before starting work, checking for any boards that needed attention alongside the main sanding and finishing work.

Before the Work

Before work began, the floor showed typical signs of wear. Surface scratches, dull patches, and general finish deterioration were present. A thorough survey was carried out to plan the correct sanding depth, assess board condition, and choose the most appropriate finish for the space.

Survey photos showing the floor condition before work:

Floor condition before work at W4 Floor condition before work at W4 Floor condition before work at W4

Our Approach

The following services were carried out as part of this project:

  • Beading Installation (incl. materials)
  • Doors Plus Frame Trimming (per door)
  • Engineered - Sand, Buff & Lacquer
  • Lift & Dispose Carpets or Laminates
  • Parquet Floor Fitting - No Border
  • Subfloor Preparation (ply 9 mm)
  • Thresholds & Fitting (inc. materials)

The Result

Once the sanding and finishing process was complete, the floor was transformed. The wood grain was opened up and brought back to life, the surface was smooth and even, and the new finish provided lasting protection. The client was left with a floor that looked, and performed, as good as new.

Photos of the completed work:

Parquet floor after sanding work in W4 Parquet floor after sanding work in W4 Parquet floor after sanding work in W4

Frequently Asked Questions

How long does floor sanding take?
Most residential sanding jobs are completed in one to two days, depending on floor size and condition. Lacquering or oiling adds further drying and curing time, which we factor into the job schedule.

Do I need to vacate the property during sanding?
Modern dustless sanding equipment keeps dust to a minimum, but we recommend keeping pets and young children clear of the area during the work. Most clients remain in their property throughout.

How much does floor sanding cost in London?
Prices typically range from £25 to £45 per square metre depending on floor condition, finish type, and any repair work required. Gap filling and board replacement are priced separately if needed.

Have a similar project? Call us on 020 88309782 or Book a Free Site Visit

Close
3  |   Battersea, Clapham Junction  |   1 December 2024

Professional floor sanding and restoration in Battersea, SW11. Our team restored this wood floor floor using dustless sanding equipment and quality finishes. The result is a clean, smooth surface that will last for years.

Case studies

Project Overview

This project involved the professional sanding and restoration of an existing wood floor at a property in Battersea, SW11. The floor had seen years of daily wear and was in need of attention to bring it back to a quality finish. Our team carried out a full assessment before starting work, checking for any boards that needed attention alongside the main sanding and finishing work.

Before the Work

Before work began, the floor showed typical signs of wear. Surface scratches, dull patches, and general finish deterioration were present. A thorough survey was carried out to plan the correct sanding depth, assess board condition, and choose the most appropriate finish for the space.

Our Approach

The following services were carried out as part of this project:

  • Stairs - Sand & Seal

The Result

Once the sanding and finishing process was complete, the floor was transformed. The wood grain was opened up and brought back to life, the surface was smooth and even, and the new finish provided lasting protection. The client was left with a floor that looked, and performed, as good as new.

Photos of the completed work:

Wood Floor floor after sanding work in SW11 Wood Floor floor after sanding work in SW11 Wood Floor floor after sanding work in SW11

Frequently Asked Questions

How long does floor sanding take?
Most residential sanding jobs are completed in one to two days, depending on floor size and condition. Lacquering or oiling adds further drying and curing time, which we factor into the job schedule.

Do I need to vacate the property during sanding?
Modern dustless sanding equipment keeps dust to a minimum, but we recommend keeping pets and young children clear of the area during the work. Most clients remain in their property throughout.

How much does floor sanding cost in London?
Prices typically range from £25 to £45 per square metre depending on floor condition, finish type, and any repair work required. Gap filling and board replacement are priced separately if needed.

Have a similar project? Call us on 020 88309782 or Book a Free Site Visit

Close
3  |   Battersea, Clapham Junction  |   1 November 2024

Professional floor sanding and restoration in Battersea, SW11. Our team restored this wood floor using dustless sanding equipment and quality finishes. The result is a clean, smooth surface that will last for years.

Case studies

Project Overview

This project involved the professional sanding and restoration of an existing wood floor at a property in Battersea, SW11. The floor had seen years of daily wear and needed attention to restore its quality finish. Our team carried out a full assessment before starting work, checking for any boards that needed attention alongside the main sanding and finishing work.

Before the Work

Before work began, the floor showed typical signs of wear. Surface scratches, dull patches, and general finish deterioration were present. A thorough survey was carried out to plan the correct sanding depth, assess board condition, and choose the most appropriate finish for the space.

Our Approach

The following services were carried out as part of this project:

  • Skirting Board Removal

The Result

Once the sanding and finishing process was complete, the floor was transformed. The wood grain was opened up and brought back to life, the surface was smooth and even, and the new finish provided lasting protection. The client was left with a floor that looked, and performed, as good as new.

Photos of the completed work:

Wood Floor floor after sanding work in SW11 Wood Floor floor after sanding work in SW11 Wood Floor floor after sanding work in SW11

Frequently Asked Questions

How long does floor sanding take?
Most residential sanding jobs are completed in one to two days, depending on floor size and condition. Lacquering or oiling adds further drying and curing time, which we factor into the job schedule.

Do I need to vacate the property during sanding?
Modern dustless sanding equipment keeps dust to a minimum, but we recommend keeping pets and young children clear of the area during the work. Most clients remain in their property throughout.

How much does floor sanding cost in London?
Prices typically range from £25 to £45 per square metre depending on floor condition, finish type, and any repair work required. Gap filling and board replacement are priced separately if needed.

Have a similar project? Call us on 020 88309782 or Book a Free Site Visit

Close
2  |   Lewisham  |   1 October 2024

Professional parquet floor fitting in Lewisham, SE14. Our experienced fitters completed this installation to a high standard with clean edges and quality finishing throughout.

Case studies

Project Overview

This project involved the professional installation of parquet flooring at a property in Lewisham, SE14. The client required a quality floor that would stand up to daily use and complement their interior. Our fitting team assessed the subfloor condition, carried out any necessary preparation work, and fitted the new floor to a high standard.

Before the Work

Prior to installation, the existing floor covering was inspected and the subfloor was prepared to ensure it was flat, dry, and suitable for the new parquet. Any existing floor covering was lifted and disposed of cleanly before the fitting work began.

Our Approach

The following services were carried out as part of this project:

  • Parquet Floor Fitting - No Border

The Result

The completed parquet installation looked clean and finished throughout. Joins are tight, edges are neat, and the floor sits flat and stable. Beading and threshold strips were fitted where required to complete the job properly. The client was pleased with both the quality of the work and the appearance of the new floor.

Photos of the completed work:

Parquet floor after fitting work in SE14 Parquet floor after fitting work in SE14

Frequently Asked Questions

How long does parquet installation take?
Most fitting jobs are completed within one to two days. Larger areas or more detailed layouts such as herringbone patterns take longer due to the additional cutting and positioning involved.

Do I need underlay?
Yes, underlay is required for most floor types and helps with insulation, sound deadening, and levelling minor subfloor imperfections. We can supply and fit appropriate underlay as part of the installation.

How much does floor fitting cost in London?
Fitting costs typically range from £70 to £100 per square metre depending on floor type and complexity. We provide a full written quote before starting any work.

Have a similar project? Call us on 020 88309782 or Book a Free Site Visit

Close
3  |   Crystal Palace  |   1 October 2024

Professional floor sanding and restoration in Crystal Palace, SE19. Our team restored this laminate floor using dustless sanding equipment and quality finishes. The result is a clean, smooth surface that will last for years.

Case studies

Project Overview

This project involved the professional sanding and restoration of an existing wood floor at a property in Crystal Palace, SE19. The floor had seen years of daily wear and was in need of attention to bring it back to a quality finish. Our team carried out a full assessment before starting work, checking for any boards that needed attention alongside the main sanding and finishing work.

Before the Work

Before work began, the floor showed typical signs of wear. Surface scratches, dull patches, and general finish deterioration were present. A thorough survey was carried out to plan the correct sanding depth, assess board condition, and choose the most appropriate finish for the space.

Our Approach

The following services were carried out as part of this project:

  • Floorboards - Sand, Buff & Lacquer
  • Gap Filling
  • Lift Carpets or Laminates
  • Thresholds & Fitting (inc. materials)
  • Slivers for Wider Gaps Closing
  • Floorboards for Repairs/ Replacement

The Result

Once the sanding and finishing process was complete, the floor was transformed. The wood grain was opened up and brought back to life, the surface was smooth and even, and the new finish provided lasting protection. The client was left with a floor that looked, and performed, as good as new.

Photos of the completed work:

Laminate floor after sanding work in SE19 Laminate floor after sanding work in SE19 Laminate floor after sanding work in SE19

Frequently Asked Questions

How long does floor sanding take?
Most residential sanding jobs are completed in one to two days, depending on floor size and condition. Lacquering or oiling adds further drying and curing time, which we factor into the job schedule.

Do I need to vacate the property during sanding?
Modern dustless sanding equipment keeps dust to a minimum, but we recommend keeping pets and young children clear of the area during the work. Most clients remain in their property throughout.

How much does floor sanding cost in London?
Prices typically range from £25 to £45 per square metre depending on floor condition, finish type, and any repair work required. Gap filling and board replacement are priced separately if needed.

Have a similar project? Call us on 020 88309782 or Book a Free Site Visit

Close

  • 1
  • 2
  • 3
  • 4
  • 5
  • 6
  • 7
  • 8
  • 9
  • 10
  • 11
  • 12
  • 13
  • 14
  • 15
  • 16
  • 17
  • 18
  • 19
  • 20
  • 21
  • 22
  • 23
  • 24
  • 25
  • 26
  • 27
  • 28
  • 29
  • 30
  • 31
  • 32
  • 33
  • 34
  • 35
  • 36
  • 37
  • 38
  • 39
  • 40
  • 41
  • 42
  • 43
  • 44
  • 45
  • 46
  • 47
  • 48
  • 49
  • 50
  • 51
  • 52
  • 53
  • 54
  • 55
  • 56
  • 57
  • 58
  • 59
  • 60
  • 61
  • 62
  • 63
  • 64
  • 65
  • 66
  • 67
  • 68
  • 69
  • 70
  • 71
  • 72
  • 73
  • 74
  • 75
  • 76
  • 77

Have a similar project?

Call us on 020 88309782 or book a free site visit

Book Free Site Visit

Our Flooring Company

Contacts & Showroom Book Free Site Survey About Our Flooring Company Join Our Team Work as a Contractor

Service Information

Terms of Service Terms of Sales Deliveries & Charges Cookie Settings Returns Policy Privacy Policy

Help

FAQs Case Studies Sitemap Glossary
𝕏
FlooringFirst! Services
158 Coles Green Road
London, NW2 7HW
T: 020 88309782
Floor Sanding Services: Central London, East London, Near London, North London, Northwest London, Southeast London, Southwest London, West London
Wood Floor Installation Service: Central London, East London, Near London, North London, Northwest London, Southeast London, Southwest London, West London

  • Flooring Services
  • Floor Sanding
    • Wood Floor Staining
    • Wood Floor Gap Filling
    • Commercial Floor Sanding
    • Engineered Floor Sanding & Refinishing
  • Wood Floor Fitting
    • Parquet Floor Installation
    • Laminate Floor Installation
    • Engineered Wood Floor Installation - Supply & Fit
    • Solid Wood Floor Fitting - Supply & Fit
    • LVT Floor Installation - Supply & Fit
  • Floor Repairs
    • Parquet Floor Repair and Restoration
    • Engineered Wood Floor Repairs
    • Wood Floor Scratch Repair
    • Floorboards Replacement
  • Care & Maintenance
    • Re-Oiling & Recoating Oiled Floors
    • Vinyl & Linoleum Cleaning
    • Hardwood Floor Buffing
    • Wood Floor Polishing
  • Shop
  • Shop
  • Gallery
  • Service Guide
  • Bookings
  • Book Free Survey
  • Service Advice
  • Product Advice