Floor Sanding & Fitting
Book Free Visit Price Guide 020 88309782
Monday - Friday 07:30 - 17:30, Saturday 07:30 - 16:00
cs@flooringfirst.co.uk
020 88309782
Monday - Friday 07:30 - 17:30, Saturday 07:30 - 16:00
cs@flooringfirst.co.uk
  • Book Free Visit
  • Home
  • Floor Sanding
  • Floor Fitting
  • Floor Repairs
  • Aftercare
    • Wooden Floors
    • Cleaning & Polishing
    • Re-Oiling Wooden Floors
    • Vinyls & Linoleum
    • Vinyl Floor Polishing
    • Get a Quote...
  • For Businesses
  • Gallery
  • Service Guide
  • Shop
  • Book Free Visit

See Few Examples of Our Works

Floor Sanding, Solid, Parquet & Laminate Floor Fitting

Gallery

See Our Floor Works

WHY CHOOSE US
CASE STUDIES
PRICE GUIDE
OFFERS
GALLERY
ASK EXPERT
WHY CHOOSE US
CASE STUDIES
PRICE GUIDE
OFFERS
GALLERY
ASK EXPERT

Floor Sanding & Fitting Project Gallery

All Projects Renovations Installations

6  |   Southwark  |   1 July 2021

Professional engineered wood floor fitting in Southwark, SE1. Our experienced fitters completed this installation to a high standard with clean edges and quality finishing throughout.

Case studies

Project Overview

This project involved the professional installation of engineered wood flooring at a property in Southwark, SE1. The client required a quality floor that would stand up to daily use and complement their interior. Our fitting team assessed the subfloor condition, carried out any necessary preparation work, and fitted the new floor to a high standard.

Before the Work

Prior to installation, the existing floor covering was inspected and the subfloor was prepared to ensure it was flat, dry, and suitable for the new engineered wood. Any existing floor covering was lifted and disposed of cleanly before the fitting work began.

Survey photos showing the floor condition before work:

Floor condition before work at SE1 Floor condition before work at SE1 Floor condition before work at SE1

Our Approach

The following services were carried out as part of this project:

  • Beading Installation (incl. materials)
  • Doors Plus Frame Trimming (per door)
  • Engineered Flooring Installation
  • Thresholds & Fitting (inc. materials)
  • Radiator Cover Trimming

The Result

The completed engineered wood installation looked clean and finished throughout. Joins are tight, edges are neat, and the floor sits flat and stable. Beading and threshold strips were fitted where required to complete the job properly. The client was pleased with both the quality of the work and the appearance of the new floor.

Photos of the completed work:

Engineered Wood floor after fitting work in SE1 Engineered Wood floor after fitting work in SE1 Engineered Wood floor after fitting work in SE1

Frequently Asked Questions

How long does engineered wood installation take?
Most fitting jobs are completed within one to two days. Larger areas or more detailed layouts such as herringbone patterns take longer due to the additional cutting and positioning involved.

Do I need underlay?
Yes, underlay is required for most floor types and helps with insulation, sound deadening, and levelling minor subfloor imperfections. We can supply and fit appropriate underlay as part of the installation.

How much does floor fitting cost in London?
Fitting costs typically range from £35 to £60 per square metre depending on floor type and complexity. We provide a full written quote before starting any work.

Have a similar project? Call us on 020 88309782 or Book a Free Site Visit

Close
6  |   Hackney  |   1 July 2021

Professional floor sanding and restoration in Hackney, N1. Our team restored this parquet floor using dustless sanding equipment and quality finishes. The result is a clean, smooth surface that will last for years.

Case studies

Project Overview

This project involved the professional sanding and restoration of an existing wood floor at a property in Hackney, N1. The floor had seen years of daily wear and was in need of attention to bring it back to a quality finish. Our team carried out a full assessment before starting work, checking for any boards that needed attention alongside the main sanding and finishing work.

Before the Work

Before work began, the floor showed typical signs of wear. Surface scratches, dull patches, and general finish deterioration were present. A thorough survey was carried out to plan the correct sanding depth, assess board condition, and choose the most appropriate finish for the space.

Survey photos showing the floor condition before work:

Floor condition before work at N1 Floor condition before work at N1 Floor condition before work at N1

Our Approach

The following services were carried out as part of this project:

  • Gap Filling
  • Parquet - Sand, Buff & Lacquer
  • Elka Stoney Oak Aqua Protect Laminate Flooring, 12mm
  • Tile removal

The Result

Once the sanding and finishing process was complete, the floor was transformed. The wood grain was opened up and brought back to life, the surface was smooth and even, and the new finish provided lasting protection. The client was left with a floor that looked, and performed, as good as new.

Photos of the completed work:

Parquet floor after sanding work in N1 Parquet floor after sanding work in N1 Parquet floor after sanding work in N1

Frequently Asked Questions

How long does floor sanding take?
Most residential sanding jobs are completed in one to two days, depending on floor size and condition. Lacquering or oiling adds further drying and curing time, which we factor into the job schedule.

Do I need to vacate the property during sanding?
Modern dustless sanding equipment keeps dust to a minimum, but we recommend keeping pets and young children clear of the area during the work. Most clients remain in their property throughout.

How much does floor sanding cost in London?
Prices typically range from £25 to £45 per square metre depending on floor condition, finish type, and any repair work required. Gap filling and board replacement are priced separately if needed.

Have a similar project? Call us on 020 88309782 or Book a Free Site Visit

Close
4  |   Kingston  |   1 July 2021

Professional floor sanding and restoration in Kingston Upon Thames, KT2. Our team restored this hardwood floor using dustless sanding equipment and quality finishes. The result is a clean, smooth surface that will last for years.

Case studies

Project Overview

This project involved the professional sanding and restoration of an existing wood floor at a property in Kingston Upon Thames, KT2. The floor had seen years of daily wear and was in need of attention to bring it back to a quality finish. Our team carried out a full assessment before starting work, checking for any boards that needed attention alongside the main sanding and finishing work.

Before the Work

Before work began, the floor showed typical signs of wear. Surface scratches, dull patches, and general finish deterioration were present. A thorough survey was carried out to plan the correct sanding depth, assess board condition, and choose the most appropriate finish for the space.

Survey photos showing the floor condition before work:

Floor condition before work at KT2 Floor condition before work at KT2 Floor condition before work at KT2

Our Approach

The following services were carried out as part of this project:

  • Hardwood - Sand, Buff & Lacquer
  • Furniture Moving ( one way only)

The Result

Once the sanding and finishing process was complete, the floor was transformed. The wood grain was opened up and brought back to life, the surface was smooth and even, and the new finish provided lasting protection. The client was left with a floor that looked, and performed, as good as new.

Photos of the completed work:

Hardwood floor after sanding work in KT2 Hardwood floor after sanding work in KT2 Hardwood floor after sanding work in KT2

Frequently Asked Questions

How long does floor sanding take?
Most residential sanding jobs are completed in one to two days, depending on floor size and condition. Lacquering or oiling adds further drying and curing time, which we factor into the job schedule.

Do I need to vacate the property during sanding?
Modern dustless sanding equipment keeps dust to a minimum, but we recommend keeping pets and young children clear of the area during the work. Most clients remain in their property throughout.

How much does floor sanding cost in London?
Prices typically range from £25 to £45 per square metre depending on floor condition, finish type, and any repair work required. Gap filling and board replacement are priced separately if needed.

Have a similar project? Call us on 020 88309782 or Book a Free Site Visit

Close
1  |   Mill Hill  |   1 July 2021

Professional floor sanding and restoration in Mill Hill, NW7. Our team restored this hardwood floor using dustless sanding equipment and quality finishes. The result is a clean, smooth surface that will last for years.

Case studies

Project Overview

This project involved the professional sanding and restoration of an existing wood floor at a property in Mill Hill, NW7. The floor had seen years of daily wear and was in need of attention to bring it back to a quality finish. Our team carried out a full assessment before starting work, checking for any boards that needed attention alongside the main sanding and finishing work.

Before the Work

Before work began, the floor showed typical signs of wear. Surface scratches, dull patches, and general finish deterioration were present. A thorough survey was carried out to plan the correct sanding depth, assess board condition, and choose the most appropriate finish for the space.

Survey photos showing the floor condition before work:

Floor condition before work at NW7

Our Approach

The following services were carried out as part of this project:

  • Furniture Moving
  • Hardwood - Sand, Buff & Lacquer

The Result

Once the sanding and finishing process was complete, the floor was transformed. The wood grain was opened up and brought back to life, the surface was smooth and even, and the new finish provided lasting protection. The client was left with a floor that looked, and performed, as good as new.

Photos of the completed work:

Hardwood floor after sanding work in NW7 Hardwood floor after sanding work in NW7 Hardwood floor after sanding work in NW7

Frequently Asked Questions

How long does floor sanding take?
Most residential sanding jobs are completed in one to two days, depending on floor size and condition. Lacquering or oiling adds further drying and curing time, which we factor into the job schedule.

Do I need to vacate the property during sanding?
Modern dustless sanding equipment keeps dust to a minimum, but we recommend keeping pets and young children clear of the area during the work. Most clients remain in their property throughout.

How much does floor sanding cost in London?
Prices typically range from £25 to £45 per square metre depending on floor condition, finish type, and any repair work required. Gap filling and board replacement are priced separately if needed.

Have a similar project? Call us on 020 88309782 or Book a Free Site Visit

Close
7  |   Romford  |   1 July 2021

Professional gap filling and refitting of the loose seasoned pine parquet blocks brought back this beautiful parquet floor in Romford to its initial glory and timeless elegance, while the sanding and refinishing services ensure lasting protection and improved appearance.

Case studies
  • Parquet floor refitting, sanding and gap filling in Romford
  • Parquet floor refitting, sanding and gap filling in Romford 1
  • Parquet floor refitting, sanding and gap filling in Romford 2
  • Parquet floor refitting, sanding and gap filling in Romford 3
  • Parquet floor refitting, sanding and gap filling in Romford 4
  • Parquet floor refitting, sanding and gap filling in Romford 5
  • Parquet floor refitting, sanding and gap filling in Romford 6

Project Overview

This Romford property had a traditional pine parquet floor that had seen many decades of use. The overall pattern was intact and the wood itself was in reasonable condition, but closer inspection showed loose blocks, gaps between sections and a tired, heavily worn finish. Rather than ripping it out, the owners sensibly opted for a full restoration: re-gluing the loose blocks, filling the gaps and sanding and refinishing the surface. Parquet restoration typically falls in the higher end of the sanding price range at around £70-100 per square metre, but it is almost always better value than replacement given the character of original parquet floors.

Parquet floor before restoration in Romford

The Challenge

Parquet floors present several challenges that solid plank floors do not. First, the blocks are laid in directional patterns, which means you cannot sand straight down the room in one direction. Sanding across the grain damages the surface, so parquet requires multiple diagonal and cross-grain passes with careful feathering at each stage. Second, loose blocks have to be identified and re-glued before any sanding takes place, because a block that lifts mid-sand can cause serious damage to the machine and uneven results. Third, the gaps in this floor were at different stages, some small and tight, others wide enough to trap debris. A uniform fill was needed that would blend with the rest of the surface after sanding.

Parquet floor showing gaps and loose blocks before work begins

Our Approach

Block inspection and re-gluing. We worked across the entire floor systematically, pressing each block to identify loose ones. Loose blocks were carefully lifted where necessary, the old adhesive was cleaned from the subfloor, and fresh flooring adhesive was used to refix them. Any blocks that were split or beyond saving were replaced with matching pine stock.

Gap filling. Once all blocks were secure and the adhesive had cured, we mixed a filler of natural resin and wood dust. This mixture remains slightly flexible when dry, which means it contracts and expands with the wood rather than cracking away from the edges. Using the sanding dust from the floor itself ensures the colour match is as close as possible.

Multi-pass sanding. The floor was sanded in several stages, starting with a coarser grit to remove the old finish and surface imperfections, then progressing to medium and fine grits to achieve a smooth, uniform surface. We worked diagonally across the herringbone pattern and used edging machines and corners scrapers to reach the areas the drum sander cannot access.

Refinishing. Two coats of a durable finish were applied to seal the floor and protect it from further wear.
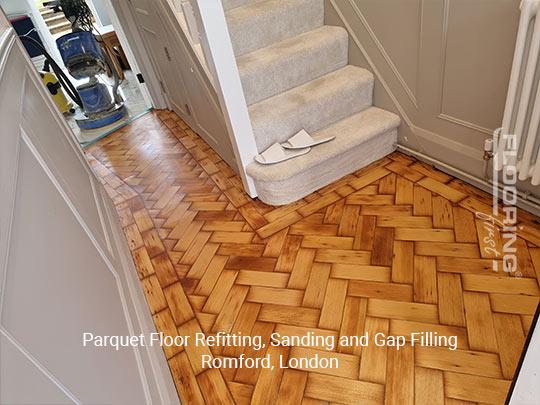
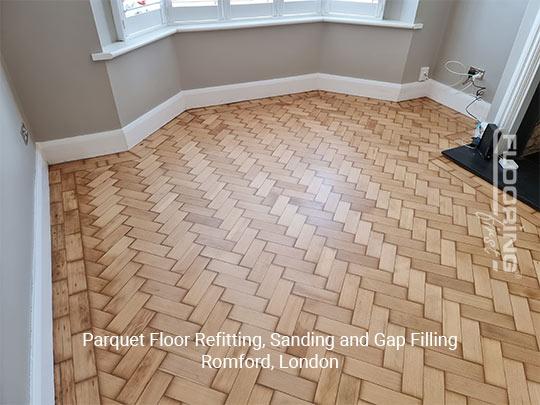
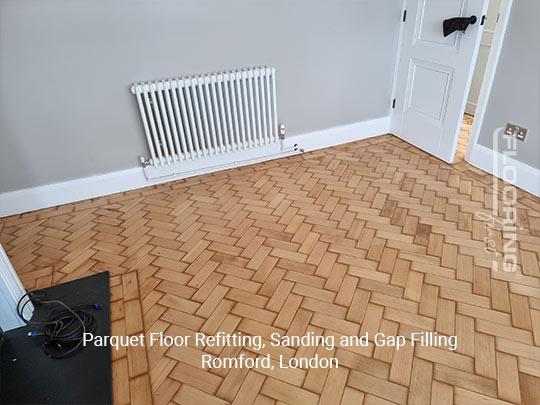
Parquet floor during sanding in Romford

The Result

The finished floor looked completely different to the one we started with. Every trace of the old worn finish was gone, the blocks sat level and tight with no movement, and the gaps had been filled to an almost invisible finish. The natural warmth and pattern of the pine parquet came back fully once the new finish was applied. This floor will now last many more decades with normal maintenance.

Frequently Asked Questions

How long does parquet floor restoration take?
A typical residential parquet floor of around 20-40 square metres takes two to three days, allowing for drying time between the gap fill and the final finish coats.

What is used to fill the gaps in parquet floors?
We mix a paste of natural wood resin and sawdust collected during sanding. This gives a colour-matched, flexible filler that does not shrink or crack when the floor moves seasonally.

Is it worth restoring old parquet rather than replacing it?
Almost always yes. Original parquet, particularly in older London homes, is often made from better-quality wood than modern equivalents and has a character that is hard to replicate. Restoration costs a fraction of replacement and the results can be remarkable.

Have a similar project? Call us on 020 88309782 or Book a Free Site Visit

Close
8  |   Lewisham  |   1 July 2021

Check out the amazing results our wood flooring professionals achieved for this worn and damaged wooden floor in Lewisham. Floorboards repair, renovation, gap filling and refinishing can truly do wonders when performed by experienced specialists.

Case studies
  • Floorboards repair, gap filling and sanding in Lewisham
  • Floorboards repair, gap filling and sanding in Lewisham 1
  • Floorboards repair, gap filling and sanding in Lewisham 2
  • Floorboards repair, gap filling and sanding in Lewisham 3
  • Floorboards repair, gap filling and sanding in Lewisham 4
  • Floorboards repair, gap filling and sanding in Lewisham 5
  • Floorboards repair, gap filling and sanding in Lewisham 6
  • Floorboards repair, gap filling and sanding in Lewisham 7

Project Overview

This solid wood floor in Lewisham had been in place for many years and showed the typical signs of age and heavy use. Several boards were beyond repair, gaps had opened between others, and the finish across the whole floor was severely worn. The job required a combination of board replacement, gap filling and a full sand and refinish to bring the floor back to a usable, attractive condition. Projects like this, which combine structural repair with cosmetic restoration, are good examples of why early professional assessment saves money in the long run. Sanding costs in London typically run from £25 to £45 per square metre depending on the condition of the floor and what prep work is needed.

Worn floorboards in Lewisham before repair and sanding

The Challenge

The most time-consuming part of this project was sourcing replacement boards that would blend with the original floor. Real wood floors in older properties are often made from timber that is no longer readily available in standard dimensions, so finding a match requires working with specialist suppliers and sometimes accepting a slight variation in width or colour that will even out after sanding. The structural condition of the subfloor also needed checking before any new boards went down. Once replacement was done, the transitions between old and new boards had to be sanded smooth so no ridge was left visible. Additionally, the gaps were varied in size from hairline to several millimetres, each requiring a different approach to filling.

Floorboards showing gaps and damage in Lewisham

Our Approach

Board assessment and replacement. We walked the floor carefully to identify every damaged or unsound board. Boards that had split, cracked severely or could not be re-secured were lifted, and new boards of a matching species and thickness were cut and fitted. Nail holes from the old boards were filled.

Gap filling. The gaps were filled using a resin and sawdust compound mixed to match the existing floor colour. Larger gaps were built up in stages to avoid shrinkage. Once dry and cured, the filler was level with the surrounding boards.

Progressive sanding. The floor was sanded in multiple passes, starting with a medium grit to remove the old finish and flatten any transitions between old and new boards, then moving to fine grits to produce a smooth, consistent surface across the whole floor.

Finishing. Two coats of a hard-wearing lacquer were applied to seal and protect the surface. The lacquer brings out the colour of the wood and provides a durable barrier against everyday wear.

Floorboards being sanded in Lewisham during restoration

The Result

The floor came out looking uniform and fresh. The new boards blended well once sanded and finished, and the gap-filled areas were barely detectable. The owners now have a solid, stable floor with a proper protective finish that will stand up well to daily life. The whole restoration was significantly cheaper than replacing the floor with new timber.

Frequently Asked Questions

How do you match replacement boards to an old floor?
We work with a network of specialist timber suppliers who stock reclaimed and reproduction boards in period dimensions. Sanding the whole floor after fitting new boards helps blend old and new by giving everything a uniform colour and finish.

Can all gaps in floorboards be filled?
Most gaps can be filled effectively with a resin and wood dust mixture. Very wide gaps, usually those over about 8mm, may need a pine sliver rather than filler paste to give a stable, long-lasting result.

How long does a sanding and repair job take on an average room?
A single room of 15-25 square metres with board replacements and gap filling usually takes two days: one day for the structural work and the fill to cure, and a second day for sanding and finishing.

Have a similar project? Call us on 020 88309782 or Book a Free Site Visit

Close
11  |   Hampstead  |   1 July 2021

Parquet floors need some in-depth care and attention, so you are able to enjoy their timeless beauty and durability for many decades. For this Hampstead project, we filled all gaps of the floor to improve its stability and durability, and re-sanded and refinished the surface of the floor for a flawless look and condition.

Case studies
  • Parquet floor sanding, refinishing and gap filling in Hampstead
  • Parquet floor sanding, refinishing and gap filling in Hampstead 1
  • Parquet floor sanding, refinishing and gap filling in Hampstead 2
  • Parquet floor sanding, refinishing and gap filling in Hampstead 3
  • Parquet floor sanding, refinishing and gap filling in Hampstead 4
  • Parquet floor sanding, refinishing and gap filling in Hampstead 5
  • Parquet floor sanding, refinishing and gap filling in Hampstead 6
  • Parquet floor sanding, refinishing and gap filling in Hampstead 7
  • Parquet floor sanding, refinishing and gap filling in Hampstead 8
  • Parquet floor sanding, refinishing and gap filling in Hampstead 9
  • Parquet floor sanding, refinishing and gap filling in Hampstead 10

Project Overview

A beautiful parquet floor in Hampstead had developed a number of problems that needed addressing. The finish was heavily worn, gaps had appeared across the block pattern, and the overall surface looked dull and tired. The owners had owned the property for several years and wanted to restore the floor to its original standard before redecorating. Parquet floors in Hampstead properties are often original to the house and made from quality hardwood, so restoration is nearly always the right choice. Professional parquet sanding in London typically costs in the region of £70 to £100 per square metre due to the additional skill and time required compared to a standard plank floor.

Parquet floor before sanding and restoration in Hampstead

The Challenge

Parquet floors are sanded differently to straight-plank floors because the blocks run in multiple directions to form the pattern. Sanding always has to follow the grain; otherwise the cross-grain scratching left by the machine becomes visible under the finish. On a herringbone or basket-weave pattern, achieving a consistent, scratch-free surface requires diagonal sanding passes at specific angles, careful edging around the perimeter, and detailed hand scraping in tight spots. The gap filling on this floor also required more attention than usual because the gaps were not uniform, varying in width depending on where the floor had contracted most. Each section had to be filled to the right level without overfilling.

Parquet floor gaps visible before treatment in Hampstead

Our Approach

Full floor inspection. Before any sanding, we checked every block for looseness and the subfloor for any soft spots or movement. All loose blocks were re-glued and left to cure before we moved on.

Gap filling with resin mixture. We mixed natural resin with the fine dust generated during the first sanding pass to produce a filler that closely matched the floor colour. The filler was pressed firmly into each gap, allowed to cure fully, then lightly sanded flush with the surface.

Multi-stage sanding. The floor was sanded in three stages using progressively finer grits. The initial passes worked diagonally across the pattern to remove the old finish and any deeper surface imperfections. Subsequent passes followed closer to the grain direction to eliminate any cross-scratch marks. Edge sanding and hand scraping completed the perimeter.

Lacquer finish application. At the client's request, two coats of a high-quality lacquer were applied. Lacquer was chosen for its durability and the clean, clear finish it gives to a classic parquet pattern.

Parquet floor detail before sanding in Hampstead

The Result

The restored floor was a significant improvement on what we arrived to. The old, dull finish was completely removed, the gaps were invisible, and the lacquer brought out the full depth of colour in the hardwood blocks. The pattern looked crisp and precise once the surface was flat and uniformly finished. The owners were very pleased with the result, and the floor now sits at the heart of a freshly redecorated room looking exactly as it should.

Frequently Asked Questions

Why does parquet sanding cost more than sanding a straight-plank floor?
Parquet requires multiple sanding angles rather than one straight pass, takes longer per square metre, and demands more experience to avoid visible cross-grain scratching. The additional time and skill involved accounts for the higher rate.

How many times can a parquet floor be sanded in its lifetime?
This depends on the thickness of the blocks. Solid parquet blocks are typically 22mm thick, and each full sand removes around 0.5 to 1mm of wood, so a well-maintained parquet floor can be sanded many times before the blocks become too thin.

Is lacquer or oil a better finish for parquet?
Both work well. Lacquer gives a harder, more durable surface film that is good for high-traffic rooms. Oil gives a more natural look and feel and is easier to spot-repair, but needs re-applying more regularly. The choice comes down to preference and how much maintenance the owner wants to carry out.

Have a similar project? Call us on 020 88309782 or Book a Free Site Visit

Close
8  |   Wandsworth  |   1 July 2021

Professional wood floor sanding and refinishing bring every hardwood floor back to its initial glory and durability and remove all traces of wear and use. Additional gap filling treatment improved the stability of this significantly Wandsworth floor.

Case studies
  • Wood floor sanding, refinishing and gap filling in Wandsworth
  • Wood floor sanding, refinishing and gap filling in Wandsworth 1
  • Wood floor sanding, refinishing and gap filling in Wandsworth 2
  • Wood floor sanding, refinishing and gap filling in Wandsworth 3
  • Wood floor sanding, refinishing and gap filling in Wandsworth 4
  • Wood floor sanding, refinishing and gap filling in Wandsworth 5
  • Wood floor sanding, refinishing and gap filling in Wandsworth 6
  • Wood floor sanding, refinishing and gap filling in Wandsworth 7

Project Overview

This hardwood floor in Wandsworth had been in the property for many years and was showing the typical signs of age: gaps between the boards, a worn and scratched finish, and a generally tired appearance. The owners wanted the floor brought back to a proper standard without replacement, which is a very sensible approach for solid hardwood. A good sanding and refinishing job on a solid wood floor will take it back to brand-new condition, and the floor can be sanded multiple times over its lifetime. Professional floor sanding in London is priced from around £25 to £45 per square metre, with gap filling usually charged on top depending on the extent of the work needed.

Hardwood floor before sanding in Wandsworth showing wear and gaps

The Challenge

The main concern on this floor was the gap situation. Several boards had contracted noticeably, leaving visible gaps of between 3mm and 6mm that were affecting the stability and insulation of the floor and were also collecting dust and dirt. Gaps in a hardwood floor are not just cosmetic; they can allow draughts from below, reduce the thermal performance of the floor and, if left untreated, allow moisture to get in from underneath. The gaps also needed to be filled before sanding, because the filler cures best into a stable, untouched surface rather than on freshly sanded wood. Getting the sequence right was important for a long-lasting result.

Hardwood floor gaps visible before gap filling in Wandsworth

Our Approach

Initial inspection and preparation. We checked the whole floor for loose or squeaking boards and secured any that needed it before starting. Squeaking boards cause problems during sanding because they can shift slightly under the machine and leave uneven patches.

Pine sliver gap filling. For the larger gaps, we used pine slivers cut and planed to fit precisely. Pine slivers give a far more stable and durable result than filler paste in wide gaps, and they move naturally with the wood as seasons change. Smaller gaps were filled with the standard resin and wood dust mixture.

Sanding sequence. Starting with a heavy belt sander for the main area and progressing through medium and fine grits, we worked the entire floor to a smooth, even finish. The edging machine and corner scraper then dealt with the perimeter.

Lacquer application. Two coats of a high-quality clear lacquer were applied, with a light flat and buff between coats to ensure a smooth, durable final surface.

Sanding the hardwood floor in Wandsworth

The Result

The finished floor was completely transformed. All the gaps had been eliminated, the surface was smooth and uniform throughout, and the lacquer finish gave the wood a rich, clear appearance that highlighted the natural grain. The floor felt noticeably more solid underfoot than before, and the draught issue was resolved. The owners were left with a floor that looks new and will continue to look good with routine care for many years ahead.

Frequently Asked Questions

Do gaps in a hardwood floor always need filling before sanding?
It is generally recommended to fill gaps before the final sanding pass. Filling before sanding allows the filler to be sanded flush with the boards in the same operation, which gives a cleaner result than trying to fill a freshly sanded surface.

How are wide gaps in a hardwood floor filled?
For gaps wider than about 4mm, we cut and fit pine slivers to size. These are glued in place and, once the adhesive cures, planed or sanded flush with the rest of the floor. This method is far more durable than filler paste in wide gaps.

How long will the lacquer finish last?
In a residential property with normal use, a good quality lacquer finish will last several years before showing significant wear. High-traffic areas like hallways may need a re-coat sooner, but the finish can be re-applied without a full sand if it is done before the lacquer wears through to the bare wood.

Have a similar project? Call us on 020 88309782 or Book a Free Site Visit

Close
14  |   Kensington  |   1 July 2021

Breathe new life to the wooden surfaces in your home like flooring and stairs with the help of professional sanding and refinishing services. This Kensington project is evidence of how dramatic the changes and improvements are when professionals ensure flawless performance.

Case studies
  • Hardwood floor and stairs sanding and refinishing in Kensington
  • Hardwood floor and stairs sanding and refinishing in Kensington 1
  • Hardwood floor and stairs sanding and refinishing in Kensington 2
  • Hardwood floor and stairs sanding and refinishing in Kensington 3
  • Hardwood floor and stairs sanding and refinishing in Kensington 4
  • Hardwood floor and stairs sanding and refinishing in Kensington 5
  • Hardwood floor and stairs sanding and refinishing in Kensington 6
  • Hardwood floor and stairs sanding and refinishing in Kensington 7
  • Hardwood floor and stairs sanding and refinishing in Kensington 8
  • Hardwood floor and stairs sanding and refinishing in Kensington 9
  • Hardwood floor and stairs sanding and refinishing in Kensington 10
  • Hardwood floor and stairs sanding and refinishing in Kensington 11
  • Hardwood floor and stairs sanding and refinishing in Kensington 12
  • Hardwood floor and stairs sanding and refinishing in Kensington 13

Project Overview

This Kensington property had a substantial hardwood floor throughout the main reception areas along with a wooden staircase running to the upper floors. Both the floor and the stairs had been in the property for many years and were suffering from heavy wear, deep scratches and a finish that had long since given up providing any meaningful protection. Taking on both the floor and the stairs in a single visit meant minimal disruption for the owners and a consistent final appearance throughout. Sanding and refinishing in a high-value London property is always worthwhile because the quality of the underlying wood usually justifies the investment.

Hardwood floor before sanding in Kensington showing wear

The Challenge

The floor itself presented a fairly standard sanding job, but the staircase added significant complexity. Wooden stairs experience more concentrated wear than a floor because every footstep lands on roughly the same spot on each tread. The nosings were particularly worn, with deep grooves in some areas. Sanding stairs requires a completely different set of equipment to floor sanding: smaller drum sanders for the treads, detail sanders and scrapers for the corners and risers, and careful hand work around the spindles and newel posts. Getting an even result across both the horizontal treads and the vertical risers, while working around the staircase fittings, is time-consuming but important for a quality finish.

Wooden stairs before sanding in Kensington

Our Approach

Structural check. Before any sanding, we tested every tread for movement or squeaking and secured any that needed attention. Loose treads create an uneven surface under the sanding machine and can be a safety issue once the refinishing is complete.

Floor sanding. The floor was sanded in the standard sequence of progressively finer grits, from heavy belt sanding to remove the old finish and deep scratches, through to fine finishing passes. Edging and corners were completed by hand.

Stair sanding. Each tread and riser was sanded individually using appropriate equipment. The nosings, which were the most worn elements, required careful grading to achieve an even surface without creating a visible step between the worn centre and the less-worn edges.

Lacquer application on both surfaces. Two coats of lacquer were applied to the floor and the stairs. The lacquer was allowed to cure fully between coats, and a light buff between applications ensured a very smooth final film.

Sanding in progress on hardwood floor in Kensington

The Result

The transformation across the whole ground floor was significant. The floor and stairs now matched in finish and colour, giving the space a coherent and well-maintained look. All the deep scratches and worn patches on the treads had been removed, and the lacquer finish gave both surfaces a clear, durable protective coating. The owners were delighted with how the floor and staircase looked together, and the property as a whole benefited from the work.

Frequently Asked Questions

Can wooden stairs be sanded at the same time as the floor?
Yes, and it is usually more efficient to do both in one visit. The same crew and equipment can be used for both, and having a single finish applied across floor and stairs gives a much more consistent result than tackling them at different times.

How long does it take to sand and refinish a flight of stairs?
A standard straight staircase of 12 to 14 treads typically takes a full day to sand and finish properly, assuming the risers and spindle areas are included. The lacquer will then need 24 to 48 hours to harden before the stairs can be walked on.

What finish is best for wooden stairs?
Lacquer is generally the most practical choice for stairs because of its hardness and resistance to concentrated wear. It can take a heavier footfall than oil without showing wear as quickly, which matters a lot on a staircase used by the whole household every day.

Have a similar project? Call us on 020 88309782 or Book a Free Site Visit

Close
4  |   Wandsworth  |   1 June 2021

Professional engineered wood floor fitting in Wandsworth, SW17. Our experienced fitters completed this installation to a high standard with clean edges and quality finishing throughout.

Case studies

Project Overview

This project involved the professional installation of engineered wood flooring at a property in Wandsworth, SW17. The client required a quality floor that would stand up to daily use and complement their interior. Our fitting team assessed the subfloor condition, carried out any necessary preparation work, and fitted the new floor to a high standard.

Before the Work

Prior to installation, the existing floor covering was inspected and the subfloor was prepared to ensure it was flat, dry, and suitable for the new engineered wood. Any existing floor covering was lifted and disposed of cleanly before the fitting work began.

Survey photos showing the floor condition before work:

Floor condition before work at SW17

Our Approach

The following services were carried out as part of this project:

  • Beading Installation (incl. materials)
  • Doors Plus Frame Trimming (per door)
  • Engineered Flooring Installation
  • Thresholds & Fitting (inc. materials)

The Result

The completed engineered wood installation looked clean and finished throughout. Joins are tight, edges are neat, and the floor sits flat and stable. Beading and threshold strips were fitted where required to complete the job properly. The client was pleased with both the quality of the work and the appearance of the new floor.

Photos of the completed work:

Engineered Wood floor after fitting work in SW17 Engineered Wood floor after fitting work in SW17 Engineered Wood floor after fitting work in SW17

Frequently Asked Questions

How long does engineered wood installation take?
Most fitting jobs are completed within one to two days. Larger areas or more detailed layouts such as herringbone patterns take longer due to the additional cutting and positioning involved.

Do I need underlay?
Yes, underlay is required for most floor types and helps with insulation, sound deadening, and levelling minor subfloor imperfections. We can supply and fit appropriate underlay as part of the installation.

How much does floor fitting cost in London?
Fitting costs typically range from £35 to £60 per square metre depending on floor type and complexity. We provide a full written quote before starting any work.

Have a similar project? Call us on 020 88309782 or Book a Free Site Visit

Close

  • 1
  • 2
  • 3
  • 4
  • 5
  • 6
  • 7
  • 8
  • 9
  • 10
  • 11
  • 12
  • 13
  • 14
  • 15
  • 16
  • 17
  • 18
  • 19
  • 20
  • 21
  • 22
  • 23
  • 24
  • 25
  • 26
  • 27
  • 28
  • 29
  • 30
  • 31
  • 32
  • 33
  • 34
  • 35
  • 36
  • 37
  • 38
  • 39
  • 40
  • 41
  • 42
  • 43
  • 44
  • 45
  • 46
  • 47
  • 48
  • 49
  • 50
  • 51
  • 52
  • 53
  • 54
  • 55
  • 56
  • 57
  • 58
  • 59
  • 60
  • 61
  • 62
  • 63
  • 64
  • 65
  • 66
  • 67
  • 68
  • 69
  • 70
  • 71
  • 72
  • 73
  • 74
  • 75
  • 76
  • 77
  • 78

Have a similar project?

Call us on 020 88309782 or book a free site visit

Book Free Site Visit

Our Flooring Company

Contacts & Showroom Book Free Site Survey About Our Flooring Company Join Our Team Work as a Contractor

Service Information

Terms of Service Terms of Sales Deliveries & Charges Cookie Settings Returns Policy Privacy Policy

Help

FAQs Case Studies Sitemap Glossary
𝕏
FlooringFirst! Services
158 Coles Green Road
London, NW2 7HW
T: 020 88309782
Floor Sanding Services: Central London, East London, Near London, North London, Northwest London, Southeast London, Southwest London, West London
Wood Floor Installation Service: Central London, East London, Near London, North London, Northwest London, Southeast London, Southwest London, West London

  • Flooring Services
  • Floor Sanding
    • Wood Floor Staining
    • Wood Floor Gap Filling
    • Commercial Floor Sanding
    • Engineered Floor Sanding & Refinishing
  • Wood Floor Fitting
    • Parquet Floor Installation
    • Laminate Floor Installation
    • Engineered Wood Floor Installation - Supply & Fit
    • Solid Wood Floor Fitting - Supply & Fit
    • LVT Floor Installation - Supply & Fit
  • Floor Repairs
    • Parquet Floor Repair and Restoration
    • Engineered Wood Floor Repairs
    • Wood Floor Scratch Repair
    • Floorboards Replacement
  • Care & Maintenance
    • Re-Oiling & Recoating Oiled Floors
    • Vinyl & Linoleum Cleaning
    • Hardwood Floor Buffing
    • Wood Floor Polishing
  • Shop
  • Shop
  • Gallery
  • Service Guide
  • Bookings
  • Book Free Survey
  • Service Advice
  • Product Advice