Looking for a Floor Sanding Company in Stratford?
Floor Sanding in Stratford — At a Glance
- Price range: £25–£45 per sqm
- Typical duration: 1–2 days for an average room
- Free site visit: Yes — book online or call 020 8830 9782
- Customer rating: 4.5/5 (590+ reviews)
- Experience: 22 years, established 2004
# Wood Floor Sanding in Stratford, London
Stratford's distinctive character sits right at the crossroads of Victorian heritage and modern regeneration. If you own one of the neighbourhood's period properties, your original wooden floors are likely a genuine asset—but they probably need professional care to shine again. Years of foot traffic, dust, and neglect can leave them looking tired, regardless of their underlying quality.
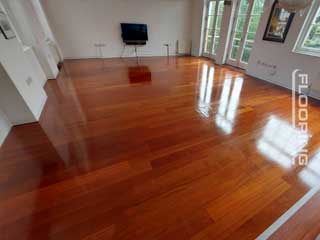
Our wood floor sanding service brings those boards back to life without the gimmicks or shortcuts. We work with Stratford's mixed housing stock regularly: from authentic Victorian terraces with their original pine and oak to newer builds where quality hardwood has been installed. Each floor tells a different story, and each needs a different approach.
Whether your floors have never been touched since the 1880s or they're simply looking worn after a decade of family life, we handle the sanding, staining, and finishing with the attention they deserve. We know Stratford homes inside out, and we understand what it takes to restore floors that'll genuinely last another generation.
Ready to see what your floors could look like?
We are your trusted experts for high-quality floor sanding, restoration, and repair services in Stratford, committed to reviving the natural beauty of your wooden floors and enhancing the aesthetics of your space. With years of experience, our skilled and fully insured technicians deliver comprehensive solutions tailored to your specific needs, ensuring exceptional results for all types of flooring, including parquet, pine, hardwood, and engineered boards. We use advanced dustless sanding equipment to protect your property during the process, offering a clean and hassle-free experience. To achieve long-lasting durability and a magnificent finish, we rely on premium wood floor sealants from renowned brands such as Bona, Loba, Junckers and Osmo. Passionate about wood and dedicated to excellence, we strive to exceed expectations by providing reliable, affordable, and professional services that have earned the trust of homeowners and businesses alike. Customer satisfaction remains at the heart of everything we do, as we aim to transform your floors with unmatched care and attention to detail.
Discover More Wood Flooring Services We Deliver in Stratford:

- Solid wood, engineered wood, and parquet floor sanding and refinishing.
- Wood floor repairs, including spot refitting and floorboards replacing, water damage repairs, nailing and glueing down loose boards, and much more dedicated to the improvement of all types of real wood floors.
- Gap filling and improving the insulation of the floor.
- Wood floor staining along with a very impressive range of wood floor dyes and stains we supply and additional samples we provide to help you make the best decision.
- Soundproofing of wood floors.
- Supply and installation of reclaimed pine wood floorboards, reclaimed parquet flooring blocks, and original reclaimed wood flooring.
- Supply of all grades of solid wood, engineered wood, and parquet flooring.
- Supply and installation of flooring accessories.
- Get an EXTRA 10% discount on our clean & polish service for all floors previously fitted or restored by FlooringFirst! Services.
When working with us, you will get more than your usual wood flooring service. We strive to achieve the best results possible because we have a real passion for real wood flooring. We have a tailored approach to each floor and recommend only the necessary services.
Dust-free floor sanding and restoration services in Stratford
We pride ourselves in delivering the best quality and high standard wood floor sanding, repair, restoration, and maintenance services. As a company with years of experience in the field and a rich portfolio of thousands of successful projects, we are glad to be able to work with clients throughout Stratford. We believe everyone will appreciate and enjoy the minimal disruption, highly efficient wood floor services we deliver and you will be impressed by the results achieved.
No matter if it comes to a commercial or domestic wood floor project, we have the best set of skills to take proper care of all types of real wood floors. It is our mission to restore the original beauty, durability, and lasting power of your favourite solid wood, engineered wood, and parquet floor and minimise the potential risks of it getting damaged over time.
What to Expect from Our Wood Floor Sanding in Stratford?
When hiring our wood floor sanding team for your Stratford project, you can expect professionalism and a really high standard of work. It is our goal to not only provide all clients with the right approach to their flooring and ensure the best results possible but also guarantee minimal disruption and no stress and mess with every service.
A wood floor sanding service delivered by us starts with a free inspection of the floor and a free quotation. This is our way to make sure you are getting only the necessary services for improving your floor and you are not over-paying for something you really don’t need. Additionally, our wood flooring specialists will be glad to further provide you with advice and tips on better wood floor maintenance and the best products you can use for looking after your flooring.
Hiring our experienced and dedicated wood floor sanding team in Stratford means you will experience the best quality of service along with attention to detail and honest communication. Additionally, our customer service team strives to be as helpful as possible, available seven days a week and gladly responding to all your questions and concerns in order to always find the best solution. All wood floor services provided by the company are covered by a Floor Service Guarantee and comprehensive Public and Treatment Risk Insurance.

Take advantage of our floor repair services in Stratford
There are a lot of things that can happen to a real wood floor that can result in minor damage or major imperfection. So whenever you feel like your wooden floor is too damaged and it deserves a second chance, our floor repair team in Stratford is here for you to take care of your favourite flooring and breathe new life.
Our floor repair team is trained in all time-proven and advanced methods and techniques for taking care of hardwood, engineered wood floors and parquetry. Thanks to our experience and the knowledge we have gained throughout the years, we can always find and pick the right solution and approach each damage and imperfection the right way so we can ensure the best results.
Our floor repair team in Stratford will skillfully restore and renovate every wooden floor. We take care of a wide range of wood floor damages and issues including scratches, dents, gaps, marks, stains, loose, damaged or broken floorboards, unfixed nails and screws, cupping and ballooning of the floorboards and other issues that are results of the contraction and expansion of the floorboards due to increased moisture and humidity indoor levels. We also take care of the subfloor, making sure the floor installed on top of it will last forever, look perfect, and be in perfect condition.
With a comprehensive portfolio of hundreds of successful projects, our floor repair company is your best choice in Stratford. We don't just provide you with a professional service and make sure we are achieving the best results possible for you. We also guarantee a high level of customer care, professionalism, attention to detail, dedication, and commitment to success.
We believe that every floor repair project in Stratford is specific and requires a tailored approach. We will inspect the condition of your floor for free in order to make sure that only the most necessary steps are taken to completely restore your favourite wooden floor back to its initial beauty, glory, and perfect condition.
Choose our parquet restoration services in Stratford

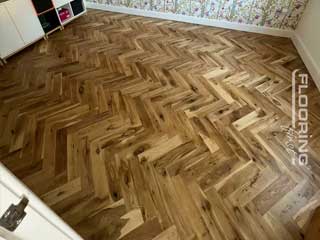
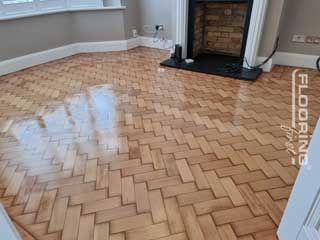
Parquet restoration is considered one of the most challenging services offered by a professional wood floor renovation and sanding company. It is because of the specifics of the parquet patterns that cannot be sanded straightforward, otherwise, the sanding machine will work against the grain of the wooden floorboards and this can damage wood permanently.
Therefore, parquet floor restoration requires a lot of attention to detail, knowledge and experience. Our parquet restoration team in Stratford works with a wide range of modern and advanced equipment and machinery in order to take care of all details and ensure the floor is perfectly sanded without missing a single spot or corner. Once the surface of the parquet pattern is absolutely smooth and there are no imperfections left, our parquet restoration team will use high-quality finishing and maintenance products to make sure all perfect results achieved will last for a very long time.
By choosing to work with us you are getting not simply a high-quality parquet restoration service. You are getting the comfort of a professional service that causes minimal disruption, minimises the mess and stress for you, and ensures the best results and all that at a reasonable price.
Our parquet restoration services in Stratford are covered with years of experience, craftsmanship, commitment to success, expertise and knowledge. The services we offer are suitable for both domestic and commercial floors and projects. We tailor every service to the specific requirements of the project and our clients. For both domestic and commercial parquet restoration services, we are flexible, working also outside business hours and during the weekends.
Finishes available with our floor restoration services in Stratford
Our commitment to excellence is reflected in the premium finishes we utilise to bring out the natural beauty of your wood floors. Whether it's a comprehensive floor restoration project or a simple refinishing job in Stratford, we have the expertise and the right products to ensure stunning results.
Our selection of finishes includes the renowned "Bona Mega" lacquer, a quick-drying, water-based option that's perfect for both domestic and light commercial use. Available in a variety of finishes, including extra-matt, matt, satin, or gloss, it caters to various preferences and styles. For areas with heavy foot traffic, we rely on the durable "Bona Traffic HD" lacquer, providing extra protection and is available with an anti-slip option for safety in commercial settings.
In addition to the Bona range, we also offer products from Junckers, such as the "MT500 Floor Lacquer" and "HT700 Floor Lacquer" known for their quick-drying properties and extra durable finishes, making them ideal for commercial-grade applications. Our selection of primers, including "Bona Classic Primer" and "Bona Amber Primer" are designed to enhance the natural characteristics of the wood while ensuring durability and fast drying times.
To achieve optimal results, we utilise primers like "Junckers SB Primer" and "Junckers WB Primer" which not only enhance adhesion but also elevate the appearance of light-coloured wood floors, ensuring a flawless finish. For exceptional durability and wear resistance, our range includes the "Loba WS Fusion 2K Lacquer" a two-component, waterborne finish suitable for various flooring types, providing lasting protection and beauty.
Experience the essence of craftsmanship as we revitalise your floors, guaranteeing a stunning and lasting transformation for your home or business. Rely on us for reliable wood floor sanding in Stratford — call 020 88309782 to get more details or arrange an initial consultation with our skilled team.

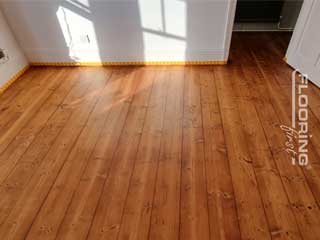
Featured Project in Stratford: Substantial Floorboards Restoration Through Sanding And Refinishing in Stratford
Our next trip took us to E11 - Stratford, a district of London which needs no introduction. The job involved supplying and replacing seasoned floor boards, removing two fireplace hearths as well as sanding, gap-filling, staining and lacquering 32 sqm of pine.
Sanding floorboards isn’t that different from sanding a solid hardwood floor. As long as you follow the grain, you should be fine. The only problem that may arise is if the boards are too thin to take the sanding. If they are, they must be replaced. Fortunately, the wood we worked on had plenty of material left to sand and the process went smoothly.
As we said, part of our job was to install floor insulation. However, that insulation wouldn’t be very effective if the gaps in the floor were not filled. Gap-filling is far from mandatory but certainly helps prevent to draughts during the winter and save a few pounds on heating bills. We used the fine sawdust collected during the sanding and mixed it with a filler resin to create a substance which blended perfectly between the boards.
Finally, all that was left to do is stain and apply the finish. We applied a medium shade stain, left it to dry and sealed the surface with Junckers HP Commercial – a fine waterborne lacquer for high traffic areas.
The client was happy with the quality of the services and this what is truly important. We did a good job and it took us 4-5 days to finish it. The difference between the old and the new surface is obvious, we turned this old pine floor into a beautiful and fine-looking part of the property.
Floor Care Tips and Advice:
Find Our More on Sanding in Stratford
Local Project: Substantial Floorboards Restoration Through Sanding And Refinishing in Stratford in Stratford — 1 November 2016
The floorboards were nailed right on top of the joists and had concrete subfloor below. We not only had to replace any damaged or missing boards, we also had to check the condition of the joists to make sure they are not rotten. We were also tasked with insulation fitting as well as subfloor preparation. The combination of so many assignments at once made our job harder and more time-consuming. However, as fully trained professionals we knew more than enough to provide excellent results. And we did, as usual.
Floor sanding and refinishing is more about changing the appearance of the wood and preventing problems in the future. It is important to do it whenever the need arises but when the damage is already there, the situation becomes a lot more complicated.
If the floor had been properly maintained and taken care of, the more extensive and obviously expensive repairs would have never been needed. After extensive examination, we discovered that despite their non-uniform appearance, the joists were not rotten or damaged. We did not have to replace them.
The next step was preparing the subfloor and seeing to the floorboards. We already knew which needed replacing and salvaged those we thought could be reused. You can clearly see the distinction between old and new pieces on the pictures below. After securing the boards and ensuring the floor is stable, we could proceed with the easy part – the sanding.
Sanding floorboards isn’t that different from sanding a solid hardwood floor. As long as you follow the grain, you should be fine. The only problem that may arise is if the boards are too thin to take the sanding. If they are, they must be replaced. Fortunately, the wood we worked on had plenty of material left to sand and the process went smoothly.
As we said, part of our job was to install floor insulation. However, that insulation wouldn’t be very effective if the gaps in the floor were not filled. Gap-filling is far from mandatory but certainly helps prevent to draughts during the winter and save a few pounds on heating bills. We used the fine sawdust collected during the sanding and mixed it with a filler resin to create a substance which blended perfectly between the boards.
Finally, all that was left to do is stain and apply the finish. We applied a medium shade stain, left it to dry and sealed the surface with Junckers HP Commercial – a fine waterborne lacquer for high traffic areas.
The client was happy with the quality of the services and this what is truly important. We did a good job and it took us 4-5 days to finish it. The difference between the old and the new surface is obvious, we turned this old pine floor into a beautiful and fine-looking part of the property.
Frequently Asked Questions
How much does floor sanding cost in Stratford?
Floor sanding prices in Stratford (E15) typically range from £25 to £45 per square metre, depending on floor condition, finish type, and any repair work required. Gap filling and board replacement are priced separately.
How long does floor sanding take in Stratford?
Most residential floor sanding jobs in Stratford are completed in 1-2 days depending on floor size and condition. Lacquering or oiling adds further drying and curing time.
Do you offer free site visits in Stratford?
Yes, FlooringFirst offers free, no-obligation site visits in Stratford and surrounding areas. Our surveyor will assess the floor condition and provide a detailed quote.
Is your floor sanding process dust-free in Stratford?
We use modern dustless sanding equipment that captures 98%+ of airborne particles. While not 100% dust-free, the process is significantly cleaner than traditional sanding methods.
What finishes do you offer for sanded floors in Stratford?
We offer lacquer (hardwearing, gloss or matt), hardwax oil (natural look, easy to maintain), and staining options to change the wood colour. Our surveyor can advise on the best finish for your floor.