Looking for a Floor Sanding Company in Croydon?

Our professional floor sanding services in Croydon are designed to restore your floors to their natural beauty. With our advanced sanding techniques and professional equipment, we can help you achieve the perfect finish on your floors. We use high-quality sanding tools and materials to ensure that your floors are free of dust, dirt, and imperfections.
Whether you have parquet blocks, hardwood, engineered timber or even floorboards that need restoring, our operatives have the skill and knowledge necessary to bring your wooden floors to life. We make sure to use only the highest quality wood floor sealants available on the market.
Our team of experienced and qualified professionals are here to provide you with the highest quality floor sanding services. We guarantee a flawless finish on your floors, using the latest sanding methods and techniques. We use high-grade materials to ensure that your floors are beautiful and long-lasting. With our quality workmanship, you can rest assured that your floors will look as good as new.
We take our customer service very seriously too - offering additional support whenever needed during the renovation process. Our team makes sure to keep any disruption at a minimum while delivering a friendly service that is second to none throughout Croydon and its neighbouring areas.
For superior wooden floor restoration services in Croydon don't hesitate to contact FlooringFirst! Our reliable operatives will be more than happy to assist you with their expert knowledge and skills in order to return your precious wooden floors back into shape without compromising on quality.
Our range of floor sanding and restoration services in Croydon
- Floorboards, hardwood and parquet floor sanding and sealing
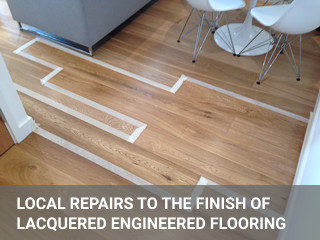
- Floor repairs - partial refitting and local replacement of floorboards, parquet, engineered and hardwood flooring; repairs of water damaged floors, including parquet, hardwood or engineered floors.
- Gap filling and minor touch-ups
- Floor staining - we offer a wide range of wood dyes and can provide a number of samples before proceeding with refinishing your floors, including whitewashed and grey finishes.
- Soundproofing floorboards and decreasing drafts in floors
- Supply and install seasoned/reclaimed original pine floorboards, hardwood and reclaimed parquet flooring to recover damage to existing floors.
- We supply prime and rustic parquet flooring, solid and engineered floors
- We install new and replace skirting boards, beading and mouldings
- Get an EXTRA 10% discount on our clean & polish service for all floors previously fitted or restored by FlooringFirst! Services.
Wooden floors can make a huge difference in the environment of your home, and they can be an essential element in your businesses image. Getting in touch with FlooringFirst! in Croydon is easy to do.
When you hire a flooring expert, you would probably like as well to receive more than just good looking smoothly finished wooden floors. You would also like prompt, reliable service from someone who cares about your satisfaction. With us, that's precisely what you'll get.

Dust-free floor sanding and restoration services in Croydon
Every type of real wood flooring requires a specific wood floor sanding approach and we are masters of all of them, knowing how to handle every wooden floor with care and attention. We work with cutting-edge modern equipment and technology in order to not simply make sure we are delivering the best results but also minimise the disruption to your household or commercial space as much as possible.
Next, we always make sure to use premium-quality wood floor sealing and maintenance products supplied by world-renowned and leading manufacturers. By this, we are able to ensure the results we achieve last for decades.
What's Included in Our Floor Sanding Service in Croydon?
Our wood floor sanding services in Croydon come with obligation free site visit and quotation as well as expert advice on floor sealing products and maintenance. When you choose FlooringFirst! in Croydon, you are getting a service with an eye on detail, and a Customer Service team, striving to achieve excellent care, available 7 days a week. All our services are covered by our Floor Service Guarantee and comprehensive Public & Treatment Risk Insurance.
Our wood floor sanding services in Croydon are not just designed to take care of and restore your aged and distressed real wood flooring. The services we deliver to each client are tailored to the individual requirements and specifics of the project. We take care of every stage of the service, ensuring the process is running smoothly and with no obstacles. In case there are some unexpected situations and requirements along the way, we always make sure to discuss our plans with the owner first and then we can continue.
We always make sure to do only the necessary steps. What we are striving for is ensuring we can achieve perfect results. Every wooden floor has the chance to live a new life, even the most damaged and old ones. Therefore, thanks to the professionalism of our wood floor sanding team in Croydon, we invest our dedication, experience, knowledge, and commitment to success in order to provide customers with stunning outcomes that last for decades.
Hiring our wood floor sanding company means you are able to enjoy mess- and stress-free process of restoring your favourite wooden flooring. Every wood floor sanding project starts with a free inspection of the condition of the floor. Once our team accesses the floor’s condition in depth and knows what is needed for achieving the best results, they can continue working.

Take advantage of our floor repair services in Croydon
There are a lot of things that can happen to a real wood floor that can result in minor damage or major imperfection. So whenever you feel like your wooden floor is too damaged and it deserves a second chance, our floor repair team in Croydon is here for you to take care of your favourite flooring and breathe new life.
Our floor repair team is trained in all time-proven and advanced methods and techniques for taking care of hardwood, engineered wood floors and parquetry. Thanks to our experience and the knowledge we have gained throughout the years, we can always find and pick the right solution and approach each damage and imperfection the right way so we can ensure the best results.
Our floor repair team in Croydon will skillfully restore and renovate every wooden floor. We take care of a wide range of wood floor damages and issues including scratches, dents, gaps, marks, stains, loose, damaged or broken floorboards, unfixed nails and screws, cupping and ballooning of the floorboards and other issues that are results of the contraction and expansion of the floorboards due to increased moisture and humidity indoor levels. We also take care of the subfloor, making sure the floor installed on top of it will last forever, look perfect, and be in perfect condition.
With a comprehensive portfolio of hundreds of successful projects, our floor repair company is your best choice in Croydon. We don't just provide you with a professional service and make sure we are achieving the best results possible for you. We also guarantee a high level of customer care, professionalism, attention to details, dedication, commitment to success.
We believe that every floor repair project in Croydon is specific and requires a tailored approach. We will inspect the condition of your floor for free in order to make sure that only the most necessary steps are taken for completely restoring your favourite wooden floor back to its initial beauty, glory, and perfect condition.
Choose our parquet restoration services in Croydon
 Parquet restoration is considered one of the most challenging services offered by a professional wood floor renovation and sanding company. It is because of the specifics of the parquet patterns that cannot be sanded straightforward, otherwise, the sanding machine will work against the grain of the wooden floorboards and this can damage wood permanently.
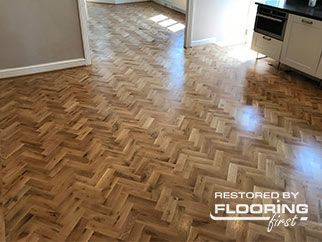
Therefore, parquet floor restoration requires a lot of attention to details, knowledge and experience. Our parquet restoration team in Croydon works with a wide range of modern and advanced equipment and machinery in order to take care of all details and ensure the floor is perfectly sanded without missing a single spot or corner. Once the surface of the parquet pattern is absolutely smooth and there are no imperfections left, our parquet restoration team will use high-quality finishing and maintenance products to make sure all perfect results achieved will last for a very long time.
By choosing to work with us you are getting not simply a high-quality parquet restoration service. You are getting the comfort of a professional service that causes minimal disruption, minimises the mess and stress for you, and ensures the best results and all that at a reasonable price.
Our parquet restoration services in Croydon are covered with years of experience, craftsmanship, commitment to success, expertise and knowledge. The services we offer are suitable for both domestic and commercial floors and projects. We tailor every service to the specific requirements of the project and our clients. For both domestic and commercial parquet restoration services we are flexible, working also outside business hours and during the weekends.
Our premier floor sanding services in Croydon deliver impeccable craftsmanship, revitalising your space with a striking and enduring transformation. Contact us at 020 88309782 to schedule your floor sanding today.
What Our Clients from Croydon Say About Us
“
The guys have done a very good job!
”
Mr. D. Monks, from Croydon, CR0
“
Excellent! Really pleasant, proffesional floor fitters.
Work completed to a very high standard.
”
Mrs. Maureen Gore, from Croydon, CR0 4LD
“
I could not have had better floor experts. They understood what I wanted. They were tremendously hard-working and conscientious. Come again!
”
Mrs. M. Heyburn, from Croydon, CR0 6BR
“
Really quick+thorough work.Looks great - better than expected.
”
Mr. Rob Kirby, from Croydon, CR0 6LU
“
Very pleased ith work - the new floor looks great. Thank you!
”
Mr. L. Newman, from South Croydon, CR2 6PQ
“
Great team, very polite and did a good job. Thanks.
”
Mr. J. Robinson, from South Croydon, CR2 0NQ
Floor Care Tips and Advice:
Find Our More on Sanding in Croydon
Local Project: Sanding And Painting Damaged Oak Floorboards in Croydon
It looked like the typical distressed floor. It had suffered from dents, marks and scratches all over. The floor, however, seemed stable enough and did not require extensive repairs or floorboard replacement of any kind. Cases such as this one allow us to immediately get on with our work and save time to our clients as well as ourselves.
There isn’t much to be said about the sanding process. Like always, we stripped the more uneven parts and slowly transitioned to finer sandpaper grits until we were sure that the floor looked as good as it could possibly be. Once the surface was fully buffed it was ready for painting.
Staining is one of the trickier parts of floor restoration for two reasons. First, sometimes the process can be tough to perform on some specific wood types because the stain isn’t properly absorbed or is affected by the wood’s original colour. Fortunately, oak is quite easy to stain so it wasn’t a problem at all.
Second, if the sanding is not performed at a professional level, any imperfection will be magnified by the stain and become more visible. If something goes wrong, the only way to fix this is to sand and re-stain again. Obviously, with our expertise such a scenario will never come to pass. We stained the floor white with no complications.
We usually go for lacquers like the Junckers HP Commercial which provides excellent results at a reasonable price but in this case, we agreed with the client to go for Bona Mega. Bona Mega is a water-based varnish which, like most of its kind, doesn’t turn yellow as it ages. This makes it very suitable for grey or white stained floors such as the one we were currently working on.
The floor was restored to its previous glory in a flash. The whole process took us no more than 2 days. One for sanding and buffing and one for staining and finishing. The differences before and after making any words obsolete. We also included pictures showing how we restored the floor before applying the stain to make the result more visible.
Local Project: Staining Floorboards After Sanding Service in Croydon
As we already mentioned, our teams are experienced in the restoration of old and damaged wooden floors. The following case is a proof for our high level of craftsmanship and expertise. The flooring is from pine floorboards and suffers from finish flaws and huge gaps, which was the reason some of the boards to be refitted. There was also a huge difference in the level of the boards in particular areas of the room.
Our tasks included stripping off the scratched surface in few stages with different sandpaper grits. Once the boards were smooth and levelled, we could continue with filling the gaps. For some of the gaps that wide up to 5mm we’ve used wood slivers with matching colour.
The clients wanted to have some major changes in the appearance of their flooring, so they also included staining in the quotation. The selected product was in medium tones – Morrells light oak. The final step from the job was to seal the flooring with the hardwearing finish, in this case, this was the water-based lacquer ‘Junckers HP Commercial’. After applying 4 coats with a satin sheen, our job here was done. These impressive results were achieved in 3 days.
Local Project: Teak Engineered Flooring Repair in Croydon
When our team arrived at the premises, it turned out that this project would not present any difficulty at all. It was pretty much a one-two job where all they had to do was refit some of the old floorboards, then proceed with the sanding process.
After the teak floors were sanded, part of the residual dust was used to fill the gaps between the floorboards. After applying the primer and sealant, respectively, the floors were finished off with Osmo's Polyx Hardwax Oil. This led to the beautiful and shiny look you can see in the photos.
Local Project: Floorboards Sanding, Staining & Sealing in Croydon
Before embarking on the floor restoration journey, a thorough inspection was conducted. The goal was to understand the extent of the damage and the best approach to address it. The floor restoration project began with floor sanding to remove the years of wear and reveal the natural beauty of the wood beneath. This process also helped to eliminate the scratches and imperfections that marred the floor's surface.
Addressing the gaps between the floorboards was the next step. Using a specially selected filler, we expertly filled these gaps, creating a smooth and uniform surface.
The next phase involved staining the floorboards to achieve the desired colour and tone. The stain not only added depth and richness to the wood but also provided an additional layer of protection. It enhanced the natural grain and character of the floor, making it a focal point of the room.
To ensure the longevity of the newly restored floor, a high-quality lacquer sealant was applied. This sealant not only enhanced the floor's appearance but also provided robust protection against future wear and tear. The result is a floor that not only looks stunning but is also durable and easy to maintain.