Floor Sanding & Fitting
Book Free Visit Price Guide 020 88309782
Monday - Friday 07:30 - 17:30, Saturday 07:30 - 16:00
cs@flooringfirst.co.uk
020 88309782
Monday - Friday 07:30 - 17:30, Saturday 07:30 - 16:00
cs@flooringfirst.co.uk
  • Book Free Visit
  • Home
  • Floor Sanding
  • Floor Fitting
  • Floor Repairs
  • Aftercare
    • Wooden Floors
    • Cleaning & Polishing
    • Re-Oiling Wooden Floors
    • Vinyls & Linoleum
    • Vinyl Floor Polishing
    • Get a Quote...
  • For Businesses
  • Gallery
  • Service Guide
  • Shop
  • Book Free Visit

Our Wood Flooring Resource

Find Your Way Around...

Floor Sanding Case Studies

See how FlooringFirst solved flooring challenges

WHY CHOOSE US
CASE STUDIES
PRICE GUIDE
OFFERS
GALLERY
ASK EXPERT
WHY CHOOSE US
CASE STUDIES
PRICE GUIDE
OFFERS
GALLERY
ASK EXPERT
  • Home
  • Case Studies
Floorboards Sanding, Buffing and Re-Oiling in Slough - Full Case Study

Project Overview This Slough property had hardwood floorboards throughout the ground floor that had been previously finished with an oil product. The oil had worn down significantly in the main traffic routes, leaving the floor looking dry and patchy, with the wood lacking the protection and appearance it had when newly finished. The client wanted a full sand, buff, and fresh oil application to r...

Project Overview

This Slough property had hardwood floorboards throughout the ground floor that had been previously finished with an oil product. The oil had worn down significantly in the main traffic routes, leaving the floor looking dry and patchy, with the wood lacking the protection and appearance it had when newly finished. The client wanted a full sand, buff, and fresh oil application to restore the floor.

Floorboards before sanding and re-oiling in Slough

The Challenge

Re-oiling an oil-finished floor that has worn unevenly is more complex than it sounds. Simply applying fresh oil over a partially worn surface would result in patchy absorption, with the areas where the old oil has fully worn off absorbing far more product than the areas where some residual oil remains. This produces an uneven finish rather than the consistent result the client wants. The correct approach is to sand back to bare wood evenly first, then apply the new oil from a uniform starting point. For buffing, the floor also needs to be properly prepared so the buff can work the oil into the surface evenly without disturbing the finish before it has set.

Worn floor surface before treatment, Slough

Our Approach

Sanding

We began with a full sanding programme to strip the old oil finish back to bare wood consistently across the whole floor. This involved working through multiple grit stages, starting with a grit appropriate to the depth of the existing finish and finishing with a fine grit that left the surface clean, smooth, and ready for oiling.

Dust Removal

Before any oil was applied, the floor was vacuumed thoroughly and wiped down with a tack cloth to remove all residual sanding dust. Even small amounts of dust trapped in an oil finish will create a gritty texture in the cured surface and should not be cut short.

Re-oiled floorboards after treatment, Slough

Oil Application and Buffing

The first coat of oil was applied across the full floor and left to absorb into the wood for the recommended time before the excess was buffed off using a buffing machine fitted with a white pad. The buffing process drives the oil deeper into the wood fibres and removes any standing excess that would otherwise dry tacky on the surface. A second coat was applied and buffed in the same way to achieve the depth of protection and sheen the client wanted.

The Result

The finished floor had a warm, natural appearance with an even, consistent oil finish throughout. The wood grain was clearly visible, the surface felt smooth underfoot, and the oil provided good protection without the plastic appearance of a lacquer finish. The client was very satisfied with the result and appreciated the natural feel of the oil compared to the alternative finishes available. Sanding and oiling in the Slough area typically costs between £25 and £40 per square metre depending on floor condition and area size.

Frequently Asked Questions

How do you maintain an oiled floor after it has been professionally re-oiled?
Day-to-day cleaning with a slightly damp mop and a wood-safe cleaning product is all that is needed. Periodically, typically every one to two years, a maintenance oil coat can be applied without a full sand. This is a quick process the homeowner can often do themselves with the right product.

Is an oil finish or a lacquer finish better for hardwood floorboards?
Both are widely used and both have their strengths. Lacquer gives a harder, more protective surface that is easier to clean in high-traffic areas. Oil gives a more natural look and feel, is easier to touch up in a localised area, and tends to suit the character of older properties better. The best choice depends on the level of traffic, the look the client wants, and how much ongoing maintenance they are willing to do.

Can you oil over an existing lacquered floor?
No. Oil and lacquer are not compatible. If a floor has been lacquered, the lacquer must be fully removed by sanding before an oil finish can be applied. Applying oil over a lacquer finish will not penetrate the wood and will not produce a satisfactory result.

Have a similar project? Call us on 020 88309782 or Book a Free Site Visit

Show more
Replacement and Fitting of Engineered Wood in Buckhurst Hill, IG9 — Full Case Study

Project Overview This project involved the professional installation of engineered wood flooring at a property in Buckhurst Hill, IG9. The client required a quality floor that would stand up to daily use and complement their interior. Our fitting team assessed the subfloor condition, carried out any necessary preparation work, and fitted the new floor to a high standard. Before the Work Prior...

Project Overview

This project involved the professional installation of engineered wood flooring at a property in Buckhurst Hill, IG9. The client required a quality floor that would stand up to daily use and complement their interior. Our fitting team assessed the subfloor condition, carried out any necessary preparation work, and fitted the new floor to a high standard.

Before the Work

Prior to installation, the existing floor covering was inspected and the subfloor was prepared to ensure it was flat, dry, and suitable for the new engineered wood. Any existing floor covering was lifted and disposed of cleanly before the fitting work began.

Survey photos showing the floor condition before work:

Floor condition before work at IG9 Floor condition before work at IG9

Our Approach

The following services were carried out as part of this project:

  • Door Frame Trimming
  • Doors Plus Frame Trimming (per door)
  • Engineered Flooring Installation
  • Lift & Dispose Carpets or Laminates
  • Skirting Board Removal
  • Skirting Boards Installation (excl. materials)
  • Thresholds & Fitting (inc. materials)
  • One Day Delay

The Result

The completed engineered wood installation looked clean and finished throughout. Joins are tight, edges are neat, and the floor sits flat and stable. Beading and threshold strips were fitted where required to complete the job properly. The client was pleased with both the quality of the work and the appearance of the new floor.

Photos of the completed work:

Engineered Wood floor after fitting work in IG9 Engineered Wood floor after fitting work in IG9 Engineered Wood floor after fitting work in IG9

Frequently Asked Questions

How long does engineered wood installation take?
Most fitting jobs are completed within one to two days. Larger areas or more detailed layouts such as herringbone patterns take longer due to the additional cutting and positioning involved.

Do I need underlay?
Yes, underlay is required for most floor types and helps with insulation, sound deadening, and levelling minor subfloor imperfections. We can supply and fit appropriate underlay as part of the installation.

How much does floor fitting cost in London?
Fitting costs typically range from £35 to £60 per square metre depending on floor type and complexity. We provide a full written quote before starting any work.

Have a similar project? Call us on 020 88309782 or Book a Free Site Visit

Show more
Floorboards Sanding and Restoration in North Kensington, W10 — Full Case Study

Project Overview This project involved the professional sanding and restoration of an existing wood floor at a property in North Kensington, W10. The floor had seen years of daily wear and was in need of attention to bring it back to a quality finish. Our team carried out a full assessment before starting work, checking for any boards that needed attention alongside the main sanding and finishi...

Project Overview

This project involved the professional sanding and restoration of an existing wood floor at a property in North Kensington, W10. The floor had seen years of daily wear and was in need of attention to bring it back to a quality finish. Our team carried out a full assessment before starting work, checking for any boards that needed attention alongside the main sanding and finishing work.

Before the Work

Before work began, the floor showed typical signs of wear. Surface scratches, dull patches, and general finish deterioration were present. A thorough survey was carried out to plan the correct sanding depth, assess board condition, and choose the most appropriate finish for the space.

Survey photos showing the floor condition before work:

Floor condition before work at W10

Our Approach

The following services were carried out as part of this project:

  • Floorboards - Refitting
  • Floorboards - Replacement (incl. materials)
  • Floorboards - Sand & Paint
  • Furniture Moving
  • Gap Filling
  • Gap Filling - Pine Slivers ( 20 linear meters)

The Result

Once the sanding and finishing process was complete, the floor was transformed. The wood grain was opened up and brought back to life, the surface was smooth and even, and the new finish provided lasting protection. The client was left with a floor that looked, and performed, as good as new.

Photos of the completed work:

Floorboards floor after sanding work in W10 Floorboards floor after sanding work in W10 Floorboards floor after sanding work in W10

Frequently Asked Questions

How long does floor sanding take?
Most residential sanding jobs are completed in one to two days, depending on floor size and condition. Lacquering or oiling adds further drying and curing time, which we factor into the job schedule.

Do I need to vacate the property during sanding?
Modern dustless sanding equipment keeps dust to a minimum, but we recommend keeping pets and young children clear of the area during the work. Most clients remain in their property throughout.

How much does floor sanding cost in London?
Prices typically range from £25 to £45 per square metre depending on floor condition, finish type, and any repair work required. Gap filling and board replacement are priced separately if needed.

Have a similar project? Call us on 020 88309782 or Book a Free Site Visit

Show more
Floorboards Sanding and Restoration in Stoke Newington, N16 — Full Case Study

Project Overview This project involved the professional sanding and restoration of an existing wood floor at a property in Stoke Newington, N16. The floor had seen years of daily wear and was in need of attention to bring it back to a quality finish. Our team carried out a full assessment before starting work, checking for any boards that needed attention alongside the main sanding and finishin...

Project Overview

This project involved the professional sanding and restoration of an existing wood floor at a property in Stoke Newington, N16. The floor had seen years of daily wear and was in need of attention to bring it back to a quality finish. Our team carried out a full assessment before starting work, checking for any boards that needed attention alongside the main sanding and finishing work.

Before the Work

Before work began, the floor showed typical signs of wear. Surface scratches, dull patches, and general finish deterioration were present. A thorough survey was carried out to plan the correct sanding depth, assess board condition, and choose the most appropriate finish for the space.

Survey photos showing the floor condition before work:

Floor condition before work at N16 Floor condition before work at N16 Floor condition before work at N16

Our Approach

The following services were carried out as part of this project:

  • Floorboards - Sand, Buff & Lacquer
  • Furniture Moving
  • Gap Filling
  • Staining

The Result

Once the sanding and finishing process was complete, the floor was transformed. The wood grain was opened up and brought back to life, the surface was smooth and even, and the new finish provided lasting protection. The client was left with a floor that looked, and performed, as good as new.

Photos of the completed work:

Floorboards floor after sanding work in N16 Floorboards floor after sanding work in N16 Floorboards floor after sanding work in N16

Frequently Asked Questions

How long does floor sanding take?
Most residential sanding jobs are completed in one to two days, depending on floor size and condition. Lacquering or oiling adds further drying and curing time, which we factor into the job schedule.

Do I need to vacate the property during sanding?
Modern dustless sanding equipment keeps dust to a minimum, but we recommend keeping pets and young children clear of the area during the work. Most clients remain in their property throughout.

How much does floor sanding cost in London?
Prices typically range from £25 to £45 per square metre depending on floor condition, finish type, and any repair work required. Gap filling and board replacement are priced separately if needed.

Have a similar project? Call us on 020 88309782 or Book a Free Site Visit

Show more
Floorboards Sanding and Restoration in Maidenhead, SL4 — Full Case Study

Project Overview This project involved the professional sanding and restoration of an existing wood floor at a property in Maidenhead, SL4. The floor had seen years of daily wear and was in need of attention to bring it back to a quality finish. Our team carried out a full assessment before starting work, checking for any boards that needed attention alongside the main sanding and finishing wor...

Project Overview

This project involved the professional sanding and restoration of an existing wood floor at a property in Maidenhead, SL4. The floor had seen years of daily wear and was in need of attention to bring it back to a quality finish. Our team carried out a full assessment before starting work, checking for any boards that needed attention alongside the main sanding and finishing work.

Before the Work

Before work began, the floor showed typical signs of wear. Surface scratches, dull patches, and general finish deterioration were present. A thorough survey was carried out to plan the correct sanding depth, assess board condition, and choose the most appropriate finish for the space.

Our Approach

The following services were carried out as part of this project:

  • Floorboards - Sand, Buff & Lacquer

The Result

Once the sanding and finishing process was complete, the floor was transformed. The wood grain was opened up and brought back to life, the surface was smooth and even, and the new finish provided lasting protection. The client was left with a floor that looked, and performed, as good as new.

Photos of the completed work:

Floorboards floor after sanding work in SL4 Floorboards floor after sanding work in SL4 Floorboards floor after sanding work in SL4

Frequently Asked Questions

How long does floor sanding take?
Most residential sanding jobs are completed in one to two days, depending on floor size and condition. Lacquering or oiling adds further drying and curing time, which we factor into the job schedule.

Do I need to vacate the property during sanding?
Modern dustless sanding equipment keeps dust to a minimum, but we recommend keeping pets and young children clear of the area during the work. Most clients remain in their property throughout.

How much does floor sanding cost in London?
Prices typically range from £25 to £45 per square metre depending on floor condition, finish type, and any repair work required. Gap filling and board replacement are priced separately if needed.

Have a similar project? Call us on 020 88309782 or Book a Free Site Visit

Show more
Floor Sanding and Restoration in Buckhurst Hill, IG9 — Full Case Study

Project Overview This project involved the professional sanding and restoration of an existing wood floor at a property in Buckhurst Hill, IG9. The floor had seen years of daily wear and was in need of attention to bring it back to a quality finish. Our team carried out a full assessment before starting work, checking for any boards that needed attention alongside the main sanding and finishing...

Project Overview

This project involved the professional sanding and restoration of an existing wood floor at a property in Buckhurst Hill, IG9. The floor had seen years of daily wear and was in need of attention to bring it back to a quality finish. Our team carried out a full assessment before starting work, checking for any boards that needed attention alongside the main sanding and finishing work.

Before the Work

Before work began, the floor showed typical signs of wear. Surface scratches, dull patches, and general finish deterioration were present. A thorough survey was carried out to plan the correct sanding depth, assess board condition, and choose the most appropriate finish for the space.

Our Approach

The following services were carried out as part of this project:

  • completion

The Result

Once the sanding and finishing process was complete, the floor was transformed. The wood grain was opened up and brought back to life, the surface was smooth and even, and the new finish provided lasting protection. The client was left with a floor that looked, and performed, as good as new.

Photos of the completed work:

Wood Floor floor after sanding work in IG9 Wood Floor floor after sanding work in IG9 Wood Floor floor after sanding work in IG9

Frequently Asked Questions

How long does floor sanding take?
Most residential sanding jobs are completed in one to two days, depending on floor size and condition. Lacquering or oiling adds further drying and curing time, which we factor into the job schedule.

Do I need to vacate the property during sanding?
Modern dustless sanding equipment keeps dust to a minimum, but we recommend keeping pets and young children clear of the area during the work. Most clients remain in their property throughout.

How much does floor sanding cost in London?
Prices typically range from £25 to £45 per square metre depending on floor condition, finish type, and any repair work required. Gap filling and board replacement are priced separately if needed.

Have a similar project? Call us on 020 88309782 or Book a Free Site Visit

Show more
Replacement and Fitting of Laminate in Southall, UB1 — Full Case Study

Project Overview This project involved the professional installation of laminate flooring at a property in Southall, UB1. The client required a quality floor that would stand up to daily use and complement their interior. Our fitting team assessed the subfloor condition, carried out any necessary preparation work, and fitted the new floor to a high standard. Before the Work Prior to installat...

Project Overview

This project involved the professional installation of laminate flooring at a property in Southall, UB1. The client required a quality floor that would stand up to daily use and complement their interior. Our fitting team assessed the subfloor condition, carried out any necessary preparation work, and fitted the new floor to a high standard.

Before the Work

Prior to installation, the existing floor covering was inspected and the subfloor was prepared to ensure it was flat, dry, and suitable for the new laminate. Any existing floor covering was lifted and disposed of cleanly before the fitting work began.

Survey photos showing the floor condition before work:

Floor condition before work at UB1 Floor condition before work at UB1

Our Approach

The following services were carried out as part of this project:

  • Doors Plus Frame Trimming (per door)
  • Furniture Moving
  • Laminate Floor Installation
  • Lift & Dispose Carpets or Laminates

The Result

The completed laminate installation looked clean and finished throughout. Joins are tight, edges are neat, and the floor sits flat and stable. Beading and threshold strips were fitted where required to complete the job properly. The client was pleased with both the quality of the work and the appearance of the new floor.

Photos of the completed work:

Laminate floor after fitting work in UB1 Laminate floor after fitting work in UB1 Laminate floor after fitting work in UB1

Frequently Asked Questions

How long does laminate installation take?
Most fitting jobs are completed within one to two days. Larger areas or more detailed layouts such as herringbone patterns take longer due to the additional cutting and positioning involved.

Do I need underlay?
Yes, underlay is required for most floor types and helps with insulation, sound deadening, and levelling minor subfloor imperfections. We can supply and fit appropriate underlay as part of the installation.

How much does floor fitting cost in London?
Fitting costs typically range from £35 to £60 per square metre depending on floor type and complexity. We provide a full written quote before starting any work.

Have a similar project? Call us on 020 88309782 or Book a Free Site Visit

Show more
Floorboards Sanding and Restoration in Mortlake, SW14 — Full Case Study

Project Overview This project involved the professional sanding and restoration of an existing wood floor at a property in Mortlake, SW14. The floor had seen years of daily wear and was in need of attention to bring it back to a quality finish. Our team carried out a full assessment before starting work, checking for any boards that needed attention alongside the main sanding and finishing work...

Project Overview

This project involved the professional sanding and restoration of an existing wood floor at a property in Mortlake, SW14. The floor had seen years of daily wear and was in need of attention to bring it back to a quality finish. Our team carried out a full assessment before starting work, checking for any boards that needed attention alongside the main sanding and finishing work.

Before the Work

Before work began, the floor showed typical signs of wear. Surface scratches, dull patches, and general finish deterioration were present. A thorough survey was carried out to plan the correct sanding depth, assess board condition, and choose the most appropriate finish for the space.

Survey photos showing the floor condition before work:

Floor condition before work at SW14 Floor condition before work at SW14

Our Approach

The following services were carried out as part of this project:

  • Floorboards - Replacement (incl. materials)
  • Floorboards - Sand, Buff & Lacquer
  • Gap Filling
  • Staining

The Result

Once the sanding and finishing process was complete, the floor was transformed. The wood grain was opened up and brought back to life, the surface was smooth and even, and the new finish provided lasting protection. The client was left with a floor that looked, and performed, as good as new.

Photos of the completed work:

Floorboards floor after sanding work in SW14 Floorboards floor after sanding work in SW14 Floorboards floor after sanding work in SW14

Frequently Asked Questions

How long does floor sanding take?
Most residential sanding jobs are completed in one to two days, depending on floor size and condition. Lacquering or oiling adds further drying and curing time, which we factor into the job schedule.

Do I need to vacate the property during sanding?
Modern dustless sanding equipment keeps dust to a minimum, but we recommend keeping pets and young children clear of the area during the work. Most clients remain in their property throughout.

How much does floor sanding cost in London?
Prices typically range from £25 to £45 per square metre depending on floor condition, finish type, and any repair work required. Gap filling and board replacement are priced separately if needed.

Have a similar project? Call us on 020 88309782 or Book a Free Site Visit

Show more
Engineered Wood Flooring Installation in Buckhurst Hill - Full Case Study

Project Overview This Buckhurst Hill property needed new flooring installed across the main living areas. The client had opted for engineered wood as their preferred choice, primarily because the house had some areas with potential for moisture variation, including a room over an unventilated crawl space. Engineered wood's layered construction makes it considerably more stable in these conditions...

Project Overview

This Buckhurst Hill property needed new flooring installed across the main living areas. The client had opted for engineered wood as their preferred choice, primarily because the house had some areas with potential for moisture variation, including a room over an unventilated crawl space. Engineered wood's layered construction makes it considerably more stable in these conditions than solid hardwood, which was the right call for this particular property. The installation covered the living room, dining area, and hallway.

Subfloor before engineered flooring installation in Buckhurst Hill

The Challenge

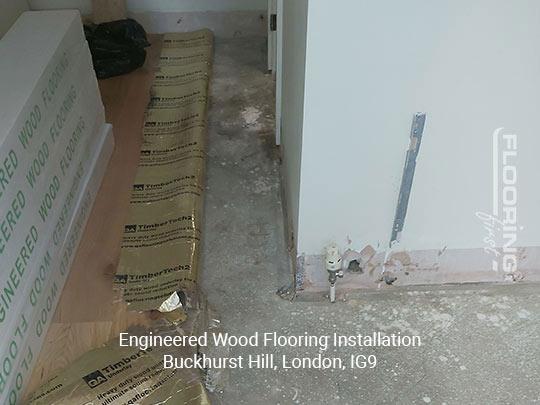
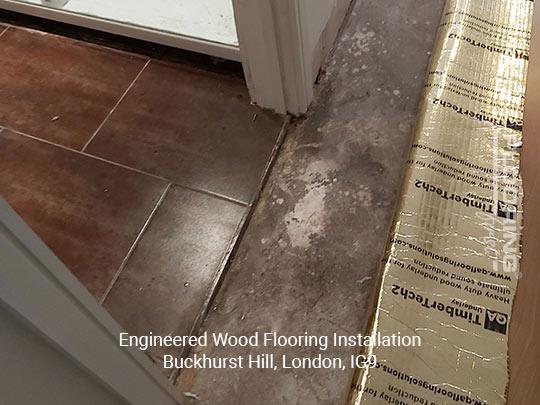
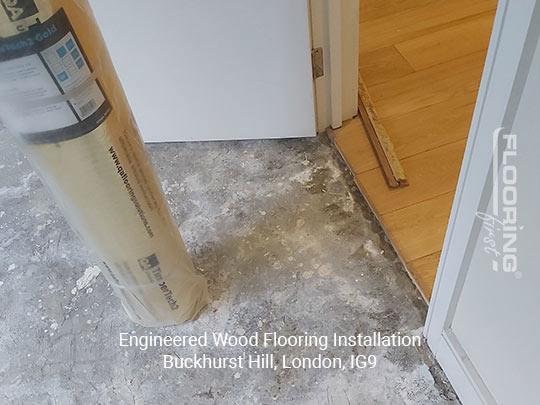
The room over the crawl space had shown slightly higher moisture readings in the past, and the subfloor in that area needed careful assessment before any flooring went down. Fitting engineered boards over a subfloor with unresolved moisture issues can lead to cupping, where the boards bow upward at their edges as they absorb moisture, or to the adhesive failing if the boards are glued down. The hallway subfloor also had an old adhesive residue from a previous floor covering that needed removing before a clean installation base was available.

Engineered boards before fitting, Buckhurst Hill

Our Approach

Subfloor Assessment and Preparation

We carried out moisture testing across all subfloor areas. The room over the crawl space had a slightly elevated reading, which we addressed with a moisture barrier membrane before installation began. The adhesive residue in the hallway was mechanically removed and the surface levelled and cleaned.

Acclimatisation

The engineered boards were delivered to the property and left to acclimatise for the manufacturer's recommended period before fitting. This allowed the boards to reach equilibrium with the temperature and humidity of the space, reducing the risk of movement after installation.

Engineered wood flooring installation in Buckhurst Hill

Installation

The boards were fitted using a combination of floating and glued methods, chosen according to the subfloor type in each area. The floating method was used in the main rooms for ease of future access, and a direct glue-down method was used in the hallway where there was less room for expansion and a firmer fix was preferable. All expansion gaps at perimeters were correctly maintained throughout.

Accessories and Finishing

Matching beading, threshold strips, and reducer bars were fitted at all walls and transitions. The product specifications were matched to the board profile to give a neat, factory-finished appearance at all edges.

The Result

The finished floor runs consistently throughout the property, with clean transitions between areas and all accessories properly fitted. The engineered boards have held their position well since installation with no movement or cupping, which confirms the subfloor preparation work was effective. Engineered floor fitting in Essex and the surrounding areas typically costs from £35 to £60 per square metre for supply and fit, depending on the board specification and subfloor preparation required.

Frequently Asked Questions

Why is engineered wood better than solid wood in a property with moisture concerns?
Engineered wood is constructed from multiple layers of timber bonded together at different grain directions, which gives it much greater dimensional stability than a solid plank. Where solid wood can expand, contract, cup, or bow significantly in response to moisture changes, engineered boards move far less and are far less likely to develop problems in areas where moisture control is not perfect.

What is the best installation method for engineered wood - floating or glue-down?
Both methods work well, and the best choice depends on the subfloor type and the property layout. Floating is quicker to install and easier to replace in sections if needed. Glue-down gives a more solid underfoot feel and is better in narrower spaces or areas with limited room for expansion. Many installations use both methods in different areas of the same property.

How thick should an engineered board be for a standard domestic installation?
Most domestic engineered floor installations use boards between 12mm and 20mm total thickness. The total thickness affects the underfoot feel and the height change at doorway transitions. The veneer thickness is also important as it determines how many times the floor can be sanded in the future. A 3mm or 4mm veneer is generally recommended for a floor you want to be able to refinish.

Have a similar project? Call us on 020 88309782 or Book a Free Site Visit

Show more
Engineered Wood Floor Fitting and Sanding in Tadworth - Full Case Study

Project Overview This Tadworth project combined engineered wood floor installation with sanding and finishing of the laid boards. The client was fitting a new unfinished engineered oak floor and wanted the sanding and finishing done on site after installation to achieve a consistent factory-flat result and their preferred finish specification. Installing unfinished engineered boards and sanding o...

Project Overview

This Tadworth project combined engineered wood floor installation with sanding and finishing of the laid boards. The client was fitting a new unfinished engineered oak floor and wanted the sanding and finishing done on site after installation to achieve a consistent factory-flat result and their preferred finish specification. Installing unfinished engineered boards and sanding on site gives a higher quality finish than pre-finished boards, particularly at the board joints, and allows full control over the final colour and sheen level.

Subfloor before engineered floor fitting in Tadworth

The Challenge

Installing unfinished engineered boards and then sanding on site requires careful sequencing. The boards must be fully fixed and the adhesive fully cured before any sanding machine is brought across the floor. Sanding too early can loosen boards or create movement at the joints. The other challenge is achieving a truly flat sanded result on a newly installed floor, where the boards may have slight height variation between individual planks. The sanding programme needs to address this levelling as well as producing the fine surface needed for finishing.

Engineered boards before installation, Tadworth

Our Approach

Subfloor Preparation and Board Installation

The subfloor was checked and prepared to the level of flatness required for a glued installation. The unfinished engineered boards were bonded down using a flexible wood floor adhesive and the full installation was completed before the floor was left to cure. No sanding or foot traffic was allowed on the new floor until the adhesive had fully set.

Levelling Sand

Once cured, we carried out an initial levelling sand to remove any height differences between adjacent boards and to open the grain of the wood consistently across the full floor. This pass uses a coarser grit than subsequent passes and focuses on getting the surface as flat as possible before moving to the finishing stages.

Engineered floor fitting in progress, Tadworth

Finishing Sanding Passes

After the levelling pass, we worked through progressively finer grits to bring the surface to a smooth, consistent condition across the whole floor. Edge sanding was carried out alongside the main floor work to keep the full area progressing at the same pace.

Finish Application

The client had chosen a natural hardwax oil finish, which was applied in two coats with buffing between each. Hardwax oil gives a natural, open appearance to the wood and is a popular choice for newly installed floors where the client wants the wood to look and feel as close to its natural state as possible.

The Result

The finished floor was smooth and consistent throughout, with the hardwax oil finish giving the oak a warm, natural appearance. The joints between boards were flush and clean, which is the key benefit of sanding on site after installation. The client was very pleased with the result. For supply, fit, sand, and finish of an engineered floor in Surrey and the surrounding area, expect to budget from around £45 to £70 per square metre depending on the board specification and finish chosen.

Frequently Asked Questions

What is the advantage of installing unfinished engineered boards and sanding on site?
The main advantage is the finish quality at the board joints. Pre-finished boards have a small bevel at each edge, which creates a visible groove at every joint in the finished floor. On a site-sanded floor, the joints sand flat and the finish goes across them uniformly, giving a much cleaner overall appearance. It also allows full control over the colour, sheen level, and finish product used.

What is hardwax oil and how does it differ from lacquer?
Hardwax oil is a penetrating finish made from natural oils and waxes that soaks into the wood rather than forming a film on the surface. It gives the floor a more natural, matte appearance and a tactile feel that many clients prefer. It is easier to touch up in small areas if damage occurs. Lacquer sits on top of the wood as a protective film, giving a harder surface and a slightly more reflective finish. Both are durable and widely used.

Can an engineered floor installed with adhesive ever be lifted and reused?
This is difficult in practice. Glued-down boards are bonded firmly to the subfloor and removal typically damages both the boards and the subfloor surface. If future flexibility is important, a floating installation is a better choice. Glue-down is generally recommended when the best underfoot performance and stability are the priority.

Have a similar project? Call us on 020 88309782 or Book a Free Site Visit

Show more
  • 1
  • 2
  • 3
  • 4
  • 5
  • 6
  • 7
  • 8
  • 9
  • 10
  • 11
  • 12
  • 13
  • 14
  • 15
  • 16
  • 17
  • 18
  • 19
  • 20
  • 21
  • 22
  • 23
  • 24
  • 25
  • 26
  • 27
  • 28
  • 29
  • 30
  • 31
  • 32
  • 33
  • 34
  • 35
  • 36
  • 37
  • 38
  • 39
  • 40
  • 41
  • 42
  • 43
  • 44
  • 45
  • 46
  • 47
  • 48
  • 49
  • 50
  • 51
  • 52
  • 53
  • 54
  • 55
  • 56
  • 57
  • 58
  • 59
  • 60
  • 61
  • 62
  • 63
  • 64
  • 65
  • 66
  • 67
  • 68
  • 69
  • 70
  • 71
  • 72
  • 73
  • 74
  • 75
  • 76
  • 77
  • 78

Our Flooring Company

Contacts & Showroom Book Free Site Survey About Our Flooring Company Join Our Team Work as a Contractor

Service Information

Terms of Service Terms of Sales Deliveries & Charges Cookie Settings Returns Policy Privacy Policy

Help

FAQs Case Studies Sitemap Glossary
𝕏
FlooringFirst! Services
158 Coles Green Road
London, NW2 7HW
T: 020 88309782
Floor Sanding Services: Central London, East London, Near London, North London, Northwest London, Southeast London, Southwest London, West London
Wood Floor Installation Service: Central London, East London, Near London, North London, Northwest London, Southeast London, Southwest London, West London

  • Flooring Services
  • Floor Sanding
    • Wood Floor Staining
    • Wood Floor Gap Filling
    • Commercial Floor Sanding
    • Engineered Floor Sanding & Refinishing
  • Wood Floor Fitting
    • Parquet Floor Installation
    • Laminate Floor Installation
    • Engineered Wood Floor Installation - Supply & Fit
    • Solid Wood Floor Fitting - Supply & Fit
    • LVT Floor Installation - Supply & Fit
  • Floor Repairs
    • Parquet Floor Repair and Restoration
    • Engineered Wood Floor Repairs
    • Wood Floor Scratch Repair
    • Floorboards Replacement
  • Care & Maintenance
    • Re-Oiling & Recoating Oiled Floors
    • Vinyl & Linoleum Cleaning
    • Hardwood Floor Buffing
    • Wood Floor Polishing
  • Shop
  • Shop
  • Gallery
  • Service Guide
  • Bookings
  • Book Free Survey
  • Service Advice
  • Product Advice