Floor Sanding & Fitting
Book Free Visit Price Guide 020 88309782
Monday - Friday 07:30 - 17:30, Saturday 07:30 - 16:00
cs@flooringfirst.co.uk
020 88309782
Monday - Friday 07:30 - 17:30, Saturday 07:30 - 16:00
cs@flooringfirst.co.uk
  • Book Free Visit
  • Home
  • Floor Sanding
  • Floor Fitting
  • Floor Repairs
  • Aftercare
    • Wooden Floors
    • Cleaning & Polishing
    • Re-Oiling Wooden Floors
    • Vinyls & Linoleum
    • Vinyl Floor Polishing
    • Get a Quote...
  • For Businesses
  • Gallery
  • Service Guide
  • Shop
  • Book Free Visit

Our Wood Flooring Resource

Find Your Way Around...

Floor Sanding Case Studies

See how FlooringFirst solved flooring challenges

WHY CHOOSE US
CASE STUDIES
PRICE GUIDE
OFFERS
GALLERY
ASK EXPERT
WHY CHOOSE US
CASE STUDIES
PRICE GUIDE
OFFERS
GALLERY
ASK EXPERT
  • Home
  • Case Studies
Engineered Wood Floor Installation in Holborn — Full Case Study

Project Overview This engineered wood floor installation project in Holborn covered the main living spaces of a residential property that was being updated as part of a broader renovation. The clients had chosen a quality engineered wood floor that offered the warmth and character of real wood with the added practical advantage of better moisture resistance compared to solid hardwood. Engineered ...

Project Overview

This engineered wood floor installation project in Holborn covered the main living spaces of a residential property that was being updated as part of a broader renovation. The clients had chosen a quality engineered wood floor that offered the warmth and character of real wood with the added practical advantage of better moisture resistance compared to solid hardwood. Engineered flooring installation in London typically costs between £35 and £60 per square metre for fitting, with the total project cost depending on the floor chosen and any subfloor preparation required. This project involved a careful subfloor assessment and a floating installation method that suited the existing conditions well.

Room before engineered wood floor installation in Holborn

The Challenge

The existing subfloor in this property was an old wooden floor, which raised a number of questions at the outset. Old wooden subfloors can be excellent bases for engineered flooring, providing good insulation and a firm base, but they have to be carefully checked for levelness, moisture, and structural integrity. Any boards that are loose, squeaky, or raised need to be secured before the new floor goes on top, because movement in the subfloor will eventually telegraph through the new floor and cause problems at the click joints. The room also had several doorways that required the engineered planks to be cut and fitted around without breaking the pattern or leaving gaps at the threshold.

Old subfloor before engineered floor installation in Holborn

Our Approach

Subfloor preparation. We walked the old wooden subfloor systematically to identify loose or squeaking boards and secured them. Any raised nails or screws were punched flush or removed. The floor was checked for level using a straight edge and any high spots were addressed.

Moisture check. A moisture reading was taken from the subfloor to confirm it was within the acceptable range for engineered wood. Readings above the threshold would require either a vapour barrier or a delay in installation until the subfloor dried out.

Floating installation. The engineered boards were installed using the floating method, clicking together over the prepared subfloor without any adhesive or nails. This method is quick, non-invasive and allows the floor to expand and contract naturally with seasonal changes in humidity.

Accessories and finishing. Matching beading and threshold strips were fitted around the perimeter and at doorways to finish the installation cleanly and protect the expansion gap around the edges of the floor.

Engineered wood floor being laid in Holborn

The Result

The finished floor was a significant improvement on the old subfloor and completed the look of the newly renovated rooms. The engineered boards clicked together tightly with no visible gaps, the beading and thresholds gave a clean, professional finish at all the edges and doorways, and the floor felt solid and stable underfoot. The clients were very pleased with the result and with how well the chosen floor complemented the rest of the decoration. Engineered wood floors installed to this standard will perform well for decades with normal care.

Frequently Asked Questions

What is the difference between floating and glued-down engineered floor installation?
A floating floor clicks together and rests on the subfloor without being fixed to it, allowing natural movement. Glued-down floors are bonded directly to the subfloor using flooring adhesive, which gives a firmer feel underfoot and is often preferred for larger areas or where underfloor heating is installed. The right method depends on the subfloor type and the client's requirements.

Can engineered wood be installed over underfloor heating?
Yes, engineered wood is suitable for use with underfloor heating because the ply core construction is more dimensionally stable than solid wood under the effects of heat. The floor must be conditioned to room temperature before installation and the heating system must be gradually brought up to operating temperature after fitting.

How long does an engineered wood floor last?
A good-quality engineered wood floor with a 4mm or thicker wear layer, properly installed and cared for, will last many decades. It can be sanded and refinished multiple times over its life, which extends its useful life considerably beyond that of most other types of flooring.

Have a similar project? Call us on 020 88309782 or Book a Free Site Visit

Show more
Parquet Sanding and Restoration in Peckham, SE5 — Full Case Study

Project Overview This project involved the professional sanding and restoration of an existing wood floor at a property in Peckham, SE5. The floor had seen years of daily wear and was in need of attention to bring it back to a quality finish. Our team carried out a full assessment before starting work, checking for any boards that needed attention alongside the main sanding and finishing work. ...

Project Overview

This project involved the professional sanding and restoration of an existing wood floor at a property in Peckham, SE5. The floor had seen years of daily wear and was in need of attention to bring it back to a quality finish. Our team carried out a full assessment before starting work, checking for any boards that needed attention alongside the main sanding and finishing work.

Before the Work

Before work began, the floor showed typical signs of wear. Surface scratches, dull patches, and general finish deterioration were present. A thorough survey was carried out to plan the correct sanding depth, assess board condition, and choose the most appropriate finish for the space.

Survey photos showing the floor condition before work:

Floor condition before work at SE5 Floor condition before work at SE5 Floor condition before work at SE5

Our Approach

The following services were carried out as part of this project:

  • Beading Installation (incl. materials)
  • Door Frame Trimming
  • Doors Plus Frame Trimming (per door)
  • Joist Repair Works
  • Parquet - Sand, Buff & Lacquer
  • Parquet Floor Fitting - With Border
  • Staining
  • Subfloor Preparation (ply 12 mm)
  • Thresholds & Fitting (inc. materials)
  • Fireplace Remove & Dispose

The Result

Once the sanding and finishing process was complete, the floor was transformed. The wood grain was opened up and brought back to life, the surface was smooth and even, and the new finish provided lasting protection. The client was left with a floor that looked, and performed, as good as new.

Photos of the completed work:

Parquet floor after sanding work in SE5 Parquet floor after sanding work in SE5 Parquet floor after sanding work in SE5

Frequently Asked Questions

How long does floor sanding take?
Most residential sanding jobs are completed in one to two days, depending on floor size and condition. Lacquering or oiling adds further drying and curing time, which we factor into the job schedule.

Do I need to vacate the property during sanding?
Modern dustless sanding equipment keeps dust to a minimum, but we recommend keeping pets and young children clear of the area during the work. Most clients remain in their property throughout.

How much does floor sanding cost in London?
Prices typically range from £25 to £45 per square metre depending on floor condition, finish type, and any repair work required. Gap filling and board replacement are priced separately if needed.

Have a similar project? Call us on 020 88309782 or Book a Free Site Visit

Show more
Engineered Wood Sanding and Restoration in Canonbury, N1 — Full Case Study

Project Overview This project involved the professional sanding and restoration of an existing wood floor at a property in Canonbury, N1. The floor had seen years of daily wear and was in need of attention to bring it back to a quality finish. Our team carried out a full assessment before starting work, checking for any boards that needed attention alongside the main sanding and finishing work....

Project Overview

This project involved the professional sanding and restoration of an existing wood floor at a property in Canonbury, N1. The floor had seen years of daily wear and was in need of attention to bring it back to a quality finish. Our team carried out a full assessment before starting work, checking for any boards that needed attention alongside the main sanding and finishing work.

Before the Work

Before work began, the floor showed typical signs of wear. Surface scratches, dull patches, and general finish deterioration were present. A thorough survey was carried out to plan the correct sanding depth, assess board condition, and choose the most appropriate finish for the space.

Our Approach

The following services were carried out as part of this project:

  • Engineered - Sand, Buff & Lacquer
  • Stairs - Sand & Seal
  • Thresholds & Fitting (inc. materials)
  • Silicone Application Around Perimeter

The Result

Once the sanding and finishing process was complete, the floor was transformed. The wood grain was opened up and brought back to life, the surface was smooth and even, and the new finish provided lasting protection. The client was left with a floor that looked, and performed, as good as new.

Photos of the completed work:

Engineered Wood floor after sanding work in N1 Engineered Wood floor after sanding work in N1 Engineered Wood floor after sanding work in N1

Frequently Asked Questions

How long does floor sanding take?
Most residential sanding jobs are completed in one to two days, depending on floor size and condition. Lacquering or oiling adds further drying and curing time, which we factor into the job schedule.

Do I need to vacate the property during sanding?
Modern dustless sanding equipment keeps dust to a minimum, but we recommend keeping pets and young children clear of the area during the work. Most clients remain in their property throughout.

How much does floor sanding cost in London?
Prices typically range from £25 to £45 per square metre depending on floor condition, finish type, and any repair work required. Gap filling and board replacement are priced separately if needed.

Have a similar project? Call us on 020 88309782 or Book a Free Site Visit

Show more
Engineered Wood Sanding and Restoration in Westminster, SW1V — Full Case Study

Project Overview This project involved the professional sanding and restoration of an existing wood floor at a property in Westminster, SW1V. The floor had seen years of daily wear and was in need of attention to bring it back to a quality finish. Our team carried out a full assessment before starting work, checking for any boards that needed attention alongside the main sanding and finishing w...

Project Overview

This project involved the professional sanding and restoration of an existing wood floor at a property in Westminster, SW1V. The floor had seen years of daily wear and was in need of attention to bring it back to a quality finish. Our team carried out a full assessment before starting work, checking for any boards that needed attention alongside the main sanding and finishing work.

Before the Work

Before work began, the floor showed typical signs of wear. Surface scratches, dull patches, and general finish deterioration were present. A thorough survey was carried out to plan the correct sanding depth, assess board condition, and choose the most appropriate finish for the space.

Survey photos showing the floor condition before work:

Floor condition before work at SW1V Floor condition before work at SW1V Floor condition before work at SW1V

Our Approach

The following services were carried out as part of this project:

  • Engineered - Sand, Buff & Oil
  • Furniture Moving
  • Single Plank Repair ( top layer & gap filling)
  • Congestion & ULEZ Charge (per day)

The Result

Once the sanding and finishing process was complete, the floor was transformed. The wood grain was opened up and brought back to life, the surface was smooth and even, and the new finish provided lasting protection. The client was left with a floor that looked, and performed, as good as new.

Photos of the completed work:

Engineered Wood floor after sanding work in SW1V Engineered Wood floor after sanding work in SW1V Engineered Wood floor after sanding work in SW1V

Frequently Asked Questions

How long does floor sanding take?
Most residential sanding jobs are completed in one to two days, depending on floor size and condition. Lacquering or oiling adds further drying and curing time, which we factor into the job schedule.

Do I need to vacate the property during sanding?
Modern dustless sanding equipment keeps dust to a minimum, but we recommend keeping pets and young children clear of the area during the work. Most clients remain in their property throughout.

How much does floor sanding cost in London?
Prices typically range from £25 to £45 per square metre depending on floor condition, finish type, and any repair work required. Gap filling and board replacement are priced separately if needed.

Have a similar project? Call us on 020 88309782 or Book a Free Site Visit

Show more
Fitting Herringbone Parquet in Bow, E3 — Full Case Study

Project Overview This project involved the professional installation of herringbone parquet flooring at a property in Bow, E3. The client required a quality floor that would stand up to daily use and complement their interior. Our fitting team assessed the subfloor condition, carried out any necessary preparation work, and fitted the new floor to a high standard. Before the Work Prior to inst...

Project Overview

This project involved the professional installation of herringbone parquet flooring at a property in Bow, E3. The client required a quality floor that would stand up to daily use and complement their interior. Our fitting team assessed the subfloor condition, carried out any necessary preparation work, and fitted the new floor to a high standard.

Before the Work

Prior to installation, the existing floor covering was inspected and the subfloor was prepared to ensure it was flat, dry, and suitable for the new herringbone parquet. Any existing floor covering was lifted and disposed of cleanly before the fitting work began.

Survey photos showing the floor condition before work:

Floor condition before work at E3 Floor condition before work at E3

Our Approach

The following services were carried out as part of this project:

  • Beading Installation (incl. materials)
  • Door Frame Trimming
  • Doors Plus Frame Trimming (per door)
  • Thresholds & Fitting (inc. materials)
  • Vinyl Installation Herringbone Style ( 35 sqm)

The Result

The completed herringbone parquet installation looked clean and finished throughout. Joins are tight, edges are neat, and the floor sits flat and stable. Beading and threshold strips were fitted where required to complete the job properly. The client was pleased with both the quality of the work and the appearance of the new floor.

Photos of the completed work:

Herringbone Parquet floor after fitting work in E3 Herringbone Parquet floor after fitting work in E3 Herringbone Parquet floor after fitting work in E3

Frequently Asked Questions

How long does herringbone parquet installation take?
Most fitting jobs are completed within one to two days. Larger areas or more detailed layouts such as herringbone patterns take longer due to the additional cutting and positioning involved.

Do I need underlay?
Yes, underlay is required for most floor types and helps with insulation, sound deadening, and levelling minor subfloor imperfections. We can supply and fit appropriate underlay as part of the installation.

How much does floor fitting cost in London?
Fitting costs typically range from £70 to £100 per square metre depending on floor type and complexity. We provide a full written quote before starting any work.

Have a similar project? Call us on 020 88309782 or Book a Free Site Visit

Show more
Replacement and Fitting of Engineered Wood in Leyton, E10 — Full Case Study

Project Overview This project involved the professional installation of engineered wood flooring at a property in Leyton, E10. The client required a quality floor that would stand up to daily use and complement their interior. Our fitting team assessed the subfloor condition, carried out any necessary preparation work, and fitted the new floor to a high standard. Before the Work Prior to inst...

Project Overview

This project involved the professional installation of engineered wood flooring at a property in Leyton, E10. The client required a quality floor that would stand up to daily use and complement their interior. Our fitting team assessed the subfloor condition, carried out any necessary preparation work, and fitted the new floor to a high standard.

Before the Work

Prior to installation, the existing floor covering was inspected and the subfloor was prepared to ensure it was flat, dry, and suitable for the new engineered wood. Any existing floor covering was lifted and disposed of cleanly before the fitting work began.

Survey photos showing the floor condition before work:

Floor condition before work at E10 Floor condition before work at E10

Our Approach

The following services were carried out as part of this project:

  • Beading Installation (excl. materials)
  • Door Frame Trimming
  • Doors Plus Frame Trimming (per door)
  • Engineered Flooring Installation
  • Lift & Dispose Carpets or Laminates
  • Thresholds & Fitting (inc. materials)
  • Installation of Noisestop Acoustic Underlay ( 1200mm x 1200mm) 1.44sqm sheet ( 31sqm)
  • Stair Nosing Fitting ( incl materials)
  • Subfloor Preparation (ply 12 mm) 31sqm

The Result

The completed engineered wood installation looked clean and finished throughout. Joins are tight, edges are neat, and the floor sits flat and stable. Beading and threshold strips were fitted where required to complete the job properly. The client was pleased with both the quality of the work and the appearance of the new floor.

Photos of the completed work:

Engineered Wood floor after fitting work in E10 Engineered Wood floor after fitting work in E10 Engineered Wood floor after fitting work in E10

Frequently Asked Questions

How long does engineered wood installation take?
Most fitting jobs are completed within one to two days. Larger areas or more detailed layouts such as herringbone patterns take longer due to the additional cutting and positioning involved.

Do I need underlay?
Yes, underlay is required for most floor types and helps with insulation, sound deadening, and levelling minor subfloor imperfections. We can supply and fit appropriate underlay as part of the installation.

How much does floor fitting cost in London?
Fitting costs typically range from £35 to £60 per square metre depending on floor type and complexity. We provide a full written quote before starting any work.

Have a similar project? Call us on 020 88309782 or Book a Free Site Visit

Show more
Engineered Wood Floor Sanding, Repair and Re-Oiling in Pimlico — Full Case Study

Project Overview This engineered wood floor in Pimlico had been in place for several years and was beginning to show a range of problems: a handful of damaged boards, gaps opening between others, and a finish that no longer offered any meaningful protection. The owner wanted the floor restored to a standard fit for a Pimlico flat, and the combination of targeted board repairs, gap filling and a f...

Project Overview

This engineered wood floor in Pimlico had been in place for several years and was beginning to show a range of problems: a handful of damaged boards, gaps opening between others, and a finish that no longer offered any meaningful protection. The owner wanted the floor restored to a standard fit for a Pimlico flat, and the combination of targeted board repairs, gap filling and a full sand and re-oil achieved exactly that. The total scope of work was larger than a straightforward refinish but smaller than a full floor replacement, and the result justified the decision to restore.

Engineered wood floor before repair and sanding in Pimlico

The Challenge

The combination of repairs, gap filling and refinishing on an engineered floor is more technically demanding than any one of those tasks in isolation. The repaired boards need to sit perfectly flush with the surrounding floor before sanding, or the sanding machine will either leave a ridge at the junction or sand through the new board more quickly than the surrounding original material. The gap filling compound also needed to be applied carefully to avoid contaminating the surface of the boards on either side of the gap, which would show up as patchy discolouration under the oil finish. Getting all three elements right in the correct sequence is the difference between a tidy, professional result and one that looks patchwork.

Damaged boards identified before repair in Pimlico

Our Approach

Board repairs first. Damaged boards were removed and replaced with matching engineered boards. Any boards that were simply loose or squeaking were re-secured with flooring adhesive and left to cure before sanding began.

Gap filling. Gaps between boards were filled with a flexible resin compound mixed with wood dust to match the floor colour. The filler was applied, allowed to cure, and then lightly sanded flush with the surface.

Sanding. The floor was sanded using a controlled sequence of grits appropriate for engineered wood. Starting with a medium grit to remove the old finish and flatten all repairs, progressing to fine grits for a smooth, consistent surface throughout. Edge sanding completed the perimeter.

Oil finish application. An oil finish was applied in two coats. Oil was chosen because it penetrates into the wood's structure rather than sitting on top, providing protection from within and giving a natural, warm appearance that suits the character of the property.

Sanding the engineered wood floor in Pimlico

The Result

The repaired and refinished floor looked clean, uniform and well-maintained. The replacement boards blended effectively after sanding, the gaps were eliminated, and the oil finish gave the whole surface a warm, natural appearance. The owner now has a floor that is structurally sound, properly protected and considerably more attractive than it was when we arrived. Oil finishes do need re-applying periodically, but maintenance is straightforward and does not require any sanding between top-up coats.

Frequently Asked Questions

Can damaged engineered boards be replaced without replacing the entire floor?
Yes, in most cases. As long as matching boards can be sourced, individual damaged boards can be removed and replaced. The whole floor is then sanded, which ensures a uniform appearance across old and new boards.

What is the difference between oil and lacquer for engineered floors?
Lacquer sits on top of the wood as a hard film, while oil penetrates into the grain. Lacquer is more scratch-resistant in the short term; oil looks more natural and is easier to maintain and spot-repair. Both are suitable finishes depending on the use and preference of the owner.

How often does an oiled engineered floor need maintenance?
In a well-used residential property, an oiled floor usually benefits from a maintenance oil coat every one to two years. This does not require sanding; the existing oil is lightly buffed and a new coat applied on top.

Have a similar project? Call us on 020 88309782 or Book a Free Site Visit

Show more
Parquet Re-Oiling and Gap Filling in Walthamstow — Full Case Study

Project Overview This parquet floor in Walthamstow had an oil finish that had not been maintained for several years and was showing the typical signs of a depleted oil coat: the surface had become dry and dull, the wood had lost its natural warmth, and minor gaps had opened between some of the blocks. Rather than a full sand, which would not have been necessary given the condition of the underlyi...

Project Overview

This parquet floor in Walthamstow had an oil finish that had not been maintained for several years and was showing the typical signs of a depleted oil coat: the surface had become dry and dull, the wood had lost its natural warmth, and minor gaps had opened between some of the blocks. Rather than a full sand, which would not have been necessary given the condition of the underlying wood, the right treatment was a targeted gap fill followed by a re-oil. This approach preserved the existing surface, required no heavy machinery, and was completed with far less disruption than a full sanding job. Re-oiling costs considerably less per visit than a full sanding cycle, making it a cost-effective part of any regular parquet maintenance programme.

Parquet floor before re-oiling and gap filling in Walthamstow

The Challenge

The gaps in this parquet floor were relatively minor but distributed across a large area of the floor. Filling them required care because the gap fill had to sit flush with the surface of the blocks rather than proud of them, and the colour had to be a reasonable match for the existing wood. On an oiled floor where the surface is not being sanded down to bare wood, the filler cannot be matched by mixing it with fresh sanding dust, so the colour match relies entirely on selecting the right resin product. The re-oiling also needed to be done in stages rather than all at once, to allow each coat to be absorbed properly by the wood rather than pooling on the surface.

Parquet floor showing minor gaps before treatment in Walthamstow

Our Approach

Initial inspection. We inspected the full floor to confirm that no blocks were loose and that the wood itself was in good condition beneath the depleted oil finish. No blocks required re-gluing, and no deeper sanding was needed.

Gap filling. The gaps between parquet blocks were filled with a natural resin compound selected for compatibility with an oiled finish. The filler was pressed into the gaps, allowed to cure, then lightly sanded flush with a fine abrasive pad to ensure a level surface before the oil was applied.

Surface preparation. The whole floor was lightly buffed with a fine pad to remove any surface contamination and open the wood's pores slightly, which helps the oil absorb evenly.

Oil application. Two coats of Osmo Polyx Hardwax Oil were applied, working in the direction of the block grain where possible. This product was selected for its combination of oil and wax, which gives a natural, lustrous finish and provides both penetrating protection from within the wood and a light surface hardness from the wax component.

Applying oil finish to parquet floor in Walthamstow

The Result

The floor came back to life after the re-oiling. The natural warmth and colour of the parquet wood returned fully once the Osmo oil was applied, the gaps were closed and invisible, and the surface had a consistent, healthy sheen throughout. The owners now have a parquet floor that is properly protected and will remain in good condition with a re-oil every year or two. On a well-maintained oiled parquet floor, the need for a full sand can be pushed back considerably by keeping up with regular re-oiling, making this a practical long-term maintenance strategy.

Frequently Asked Questions

How often does an oiled parquet floor need re-oiling?
In a busy household, re-oiling every one to two years is usually appropriate. Lightly used rooms may go three years between treatments. The floor itself gives clear signals when re-oiling is due: the surface looks dry, the colour becomes flat, and water no longer beads on the surface as it should on a well-oiled floor.

Does re-oiling require sanding the parquet first?
Not for a routine maintenance re-oil. A light buff with a fine pad to remove surface contamination and open the pores is usually all that is needed. Sanding is only necessary if the floor has scratches that have gone through the oil finish into the bare wood, or if the surface needs significant correction.

What is Osmo Polyx Hardwax Oil and why is it used on parquet floors?
Osmo Polyx is a combination of natural oils and hard waxes that penetrates the grain of the wood while leaving a light protective layer on the surface. It is popular for parquet floors because it gives a natural appearance that enhances the character of the wood pattern, it is hard-wearing for a penetrating oil, and it can be re-applied without stripping the old finish.

Have a similar project? Call us on 020 88309782 or Book a Free Site Visit

Show more
Parquet Floor Sanding and Restoration in Bromley - Full Case Study

Project Overview St Johns the Evangelist Church in Bromley approached us for a large-scale parquet floor restoration covering 5,000 square feet of original wood block flooring. The church had been planning the project for some time, wanting experienced contractors who could handle the scale without disrupting services. We were commissioned to sand, gap fill, and refinish the entire floor to comme...

Project Overview

St Johns the Evangelist Church in Bromley approached us for a large-scale parquet floor restoration covering 5,000 square feet of original wood block flooring. The church had been planning the project for some time, wanting experienced contractors who could handle the scale without disrupting services. We were commissioned to sand, gap fill, and refinish the entire floor to commercial-grade standard.
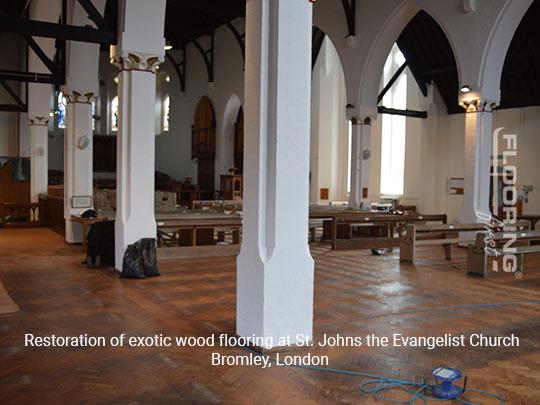
Parquet floor before sanding at St Johns the Evangelist Church, Bromley

The Challenge

A project of this size in a public building brings its own set of difficulties. The floor had years of accumulated wear from daily foot traffic, regular events, and general use. Gaps had opened up between the blocks, the finish was dull and flaking in patches, and the surface had lost the consistency you want to see across a floor of this quality. Because parquet blocks are laid in a herringbone pattern at 45 degrees, sanding against the grain would have caused damage rather than resolved it. Planning the correct sanding sequence across 5,000 square feet, while keeping disruption to the church to a minimum, required careful scheduling and a clear method from the start.
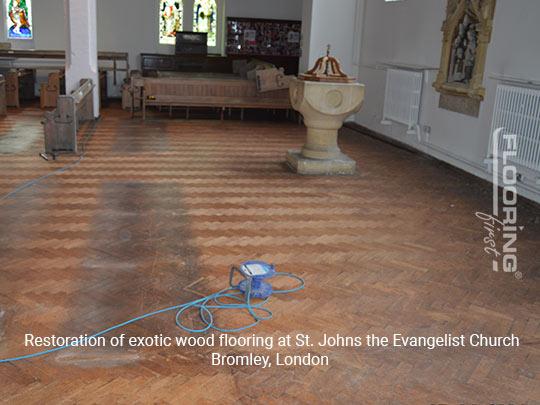
Worn parquet before treatment, Bromley church

Our Approach

Floor Inspection

Before any machinery was brought in, we carried out a thorough inspection of the full floor. Every section was assessed for loose blocks, significant gaps, and areas of more serious surface damage. This stage determined exactly what preparation work was needed before sanding could begin.

Gap Filling

All gaps between the parquet blocks were filled using a mixture of natural resin and wood dust. This method is the preferred approach for gap filling on wood floors because the resin remains slightly flexible when cured, meaning it will not crack or shrink back over time. The filled surface was left to fully harden before we moved on.
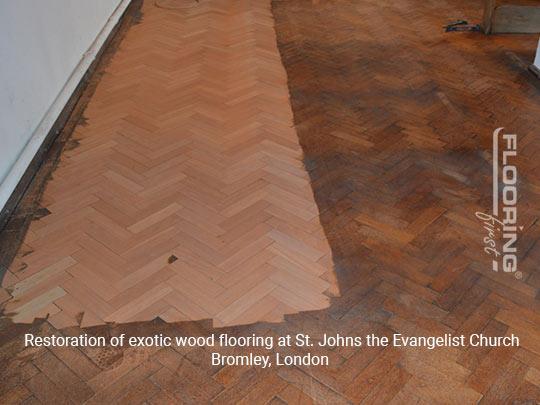
Multi-Stage Sanding

We worked through a multi-stage sanding programme, starting with coarser grits to remove the old finish and surface damage, then working progressively finer to achieve a smooth, even surface across the full 5,000 square feet. For parquet, the direction of each sanding pass is critical, so we carefully followed the grain of each section rather than working in a single direction across the floor.

Sanding in progress at St Johns Church, Bromley

Refinishing with Commercial-Grade Lacquer

Once sanding was complete, the floor was coated with Pallmann Pal-X Trend, a two-component lacquer designed specifically for heavy-traffic environments. It provides hard-wearing protection that is appropriate for a building used by the public on a daily basis. Multiple coats were applied, with light buffing between each one, to achieve a consistent and durable finish.

The Result

The finished floor looks completely different from how it appeared when we started. All surface imperfections were removed, the gaps are no longer visible, and the parquet pattern reads clearly across the whole space. The church now has a floor that is protected for years of continued heavy use. For commercial sanding projects of this kind in the Bromley area, pricing typically runs from around £25 to £45 per square metre depending on the condition of the floor and the finish specified.

Frequently Asked Questions

How long does a commercial floor sanding project of this scale take?
A 5,000 square foot project requires several days of continuous work. We plan the schedule to minimise the number of sessions needed and to allow each coat of finish to cure properly before the next one is applied. The total duration depends on the condition of the floor and the number of coats required.

Can parquet floors be sanded as many times as solid wood floors?
Parquet blocks are generally shallower than solid timber planks, so the number of times they can be fully sanded is more limited. However, a professional assessment will confirm how much material remains and what sanding approach is appropriate. Many parquet floors can be fully restored without reaching that limit.

What finish is best for a church or public building floor?
A two-component oil-based or water-based commercial lacquer is the standard choice for public premises. Products like Pallmann Pal-X Trend are designed for exactly this kind of environment and provide the durability needed to withstand daily foot traffic without requiring frequent maintenance.

Have a similar project? Call us on 020 88309782 or Book a Free Site Visit

Show more
Engineered Wood Sanding and Restoration in Dartford, DA13 — Full Case Study

Project Overview This project involved the professional sanding and restoration of an existing wood floor at a property in Dartford, DA13. The floor had seen years of daily wear and was in need of attention to bring it back to a quality finish. Our team carried out a full assessment before starting work, checking for any boards that needed attention alongside the main sanding and finishing work...

Project Overview

This project involved the professional sanding and restoration of an existing wood floor at a property in Dartford, DA13. The floor had seen years of daily wear and was in need of attention to bring it back to a quality finish. Our team carried out a full assessment before starting work, checking for any boards that needed attention alongside the main sanding and finishing work.

Before the Work

Before work began, the floor showed typical signs of wear. Surface scratches, dull patches, and general finish deterioration were present. A thorough survey was carried out to plan the correct sanding depth, assess board condition, and choose the most appropriate finish for the space.

Survey photos showing the floor condition before work:

Floor condition before work at DA13 Floor condition before work at DA13 Floor condition before work at DA13

Our Approach

The following services were carried out as part of this project:

  • Damp Proofing - Liquid DPM
  • Door Frame Trimming
  • Engineered - Sand, Buff & Oil
  • Engineered Flooring Installation
  • Thresholds & Fitting (inc. materials)
  • Solid Oak Scotia Beading, Lacquered, 19x19 mm, 2.0 m
  • Cut LED Lights

The Result

Once the sanding and finishing process was complete, the floor was transformed. The wood grain was opened up and brought back to life, the surface was smooth and even, and the new finish provided lasting protection. The client was left with a floor that looked, and performed, as good as new.

Photos of the completed work:

Engineered Wood floor after sanding work in DA13 Engineered Wood floor after sanding work in DA13 Engineered Wood floor after sanding work in DA13

Frequently Asked Questions

How long does floor sanding take?
Most residential sanding jobs are completed in one to two days, depending on floor size and condition. Lacquering or oiling adds further drying and curing time, which we factor into the job schedule.

Do I need to vacate the property during sanding?
Modern dustless sanding equipment keeps dust to a minimum, but we recommend keeping pets and young children clear of the area during the work. Most clients remain in their property throughout.

How much does floor sanding cost in London?
Prices typically range from £25 to £45 per square metre depending on floor condition, finish type, and any repair work required. Gap filling and board replacement are priced separately if needed.

Have a similar project? Call us on 020 88309782 or Book a Free Site Visit

Show more
  • 1
  • 2
  • 3
  • 4
  • 5
  • 6
  • 7
  • 8
  • 9
  • 10
  • 11
  • 12
  • 13
  • 14
  • 15
  • 16
  • 17
  • 18
  • 19
  • 20
  • 21
  • 22
  • 23
  • 24
  • 25
  • 26
  • 27
  • 28
  • 29
  • 30
  • 31
  • 32
  • 33
  • 34
  • 35
  • 36
  • 37
  • 38
  • 39
  • 40
  • 41
  • 42
  • 43
  • 44
  • 45
  • 46
  • 47
  • 48
  • 49
  • 50
  • 51
  • 52
  • 53
  • 54
  • 55
  • 56
  • 57
  • 58
  • 59
  • 60
  • 61
  • 62
  • 63
  • 64
  • 65
  • 66
  • 67
  • 68
  • 69
  • 70
  • 71
  • 72
  • 73
  • 74
  • 75
  • 76
  • 77
  • 78

Our Flooring Company

Contacts & Showroom Book Free Site Survey About Our Flooring Company Join Our Team Work as a Contractor

Service Information

Terms of Service Terms of Sales Deliveries & Charges Cookie Settings Returns Policy Privacy Policy

Help

FAQs Case Studies Sitemap Glossary
𝕏
FlooringFirst! Services
158 Coles Green Road
London, NW2 7HW
T: 020 88309782
Floor Sanding Services: Central London, East London, Near London, North London, Northwest London, Southeast London, Southwest London, West London
Wood Floor Installation Service: Central London, East London, Near London, North London, Northwest London, Southeast London, Southwest London, West London

  • Flooring Services
  • Floor Sanding
    • Wood Floor Staining
    • Wood Floor Gap Filling
    • Commercial Floor Sanding
    • Engineered Floor Sanding & Refinishing
  • Wood Floor Fitting
    • Parquet Floor Installation
    • Laminate Floor Installation
    • Engineered Wood Floor Installation - Supply & Fit
    • Solid Wood Floor Fitting - Supply & Fit
    • LVT Floor Installation - Supply & Fit
  • Floor Repairs
    • Parquet Floor Repair and Restoration
    • Engineered Wood Floor Repairs
    • Wood Floor Scratch Repair
    • Floorboards Replacement
  • Care & Maintenance
    • Re-Oiling & Recoating Oiled Floors
    • Vinyl & Linoleum Cleaning
    • Hardwood Floor Buffing
    • Wood Floor Polishing
  • Shop
  • Shop
  • Gallery
  • Service Guide
  • Bookings
  • Book Free Survey
  • Service Advice
  • Product Advice