Project Overview
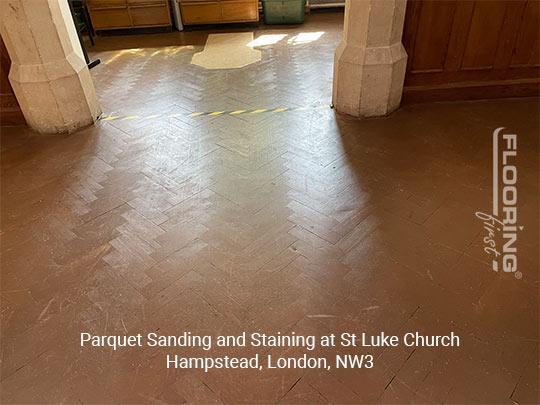
This project at St Luke Church in Hampstead, NW3, involved the full restoration of a parquet floor that had been heavily damaged by poor previous work — the floor had been sanded by cowboy operators who had left scratches running against the grain throughout. In addition to the surface damage, the finish had been applied poorly and was peeling in places. The brief was to re...
Project Overview
This project at St Luke Church in Hampstead, NW3, involved the full restoration of a parquet floor that had been heavily damaged by poor previous work — the floor had been sanded by cowboy operators who had left scratches running against the grain throughout. In addition to the surface damage, the finish had been applied poorly and was peeling in places. The brief was to remove all surface damage, apply a fresh stain in the colour the client required, and finish with a commercial-grade lacquer capable of withstanding the heavy foot traffic typical of a church. Parquet sanding and staining of this complexity typically sits at £30 to £50 per square metre.
The Challenge
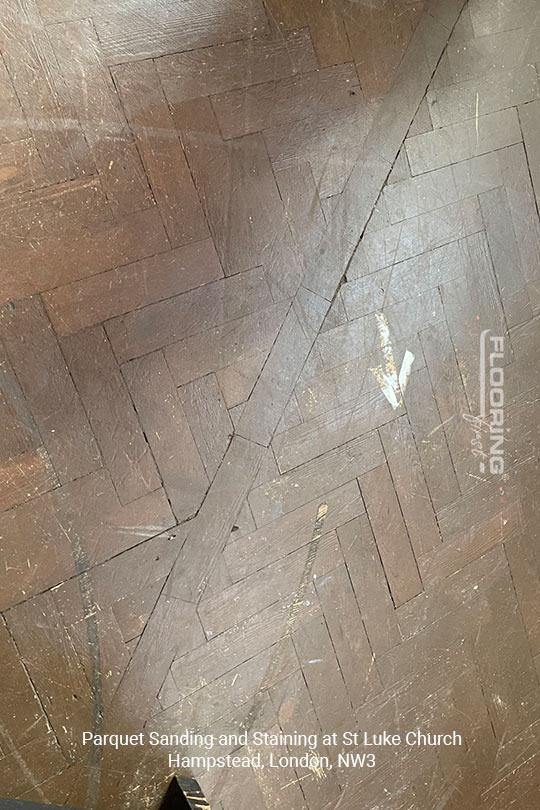
Correcting damage caused by sanding against the grain on a parquet floor is one of the more demanding tasks in floor renovation. When a belt sander runs across the face of parquet blocks in the wrong direction it tears the grain fibres rather than cutting them cleanly, leaving visible scratches that must be removed with careful sanding across multiple grit levels. The challenge is doing this without damaging the blocks further or removing too much material. Commercial lacquer over a stained floor also needs careful preparation — if the stain is not fully dry and evenly applied before the first lacquer coat, the finish will look patchy and uneven. Timing and patience matter on a job like this.
Our Approach
Assessment: Before any machines were started we went over the floor by hand, assessing the depth of the grain damage from the previous sanding. The worst-affected areas were marked so we could give them additional attention in the early passes.
Multi-direction sanding: We used a combination of disc sanders and belt sanders sized for parquet work, adjusted carefully for the pattern direction in each section of the floor. Multiple passes starting at a coarse grit were needed to remove the previous damage, working progressively finer until the surface was consistent. Gap filling was carried out between sanding passes — resin and sawdust for the narrower gaps across the floor.
Staining: Once the surface was clean, smooth and uniformly prepared, the stain was applied by hand in sections, keeping a wet edge and working consistently in the direction of the grain in each block run. The client's chosen colour was applied evenly and left to dry fully before any lacquer was applied.
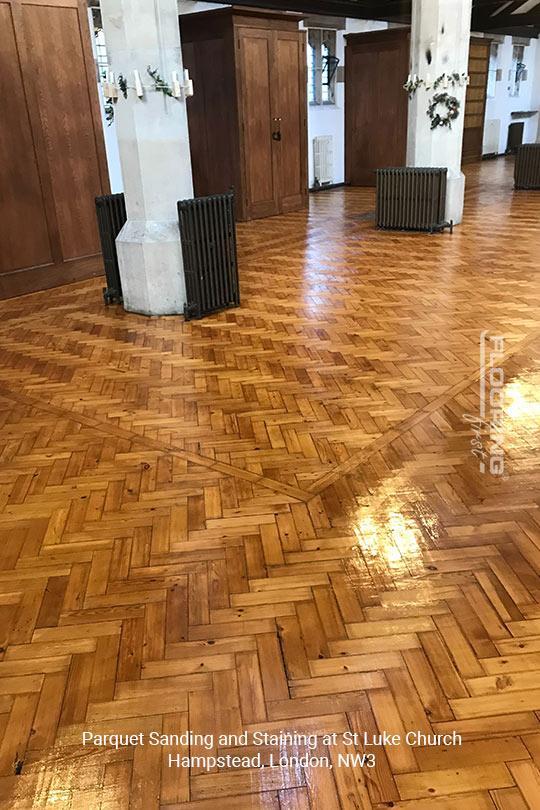
Commercial-grade lacquering: Three coats of commercial lacquer were applied with sanding between each coat. Commercial lacquer is specified in high-traffic environments such as churches because it is significantly harder and more resistant to scuffing than standard domestic lacquer. The result is a finish that will hold up under regular heavy use.
The Result
The finished floor looks entirely different from how it arrived with us. All grain damage from the previous poor work has been removed, the stain colour is even throughout and the commercial lacquer gives the surface a clean, uniform sheen. The church has a floor that will perform well in daily use for years without needing further professional attention beyond routine cleaning.
FAQ
Can damage caused by sanding against the grain always be fixed?
In most cases, yes — provided the damage does not go too deep into the block. Grain-direction scratches left by incorrect sanding need to be cut back to below the scratch level, which takes material. If the blocks are thick enough this is achievable. We assess this before quoting to confirm that remediation is viable rather than raising false expectations.
Is commercial lacquer noticeably different in appearance to domestic lacquer?
Commercial lacquer is harder and more resistant to abrasion, but visually it is very similar to a standard hard-wearing domestic lacquer. Both are available in matt, satin and gloss sheens. The main difference is durability under very heavy traffic — commercial formulas are specified precisely because they hold up better in venues like churches, schools and offices.
How should a stained and lacquered floor be cleaned without damaging the finish?
A soft broom or vacuum for dry debris, followed by occasional damp mopping with a mild wood-safe cleaner, is all that is needed. Avoid solvent-based cleaners, bleach or excessive water. For institutional settings, we can recommend suitable commercial cleaning products compatible with the lacquer we have applied.
Have a similar project? Call us on 020 88309782 or Book a Free Site Visit