Back to Wood Floor Fitting
How to Install Wooden Stair Treads, Risers and Nosings

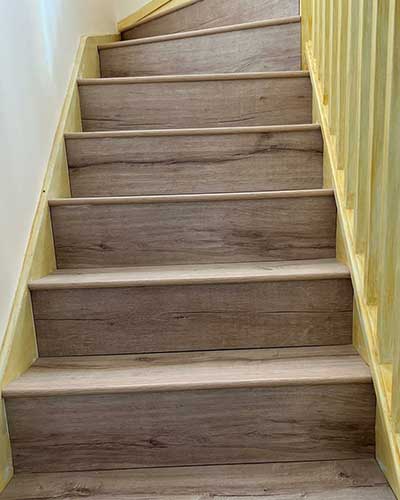
When it comes to transforming your interior, few elements make as strong a statement as a beautifully finished staircase. Whether you're replacing tired carpet or matching a new wood floor, upgrading your stairs with timber treads, risers, and nosings offers a sleek, cohesive look that adds value and elegance to your home. More than just an aesthetic choice, wooden stair parts also improve durability and make daily cleaning a breeze compared to fabric-covered steps.
From choosing the right wood finish to ensuring proper fitting and alignment, staircase refurbishment requires careful planning and attention to detail. If you’re installing engineered wood or solid timber flooring in the rest of your property, extending the look up the stairs helps create a seamless, flowing design that connects each level beautifully. But stair installation isn’t quite the same as laying floorboards — it involves more intricate cuts, precise measurements, and the correct use of stair noses to ensure both safety and long-term performance.
In this detailed guide, we walk you through every stage of installing wooden stair treads, risers, and noses — from initial preparation to finishing touches. Whether you’re a confident DIYer or simply want to understand what to expect from a professional installation, here’s everything you need to know to get it right the first time.
Step-by-Step Installation Guide for Wooden Stair Treads, Risers & Nosings
Installing wood flooring on stairs is more complex than fitting it on flat surfaces, but the result is worth every effort. The key is to work methodically — measuring and fitting each part carefully, ensuring stability, and finishing with precision. Below is a comprehensive process that professionals follow to achieve a flawless stair transformation.
Step 1: Remove Existing Coverings and Prepare the Staircase
- Start by removing old coverings such as carpet, underlay, grippers, staples, or old nosing trims.
- Inspect the staircase structure for damage — check that all steps are solid, secure, and squeak-free. Reinforce loose treads or risers where necessary.
- Thoroughly clean the stair surfaces, removing debris, nails, or adhesive residue.
- If the stairs are uneven, sand or fill imperfections so the wood flooring can sit flush.
Step 2: Measure and Template Each Step
- Each stair is slightly different, especially in older homes. Measure every tread and riser individually.
- Use a stair tread template tool or create a cardboard template for each step to ensure accuracy.
- Plan your cuts carefully — especially for winding or L-shaped staircases — to ensure symmetry and alignment.
Step 3: Cut and Install the Risers

- Cut the riser boards to fit the height and width of each step. These should fit snugly against the stair base with no visible gaps.
- Apply a high-strength adhesive (and nails if appropriate) to secure each riser in place. Press firmly and allow to set.
- Ensure risers are installed vertically and level — a crooked riser will affect the alignment of the tread above it.
Step 4: Cut and Install the Treads
- Cut the wood planks for the stair treads according to your template. If using multiple boards per tread, ensure tongue-and-groove joints are secure and expansion is considered.
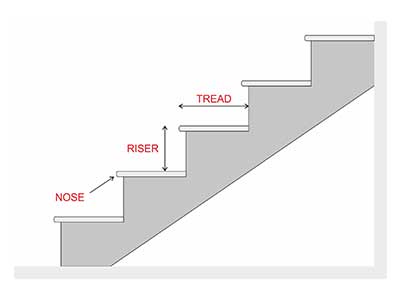
- Dry-fit each tread before gluing to confirm the fit. The front edge should sit just short of the stair’s edge to allow space for nosing.
- Use flexible flooring adhesive or adhesive plus mechanical fixings (like screws or flooring pins) to secure the tread. Be careful not to split the wood.
- Wipe away any excess adhesive immediately with a damp cloth.
Step 5: Fit the Stair Nosing
- Choose nosing that matches the wood type, thickness, and finish of your stair treads. Options include flush nosing, overhang nosing, and L-shaped profiles.
- Apply adhesive evenly along the nosing edge and press it into place at the front of each tread. Use a rubber mallet to secure the fit without damaging the surface.
- If required, discreetly fix with nails or screws — then cover fixings with matching filler or plugs.
- Ensure the nosing is level and aligned from step to step to maintain safety and visual consistency.
Step 6: Final Touches and Finishing
- Seal any gaps with colour-matched filler or caulk to give the staircase a polished finish.
- Clean the entire staircase with a vacuum and a slightly damp cloth — avoid excessive moisture on timber.
- If the staircase connects to a landing or upper hallway, install matching flooring and transition trims to complete the look.
Once the staircase is complete, allow adhesive and any finishing products to fully cure before heavy use. The result is a staircase that not only looks high-end but also matches the surrounding flooring seamlessly and safely.
Need Help Installing Wood Flooring on Your Stairs?
Fitting wooden treads and nosings on stairs requires precision, patience, and professional technique. If you're looking for guaranteed results without the hassle, our expert team at FlooringFirst! is here to help. We provide skilled staircase refurbishment services across London using top-quality materials and tools.
Book a free site visit today or contact us to learn more about our stair fitting services. Let us turn your staircase into a stunning centrepiece of your home.