Back to Floor Sanding
Restoring 100-Year-Old Hardwood Floors: A Comprehensive Step-by-Step Guide
 Old hardwood flooring tells stories. The scuff marks, dents, and uneven finishes often collectively represent generations of life, love, and wear. For homeowners, designers, DIY enthusiasts, and restoration professionals in the UK, refinishing 100-year-old hardwood floors with “character” presents a beautiful challenge. This comprehensive guide explores how to rejuvenate antique floors while preserving their unique charm using polyurethane, one of the most durable and sought-after modern finishes.
Why Restore Old Hardwood Floors?
Preserves Historic Integrity: Restoring old hardwood floors helps maintain the original charm and character of period homes, particularly in Victorian, Edwardian, or other heritage properties. These floors often have unique details that add to the overall aesthetic and history of the home.
Eco-friendly: Refinishing and restoring existing hardwood floors is an environmentally responsible option. Rather than contributing to the demand for new materials, reusing and revitalising your floors helps reduce waste and the carbon footprint associated with manufacturing and transporting new timber.
Cost-effective: Compared to installing new timber flooring, refinishing your old hardwood floors can be a more budget-friendly solution. You save on the cost of purchasing and installing new planks, and you retain the quality of your existing floors.
Increases Property Value: Restored hardwood floors are a highly sought-after feature for potential buyers. They contribute to the overall appeal and value of your home, making it more attractive to buyers who appreciate the craftsmanship and aesthetics of vintage flooring.
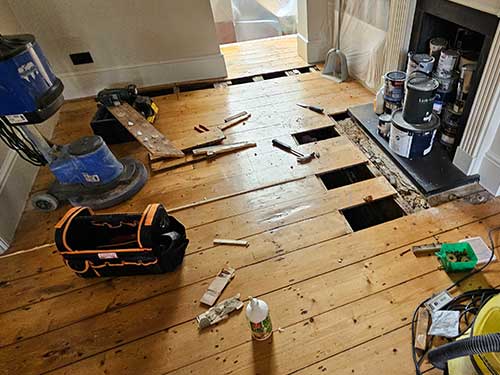
Assessing the Floor's Condition
Before starting any sanding or finishing, it’s essential to carefully assess the condition of your hardwood floor. Check for the following common issues:
- Water Damage: Look for any signs of warped or rotted planks. Water damage can cause significant structural issues, and these planks may need to be replaced entirely to restore the floor’s integrity.
- Nail Pops: Nail pops are a common issue in older floors. They can interfere with the sanding process and cause surface imperfections. These should be resecured before proceeding with sanding.
- Deep Gouges or Gaps: While deep gouges and gaps can be filled, it’s important to consider how they impact the overall aesthetic. Some imperfections can enhance the floor’s character and vintage appeal, so decide if filling is necessary or if they should be left as is.
- Presence of Wax or Oil Products: If the floor has been treated with wax or oil-based products, polyurethane finishes may not adhere properly. It’s crucial to remove any previous coatings before applying a new finish, which may involve stripping the old layers completely.
- Lead-Based Finishes: In homes built before 1960, the presence of lead-based finishes is a concern, particularly in older paints or stains. Testing for lead is essential to ensure safety during restoration. If you’re uncertain, it’s best to consult a professional to avoid health risks and potential complications.
Preparing the Room
 Hardwood floor restoration is a messy and time-consuming process, so proper preparation is key to making the job smoother and less stressful. Here's what you need to do before getting started:
- Move All Furniture Out of the Room: Clear the room completely to provide ample space for working. Furniture and other items can obstruct your movement and pose a risk of getting damaged by dust or finish.
- Ventilate the Area: Ventilation is crucial to keep the air quality safe and help dissipate fumes from sanding and finishing. Open windows and remove any curtains to allow airflow. Cover vents and air ducts to prevent dust from spreading into other parts of the house.
- Seal Adjoining Rooms with Plastic Sheeting: To prevent dust from traveling into other areas of the home, use plastic sheeting to seal off any adjoining rooms. This simple step can significantly reduce cleanup time and keep your living space dust-free.
- Use a Mask and Ear Protection During Sanding: Sanding generates a lot of dust and noise, so it’s essential to protect yourself. Wear a dust mask to avoid inhaling harmful particles and ear protection to reduce the noise from power tools. Safety should always be your top priority during the restoration process.
Step-by-Step: Sanding Antique Wood Flooring
Sanding is an important part of refinishing antique wood floors, as it removes old finishes, smooths out imperfections, and helps create a clean, prepared surface for finishing. However, with older wood, caution is necessary. Antique floors may be thinner, weakened by age, or have uneven wear, so proper sanding techniques are essential to avoid damaging the wood. Here’s a step-by-step guide to sanding antique wood flooring:
- Start with Coarse Grit (36-40):
- Begin with coarse-grit sandpaper to remove the bulk of the old finish and smooth out larger imperfections.
- Diagonal sanding is ideal for uneven floors, as it helps to level out any high spots and deep scratches.
- Be mindful that older floors may have worn thinner over time, so avoid pressing too hard to prevent sanding too deeply.
- Move to Medium Grit (60):
- Once the initial sanding is complete, move to medium grit sandpaper (around 60).
- Sand with the grain of the wood to remove any scratches or imperfections left by the coarse grit. This will help prepare the surface for the finer sanding stage and ensure a smoother finish.
- Finish with Fine Grit (100-120):
- For the final sanding, use fine-grit sandpaper (100-120).
- This step is essential to achieve a smooth, even surface that’s ready to be finished. The fine grit will remove any remaining scratches and prepare the floor for a seamless finish.
- Detail Sand Corners and Edges:
- Large sanding machines may not be able to reach tight corners or edges of the floor, so use a hand sander or edge sander to finish these areas.
- Taking extra care in these spots ensures that the entire floor has a consistent finish.
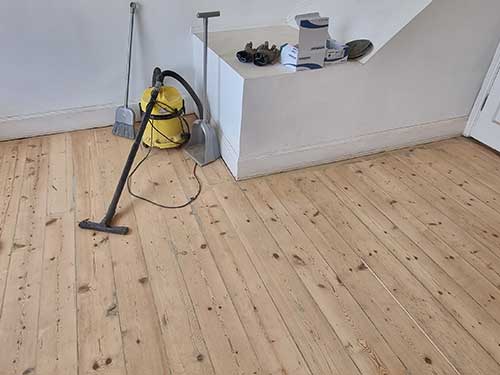
- Vacuum and Use Tack Cloth:
- After sanding, thoroughly vacuum the entire floor to remove all dust and debris.
- Follow up with a tack cloth to wipe down the surface and ensure it’s completely dust-free before applying any finish. Dust can interfere with the adhesion of polyurethane and result in an uneven, bumpy finish.
Note: Avoid over-sanding, as it can strip the wood of its natural saw marks and age marks, which contribute to the floor’s character. Preserving these imperfections adds to the beauty and charm of antique floors.
Filling Gaps and Cracks (Optional)
Deciding whether to fill imperfections in your antique hardwood floor is a personal choice. Some homeowners choose to embrace these imperfections, showcasing the rustic charm of an older floor. Others prefer to fill gaps and cracks for a cleaner, more uniform appearance. Here are some options for filling gaps and cracks:
- Wood Filler:
- For smaller cracks, use a colour-matched wood filler. This type of filler is ideal for filling in gaps without disrupting the natural look of the wood.
- Make sure to choose a filler that matches the colour of your floor to ensure a seamless appearance.
- Apply the filler carefully, pressing it into the cracks, and smooth it out with a putty knife. Once dry, sand it flush with the floor.
- Sawdust and Resin:
- For a more natural fill, you can mix floor sawdust with resin or wood glue. This creates a fill that blends in well with the floor’s texture and colour.
- The mixture will harden and take on the same finish as the surrounding wood, providing a more integrated and seamless repair.
- Leave Historic Gaps:
- In many old homes, slight gaps between boards are normal, and they can add to the historical charm of your floor.
- If the gaps are not causing drafts or structural issues, it might be best to leave them as they are. These gaps can also contribute to the “lived-in” look, giving your home more character.
Choosing the Right Polyurethane Finish
 Polyurethane is an essential step in refinishing antique hardwood floors, offering lasting protection and enhancing the depth and tone of the wood. There are two main types of polyurethane finishes, each with its own set of benefits:
- Oil-Based Polyurethane:
- Rich, amber tone: Oil-based finishes provide a warm, classic look, enhancing the natural patina and depth of aged wood. This is particularly ideal for older floors made of oak, pine, or chestnut.
- Durability: It is incredibly durable, providing a thick, protective layer that can withstand heavy traffic.
- Longer drying time: While oil-based polyurethane offers excellent protection, it has a longer drying time and a stronger odour, which may require more ventilation during application.
- Ideal for traditional aesthetics: If you want to maintain a vintage, rich appearance that complements the character of old floors, oil-based polyurethane is the way to go.
- Water-Based Polyurethane:
- Faster drying time: Water-based finishes dry more quickly, allowing you to apply multiple coats in a shorter amount of time.
- Low odour: With minimal fumes, water-based polyurethane is more pleasant to work with, making it a good choice if you are sensitive to strong smells.
- Doesn’t significantly alter wood tone: It maintains a neutral tone, allowing the original wood colour to shine through without adding any noticeable tint or amber hue.
- Ideal for modern aesthetics: If you prefer a cleaner, more contemporary look, water-based polyurethane is the better choice. It provides a sleek, glossy finish that won’t drastically change the wood’s natural colour.
Which Finish to Choose for Antique Floors?
For antique hardwood floors, oil-based polyurethane is often the preferred choice, as it brings out the classic warmth and richness of older woods, adding an elegant amber hue that enhances the floor’s natural charm. This finish is particularly suited for oak, pine, and chestnut flooring, commonly found in period homes.
However, if you want a faster, less odorous option, or if you prefer to preserve the original, lighter tone of the wood, water-based polyurethane may be the better choice for your needs. Both finishes offer exceptional protection, so the decision comes down to the desired aesthetic and the time and conditions under which you're working.
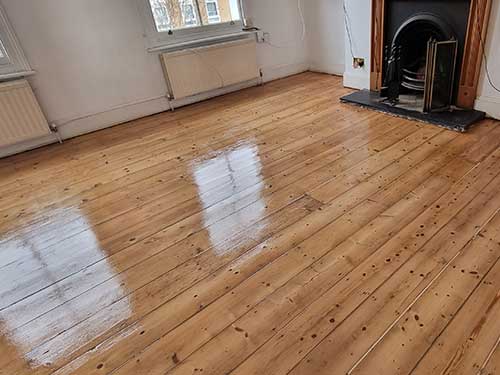
Applying Polyurethane: Perfecting the Finish
Once you’ve selected the appropriate polyurethane finish for your antique hardwood floors, it's time to apply it carefully to ensure a smooth, long-lasting result. Here's a step-by-step guide to help you achieve a professional-grade finish:
1. Apply a Sealer Coat (If Necessary)
- Water-based polyurethane systems especially benefit from a sealer coat to help with adhesion and to prevent streaks.
- Oil-based finishes often don’t require a sealer, but it can be used for added protection.
- Tip: Always follow the manufacturer’s instructions to determine whether a sealer is recommended for the specific product you're using.
2. Use the Right Applicator
- For a smooth, even coat, use a lambswool applicator or a foam pad. Both are ideal for spreading polyurethane without leaving streaks or bubbles.
- Lambswool applicators are great for larger areas, while foam pads work well for smaller, more intricate spots.
- Tip: Avoid using a paintbrush for large areas as it can leave unsightly brush marks.
3. Allow Drying Time
- Oil-based polyurethane requires a drying time of 12-24 hours between coats.
- Water-based polyurethane dries much quicker, typically requiring 4-6 hours between coats.
- Tip: Ensure the room is well-ventilated and dust-free during drying to avoid imperfections.
4. Lightly Sand Between Coats
- Once the first coat has dried, lightly sand the surface using 220-grit sandpaper to remove any imperfections and promote better adhesion for the next coat.
- After sanding, be sure to vacuum up all dust and use a tack cloth to ensure a clean surface.
5. Apply 2-3 Coats Total
- Most hardwood floors benefit from 3 coats of polyurethane for optimal durability and protection.
- Each layer enhances the floor’s resilience and shine, giving it that perfect glossy finish that will last for years.
6. Allow the Final Coat to Cure Fully
- After applying the final coat, allow it to cure completely before moving furniture back in. Curing can take up to 72 hours, depending on the product used.
- Tip: Avoid walking on the floor during the curing time, and be mindful of humidity levels, as this can affect curing time.
Taking the time to properly apply polyurethane ensures that your antique hardwood floors not only look their best but are also protected for years to come. By following these steps and using the right tools and materials, you’ll achieve a beautiful, professional-quality finish that enhances the character and integrity of your floors.