Back to Wood Floor Fitting
Installing Hardwood Floors on Stairs Without Headaches (Pro Tips Inside)
 Installing hardwood flooring on stairs is one of the most rewarding — yet challenging — upgrades you can tackle in your home. Unlike flat surfaces, stairs involve precise cuts, snug fitting, and extra attention to safety and durability. But with the right approach and tools, you can transform your staircase into a seamless extension of your hardwood flooring.
This guide walks you through the key steps and expert tips for installing wooden treads and risers with confidence. Whether you're an ambitious DIYer or just want to better understand what your installer is doing, you'll find practical advice here to make your stair project smooth and professional-looking.
Know the Parts: Stair Anatomy
Before picking up a saw or ordering materials, it's important to understand the basic components of a staircase. Each part plays a role in both the installation process and the finished look:
- Tread: The flat horizontal part of the step where your foot lands.
- Riser: The vertical portion between each tread. It gives the stair height and structure.
- Nosing: The front edge of the tread that often overhangs slightly — it can be rounded or squared.
- Stringer: The side support structure that holds the stairs in place (not always visible).
- Skirt board: The decorative trim running along the wall beside the stairs, if present.
Knowing these parts will help you plan your installation more effectively and avoid common mistakes when cutting and fitting wood components.
Choose the Right Hardwood Material
Not all hardwood flooring is suitable for stair installation, so choosing the right type of wood is critical for both safety and aesthetics. Here are some key factors to consider when selecting materials for your stairs:
- Solid vs engineered wood: Both can work, but solid wood is preferred for durability and sanding potential. Engineered wood can be used if it has a thick enough top layer and is installed properly.
- Pre-finished vs unfinished boards: Pre-finished wood saves time and ensures a uniform finish. Unfinished wood gives you more flexibility to match custom stains or finishes — ideal when blending with existing flooring.
- Wood species: Opt for hardwoods like oak, maple, or walnut for longevity and resistance to wear. Avoid softwoods, which dent more easily under foot traffic.
- Match your existing floor: For a cohesive look, use the same species and colour as your flooring on the adjacent levels. Many manufacturers offer stair tread kits or matching accessories for this purpose.
Taking the time to choose quality, durable materials that match your floor ensures the final result is both beautiful and long-lasting.
Tools and Materials You’ll Need
Before you begin, gather all the tools and supplies needed to complete the job efficiently and safely. Installing hardwood on stairs requires more precision than standard floor fitting, so having the right equipment will make a big difference.
- Measuring tools: Tape measure, square, stair tread template, pencil or chalk line
- Cutting tools: Circular saw, mitre saw, jigsaw (for notches or curves)
- Adhesives and fasteners: High-strength construction adhesive, finishing nails or nail gun
- Installation materials: Hardwood treads, risers, stair nosing pieces, matching wood filler
- Safety gear: Safety glasses, ear protection, dust mask, gloves
- Optional extras: Clamps, rubber mallet, sanding block, caulk for finishing edges
Having everything ready at the start will prevent delays and help ensure a smoother, more professional-looking installation.
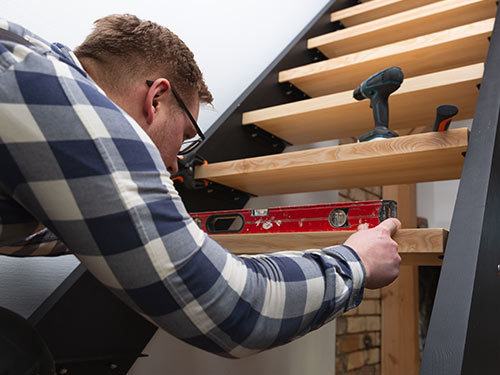
Step-by-Step Installation Guide
 Installing hardwood on stairs requires patience and precision. Follow these steps carefully to ensure a secure, clean finish that looks like it was done by a pro:
- Remove old coverings: Pull up any carpet, padding, nails, or staples. Clean the stair surface thoroughly and check for loose boards or uneven spots.
- Prepare the stair structure: Make sure all steps are level and the surface is clean and dry. Fix any squeaks or gaps in the stair framing before you start.
- Measure and cut risers: Start from the bottom step. Measure the width and height of each riser individually — stairs are rarely uniform. Cut and test-fit each piece.
- Install the risers: Apply a strong construction adhesive to the back of each riser, press it into place, and secure it with finishing nails if needed.
- Measure and cut treads: Use a stair tread template to mark the exact shape of each tread. Cut with a circular saw and test the fit before applying adhesive.
- Install the treads: Spread adhesive evenly across the stair surface, place the tread firmly, and use nails or clamps to hold it in place while it sets.
- Add stair nosing: Install a matching nosing piece on the front edge of each tread. Secure it tightly for a clean, finished edge and added safety.
- Repeat the process: Work your way up the stairs one step at a time, checking for level and alignment as you go.
Taking your time and double-checking measurements for each step is the key to a smooth, polished result.
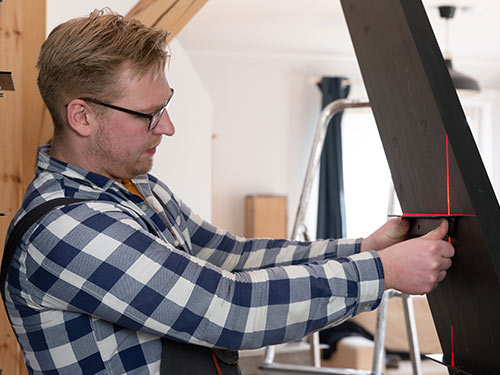
Safety and Precision Tips
Precision is essential when working with stairs — not just for aesthetics, but for safety as well. Even small inconsistencies in alignment or finish can affect how safe and professional your stairs feel. Keep these tips in mind throughout the installation:
- Always dry-fit first: Before applying any adhesive, test each riser and tread in place to ensure it fits snugly with no gaps or misalignment.
- Use a non-slip finish: High-gloss surfaces may look attractive but can be slippery. Opt for a satin or matte finish, or apply a slip-resistant sealant.
- Maintain consistent overhang: Make sure the stair nosing projects evenly on each step — typically ¾" to 1" — for both looks and safety.
- Watch your measurements: Double-check every riser and tread height. Uneven steps can be a trip hazard and may violate building regulations.
- Secure properly: Use sufficient adhesive and fasteners to prevent any movement or squeaking over time.
Attention to detail at this stage will ensure your staircase is not only attractive but also solid, safe, and built to last.
Finishing Touches That Make a Difference
It’s the final touches that separate a decent stair installation from one that truly looks high-end. After fitting the treads, risers, and nosing, focus on these small details to elevate the overall appearance:
- Fill nail holes: Use a colour-matched wood filler to conceal any visible nail marks on treads or risers.
- Sand and seal if using unfinished wood: Lightly sand the surface, then apply a protective finish such as oil, varnish, or lacquer. Choose a finish that matches your flooring and complements the room.
- Caulk along edges: Apply a thin line of caulk where the stair components meet walls or skirt boards to hide small gaps and give a cleaner transition.
- Match accessories: Use stair nosing and end caps that match the tone and grain of your flooring for a seamless, coordinated look.
Taking the time to complete these steps gives your staircase a polished, professional finish that blends beautifully with the rest of your hardwood flooring.
When to Call in a Pro
While many homeowners can handle a straightforward stair installation with the right tools and patience, there are situations where calling in a professional is the smarter choice. Here’s when it makes sense to get expert help:
- Complex stair designs: Winding, curved, or open-sided staircases require advanced cutting and installation skills to achieve a clean result.
- Multiple landings or transitions: Connecting stairs seamlessly to other flooring areas, especially at angles or junctions, can be tricky without experience.
- Time constraints: Professionals can complete the job more quickly and efficiently, minimising disruption to your home.
- Perfection required: If the stairs are in a highly visible area or part of a home upgrade for resale, a flawless finish can add serious value.
Hiring a professional installer ensures your staircase is not only beautiful but also safe, code-compliant, and built to last.
Conclusion
Installing hardwood floors on stairs is a detailed job, but with the right preparation, quality materials, and attention to precision, it’s entirely achievable as a DIY project. From understanding stair parts to choosing the right wood, cutting with care, and applying thoughtful finishing touches, each step plays a role in the final result.
With patience and planning, your stairs can match the beauty and durability of the rest of your hardwood flooring, adding value, style, and a seamless flow to your home. And if you run into challenges, remember that professional help is always an option for achieving the perfect finish. Need help with your stair flooring project? Contact us for expert advice or book a free site visit to get started with confidence.