Back to Wood Floor Fitting
How to Install LVP Flooring Like a Pro: Complete Step-by-Step Guide
 Luxury Vinyl Plank (LVP) has become one of the most popular flooring choices in UK homes, especially among DIY enthusiasts. It combines the natural appearance of wood with the practicality of a synthetic floor, offering durability, water resistance, and ease of maintenance. Unlike traditional hardwood or laminate flooring, LVP is designed with convenience in mind — many products come with a simple click-lock system, making installation straightforward for those with little to no prior experience.
Its suitability for high-moisture areas like kitchens and bathrooms makes it incredibly versatile, while the wide range of designs means it’s easy to find a style that suits your home’s interior. From rustic oak to contemporary grey tones, LVP mimics the textures and grain of real wood with impressive realism. And since it requires no sanding, sealing, or varnishing, you can enjoy the look of hardwood without the ongoing upkeep. For anyone looking to upgrade their floors quickly and affordably, LVP is one of the best DIY-friendly options available.
Tools and Materials You’ll Need
Before you begin your LVP installation, it’s essential to gather all the right tools and materials. Having everything ready will save you time, reduce stress, and help you achieve a more professional finish.
- Luxury Vinyl Planks (LVP): Order enough to cover your space — plus at least 10% extra for cuts, mistakes, or future repairs.
- Underlay (if required): Some click-lock LVP comes with built-in underlay, while others require a separate one for soundproofing and insulation.
- Spacers: Ensure a consistent expansion gap around the perimeter of the room.
- Utility knife: Essential for clean, accurate cuts through the planks.
- Measuring tape and pencil: For accurate room dimensions and layout planning.
- Rubber mallet and tapping block: To gently click planks together without damaging edges.
- Pull bar: Useful for tight spaces, like near walls or under door frames.
- Moisture barrier (optional): Recommended for installations over concrete or in moisture-prone areas.
If you’re unsure what type of underlay or tools you need, our experts at FlooringFirst! can offer advice, or handle the entire fitting process for you.
Prepare Your Room for Installation
Proper preparation is crucial for a successful LVP flooring installation. Begin by clearing the room entirely — remove all furniture, rugs, and appliances to ensure a clean, open workspace. If possible, also take off skirting boards and trim the bottom of door frames so the planks can fit neatly underneath. Once the room is empty, thoroughly sweep and vacuum the floor to remove any dust, debris, or protruding nails that could affect the installation or damage the new planks.
Next, inspect the condition of your subfloor. It should be clean, level, dry, and structurally sound. Use a long spirit level or straight edge to identify any dips or high spots — uneven areas greater than 3mm over 1 metre should be levelled out using a self-levelling compound. If you're installing over concrete, it's essential to check for moisture. A moisture meter will help you determine whether a barrier is needed. In older properties or basement spaces, installing a damp-proof membrane is often a smart precaution.
Finally, acclimate your LVP planks by placing them in the room where they’ll be installed for 24 to 48 hours. This allows the flooring to adjust to the room’s temperature and humidity, helping to prevent warping or gapping after installation. Skipping this step is one of the most common DIY mistakes — and one of the easiest to avoid.
Step-by-Step: How to Install Click-Lock LVP Flooring
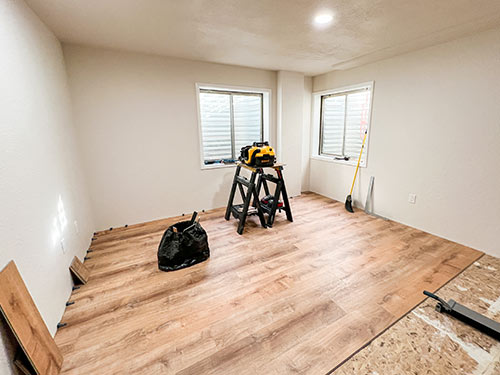
 Click-lock LVP is one of the easiest types of flooring to install, making it ideal for DIYers. The planks are designed to snap together at an angle, forming a floating floor that doesn’t require adhesive or nails. Before starting, make sure your first row of planks is perfectly aligned, as this will affect the entire layout of the room.
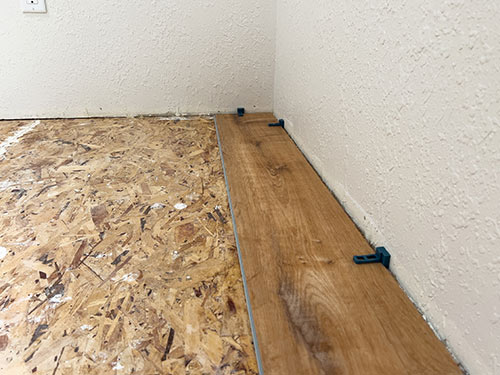
Begin along the longest, straightest wall. It’s usually best to install the planks parallel to the longest dimension of the room, or in the direction of natural light. Use spacers between the wall and the flooring to maintain a small expansion gap — typically 8 to 10mm — to allow for natural movement.
The installation process follows these simple steps:
- Lay the first plank flat with the tongue side facing the wall.
- Connect the next plank by angling it into place and clicking it into the first one, then gently tapping with a mallet if needed.
- Continue this process to complete the first row, cutting the final plank to fit using a utility knife.
- Stagger the joints of each new row by at least 30cm from the previous row to create a more natural appearance.
- Repeat the click-and-lock process row by row, using a pull bar in tight areas.
Remember to trim planks around door frames and other obstacles carefully. For a seamless finish, you may need to undercut the frame so the flooring can slide underneath. Once complete, remove the spacers and install skirting boards or beading to cover the expansion gap.
Step-by-Step: How to Install Glue-Down LVP Flooring
Glue-down LVP is often chosen for areas that require a more secure and permanent solution, such as commercial spaces or high-traffic rooms. Unlike floating floors, this method uses adhesive to bond the planks directly to the subfloor, creating a firmer, more stable finish. It takes more time and care than click-lock installation, but it provides excellent long-term durability.
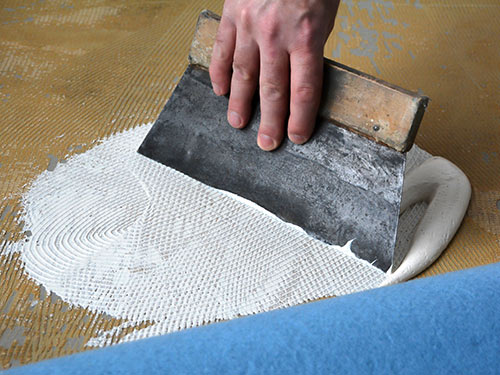
Before beginning, double-check that the subfloor is completely smooth, level, and free from dust or grease. Even small imperfections can affect the bond or show through the planks over time. Use a trowel to apply a thin, even layer of adhesive to a small section of the floor, typically no more than what you can cover within 30 minutes.
Then, follow these key steps:
- Press each LVP plank into the adhesive carefully, making sure it aligns with the previous plank without gaps.
- Use a flooring roller (or a heavy hand roller) to firmly press the planks into place and remove any air pockets.
- Wipe away any excess adhesive immediately with a damp cloth before it dries.
It’s essential to let the glue cure for at least 24 hours before walking on the floor or placing furniture back in the room. This ensures a secure bond and prevents shifting or unevenness.
Common Mistakes to Avoid
Even though installing LVP is more forgiving than many other flooring types, there are still several common mistakes that can compromise the final result. One of the biggest issues is neglecting proper subfloor preparation. A floor that isn’t level or has hidden moisture issues will eventually cause visible defects or even structural problems in the new flooring. Always take time to assess and prepare the base before laying planks, especially when working with concrete or uneven surfaces. If in doubt, book a free site survey with our team at FlooringFirst! for professional advice.
Another mistake is skipping the acclimatisation period. LVP needs time to adjust to the room’s environment before installation. Planks that are installed too soon can expand or contract unexpectedly, resulting in lifted edges or gaps. Similarly, many DIYers forget to leave an expansion gap between the planks and the wall. This small buffer — typically 8–10mm — gives the floor room to expand naturally without buckling.
Lastly, rushing the layout can ruin the look of your floor. Take time to measure and plan plank placement, especially in visible areas like entrances or transitions between rooms. Using a staggered layout with consistent spacing not only improves appearance but also strengthens the structural stability of the floor.
Can You Install LVP Over Existing Floors?
 One of the biggest advantages of Luxury Vinyl Plank flooring is that it can often be installed directly over existing floors, making it a time-saving and cost-effective choice for renovations. However, not every surface is ideal, and it’s important to understand which ones work — and which ones don’t — before beginning your project.
In most cases, LVP can be laid over surfaces that are clean, dry, flat, and structurally sound. This includes:
- Tile or stone flooring (as long as it's level)
- Concrete subfloors (with or without a moisture barrier)
- Old vinyl or linoleum flooring that’s securely bonded and undamaged
If you're considering installing vinyl plank over hardwood, check out our dedicated guide on how to lay vinyl on hardwood floors for important tips on moisture checks and surface prep. Similarly, if you’re planning to install new floors over tile, you’ll want to read our article on installing hardwood flooring over tiles — many of the principles apply to LVP as well.
Surfaces to avoid include carpets, loose or floating flooring, and uneven hardwood that may shift beneath the vinyl. If you’re unsure whether your current floor is suitable, our team can help — simply book a free survey and we’ll assess your subfloor on site.
When to Call a Professional
While many homeowners successfully install LVP flooring on their own, there are situations where professional help can save time, prevent costly mistakes, and ensure a flawless result. One of the most common reasons to call in the experts is when dealing with an uneven or moisture-prone subfloor. Professional installers have the tools and experience to assess and correct these issues before any planks go down, ensuring your flooring remains stable and secure over time.
Another case where it makes sense to hire a professional is if you're working with complex layouts, such as rooms with irregular shapes, curved walls, staircases, or tight corners. Skilled fitters can make precise cuts and achieve seamless transitions that are difficult for DIYers to replicate. If time is a factor — for example, if you're renovating a rental unit between tenants — bringing in an experienced team can help you complete the project faster and with peace of mind.
At FlooringFirst!, we offer expert LVT floor fitting in London for both residential and commercial clients. Whether you need help preparing the subfloor, choosing the right product, or completing a flawless installation, our team is here to help. We also provide free site surveys to assess your space and recommend the best approach — no obligation required.
Conclusion: DIY Success or Professional Finish?
Luxury Vinyl Plank flooring is one of the most accessible options for homeowners looking to take on a flooring project themselves. With its water resistance, easy installation, and wide design variety, it’s no surprise that LVP is growing in popularity across UK homes. If your subfloor is in good condition and you’re confident in your tools and preparation, this guide provides all the key steps to help you lay LVP flooring like a pro.
That said, not every space is DIY-friendly. Complex floor plans, moisture-prone rooms, or time-sensitive renovations may call for professional help. If you'd rather skip the learning curve and guarantee a perfect finish, our expert team at FlooringFirst! is here to help. We offer complete LVT floor fitting services in London, with high-quality materials, expert installation, and flexible scheduling.
Still unsure which path to take? Book a free visit with one of our specialists, and we’ll assess your space, recommend the right approach, and provide a no-obligation quote. Whether you go DIY or professional, your perfect LVP floor starts here.