Back to Floor Sanding
Complete Guide to Floor Restoration Decisions
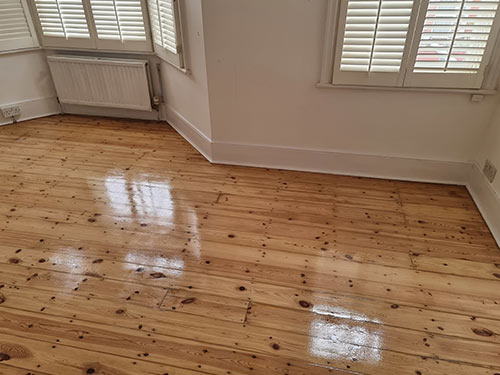
 Restoring a worn or damaged wooden floor can completely transform the look and feel of your space. Whether you're renovating a heritage home or freshening up a modern interior, floor restoration offers a cost-effective and sustainable alternative to full replacement. This guide will walk you through all the key decisions involved in the floor restoration process—from evaluating your existing floor to choosing the right finish—so you can make confident, informed choices every step of the way.
When to Choose Floor Restoration Over Replacement
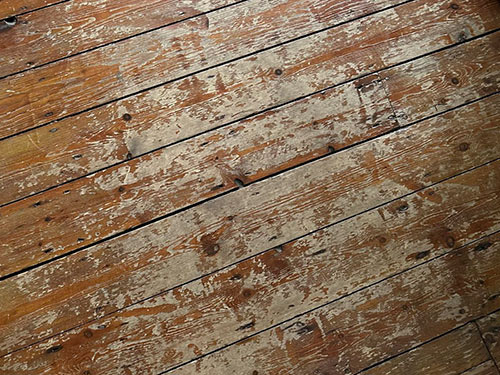
One of the first decisions to make is whether your existing floor is worth restoring. In many cases, professional restoration can breathe new life into hardwood, parquet, or engineered wood floors without the need for costly replacement. If your floor has visible scratches, dullness, uneven colour, or even minor gaps, it may still be a strong candidate for sanding and refinishing.
Restoration is typically a better option when:
- The floor is made from solid or thick engineered wood with a sandable wear layer.
- There are no major structural issues with the subfloor or joists.
- You want to preserve original character or vintage flooring materials.
- Your goal is to save money while enhancing aesthetics and functionality.
In contrast, if your flooring is severely water-damaged, overly thin, or poorly installed, replacement may be the safer and more practical long-term solution.
Types of Floor Restoration Services
Floor restoration can involve several different processes depending on the condition and material of your existing floor. Each service plays a specific role in reviving your floor’s appearance and extending its lifespan.
- Sanding and Refinishing: This is the core of most restoration projects. It removes old finishes, surface scratches, and uneven wear, revealing fresh wood underneath ready for sealing or staining.
- Gap Filling: Used to close unsightly gaps between floorboards. Common materials include resin mixed with sawdust or flexible gap fillers that expand and contract with the wood.
- Staining: Perfect for changing the colour of your floor or enhancing the natural grain. It allows you to customise your floor to better match your interior design.
- Sealing and Finishing: Once sanded, floors must be sealed with either a lacquer or oil finish to protect the wood from moisture, wear, and daily use.
Additional services may include repairing damaged boards, replacing loose blocks, or even buffing and re-coating lightly worn finishes without a full sanding process.
Understanding Your Floor Type Before Restoration
Before starting any restoration work, it’s essential to identify what type of flooring you have. The approach, tools, and materials used can vary greatly depending on the floor's structure and composition.
Solid wood floors are the most suitable for multiple restorations. They can be sanded down several times over the years due to their full-thickness timber construction.
Engineered wood flooring can also be restored, but only if the top wear layer is at least 3 mm thick. Always check the specifications or consult a professional before sanding.
Parquet flooring can be beautifully restored but requires special attention due to the direction of the grain and pattern. Professional experience is highly recommended to avoid damage.
It's also important to assess the condition of the subfloor. If it's unstable, uneven, or damp, these issues must be addressed first, as they can impact the success and longevity of your restoration project.
Key Factors That Influence Restoration Choices
Several factors can affect whether and how your floor should be restored. Understanding these elements helps you make smart decisions that preserve both the beauty and function of your floor.
- Age and condition: Older floors may have character worth preserving, but excessive wear, damage, or warping might require more extensive repairs or partial replacement.
- Type of existing finish: Floors previously finished with strong lacquers may need more aggressive sanding. Waxed floors require full removal before applying new finishes.
- Moisture and subfloor stability: Moisture issues can lead to cupping or warping. A dry, solid subfloor is essential for any successful restoration job.
- Desired aesthetic outcome: Whether you're after a natural, rustic look or a deep, dark stained floor, your vision will guide choices like staining, brushing, or oiling.
- Budget and timing: Restoration is typically more affordable than full replacement, but larger areas, deeper sanding, or premium finishes may increase costs. Consider how quickly the area needs to be usable again.
Common Floor Restoration Mistakes to Avoid
Restoring wooden floors can deliver beautiful results—but only if done correctly. Avoiding common mistakes ensures your efforts won’t lead to costly repairs or disappointing outcomes.
- Over-sanding engineered floors: Engineered wood has a limited wear layer. Sanding too deeply can permanently damage the surface or expose the core.
- Skipping professional assessment: Not all floors are suitable for restoration. A quick inspection by an expert can prevent wasted time and money on an unsuitable project.
- Using the wrong finish: Applying an incompatible finish can cause poor adhesion, uneven appearance, or reduced protection. Know whether to use lacquer, oil, or hardwax based on your wood type and usage.
- Ignoring moisture and subfloor issues: Restoring a floor over a damp or unstable base can cause ongoing structural problems. Always fix these first.
- DIY mistakes: Inexperienced use of sanding machines can leave gouges, swirl marks, or uneven surfaces. Restoration is a skilled task—cutting corners often results in visible flaws.
Choosing the Right Finish for Restored Floors
After sanding, choosing the right finish is one of the most important decisions in the restoration process. It affects the floor’s durability, look, and maintenance requirements.
Lacquer finishes offer strong surface protection and are ideal for high-traffic areas. They create a smooth, glossy or satin sheen and are easy to clean, but once scratched, the damage is harder to spot-fix.
Oil finishes soak into the wood, enhancing its natural texture and colour. They’re ideal for those who want a matte, organic look. While they require more frequent maintenance, individual areas can be easily repaired without redoing the whole floor.
Hardwax oils combine the benefits of both oil and lacquer—providing a natural look with moderate surface protection. They’re increasingly popular for domestic floors due to their balanced performance.
Your choice should depend on your lifestyle, traffic levels, aesthetic preferences, and willingness to maintain the floor regularly.
Cost of Floor Restoration: What to Expect
Understanding the cost of floor restoration helps you plan your budget and compare it realistically with replacement options. While prices vary, restoration is often more affordable—especially for larger areas or premium materials.
Average prices typically range from £25 to £45 per square metre for sanding and finishing, depending on the floor type and condition. More complex work, such as parquet restoration or custom staining, may be priced higher.
Several factors influence the final cost:
- Floor size and layout: Open areas are faster to restore, while tight corners and hallways take more time.
- Damage level: Heavily worn or uneven floors may require deeper sanding or board repairs.
- Type of finish: High-end lacquers or multiple coats of oil can raise the overall price.
- Extra services: Gap filling, staining, or repairs add to the cost but also extend the life and beauty of your floor.
Compared to full replacement, which can range from £80 to £150 per square metre for high-quality wood, restoration is usually the more cost-effective solution—especially when the original flooring has value worth preserving.
DIY vs Professional Floor Restoration
When considering floor restoration, one key question is whether to take the DIY route or hire professionals. While DIY can seem appealing for budget-conscious homeowners, the results often differ significantly.
DIY restoration might be suitable for small tasks like buffing, re-oiling, or light recoating. However, sanding machines are powerful and require skill, incorrect use can cause permanent damage to the floor surface.
Professional floor restoration ensures even sanding, correct use of materials, and a finish that lasts. Professionals use dust-free equipment, know how to deal with tricky areas like stairs and corners, and can advise on the most suitable products for your wood type and lifestyle.
If your floor is valuable, large, or showing signs of deeper wear, hiring experienced professionals is usually the wiser and more cost-effective decision in the long run.
How to Maintain Your Restored Floors
 Proper maintenance is key to preserving the beauty and durability of your newly restored floor. With the right care, you can extend the life of the finish and avoid premature wear or damage.
- Use the right cleaning products: Always clean with products designed for your floor's finish. Avoid harsh chemicals, bleach, or steam mops, as they can strip the protective layer or damage the wood.
- Sweep or vacuum regularly: Dirt and grit act like sandpaper on wood floors. Daily sweeping or vacuuming with a soft brush attachment prevents scratches.
- Protect high-traffic areas: Use mats or rugs at entrances and under furniture legs to minimise wear. Felt pads under chairs help prevent scuffing.
- Re-oil or recoat as needed: Floors finished with oil or hardwax oil benefit from periodic reapplication. Lacquered floors may need buffing and a fresh topcoat every few years.
- Control humidity: Use a humidifier in winter or a dehumidifier in summer to prevent boards from shrinking or expanding, especially with solid wood flooring.
FAQs About Floor Restoration
Can all wooden floors be restored?
Not all. Solid wood can usually be sanded multiple times. Engineered floors can be restored if the wear layer is thick enough. Laminate and vinyl floors cannot be sanded or refinished.
How many times can my floor be sanded?
It depends on the floor type. Solid wood may handle 4–6 sandings over its lifetime. Engineered wood with a 4 mm wear layer can usually be sanded once or twice.
How long does the restoration process take?
Most rooms take 1–3 days, depending on the floor size, repairs needed, and drying time between finish coats. Add more time for staining or oiling.
Is restoration messy?
Modern floor sanding uses dustless machines that keep mess to a minimum. A professional service will also handle clean-up and waste disposal properly.
Will I need to leave my home during the process?
Not always. You may need to avoid walking on the floor for short periods, especially after finishes are applied. Ventilation is important to speed up drying and reduce odours.
Final Thoughts and Expert Advice
Restoring your wooden floors is not just about improving appearance—it’s a smart investment that can increase property value, extend the life of your flooring, and enhance the overall comfort of your space. Whether you’re dealing with scratches, fading, or uneven wear, a well-planned restoration can deliver like-new results without the disruption and expense of full replacement.
Before starting, take time to assess your floor type, understand your finish options, and consult with professionals when needed. Every floor is different, and getting expert advice ensures the right approach is taken for your unique situation.
If you’re unsure where to begin, a professional evaluation will help determine whether your floors are good candidates for restoration and what results you can realistically expect.