Back to DIY Advice
How to Fix Creaky Floorboards (7 Easy DIY Solutions That Work)

Creaky floorboards are a common problem in many homes, especially in properties with timber flooring or older wooden structures. That familiar squeak when you walk across the room can be frustrating, but in most cases it’s not a serious issue — and it’s often something you can fix yourself with a few simple tools.
Floorboards usually creak when parts of the floor move slightly against each other. This movement can happen between the boards themselves, between the boards and the joists underneath, or around loose nails and fixings. Over time, natural wear, seasonal changes in humidity, and everyday foot traffic can all contribute to these small movements that cause the noise.
The good news is that most squeaky floors can be repaired without replacing the flooring. With the right approach, you can stop the noise and restore stability to your floor.
In this guide, you’ll learn:
- What causes creaky floorboards
- How to locate the exact source of the squeak
- Several proven DIY methods to fix squeaky floors
- When the issue may require professional attention
Whether the problem is under carpet, beneath exposed floorboards, or coming from upstairs rooms, the solutions below will help you deal with creaky floors effectively.
What Causes Creaky Floorboards?

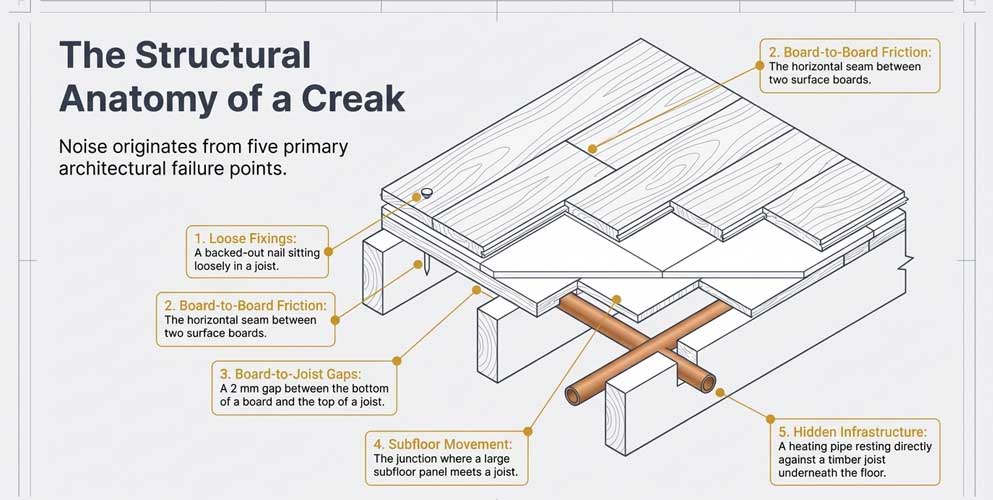
Before attempting any repair, it’s important to understand why floorboards creak in the first place. The noise is usually caused by movement somewhere within the floor structure. Identifying the cause helps you choose the most effective fix.
Below are the most common reasons wooden floors start to squeak.
Loose Nails or Screws
One of the most frequent causes of creaky floors is loose fixings. Many older floors were installed using nails rather than screws. Over time, natural expansion and contraction of the wood can cause these nails to slowly work their way out of the joists. When you walk on the floor, the board moves slightly against the nail, producing the familiar squeaking sound.
Signs this may be the problem include:
- Squeaking in specific spots when stepped on
- Slight movement in the floorboard
- Visible nail heads lifting from the floor surface
Replacing nails with proper flooring screws is often the most effective solution.
Floorboards Rubbing Against Each Other
Another common cause is friction between adjacent floorboards. Wood naturally expands and contracts depending on humidity and temperature. As boards shift over time, the edges may begin to rub against each other when pressure is applied. This friction can create a squeaking or creaking noise with each step.
This is especially common in:
- Older timber floors
- Rooms with fluctuating humidity levels
- Areas with heavy foot traffic
In many cases, applying a dry lubricant between the boards can significantly reduce the noise.
Movement Between Floorboards and Joists
Floorboards are normally secured to structural beams called joists. If a small gap develops between the board and the joist underneath, the board may flex slightly when stepped on. This movement can create creaking as the wood shifts against the fixing or the joist itself.
Gaps can appear due to:
- Timber shrinkage over time
- Inadequate original fixings
- Minor structural movement in the property
Solutions usually involve tightening the board to the joist or filling the gap with shims or support blocks.
Subfloor or Structural Movement
Sometimes the issue isn’t the visible floorboards but the subfloor beneath them. If the subfloor panels or joists move slightly under pressure, the movement can transfer to the boards above. This tends to produce deeper creaks rather than sharp squeaks.
Potential causes include:
- Weakened subfloor panels
- Poorly secured joists
- Moisture damage
- Structural settling in older homes
These problems are less common but may require more extensive repair.
Pipes or Wiring Beneath the Floor
In some cases, the creaking noise isn’t caused by wood rubbing at all. Pipes, ducts, or electrical wiring beneath the floorboards may be shifting slightly when pressure is applied from above.
For example:
- Heating pipes expanding with temperature changes
- Cables rubbing against timber
- Loose pipe clips beneath the floor
While less frequent, these issues can still produce noises that sound very similar to squeaky floorboards.
How to Find the Source of a Squeaky Floor

Before attempting any repair, it’s important to pinpoint the exact location and cause of the creak. Fixing the wrong area is one of the most common mistakes when dealing with squeaky floorboards. In many cases, the sound you hear may not come from the exact spot where you step. Movement in the floor structure can cause the noise to travel slightly, so a careful inspection will help you identify the real problem area.
Step 1: Walk Slowly Across the Floor
Start by walking slowly across the floor and listening carefully.
Try to:
- Apply pressure with each step
- Shift your weight gradually
- Pause on areas where the creak occurs
This helps you identify the precise location of the squeak. It can be useful to have another person nearby who can listen from a different position in the room.
Step 2: Mark the Problem Areas
Once you locate the noisy spots, mark them so you can easily return to them later.
You can use:
- Masking tape
- Chalk
- Small sticky notes
Marking the spots allows you to see patterns — for example, whether the creaks occur along a joist line or between boards.
Step 3: Check for Visible Movement
Next, examine the floorboards closely while applying pressure to the area.
Look for signs such as:
- Floorboards moving slightly when stepped on
- Nails lifting from the wood
- Small gaps between boards
- Flexing in the floor surface
These clues often indicate the underlying issue.
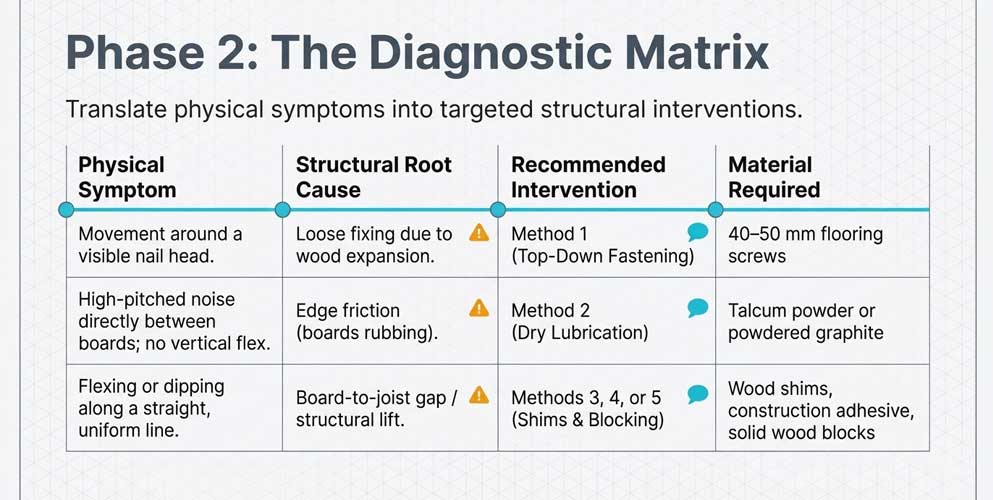
For example:
- Movement around a nail → loose fixing
- Noise between boards → boards rubbing together
- Flexing along a straight line → joist-related movement
Step 4: Locate the Floor Joists
Most creaking problems involve the joists underneath the floorboards, so identifying their position is extremely helpful. Joists usually run in straight, evenly spaced lines beneath the floor.
You can find them by:
- Looking for rows of nail heads
- Using a stud finder
- Measuring from known joist spacing (typically 400mm or 16 inches apart)
Once you know where the joists are, you can determine whether the squeak is caused by:
- A board lifting from the joist
- Movement between joists
- Rubbing boards above the joist line
Step 5: Check If You Can Access the Floor from Below
If the room below has an exposed ceiling, basement, or crawl space, you may be able to inspect the floor from underneath.
This can help you spot:
- Gaps between joists and boards
- Loose nails or screws
- Pipes touching the floorboards
- Unsupported flooring sections
Repairs made from underneath can sometimes be more effective and less visible, particularly when dealing with finished flooring or carpet.
7 Ways to Fix Creaky Floorboards

Once you’ve located the source of the squeak, the next step is choosing the right repair method. The best solution will depend on what is causing the movement in the floor — loose boards, friction between boards, or gaps between the floorboards and joists.
Below are some of the most effective DIY fixes used by flooring professionals.
Method 1: Fix Loose Floorboards with Screws
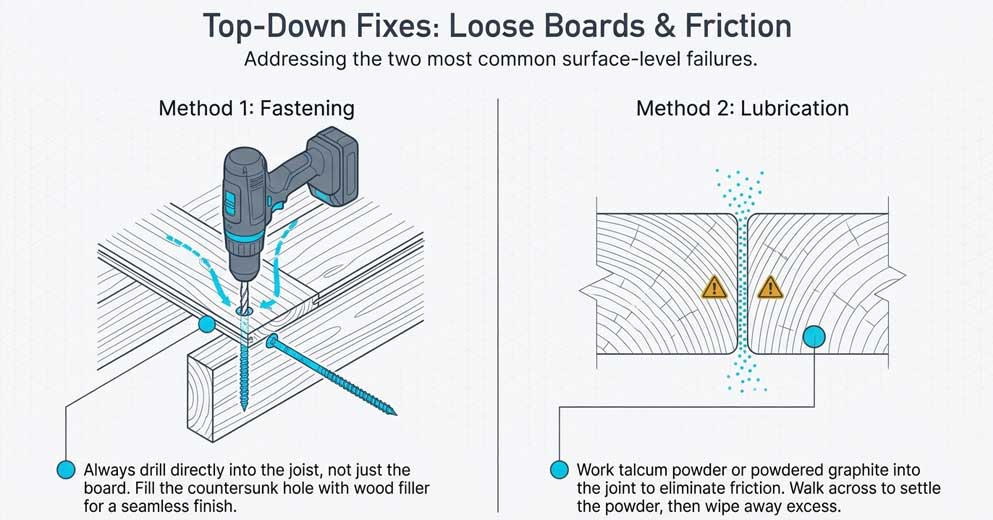
Securing loose boards with screws is often the most reliable way to fix creaky floorboards. Unlike nails, screws hold the wood firmly in place and prevent the board from moving when weight is applied. This method works best when the squeak is caused by a board lifting slightly from the joist underneath.
How to do it
- Locate the joist beneath the squeaky area.
- Drill a small pilot hole through the floorboard.
- Drive a flooring screw into the joist.
- Countersink the screw head slightly below the surface.
- Fill the hole with wood filler if the floor is visible.
Helpful tips
- Use flooring or wood screws around 40–50 mm long.
- Always drill into the joist below the board, not just the board itself.
- Avoid overtightening, which can damage the wood.
This fix usually provides a permanent solution when the problem is caused by loose boards.
Method 2: Lubricate Gaps Between Floorboards
If the squeak occurs when two boards rub together, a simple lubrication method can often eliminate the noise. This approach works best for minor friction between boards, particularly in older timber floors.
Materials you can use
- Talcum powder
- Powdered graphite
- Dry lubricant
Steps
- Sprinkle the powder along the gap between the boards.
- Work it into the joint using a brush or cloth.
- Walk across the area to help the powder settle.
- Wipe away any excess residue.
The powder reduces friction between the boards, which can stop the squeaking almost immediately. While this fix is quick and easy, it may need to be reapplied over time.
Method 3: Fix Squeaky Floors from Underneath
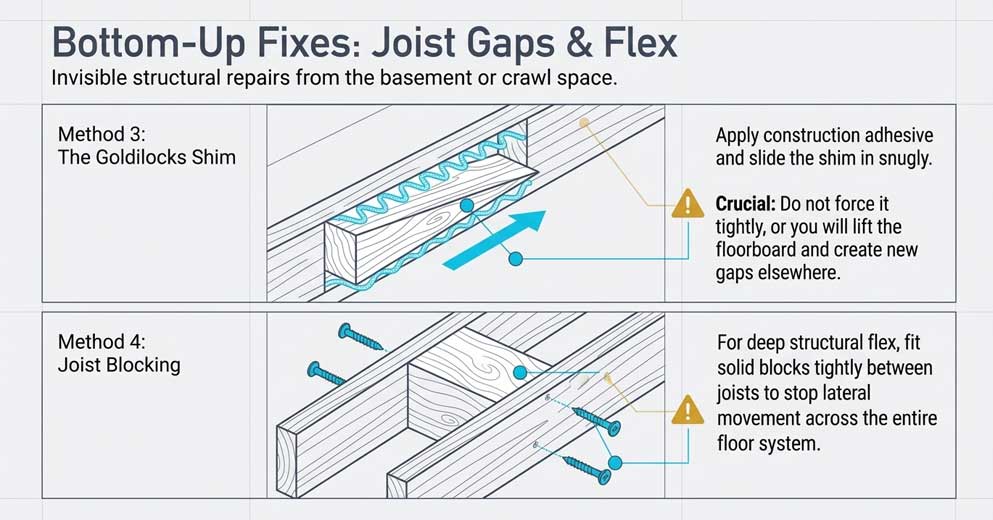
If you have access to the floor from below — for example, from a basement, crawl space, or exposed ceiling — repairs can often be made without touching the finished flooring. This method addresses gaps between the floorboard and the joist.
How to repair from underneath
- Identify the squeaky area from above.
- Locate the corresponding joist below.
- Insert a small wood shim into the gap between the joist and the floorboard.
- Apply construction adhesive for extra support.
- Trim off any excess shim material.
Important note
The shim should fit snugly but should not be forced in too tightly, as this could lift the floorboard and create new problems. Repairs from underneath are often very effective and invisible from the surface.
Method 4: Install Wood Blocks Between Joists
For more persistent creaks, adding extra support between joists can stabilise the floor structure. Wood blocks help prevent movement and strengthen the flooring system.
Steps
- Cut solid wood blocks to fit tightly between joists.
- Position the blocks beneath the squeaky section.
- Secure them with screws or construction adhesive.
- Ensure the blocks sit flush against both joists.
This reinforcement reduces flex in the floor and can eliminate deeper creaking noises caused by structural movement.
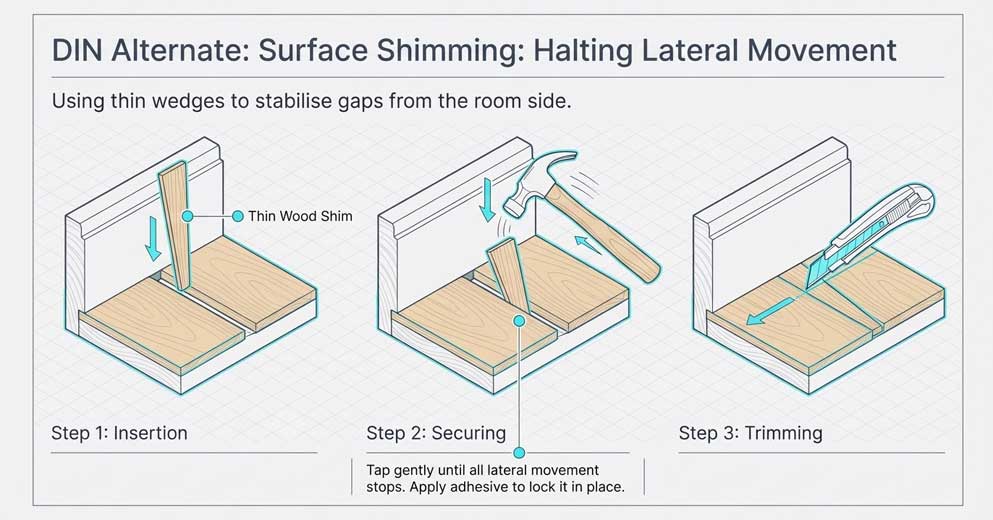
Method 5: Use Wood Shims to Stop Movement
Shims are thin wedges of wood that can fill small gaps between structural elements. They are especially useful when a floorboard doesn’t sit tightly against the joist.
Basic process
- Insert the shim into the gap
- Tap gently until the movement stops
- Secure with adhesive if needed
Shims provide additional support and can prevent the board from flexing under weight.
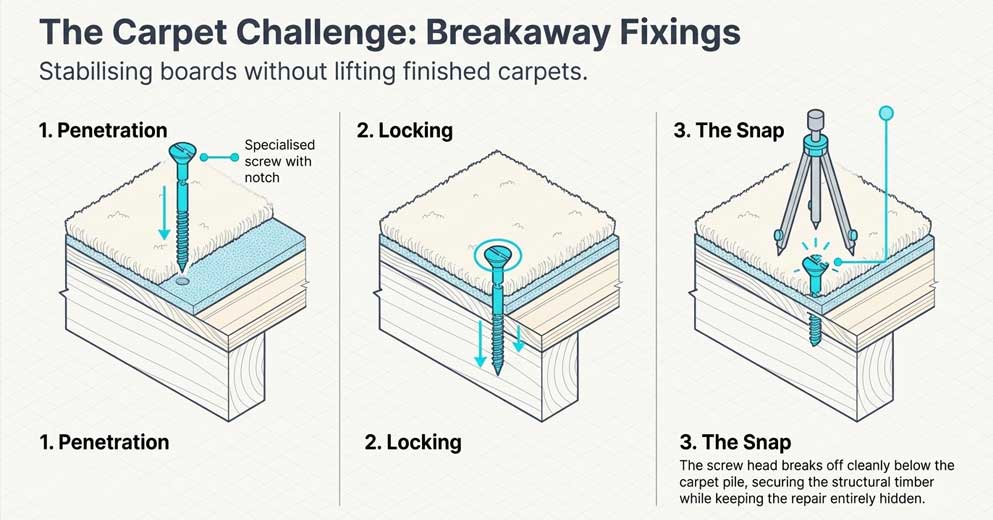
Method 6: Fix Squeaky Floors Under Carpet
Many squeaky floors occur beneath carpeted rooms, which can make repairs slightly more challenging. However, there are methods designed specifically for this situation. These often involve special repair screws that can be installed through the carpet without damaging it.
Typical steps include:
- Locate the joist beneath the carpet.
- Drive a special breakaway screw through the carpet and into the joist.
- Snap off the screw head so it sits below the carpet surface.
This secures the floorboard while keeping the repair hidden.
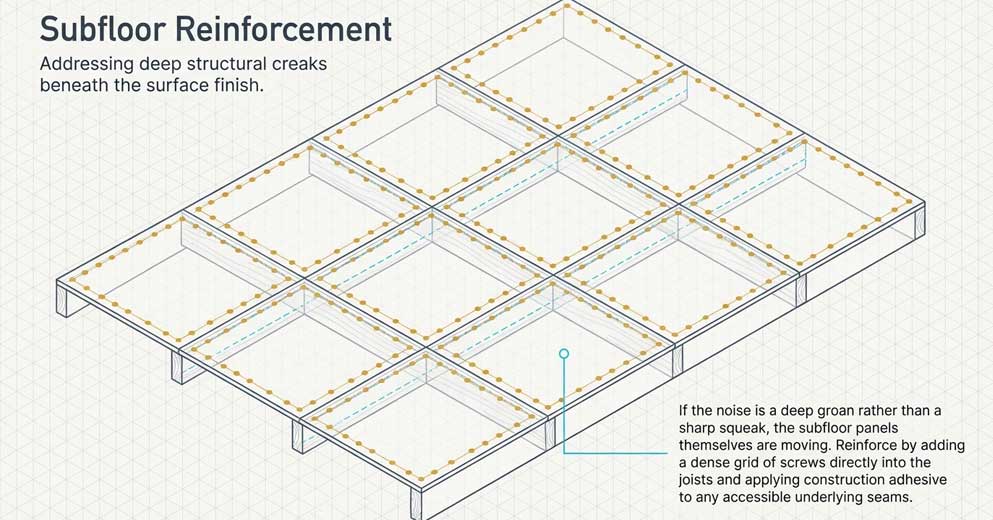
Method 7: Reinforce the Subfloor
If the creaking is caused by movement in the subfloor panels rather than the floorboards themselves, reinforcement may be necessary.
This can involve:
- Adding screws to secure subfloor panels
- Installing additional blocking between joists
- Applying construction adhesive along joists
These measures strengthen the flooring structure and help eliminate movement that causes noise.
Tools and Materials You May Need
Before starting any repairs, it helps to gather the right tools and materials. Most squeaky floorboard fixes are straightforward DIY jobs, and many homeowners will already have some of the required tools. Having everything ready beforehand will make the repair process quicker and easier.

Common Tools
These tools are typically used when securing or inspecting floorboards:
- Power drill or screwdriver – for driving screws into floorboards and joists
- Drill bits – used to create pilot holes before inserting screws
- Stud finder – helps locate floor joists beneath the floorboards
- Tape measure – useful for identifying joist spacing
- Hammer – for tapping shims or adjusting boards
- Utility knife – helpful when working around carpet
A stud finder is particularly useful because accurately locating joists ensures screws anchor the floorboard securely.
Materials Often Used for Repairs
Depending on the cause of the creak, you may need a few simple materials:
- Wood screws or flooring screws
- Wood shims
- Construction adhesive
- Wood filler (for visible floors)
- Talcum powder or dry lubricant
- Timber blocks for joist reinforcement
Each of these materials helps address different causes of squeaky floors.
For example:
| Problem |
Material Used |
| Loose floorboard |
Flooring screws |
| Boards rubbing together |
Talcum powder or graphite |
| Gap between joist and board |
Wood shims |
| Weak floor structure |
Timber blocks |
Optional Tools That Can Help
While not always necessary, these tools can make the job easier in some situations:
- Pry bar – useful for lifting floorboards if access underneath is needed
- Work light or flashlight – important when working beneath floors
- Safety gloves and eye protection – recommended for DIY repairs
These items are especially helpful if you need to inspect the floor from below or carry out more extensive reinforcement work.
How to Prevent Floorboards from Creaking
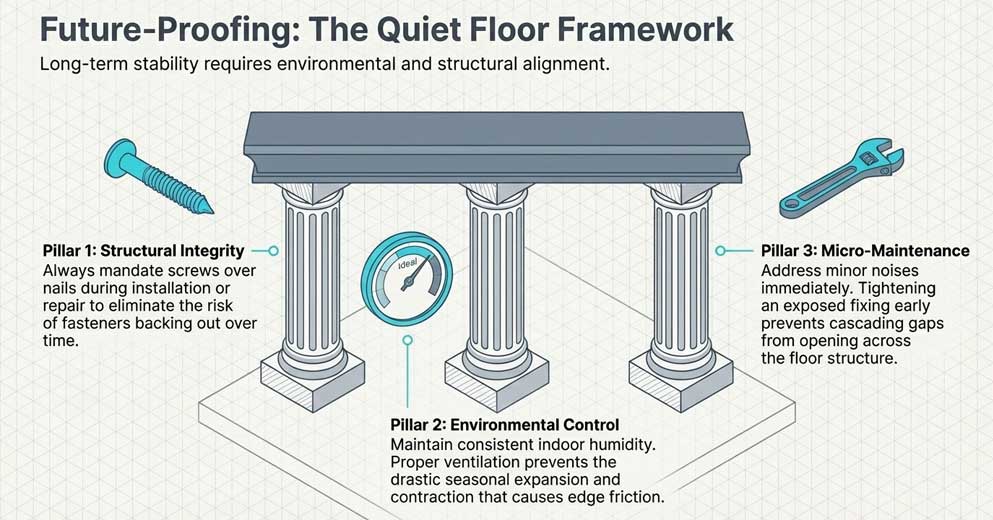
While squeaky floors can usually be repaired, preventing creaks from developing in the first place is always the best approach. Proper installation, regular maintenance, and good indoor conditions can significantly reduce the chances of floorboards becoming noisy over time. Here are some practical steps that can help keep your floors stable and quiet.
Use Screws Instead of Nails
When installing or repairing floorboards, screws generally provide a more secure fixing than nails. Nails can gradually loosen as the wood expands and contracts, which allows boards to move and create noise. Screws, on the other hand, hold the boards firmly in place and reduce the likelihood of movement.
For best results:
- Secure floorboards directly into joists
- Use appropriate flooring screws
- Ensure screws are spaced evenly along the board
This simple change can greatly improve long-term stability.
Maintain Consistent Indoor Humidity
Wood naturally reacts to changes in temperature and humidity. When humidity levels fluctuate significantly, floorboards can expand and contract, leading to gaps and friction between boards.
To minimise this movement:
- Keep indoor humidity at a stable level
- Ensure rooms are properly ventilated
- Avoid excessive moisture in kitchens or bathrooms
- Consider using a humidifier or dehumidifier if necessary
Maintaining a balanced indoor environment helps preserve the structure of wooden flooring.
Secure Floorboards Properly During Installation
Many squeaky floor problems originate during the installation stage. If floorboards are not fixed securely to the joists or subfloor, movement can develop over time.
During installation, it’s important to:
- Align boards properly with joists
- Ensure each board is firmly secured
- Avoid leaving gaps between structural elements
- Check that subfloor panels are tightly fixed
A well-installed floor structure is far less likely to develop creaks later on.
Address Minor Noises Early
Small squeaks can often be resolved quickly if they are dealt with early. Ignoring them may allow the movement to worsen over time.
If you notice new creaking sounds:
- Check for loose boards
- Tighten any exposed screws or fixings
- Apply lubricant between rubbing boards if necessary
Quick maintenance can prevent minor issues from becoming larger repairs.
FAQs About Creaky Floorboards
Why do floorboards creak when you walk on them?
Floorboards usually creak because parts of the floor structure move slightly when weight is applied. This movement may occur between floorboards, between boards and joists, or around loose nails or screws.
Can squeaky floors be fixed without lifting the floor?
Yes, many squeaky floors can be repaired without removing the floorboards. Common solutions include securing boards with screws, adding lubricant between boards, or fixing gaps from underneath the floor if access is available.
What is the best screw for fixing squeaky floorboards?
Wood screws or specialised flooring screws are typically the best option. They provide stronger and longer-lasting hold than nails, helping prevent future movement in the boards.
Are creaky floors dangerous?
In most cases, creaky floors are not dangerous and are simply caused by minor movement in the flooring structure. However, if the floor feels soft, uneven, or unstable, it may indicate a more serious structural issue that should be inspected.
Does talcum powder stop squeaky floors?
Talcum powder can help reduce friction between floorboards that rub against each other. While it may provide a quick fix, it is often considered a temporary solution and may need to be reapplied over time.
Can squeaky floors be fixed from underneath?
Yes, if you can access the floor from below (such as from a basement or crawl space), repairs can be made by inserting shims, applying adhesive, or reinforcing joists. This method can sometimes provide a cleaner and more discreet repair.
Conclusion
Creaky floorboards are a common issue in many homes, but they are usually straightforward to fix. In most cases, the noise is caused by small movements between floorboards, joists, or fixings, which can often be resolved with simple DIY methods.
By identifying the source of the squeak and applying the appropriate repair — whether securing boards with screws, filling gaps with shims, or reducing friction between boards — you can restore stability and eliminate unwanted noise.
With proper installation and regular maintenance, wooden floors can remain quiet, secure, and durable for many years.