Back to DIY Advice
DIY Hardwood Floor Scratch Removal Made Simple
 Hardwood floors are like the superheroes of your house — strong, shiny, and always there under your feet. But even superheroes get battle scars. Over time, your floor might collect scratches from furniture sliding, pets zooming around, or just everyday life. Those scratches can make your floor look tired and cranky. The good news? You don’t need magic or a new floor to fix them!
With a few easy tricks, you can smooth out those scratches and make your floor look like it just got a spa day. We’re talking simple fixes like wood fillers, crayons (yes, really!), sanding, and a touch of polish. By the end, your floor will be back to showing off its beauty without those annoying little lines. So grab your DIY cape, and let’s rescue your hardwood floors together — scratch by scratch!
Fixing Tiny Scratches (The Easy Way!)
So your hardwood floor has a few little scratches? Don’t panic — that doesn’t mean it’s ruined. Think of fine scratches like tiny pencil marks on your floor. Annoying, yes. Permanent? Nope!
Here are some quick and easy fixes:
- Magic markers for wood: Okay, not actual magic, but close. Buy a wood stain marker in the same colour as your floor. Just colour in the scratch like you’re doing arts and crafts, and poof — the line disappears.
- Clean and buff: Sometimes a gentle hardwood floor cleaner and a soft cloth are all you need. Rub in circles (like you’re polishing a genie lamp) and then wipe away the extra. Shine restored!
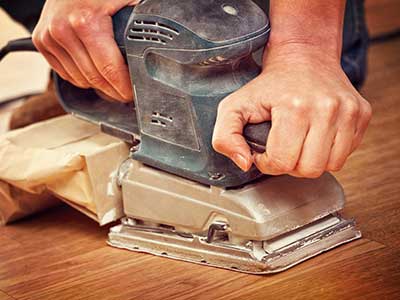
- For bigger scratches: If the marks are deep, you might need the “big guns” — sanding and refinishing. That’s more of a pro job, but it will make the floor look brand new.
Once your repair is done, always vacuum or sweep to clear away dust before adding a protective finish. And don’t forget: prevention is your best friend. Rugs in busy spots, felt pads under furniture, and regular cleaning will keep your hardwood floor looking fabulous. Treat it well, and it’ll keep shining for years — like the star of your living room it is!
How to Heal Big, Ugly Scratches
Fine scratches are like paper cuts… annoying but not a disaster. Deep scratches, though? Those are more like battle scars. Luckily, even those big lines across your hardwood floor can be fixed without calling in a superhero team. Here’s how to do it with everyday tools:
- Step 1: Clean the wound. Grab a soft cloth, warm water, and a tiny splash of mild soap. Wipe the scratch so it’s free of dust and grime. You don’t want to trap dirt under the fix!
- Step 2: Fill the gap. Use wood filler (you can grab it at any hardware store) and a putty knife to press it into the scratch. Think of it as giving your floor a little patch-up job.
- Step 3: Sand it smooth. Once the filler dries (a few hours of patience needed), use fine-grit sandpaper to make the spot level with the rest of the floor. Smooth like butter.
- Step 4: Add some colour. Stain the repaired spot so it matches your floor’s shade — like colouring in a missing puzzle piece.
- Step 5: Protect the masterpiece. Finish with a layer of polyurethane or wax to lock in the repair and keep future scratches at bay.
And voilà — your floor looks refreshed and happy again. Nobody will ever know there was a scratch there… unless you brag about your DIY skills, which, let’s be honest, you totally should!
How to Keep Scratches from Coming Back
 Fixing scratches is great… but wouldn’t it be nicer if they didn’t show up in the first place? Luckily, your hardwood floor doesn’t ask for much. Just follow these simple “house rules,” and you’ll keep it looking smooth and shiny for years:
- No shoes, please: Think of your floor as a VIP lounge. Shoes carry dirt and little rocks that scratch like crazy. Socks or slippers only beyond this point!
- Pet manicure day: Your dog or cat may be adorable, but their claws are basically tiny floor saboteurs. Keep them trimmed, and your planks will thank you.
- Rug life: Place rugs in high-traffic areas to act like shields. They catch spills, soften footfalls, and add some cosy style points.
- Furniture on ice skates: Dragging chairs or tables? Instant scratches. Stick felt pads or coasters under the legs, and suddenly your furniture glides instead of gouges.
Follow these easy tricks and your hardwood will stay gorgeous, scratch-free, and ready to impress guests. Bonus: no more wincing every time someone drags a chair across the room.
When It’s Time to Call the Floor Rescue Squad
Sure, DIY fixes are fun — a little stain here, a filler there — but sometimes your hardwood floor needs more than a quick patch-up. If the scratches look more like battle scars, it’s probably time to call in the professionals. Think of flooring contractors as the “floor doctors.” They know every species of wood, every type of finish, and have the fancy tools that make repairs look effortless.
Instead of spending your weekend trying (and maybe failing) to fix a crater-sized scratch, a pro can swoop in, diagnose the problem, and restore your floor to showroom glory. Even better, they have access to high-quality products made specifically for hardwood floor repair, which means the results don’t just look good — they last.
And let’s be honest: hiring a pro for scratch repair often saves money in the long run. Why? Because one wrong move with a sander or filler can make the damage worse — and more expensive to fix later. Sometimes the smartest DIY move is knowing when to hang up your tools and let the experts handle it.
Wrapping It Up: Floors Deserve a Little TLC
Hardwood floors are like the loyal friends of your home — always there, taking every step (literally). Scratches happen, but with the right care, they don’t have to be permanent scars. Whether you go for DIY fixes with stain markers and fillers, or you call in the pros for serious damage, your floor can keep looking gorgeous for years. A little maintenance today means fewer headaches (and fewer squeaks!) tomorrow.
FAQ: Quick Answers for Scratch Stress
- Can I use a crayon to fix scratches? Yes! In a pinch, a wax crayon that matches your floor colour can fill in light scratches surprisingly well. Think of it as art class, but for grown-ups.
- Do I need to sand the whole floor for a few scratches? Nope. Spot treatments work fine for small scratches. Save the big sanding job for when most of your floor looks tired.
- Are pets the main reason floors get scratched? Pets definitely contribute (those claws are tiny daggers!), but furniture and shoes are just as guilty.
- When should I call a professional? If the scratch looks more like a canyon than a line, or if you’re nervous about making it worse — it’s pro time.