Back to Wood Floor Fitting
Reclaimed Wood Floor Installation: A Complete Guide
Reclaimed wood flooring is more than just a design choice—it's a statement. Whether salvaged from old barns, factories, or historic buildings, every board carries its unique charm, with weathered textures, nail marks, and rich tones that can’t be replicated with new timber. For homeowners and designers looking to add warmth, authenticity, and sustainability to their interiors, reclaimed wood flooring is a standout option.
At FlooringFirst!, we understand that reclaimed wood requires special attention during installation. From sourcing high-quality boards to preserving their original character through precise fitting and finishing, our experts take pride in delivering results that are both stunning and long-lasting. In this guide, we’ll walk you through the key considerations, preparation, installation process, and aftercare tips for working with reclaimed wood flooring.
What Is Reclaimed Wood & Why Choose It?
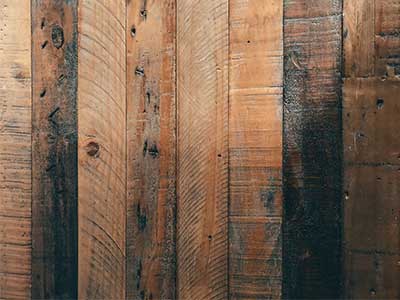
Reclaimed wood is timber that has been salvaged from old buildings, barns, warehouses, and even shipyards, then repurposed for new uses like flooring. Unlike newly milled planks, reclaimed boards have a story to tell, carrying the marks of their history in every knot, nail hole, and grain variation.
There are several reasons why reclaimed wood flooring has become a popular choice for homeowners and interior designers alike:
- Authentic character: No two boards are alike. The natural imperfections and aged patina give reclaimed wood a rustic, time-worn beauty that modern materials can’t match.
- Eco-friendly: Reusing wood reduces the demand for new timber, lowers environmental impact, and often prevents valuable hardwoods from being discarded.
- Durability: Old-growth timber is often denser and more stable than newly harvested wood, offering excellent longevity and resistance to wear.
- Unique aesthetics: From weathered oak to reclaimed pine, the depth of colour and variation in reclaimed flooring creates a bold design feature in any room.
Whether you're aiming for a rustic cottage feel, an industrial edge, or a classic Victorian restoration, reclaimed wood flooring delivers timeless appeal with built-in sustainability.
Choosing the Right Reclaimed Boards
Selecting reclaimed wood flooring isn’t just about picking a species or colour—it’s about finding boards with the right balance of character, condition, and compatibility with your interior. Because reclaimed timber varies widely in appearance and age, careful selection is key to achieving a beautiful and stable finished floor.
What to Look For
- Wood species: Oak, pine, maple, and chestnut are common choices. Oak is popular for its strength and uniform grain, while pine adds warmth with its soft knots and colour variation.
- Condition of boards: Check for excessive warping, rot, or deep cracks. Some wear is expected (and desirable), but boards should be structurally sound.
- Dimensions: Choose a consistent width or embrace variation for a more rustic look. Wider planks may require glue-assisted fitting for stability.
- Edge profile: Some reclaimed boards come with tongue-and-groove joints, others may be square-edged and require face-nailing.
- Level of distressing: Decide how much visible character you want. Some prefer heavy markings and aged patina; others seek a more refined, lightly weathered appearance.
Before installation, it’s a good idea to sort and lay out your boards in advance, mixing lengths, tones, and character markings evenly throughout the room. This helps achieve a natural, balanced look without overly repeating colours or defects in one area.
Pre-Installation Prep – Acclimation & Layout
Reclaimed wood flooring, like all natural timber products, must be properly acclimated before installation to ensure stability and prevent future movement. Because reclaimed boards often come from varied environments and have been exposed to different moisture levels over time, this step is especially critical.
Acclimating Reclaimed Wood
- Bring boards indoors at least 7 days before installation to allow them to adjust to the temperature and humidity of the room.
- Stack loosely in the installation space with spacers between each layer to promote air circulation.
- Maintain stable conditions during acclimation—ideally between 18–22°C and 40–60% relative humidity.
Planning the Layout
- Dry lay a section of the floor before fixing to preview the colour and grain distribution.
- Mix boards from different bundles to avoid grouping similar tones or markings in one area.
- Consider focal points like fireplaces, doorways, or feature walls when deciding board direction and layout pattern.
A careful layout stage ensures your floor looks balanced and intentional, showcasing the rich history of each plank without visual clutter or inconsistencies. Once the boards are acclimated and laid out, you’re ready to begin the installation process.
Installation Methods Overview
 Reclaimed wood flooring can be installed using a few different techniques, depending on the board profile, subfloor type, and the overall condition of the reclaimed material. Choosing the right method will help maintain long-term stability while preserving the character of the boards.
1. Nail or Staple-Down (Most Common)
- Best for tongue-and-groove reclaimed boards or milled planks.
- Ideal for installation over wooden subfloors or plywood sheathing.
- Use flooring nails or staples with a nail gun, securing each board at an angle through the tongue.
2. Glue-Down Method
- Suitable for concrete subfloors or areas where nailing is not possible.
- Requires a strong, flexible adhesive designed for timber flooring.
- May be combined with secret nailing for added security on wide planks.
3. Face-Nailing (Traditional Square-Edge Boards)
- Used when boards lack tongue-and-groove edges.
- Each plank is nailed directly through the face into the subfloor, then filled or left visible for a rustic effect.
- Ideal for achieving a vintage, barnwood-style aesthetic.
Before you begin, assess your subfloor’s condition and moisture levels. You may also need to use a moisture barrier or underlay, depending on the installation method. For the best results, especially with uneven or aged boards, a combination of gluing and nailing may offer added strength and stability.
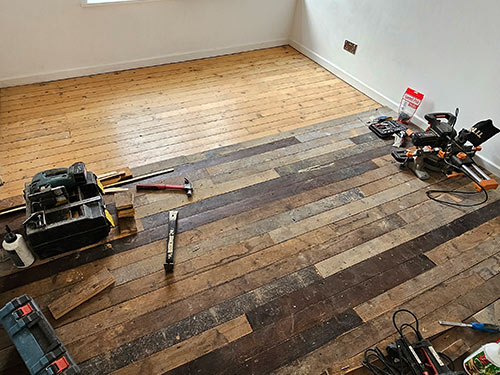
Step-by-Step Installation Guide
Installing reclaimed wood flooring takes more care than working with new boards, but the reward is a one-of-a-kind floor full of character and charm. Follow these steps to ensure a secure, well-aligned, and visually stunning result.
Step 1: Prepare the Subfloor
- Ensure the subfloor is level, dry, and clean.
- Use a moisture meter to check the moisture content of both the subfloor and the boards—ensure they’re within 2–4% of each other.
- Install a vapour barrier if fitting over concrete or ground-level spaces prone to dampness.
Step 2: Plan and Rack the Boards
- Lay out several rows before installation to plan for board colour, grain variation, and feature placement.
- Stagger end joints by at least 150mm to maintain structural integrity and visual balance.
Step 3: Begin Installation
- Start from the longest straight wall, leaving an expansion gap of 10–15mm around the perimeter.
- For tongue-and-groove boards, use a flooring nailer to secure nails into the tongue at a 45° angle.
- For square-edge boards, face-nail each plank and fill holes later if desired.
- For glue-down installations, spread adhesive using a notched trowel and lay the boards firmly into place.
Step 4: Cut and Fit Edge Boards
- Trim the final rows to fit using a circular saw or jigsaw.
- Ensure tight joints and leave expansion space at all edges and fixed objects.
Step 5: Address Knots, Holes, and Cracks
- Decide whether to fill imperfections or leave them exposed for character.
- Use wood filler, epoxy, or reclaimed sawdust mixed with adhesive to patch any unwanted gaps.
Once the boards are installed, allow the adhesive (if used) to fully cure for 24–48 hours before proceeding with sanding or finishing. The result should be a solid and naturally beautiful floor that blends historic craftsmanship with modern stability.
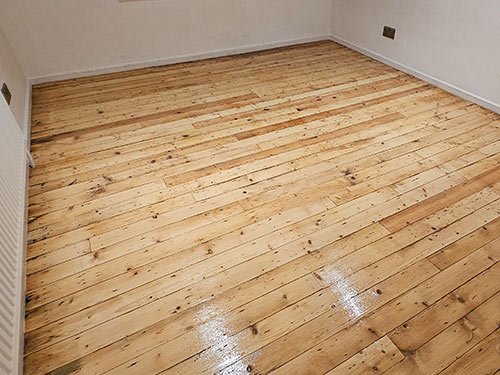
Finishing and Sanding
One of the biggest appeals of reclaimed wood flooring is its aged patina, but finishing it correctly is essential to preserve its character while ensuring long-term protection. Sanding should be approached with care to avoid removing too much of the unique texture that makes reclaimed wood so special.
Sanding Tips for Reclaimed Wood
- Use a belt sander or orbital sander instead of a heavy drum sander, which can remove too much surface detail.
- Spot sand selectively to level any uneven joints, but avoid over-sanding worn edges or character marks.
- Start with a medium-grit paper (e.g., 80-grit) and finish with a fine grit (120–150) for a smooth, seal-ready surface.
Filling Character Marks (Optional)
- If you want a smoother finish, fill nail holes, cracks, or deep knots using colour-matched wood filler or epoxy resin.
- For a more rustic finish, leave imperfections visible to celebrate the natural history of the boards.
Choosing the Right Finish
- Hardwax oil: Enhances natural colour and grain while preserving a matte, breathable finish—ideal for rustic interiors.
- Lacquer: Adds extra protection and a subtle sheen. Available in matt, satin, and gloss finishes depending on your preference.
- Stain + seal combo: If desired, apply a wood stain to unify the colour before sealing. Test on spare boards first.
Apply the finish evenly with a roller, brush, or pad, following the manufacturer’s instructions. Allow full drying and curing time between coats, and lightly buff between applications if using oil or lacquer. Done right, the finish will lock in the natural beauty of the reclaimed timber while protecting it from wear and moisture.
Maintenance and Care
Reclaimed wood flooring is not only beautiful but also incredibly durable, especially when properly cared for. By following a few simple maintenance steps, you can preserve its unique character and ensure it lasts for generations.
Daily and Weekly Cleaning
- Dry mop or vacuum regularly using a soft brush attachment to remove dust and debris.
- Avoid excess water—use a slightly damp (not wet) mop and a pH-neutral wood floor cleaner if needed.
- Place mats at entrances to reduce tracked-in dirt and moisture.
Preventing Damage
- Use felt pads under furniture legs to prevent scratches and dents.
- Lift heavy items instead of dragging them across the floor.
- Maintain indoor humidity between 40%–60% to reduce expansion or shrinkage of the wood.
Long-Term Care
- Depending on the finish, reapply oil or lacquer every few years to refresh protection and sheen.
- For deeper scratches or wear, consider light sanding and reapplication of the finish to restore the surface.
Properly maintained, reclaimed wood floors will continue to age gracefully—deepening in colour, softening in tone, and developing a rich patina that new wood simply can't replicate.
Common Pitfalls & Troubleshooting
While reclaimed wood flooring offers exceptional beauty, it also presents unique challenges. Being aware of common mistakes can help you avoid costly errors and ensure a successful, long-lasting installation.
1. Skipping Moisture Testing
- Failing to check moisture levels in the subfloor and the reclaimed boards can lead to warping, cupping, or gaps after installation.
- Tip: Use a moisture meter and allow time for acclimation before fitting.
2. Over-Sanding the Surface
- Too much sanding can erase the very patina and character that make reclaimed wood special.
- Tip: Sand only as needed to smooth joints and prepare for finishing—avoid heavy drum sanders.
3. Poor Board Selection and Layout
- Grouping similar colours or heavily marked boards can create visual imbalance.
- Tip: Mix boards from different bundles and lay them out before installation for a balanced look.
4. Insecure Fastening
- Wide or irregular boards may shift or creak if not properly secured.
- Tip: Consider combining glue and nails, especially for wide or square-edge planks.
5. Inconsistent Finishing
- Inconsistent application of oils or lacquers can result in patchy protection and appearance.
- Tip: Apply finishes in thin, even coats and buff or sand lightly between layers where needed.
By avoiding these common pitfalls, you'll be better equipped to enjoy the full beauty and longevity of your reclaimed wood floor, without unpleasant surprises down the line.
Cost & Sustainability Considerations
 Reclaimed wood flooring may carry a higher upfront cost compared to mass-produced new flooring, but its long-term value, environmental benefits, and unique appeal make it a worthwhile investment, especially for those seeking quality, character, and eco-conscious choices.
Cost Factors
- Price per square metre: Reclaimed wood can range from moderately priced pine to high-end oak or exotic hardwoods, depending on age, rarity, and quality.
- Preparation costs: Additional time may be required for cleaning, acclimating, milling, and sorting boards before installation.
- Installation complexity: Due to varying board dimensions and imperfections, fitting reclaimed wood may require a skilled installer and take longer than standard flooring projects.
Sustainability Benefits
- Conservation of resources: Using reclaimed timber reduces demand for newly harvested wood, helping to preserve forests.
- Lower environmental impact: Salvaged wood avoids energy-intensive processing and transportation typical of new flooring materials.
- LEED & eco-certification potential: Reclaimed wood can contribute to green building certifications and meet FSC or PEFC standards when traceable.
While the initial cost may be slightly higher, the character, durability, and ecological value of reclaimed wood flooring often outweigh the expense. It’s an ideal choice for those who want to make a responsible and lasting impact on both their home and the environment.
Reclaimed Wood Flooring: A Timeless Choice with Lasting Value
Reclaimed wood flooring brings history, warmth, and individuality into any space. With its unmatched charm and sustainability, it’s a smart investment that tells a story beneath your feet. While it may require more planning and precision during installation, the result is a truly unique floor, rich in texture, full of character, and built to last.
Whether you're renovating a period property, adding rustic touches to a modern home, or simply looking for an eco-friendly flooring solution, reclaimed wood delivers on both aesthetics and performance.
Looking for expert help with reclaimed wood installation? At FlooringFirst!, we’ve helped homeowners across London achieve flawless results with reclaimed timber. Book a free site visit or get in touch with our team for advice, fitting, and restoration tailored to your space.