Back to Wood Floor Fitting
Preventing Pitfalls During Wood Floor Installation
One of the main ways to ensure the good structural integrity, durability, and long-lasting power of your wooden floor is by making sure its installation is performed properly and professionally. Many pitfalls can be caused by a poorly performed fitting process, and there are many issues that the floor may struggle with later on due to this problem. Therefore, today we would like to discuss more wood floor installation and how to avoid some common mistakes and pitfalls during the fitting process.
How High Moisture Levels Affect Floor Performance

Some of the most common issues with a wooden floor are caused exactly by high moisture levels. Excessive moisture levels can have many sources - therefore, there are many aspects that need to be considered before the wood floor installation begins. First off, one of the main sources of high moisture levels may be the moisture contained in the subfloor, especially when it comes to a concrete subfloor.
Secondly, the overall moisture levels in the room or area where installation is planned may be higher than what is recommended for a proper wood floor installation. Unfortunately, moisture at job sites is not the easiest thing to control - therefore, you should ensure professional assistance and performance in order to prevent moisture issues that will affect the durability and condition of the floor. Here are some of the best and most popular recommendations to avoid such problems.
Recommendations for Ensuring Good Moisture Level During Floor Fitting
Many factors affect the overall environment at the job site, and all of them should be taken into account in order to ensure proper and efficient wood floor installation. The ambient temperature at the job site, along with the relative humidity during the time of installation, is very important. Many variables can affect the wooden floor and its installation, and only really experienced and knowledgeable professionals know exactly what to do in order to ensure the best conditions at the job site during installation. Here are some main guidelines:
- The building should be conditioned to the level of moisture and humidity expected during service life.
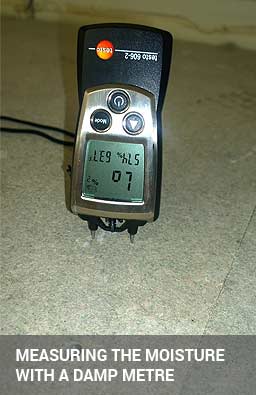
- The subfloor must be properly prepared and its moisture level checked before the delivery of the wood flooring and also before the start of the installation process.
- The moisture content of both the wood floorboards and the subfloor should be within 2% for boards that are three inches in width or wider and within 4% for boards that are less than three inches in width.
- The subfloor should be levelled and even, and the same applies to the flooring construction itself.
What Happens When Moisture Conditions Are Too High?

Moisture can affect the wood in many ways. While wood, being a natural material with a natural response to changes in its environment, can pretty much withstand the impact of moisture on its own in most cases, when the moisture levels are really excessive, this can cause a bunch of problems and issues with the floor. Generally speaking, moisture makes the wooden floorboards expand and contract. This is a natural movement and usually, the wooden boards will be back in their original shape soon enough.
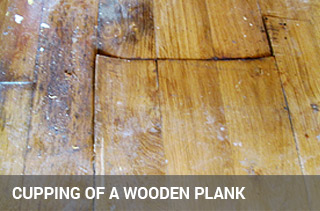
However, sometimes the impact of moisture is so massive that the boards expand to an extent where they get damaged, distressed, cupped, ballooned, or even break. When the expansion is restricted, the edges of the floorboards may get ridged upwards, and this will apply a lot of pressure to the fasteners along with the tongue of the boards, which can impact the structural integrity of the floor and damage the floorboards. Also, the expansion of the wooden floorboards along with tight joints along the end joints of the flooring boards can lead to a very noisy and squeaky floor as a result of high traffic.
Expansion areas around the perimeter of the room can leave not enough room for the full expansion of the flooring boards, which can seriously damage the boards. This is why the expansion gap is something very important and should be left during the installation process. The most common reason for cupping of the floorboards is caused by the higher moisture levels of the subfloor that has not been properly prepared and dried before the start of the installation.
In case the moisture levels on site have not been under control during the installation process and the preparation of the subfloor, along with the fitting of the flooring boards, have been performed poorly, noise from the flooring and other issues with the floorboards can occur anytime. Besides the more popular and obvious issues due to high moisture levels and improper installation and preparation, it is also important to mention the risk of the occurrence of gaps between the floorboards, which significantly decreases the insulation of the floor and affects its stability.
How to Minimise the Risk?
To ensure a stable, durable, and long-lasting wood flooring installation, hiring a professional and experienced team is essential. However, there are additional steps you can take to reduce potential issues and create a solid wood flooring structure that will last for decades.
Before installation, inspect the crawl space. Ensure it is conditioned or that a vapour barrier membrane is installed on the crawl space ground. Proper ventilation is key to preventing moisture buildup, so make sure the area is adequately ventilated before beginning.
- Control Excessive Moisture
Excess moisture is a major enemy of wood floors. You can use an auxiliary dehumidifier to remove excess moisture from the room and the subfloor before installation. The aim is to reduce the moisture levels to what the floor manufacturer recommends for a safe and secure installation.
- Follow the Fastener Schedule
Adhere to the manufacturer's recommended fastener schedule, or even augment the attachment by spacing the fasteners more closely. Just ensure that the tongue and core material remain intact and don’t split during installation.
- Use the Correct Flooring Fasteners
Ensure the diameter and length of the fasteners either meet or exceed the manufacturer's recommendations. This will provide the necessary strength and stability to the flooring.
- Consider Using Flooring Adhesive
For additional security, consider using high-quality wood flooring adhesive in combination with the recommended fastener schedule. This can help to enhance the overall stability and longevity of your floor.