Back to Wood Floor Fitting
Glue-Down Wood Floor Installation
 Are you considering a new wooden floor for your home or office space? Great choice! However, you might be wondering which installation method is best suited for your project. In today’s article, we will delve into the glue-down wood floor installation method and discuss when it is the most efficient option for you. Let’s walk through how the glue-down installation works and its benefits.
Preparation for Glue-Down Installation
Before starting your glue-down installation project, proper preparation is essential. Here are key steps to ensure a successful installation:
-
On-Site Inspection: Begin with a thorough on-site inspection conducted by an experienced wood flooring specialist. This assessment will help identify any potential issues with the subfloor and overall environment.
-
HVAC Functionality: Ensure that the heating, ventilation, and air conditioning (HVAC) system is operational. A stable indoor climate is crucial for the proper acclimatisation of the wood flooring.
-
Acclimatisation: Allow the wood flooring boards to acclimatise to the indoor humidity levels and temperature of the room where installation is planned. This step is vital to prevent warping or shrinking after installation.
-
Subfloor Condition: The subfloor requires special attention to ensure it is in perfect condition and ready for installation. Since glue-down wood flooring involves adhering the wooden floorboards directly to the subfloor, its condition is critical to the success of the project.
By taking these preparatory steps, you can help ensure a smooth and effective glue-down wood floor installation.
Subfloor Preparation
As you may know, proper preparation of the subfloor is important for a successful glue-down wood floor installation. Here are essential steps and considerations for ensuring your subfloor is in optimal condition:
Services and Treatments
Depending on the type and condition of your subfloor, several services and treatments may be necessary to achieve the best results:
- Sanding: Smooth out any rough areas and prepare the surface for adhesion.
- Scraping: Remove any old adhesive, debris, or imperfections that could affect installation.
- Leveling: Ensure the subfloor is as level as possible to create a stable and uniform wooden floor.
- Filling Low Spots: Address any dips or low areas to prevent unevenness in the finished floor.
- Replacing the Subfloor: If the existing subfloor is beyond repair, consider installing a new subfloor to provide a solid foundation for your glue-down flooring.
Considerations for Concrete Subfloors
If your subfloor is made of concrete, special attention is required:
-
Moisture Content: Ensure that the moisture content of the concrete subfloor is within the recommended limits for wood floor installation. High moisture levels can lead to damage and deterioration of the wooden floorboards.
-
Moisture Vapor Protection: Install a proper moisture vapour barrier underneath the wooden floor to protect against moisture from the concrete.
-
Proper Drainage: Ensure that drainage is directed away from the building to prevent water accumulation around the foundation, which can contribute to moisture issues.
By addressing these key factors in your subfloor preparation, you can help ensure a successful glue-down wood floor installation that lasts for years to come. Once your subfloor is ready, it's time to choose the best adhesive for your project.
Choosing the Right Adhesive
When it comes to glue-down wood floor installation, selecting the appropriate adhesive is crucial for ensuring a successful and long-lasting outcome. Here are some key considerations:
Types of Wood Floor Adhesives
There are various wood floor adhesives available on the market, but it's essential to choose one specifically designed for hardwood installations. Here’s why:
-
Strength: Adhesives designed for hardwoods provide the necessary strength to keep the wooden floorboards firmly in place, ensuring a stable and solid floor construction.
-
Flexibility: A quality wood floor adhesive allows for the natural contraction and expansion of the wooden floorboards, which can be affected by changes in moisture, humidity, and temperature fluctuations. This flexibility is crucial to accommodate the wood's movement without compromising the integrity of the installation.
Key Features of High-Quality Adhesives
When selecting an adhesive, look for products that offer the following benefits:
-
Elasticity: High-quality wood flooring adhesives provide excellent elasticity, allowing them to adapt to the natural movements of the wood without cracking or separating.
-
Durability: Choose an adhesive that ensures long-lasting adhesion, so it remains strong and effective even as the wooden floorboards expand and contract over time.
-
Resistance to Environmental Changes: A reliable adhesive will maintain its strength and integrity, preventing issues like weakening or deterioration due to moisture or temperature changes.
By investing in a high-quality adhesive specifically formulated for wood floor installation, you can help ensure the longevity and durability of your glue-down wood floor, creating a beautiful and functional space in your home or office.
Installation Process
Once you have prepared your subfloor and selected the right adhesive, it’s time to proceed with the glue-down wood floor installation. Follow these steps to ensure a successful installation:
Leave an Expansion Gap
- Expansion Gap: It’s essential to leave a sufficient expansion gap around the perimeter of the installation area. This gap allows the wooden floorboards to expand without causing damage or buckling. A typical gap size is 1/4 to 1/2 inch - however, refer to the manufacturer's guidelines for specific recommendations.
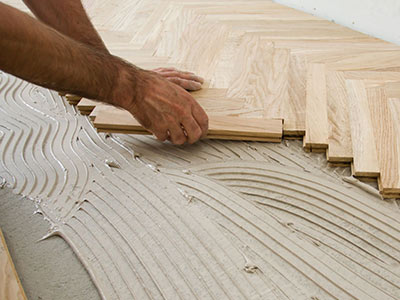
Apply the Adhesive
-
Using a Trowel: Utilise a specialised trowel to apply and spread the hardwood floor adhesive evenly onto the subfloor. This ensures that the adhesive provides a solid bond between the floorboards and the subfloor.
-
Work in Sections: Focus on small areas at a time, moving systematically across the space. This method helps prevent the adhesive from drying before you place the floorboards.
-
Avoid Pre-Spreading: It is highly not recommended to pre-spread adhesive beyond the area you are currently working on, as it may lead to premature drying and poor adhesion.
Check Adhesive Coverage
- Periodic Checks: After placing each floorboard, periodically lift it to check for full adhesive coverage on the back. Ensuring complete coverage is critical for the stability, durability, and longevity of your floor.
Final Steps
- Curing Time: Once all floorboards are installed, it’s crucial to leave the floor undisturbed for at least 24 hours. This curing time allows the adhesive to set properly, ensuring a strong bond.
By following these steps, you can achieve a beautifully installed glue-down wood floor that will stand the test of time and enhance the aesthetics of your space.
Glue-Down Floor Installation – Pros
Choosing the glue-down wood floor installation method offers several advantages, making it a popular choice among homeowners and professionals alike. Here are the key benefits:
- Long-lasting Bond: Glue-down installation creates a permanent bond between the wood floorboards and the subfloor, ensuring durability and longevity. This method is less likely to require repairs or replacements over time compared to other installation methods.
- Stability: This method significantly reduces the likelihood of deflection between the floorboards and the subfloor. A stable floor contributes to a more pleasant walking experience and enhances the overall quality of the flooring.
- Quiet Floors: With a glue-down installation, the risk of squeaking is minimised. This is particularly important in areas with heavy foot traffic, where noise reduction is desired for comfort and tranquillity.
- The Feel of Stability: Glue-down floors offer a sense of stability and solidness underfoot. This characteristic makes them an excellent choice for spaces that require a sturdy flooring solution, such as commercial areas or busy households.
- Noise Reduction: The adhesive used in glue-down installations provides sound-proofing benefits, helping to absorb sound and reduce noise transmission between floors. This can be particularly advantageous in multi-level homes or commercial buildings.
- Seamless Transitions: Glue-down installations allow for the use of flush mount transition mouldings, creating a seamless look between different flooring types. This enhances the aesthetic appeal of your space and offers a professional finish.
By considering these advantages, you can better understand why glue-down wood floor installation is a preferred choice for many residential and commercial projects.
Glue-Down Floor Installation – Cons
While glue-down wood floor installation offers several advantages, it also comes with its own set of drawbacks. Here are some of the main considerations to keep in mind:
- Adhesive Expenses: Using wood floor adhesive adds extra costs to the overall project. Depending on the size of the area and the type of adhesive chosen, this can significantly impact your budget.
- Not DIY-Friendly: Glue-down installation is generally not suitable for DIY projects. The complexity of the process and the need for precision make it better suited for experienced professionals. Incorrect installation can lead to a host of issues, including improper adhesion and uneven floors.
- Preparation Requirements: Glue-down installations require in-depth preparation of the subfloor. This may involve sanding, leveling, and ensuring the surface is completely clean and dry. The additional preparation steps can extend the timeline of the project.
- Increased Labor Expenses: Given the specialised nature of the glue-down installation, it may lead to increased labour costs. Hiring skilled professionals who are experienced with this installation method can be more expensive than simpler flooring methods.
Considering these drawbacks is essential for making an informed decision about whether glue-down wood floor installation is the right choice for your project. While it offers durability and stability, the associated costs and complexities should not be overlooked.
Planning a glue-down wood floor installation? Whether you're renovating a home or fitting out a commercial space, our expert team can ensure a strong, stable, and long-lasting result. Book a free site visit or get in touch with FlooringFirst! for professional advice and precision fitting across London.