Back to Floor Sanding
Why Are My Wood Floors Cupping – and How Can I Fix Them?
 Cupping is one of the most common and frustrating issues homeowners face with wood flooring. If you’ve noticed that the edges of your floorboards are curling upward while the centre appears slightly lower, you’re likely dealing with cupped wood floors. While this problem can be alarming, it often signals an underlying moisture issue that can be corrected if caught early. In this guide, we’ll explain what causes wood floors to cup, how to fix the problem safely, and how to prevent it from happening again.
What Is Floor Cupping?
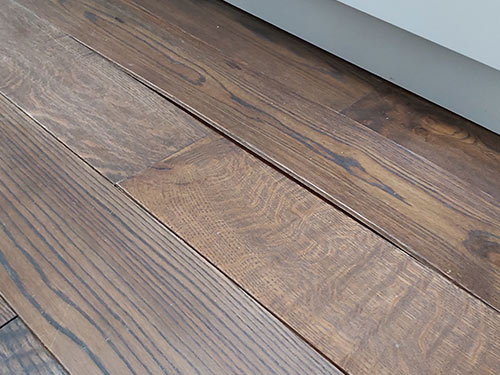
Wood floor cupping occurs when the edges of a floorboard rise higher than the centre, giving the surface a concave or “dished” appearance. This deformation changes the smooth, even surface of your floor and can sometimes cause boards to press against one another.
Cupping should not be confused with crowning, which is the opposite effect — where the centre of the board rises above the edges. Both are usually caused by moisture imbalances, but they require different responses. Recognising the signs early can help you avoid permanent damage or costly repairs.
What Causes Wood Floors to Cup?
Wood is a natural material that expands when it absorbs moisture and contracts when it dries. Cupping occurs when the bottom of a wood board takes in more moisture than the top, causing the edges to rise. Understanding the source of that moisture is key to solving the problem. Here are the most common causes of wood floor cupping:
- Moisture from below: In homes with crawl spaces or concrete subfloors, moisture rising from beneath can enter the wood from the bottom up, especially if a vapour barrier wasn't used during installation.
- High indoor humidity: Excessive humidity, especially in summer, can introduce moisture into the air that the wood then absorbs, leading to cupping.
- Water leaks or spills: A leaking pipe, dishwasher, or even a large spill can soak into the wood and trigger cupping if not addressed quickly.
- Improper acclimation: If the wood flooring wasn’t allowed to acclimate to the room’s conditions before installation, it may absorb moisture later and react unpredictably.
- Poor ventilation: Inadequate airflow under floorboards can trap moisture, especially in older homes with suspended timber floors or poorly ventilated subfloors.
Identifying the moisture source is essential before attempting any repairs. Fixing the surface alone won't stop the cupping if the moisture problem persists.
Can Cupped Wood Floors Fix Themselves?
In many cases, cupped wood floors can flatten out over time, but only if the source of moisture is removed and the environment is stabilised. Wood naturally expands and contracts with changes in humidity, so slight cupping may resolve on its own once conditions return to normal.
Here are a few key points to consider:
- Seasonal humidity changes: Floors that cup during humid summer months may flatten in the winter as indoor air becomes drier.
- Time is important: Allow several weeks for the floor to stabilise before deciding on any sanding or replacement.
- Avoid premature sanding: Sanding a cupped floor too early can result in “crowning” later when the boards shrink back to normal shape.
If the cupping persists or worsens, there's likely an ongoing moisture problem that needs to be addressed before any repairs can be effective.
Step-by-Step: How to Fix Mild Cupping
If your wood floor is only slightly cupped and not severely distorted, you may be able to correct the issue with a few careful steps. The goal is to stabilise moisture levels and allow the wood to return to its natural shape without sanding or replacement.
- Identify and stop the moisture source: Check for leaks, spills, damp subfloors, or condensation from appliances. Address these issues first before proceeding.
- Increase air circulation: Open windows or use fans to improve ventilation in the affected area. Good airflow speeds up drying.
- Use a dehumidifier: Run a dehumidifier in the room to reduce airborne moisture. This is especially important during humid weather or in poorly ventilated spaces.
- Avoid adding heat: Resist the urge to apply direct heat (like space heaters), as rapid drying can cause cracking or warping.
- Wait and monitor: Give the floor at least a few weeks to adjust before taking further action. In many cases, the cupping will gradually lessen on its own.
Be patient — wood needs time to react to changing conditions. Only consider repairs or refinishing if the cupping remains after the floor has fully dried and stabilised.
When You Might Need Professional Restoration
While mild cupping can often resolve naturally, severe or long-lasting cases may require professional help. If the floorboards remain visibly distorted after several weeks — or if new cupping continues to appear — it’s a sign that the issue may be deeper than surface moisture.
Here are situations where professional floor restoration is recommended:
- Persistent cupping after drying: If the boards don’t return to normal shape, even after moisture levels have stabilised.
- Subfloor moisture problems: Issues like a damp concrete slab or poorly ventilated crawl space may need specialised treatment.
- Buckling or separation: When the wood lifts off the subfloor or separates at the joints, repairs may involve replacing sections of flooring.
- Surface damage from over-drying: Cracks, gaps, or discolouration may require sanding and refinishing to restore the look of the floor.
A professional can assess moisture levels, determine whether sanding is appropriate, and ensure that any underlying problems are corrected before cosmetic fixes are made.
How to Prevent Floor Cupping in the Future
Preventing wood floor cupping is far easier — and less expensive — than fixing it after the fact. Most cases of cupping can be avoided with proper planning, installation, and environmental control. Here are the best ways to keep your floors flat and stable:
- Acclimate your flooring before installation: Always allow wood flooring to adjust to the room’s temperature and humidity for several days before fitting. This prevents sudden expansion after installation.
- Use vapour barriers: When installing over concrete or in areas with high humidity, include a suitable vapour barrier or underlay to block moisture from below.
- Maintain balanced indoor humidity: Aim to keep indoor humidity between 40%–60% year-round. Use humidifiers or dehumidifiers as needed, depending on the season.
- Ensure good subfloor ventilation: Especially important in older homes with suspended floors — make sure air bricks and vents aren’t blocked.
- Inspect regularly for leaks: Check around radiators, appliances, and under sinks to catch plumbing issues early before they affect your floor.
These preventative measures help protect your investment and ensure your wood floors stay level, beautiful, and structurally sound for years to come.
Conclusion
Wood floor cupping is a common issue that often stems from moisture imbalances — whether from below the floor, indoor humidity, or installation mistakes. While mild cupping may correct itself over time with proper ventilation and moisture control, more severe cases may need professional attention.
The key to long-lasting, beautiful hardwood floors is prevention. With proper acclimation, vapour protection, and humidity regulation, you can avoid cupping altogether and keep your floor in excellent condition.
If you're unsure about the severity of your cupped floors or need expert advice, contact a professional floor restoration specialist to assess the situation and recommend the best solution.