Back to Floor Sanding
Sanding Hardwood Floors by Hand: Complete Step-by-Step Guide

Sanding hardwood floors by hand is a technique that combines precision, control, and traditional craftsmanship. While professional floor restoration typically relies on powerful drum sanders and edging machines, hand sanding remains an essential method for working on detailed areas, delicate flooring, and small repair sections where large machines cannot operate safely.
For homeowners and DIY enthusiasts, hand sanding can also be a practical way to restore small sections of wooden flooring, smooth out imperfections, or prepare surfaces before applying stain or lacquer. When performed correctly using the right tools and sandpaper progression, sanding wood floors by hand can produce excellent results with minimal risk of damaging the boards.
When Sanding Hardwood Floors by Hand Is the Best Option

Although machine sanding is normally the fastest way to restore wooden floors, there are many situations where hand sanding is the safer and more practical solution. Professional floor sanding specialists frequently rely on handheld sanders and manual sanding techniques to finish areas that large sanding machines cannot reach. Hand sanding is particularly useful for detailed work and smaller restoration projects, where precision matters more than speed.
Common situations where sanding hardwood floors by hand is recommended include:
- Corners and edges of rooms where drum sanders and large edging machines cannot reach
- Staircases and stair treads, which require careful sanding to preserve their shape and profile
- Thresholds and doorways where machine access is limited
- Parquet flooring repairs, especially intricate patterns such as herringbone or chevron
- Small damaged sections of flooring that need spot restoration rather than full sanding
- Delicate or antique wood floors where aggressive machine sanding could remove too much material
In many professional floor restoration projects, hand sanding is used as a complementary finishing step after machine sanding. Once the main floor area has been sanded with drum and edging machines, detailed hand sanding helps achieve a perfectly smooth and consistent finish across the entire surface.
Tools Needed for Hand Sanding Hardwood Floors

Before starting any hand sanding project, it is important to gather the right tools and equipment. Using suitable sanding tools not only makes the job easier but also ensures that the wooden floor is sanded evenly and safely without damaging the boards.
Unlike large drum sanders used in professional floor restoration, hand sanding relies on smaller, more precise tools that allow better control over the sanding process. These tools are especially useful for edges, corners, staircases, and detailed flooring areas where larger machines cannot reach.
Some of the essential tools used for sanding hardwood floors by hand include:
- Sanding block – A simple but effective tool used with sandpaper sheets to manually smooth small areas of wood flooring. It helps maintain even pressure and prevents uneven sanding.
- Handheld orbital sander – A popular power tool that produces a smooth sanding pattern and is ideal for light floor restoration work.
- Palm sander – A compact and easy-to-control tool commonly used for removing old finishes and smoothing wooden surfaces.
- Delta sander – Designed with a triangular sanding pad, this tool is perfect for reaching tight corners and detailed areas.
- Handheld belt sander – A more powerful sanding tool capable of removing material quickly when working on heavily worn wooden floors.
- Scraper – Useful for removing stubborn finishes, paint, or adhesive residue before sanding begins.
- Vacuum cleaner or dust extractor – Essential for removing sanding dust between sanding stages and keeping the working area clean.
- Protective equipment – Dust masks, safety glasses, and hearing protection help ensure safe working conditions during sanding.
Choosing the right combination of tools depends on the condition of the floor, the size of the area, and the level of restoration required. In many cases, a combination of manual sanding blocks and small power sanders provides the best results.
Choosing the Right Sandpaper Grit

Selecting the correct sandpaper grit is one of the most important factors when sanding hardwood floors by hand. Sandpaper grit determines how aggressively the surface is sanded and how smooth the final finish will be.
Successful floor sanding usually involves multiple sanding stages, gradually progressing from coarse sandpaper to finer grits. This method removes old finishes and imperfections while refining the surface until it is ready for staining or finishing.
A typical sanding sequence for hardwood floors includes:
- 40–60 grit (Coarse sanding) – Used for removing old finishes, paint, and heavy surface damage.
- 80 grit (Intermediate sanding) – Smooths the wood surface and removes scratches left by coarse sandpaper.
- 100–120 grit (Fine sanding) – Prepares the floor for staining, oiling, or lacquer finishing.
Each stage plays an important role in creating a smooth and professional-looking surface. Skipping sanding stages can leave visible scratches and uneven textures that become even more noticeable after the floor finish is applied.
When sanding hardwood floors by hand, several important rules should always be followed:
- Always sand in the direction of the wood grain to avoid visible scratches.
- Avoid applying too much pressure, as this can create uneven sanding marks.
- Clean the floor thoroughly between sanding stages to remove dust particles.
- Inspect the surface carefully before moving to a finer grit to ensure previous scratches are fully removed.
Using the correct sandpaper progression ensures that the floor surface becomes progressively smoother at each stage, allowing the final wood finish to adhere properly and highlight the natural beauty of the timber.
Step-by-Step Guide: How to Sand Hardwood Floors by Hand

Hand sanding hardwood floors requires patience, careful technique, and the right sanding sequence. While the process is slower than machine sanding, following a structured approach will help you achieve a smooth and evenly prepared floor surface ready for finishing.
Below is a step-by-step method used by many flooring professionals when working on edges, corners, stairs, and detailed floor areas.
Step 1 – Prepare the Floor

Proper preparation is essential before starting any sanding work. A clean and stable floor surface helps prevent uneven sanding and protects your tools from damage. Begin by clearing the entire area and removing anything that may interfere with the sanding process.
Preparation should include:
- Removing all furniture, rugs, and floor coverings
- Inspecting the floor for nails, screws, or staples
- Hammering down any protruding fasteners
- Cleaning the floor thoroughly to remove dust and debris
At this stage it is also useful to inspect the condition of the wood. Look for deep scratches, worn finish areas, and damaged boards, as these may require additional sanding attention later.
Step 2 – Start With Coarse Sandpaper
Once the floor is prepared, the first sanding stage focuses on removing the existing finish and surface imperfections. This is done using coarse sandpaper, usually in the 40–60 grit range.
Coarse sanding removes:
- Old floor finishes such as lacquer or varnish
- Dirt and surface contaminants embedded in the wood
- Light scratches and surface wear
When sanding by hand, move the sanding block or handheld sander slowly and evenly across the boards, allowing the sandpaper to do the work rather than applying excessive pressure.
If the floor is heavily worn or has thick old finishes, you may need to repeat the coarse sanding stage in certain areas until the wood surface becomes uniform.
Step 3 – Sand Along the Wood Grain

One of the most important professional rules when sanding wooden floors is always sanding in the direction of the wood grain.
Sanding against the grain can leave visible scratches that are difficult to remove later and may become very noticeable after the floor finish is applied.
When sanding hardwood floors by hand:
- Follow the natural grain direction of the floorboards
- Use long, consistent sanding strokes
- Maintain steady pressure across the sanding surface
For corners and detailed areas, smaller sanding tools such as delta sanders allow better control and make it easier to maintain the correct sanding direction.
Step 4 – Progress to Medium Grit Sandpaper
After the coarse sanding stage has removed the old finish, the next step is smoothing the wood surface using medium-grit sandpaper.
Typically 80-grit sandpaper is used for this stage.
The goal of intermediate sanding is to:
- Remove scratches created during the coarse sanding stage
- Refine the surface of the wood
- Prepare the floor for final sanding
Work evenly across the surface and inspect the wood regularly to ensure that all coarse sanding marks are removed before moving to the final sanding stage.
Between sanding passes, vacuum the floor to remove dust and prevent particles from creating additional scratches.
Step 5 – Finish With Fine Sandpaper

The final sanding stage prepares the wood surface for finishing. Fine sandpaper in the 100–120 grit range is typically used to create a smooth and uniform floor surface.
During this stage:
- Sand the floor lightly and evenly
- Focus on removing any remaining sanding marks
- Ensure the surface feels smooth to the touch
Fine sanding helps the floor absorb stains and finishes more evenly, which improves the overall appearance and durability of the finished floor.
After the final sanding pass, vacuum the entire floor thoroughly and wipe the surface with a slightly damp cloth or tack cloth to remove the remaining sanding dust.
Once the floor is clean and smooth, it is ready for the next stage of the restoration process — applying wood stain, oil, or floor lacquer.
Types of Hand Sanders for Hardwood Floors

When sanding hardwood floors by hand, selecting the right sanding tool can make a significant difference in both efficiency and finish quality. While traditional sanding blocks can be used for manual sanding, most floor restoration projects benefit from handheld power sanders that provide better consistency and faster results.
Different types of hand sanders are designed for specific sanding tasks, from removing old finishes to refining detailed corners and edges. Understanding how each tool works helps ensure the floor is sanded evenly without causing unnecessary damage to the wood.
Below are some of the most commonly used hand sanders for hardwood floor restoration.
Delta Sander
The delta sander is one of the most useful tools for detailed floor sanding work. Its distinctive triangular sanding pad allows it to reach areas that other sanders cannot access.
This tool is commonly used by professional floor sanding specialists for:
- Corners where walls meet the floor
- Edges along skirting boards
- Tight spaces around radiators or door frames
- Detailed sanding work on parquet flooring
Delta sanders use an oscillating motion that helps create a smooth sanding pattern while reducing the risk of leaving swirl marks on the wood surface. Because of their compact size and precision, they are ideal for finishing work after the main floor sanding has been completed.
Many modern delta sanders also feature dust extraction systems, which help keep the working area clean and improve visibility during sanding.
Random Orbital Sander
The random orbital sander is one of the most versatile tools used for sanding wooden floors. It combines both rotational and orbital motion, which helps produce a smooth finish without leaving visible sanding patterns.
This type of sander is particularly useful for:
- Refinishing worn hardwood floors
- Removing old finishes
- Smoothing previously sanded surfaces
- Preparing wood floors for staining or sealing
Because the sanding pad moves in random patterns, it greatly reduces the risk of creating circular sanding marks, which are a common problem when using simpler sanding tools.
Random orbital sanders are also available with variable speed settings, allowing better control depending on the sanding stage and the condition of the floor.
Palm Sander
The palm sander is a compact and easy-to-handle sanding tool that is commonly used for smaller floor sanding jobs. It operates using a vibrating motion with a flat rectangular sanding pad.
Palm sanders are particularly effective for:
- Light surface sanding
- Removing thin layers of old finish
- Smoothing wooden floor surfaces
- Working in smaller areas where larger sanders are impractical
Because of their lightweight design, palm sanders are comfortable to use for longer periods and provide good control when working close to edges and walls.
Although they are not as powerful as belt sanders, palm sanders are excellent for fine sanding stages and finishing preparation.
Handheld Belt Sander
The handheld belt sander is one of the most powerful handheld sanding tools available. It uses a continuous sanding belt that rotates between two rollers, allowing it to remove material quickly and efficiently.
Belt sanders are commonly used for:
- Removing thick layers of old floor finishes
- Leveling uneven floor surfaces
- Heavy sanding on worn wooden floors
Because of their power, belt sanders require careful handling. Applying too much pressure or keeping the sander in one place for too long can create uneven sanding marks or dips in the floor surface.
For best results, the belt sander should be moved steadily along the direction of the wood grain, allowing the sanding belt to remove material evenly across the floorboards.
Festool Rotex
The Festool Rotex is a professional-grade sanding tool widely used by flooring specialists for precision sanding tasks. It is known for its ability to switch between two different sanding modes, making it extremely versatile.
The Rotex offers:
- Random orbital mode for fine sanding and surface finishing
- Geared rotary mode for more aggressive material removal
This combination allows the tool to handle both heavy sanding tasks and delicate finishing work.
The Festool Rotex is especially useful when working on:
- Stairs and stair edges
- Thresholds and small floor sections
- Detailed sanding areas where precision is essential
Its ergonomic design and high-quality dust extraction system also make it a preferred choice among professionals who require maximum control and clean working conditions.
Common Mistakes When Sanding Hardwood Floors by Hand

Although sanding hardwood floors by hand offers excellent control, it is still possible to make mistakes that can affect the final result. Many of these problems occur when sanding techniques are rushed or when the correct sanding sequence is not followed.
Understanding the most common sanding mistakes can help you achieve a smoother floor surface and avoid unnecessary repair work later.
Some of the most frequent mistakes include:
- Sanding against the wood grain
One of the most common errors is sanding across or against the grain of the wood. This creates visible scratches that may remain noticeable even after the floor finish is applied.
- Skipping sandpaper grit stages
Moving directly from coarse sandpaper to fine grit can leave deep sanding marks in the wood. Each grit stage is designed to remove scratches from the previous stage and gradually smooth the surface.
- Applying too much pressure
Pressing down too hard on the sanding tool can cause uneven sanding patterns and may create dips in the floor surface. Let the sandpaper do the work instead of forcing the tool.
- Not cleaning dust between sanding stages
Sanding dust left on the floor can become trapped under the sandpaper and create additional scratches. Vacuuming the floor between sanding passes helps maintain a smooth surface.
- Over-sanding certain areas
Spending too much time on one section of the floor can remove more wood than intended, creating uneven patches that become noticeable after finishing.
Taking time to sand carefully and inspecting the floor regularly during the process will help prevent these issues and ensure the wood surface remains even and properly prepared for finishing.
Preparing the Floor for Staining, Oiling, or Lacquering
Once the sanding process is complete, the floor must be properly prepared before applying any finish. Even small amounts of sanding dust or unnoticed scratches can affect how evenly stains or finishes absorb into the wood.
Remove Sanding Dust Thoroughly
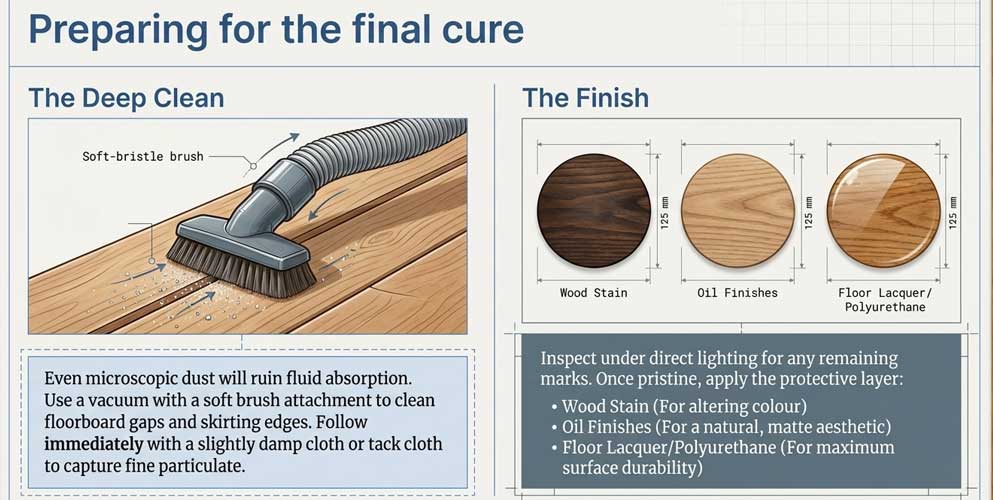
After the final sanding stage, vacuum the entire floor carefully to remove dust and debris. Fine dust often collects in joints between floorboards and along skirting boards, so these areas should be cleaned thoroughly.
For best results:
- Use a vacuum cleaner with a soft brush attachment
- Clean corners, edges, and floorboard gaps
- Wipe the floor with a slightly damp cloth or tack cloth to remove remaining fine dust
Inspect the Surface
Before applying a finish, inspect the floor under good lighting to check for sanding marks or uneven areas. If needed, lightly sand these spots using fine sandpaper and clean the floor again.
Apply the Floor Finish
Once the floor is clean and smooth, it is ready for finishing. Common options include:
- Wood floor stain for enhancing or changing the colour
- Oil finishes for a natural, matte appearance
- Floor lacquer or polyurethane for strong surface protection
Apply the finish evenly following the manufacturer’s instructions, allowing each coat to dry fully before applying the next. Proper finishing protects the wood and highlights the natural beauty of the floor.