Back to Floor Sanding
From Start to Finish – How We Sand and Refinish Hardwood Floors
 Refinishing hardwood floors is one of the most satisfying home improvement projects you can take on. Whether you're a seasoned tradesperson, a young professional looking to upgrade your first home, or a design-savvy architect restoring period charm — restoring wood floors adds instant value and beauty. In this post, we’ll walk you through exactly how we sand and refinish wood floors from start to finish, based on years of experience across London homes and heritage properties across the area.
Why Refinish Instead of Replace?
Before we dive into the how-to, it's worth asking — why refinish at all? Many homeowners are tempted to rip out old, tired-looking floors thinking replacement is the only option. In most cases, that couldn’t be further from the truth. Solid wood floors can be sanded and refinished multiple times, often lasting well over a century with proper care.
Refinishing also preserves the character and sustainability of your space. Especially in older UK homes where unique grain patterns or parquet designs are part of the original aesthetic, sanding and re-oiling or varnishing can bring that detail roaring back to life. Plus, it's far more affordable and eco-friendly than the installation of new flooring.
Finally, refinishing allows you the flexibility to customise the appearance, whether you’re after a Scandi-style light oak finish, a rich smoked walnut tone or a sleek, contemporary matte surface.
Tools & Materials You’ll Need
Quality tools are essential for a successful refinish. Here’s the kit we always have on hand — some can be hired from tool rental shops across London if you’re not using them regularly:
- Drum floor sander or belt sander (for larger areas)
- Edge sander (for perimeter and tight spots)
- Detail sander or multi-tool (for corners or stairs)
- Vacuum cleaner (preferably HEPA-rated)
- Sandpaper (grits 24, 40, 80, 120 – depending on the state of the floor)
- Wood filler (for gaps and cracks)
- Hardwax oil, polyurethane varnish or traditional floor oil
- Applicators – cloths, rollers, pads or brushes, depending on the finish
- Protective gear – dust mask, knee pads, ear protection, safety glasses
Note: Different finishes can demand specific tools or methods. For example, oils should typically be applied with a buffing machine or a pad, while water-based finishes work best with microfibre applicators. Check your product instructions carefully!
Step 1: Preparation is Everything
Before a single machine touches the wood, take time to fully prep your workspace. Move all furniture out of the room. Remove skirting boards if they obstruct sanding machines or if you plan on repainting them separately. Make sure you fix any loose boards, pop out nails or tacks, and secure creaky sections — especially common in older UK homes.
Thoroughly hoover the floor to remove loose dust and debris. Cover doorways with plastic sheeting and tape to prevent dust from migrating through the house, especially in shared flats or newly redecorated rooms.
If you're working on Victorian-era floorboards or parquet, inspect for signs of previous floor treatments like wax or polish. These may require an initial light stripping or neutralising before sanding to avoid clogging the sandpaper.
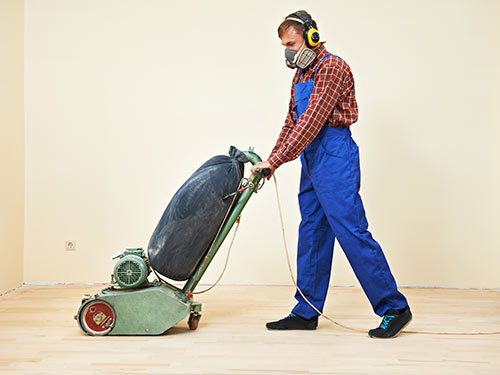
Step 2: Sanding the Floor
Start floor sanding with the coarsest grade of sandpaper – usually 24 or 36 grit – to remove the top layer of finish, stains or scratches. Use a drum sander in straight, overlapping paths along the grain. Don't linger in one spot, or you’ll risk gouging the wood. Aim for consistent movement across every board.
Once the old finish is removed, progress through finer grits: 60-80 to smooth the timber, remove swirl marks, and 100-120 to prepare the surface for the new finish. Always vacuum between grits to keep the sanding surface clean and ensure a professional result.
Use an edge sander for areas near walls, transitions between rooms, or around fireplaces. For corners or steps, get in with a detail sanding pad or multi-tool. While dustless sanding is a dream, it's often aspirational — wear proper dust masks and ventilate the room well.
Not sure how to tell when you’ve sanded enough? Run your hand over the floor. If it feels even and smooth with consistent colour, you’re ready for finishing. If you can still see old finish or dark patches near knots, keep going.
Step 3: Filling Gaps (Optional)
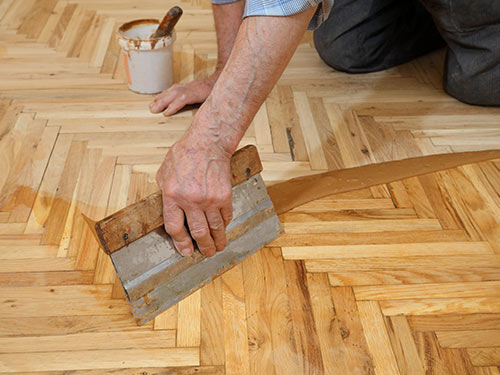 In London homes — especially Georgian and Victorian terraces — gaps between floorboards are incredibly common. These can be filled for better draft-proofing and a neater appearance using a flexible wood filler mixed with sanding dust from your floor to match the colour perfectly.
Apply filler with a flexible trowel across the entire floor if doing a full gap fill, or spot-fill only larger cracks and holes. Allow to dry completely before final sanding with a 120-grit pass.
Note: In very old homes with floor movement or where gaps are intentional for breathability (like under property insulation regs), gap filling may not be recommended. Consult a pro if you're unsure!
Step 4: Choosing the Right Finish
Now comes the fun part – sealing and finishing your wood floors. Here’s a quick table comparing common options used in the UK:
| Finish Type |
Appearance |
Durability |
Maintenance |
Best For |
| Hardwax Oil |
Natural, matt or satin sheen |
Moderate–High |
Can be easily patched |
Period homes, DIY projects, eco-conscious |
| Water-Based Lacquer |
Clear, low-yellowing gloss or satin |
High |
Minimal – recoat every few years |
High-traffic areas, modern homes |
| Traditional Varnish |
Glossy, amber tone |
Very High |
More prep needed before recoating |
Commercial, vintage look |
Apply your chosen finish with the right tool (roller, brush, pad or cloth). Work with the grain, and always maintain a wet edge to avoid lap marks. Allow recommended drying time between coats, usually 4–12 hours depending on ventilations and product type.
Most floors require two to three coats. For dark stains or high wear areas like hallways and kitchens, adding a top coat of extra-protective lacquer or oil may be worthwhile.
Step 5: The Final Result – and Aftercare
After the last coat is fully dry and cured (give it at least 24-48 hours before walking or replacing furniture), you’ll be standing on what feels like a brand-new floor! The transformation is always surreal — you can finally see grain, pattern and colour that may have been obscured for years.
To protect your new finish, avoid shoes for the first few weeks — especially stilettos or boots. Use felt pads under furniture and mop only with slightly damp cloths for a few months. Avoid harsh household cleaners that can strip oil or leave residue on varnish.
With proper aftercare, your refinished floor can remain gorgeous for 5-10+ years before you need a light maintenance coat. Some oil finishes can even be refreshed annually with a quick buff and apply method — no need to re-sand every time.
Wrap-Up: Should You DIY or Call a Pro?
Sanding and refinishing hardwood floors in your own London home is achievable with careful planning, patience and the right tools. For one or two rooms, it's a great weekend project. However, if you're dealing with historic parquet, major repairs or large-scale commercial work, don't hesitate to call in professionals who can guarantee a flawless finish with full dust extraction.
Whether you’re a DIY warrior making over a Hackney flat or a young couple redecorating your first home in London, restoring hardwood floors is a project with massive payoff.
Thinking of starting your own floor restoration journey? Drop us a message or check out our services section for hire rates, product recommendations and expert help!