Back to DIY Advice
Laminate Floor Repairs: Fixing Scratches and Replacing Damaged Planks

Laminate flooring is a stylish and budget-friendly alternative to hardwood, designed to mimic the look of natural materials like wood, stone, or tile. It’s durable, low-maintenance, and easy to install, which makes it a popular choice for busy households. With just regular sweeping and the occasional mop, laminate floors can stay looking sharp for years. Unlike hardwood, which often needs weeks of acclimatisation before fitting, laminate is usually ready to install within a few days.
That said, laminate flooring does come with some limitations. Its biggest drawback is that it cannot be refinished. While minor scratches and small dents can often be repaired with the right techniques, deeper damage is permanent. In contrast, solid or engineered wood floors can be sanded and refinished multiple times throughout their lifespan. Another weakness of laminate is its vulnerability to moisture — while it resists everyday wear and tear well, prolonged water exposure can cause it to swell or warp. And once that happens, warped laminate cannot be repaired — it must be replaced.
Step-by-Step Guide to Repairing Minor Scratches on Laminate Flooring

Scratches on laminate floors are almost unavoidable, especially in busy households. The good news? They don’t have to ruin the look of your flooring. With a Quickstep Repair Kit or another wax-based solution, you can restore your floor’s appearance with just a little time and patience. Follow this step-by-step guide to bring your laminate back to life.
1. Prepare the Surface
Start by cleaning the scratched area thoroughly. Use a soft, dry cloth or microfiber mop to wipe away dust and dirt. For stubborn marks, lightly dampen the cloth with a mild laminate floor cleaner. Any debris left behind could get trapped in the wax and spoil the repair, so this step is crucial.
2. Choose the Right Colour
Most kits include several wax shades. Examine your floor in natural light and pick the closest match. If your laminate has a unique tone or grain variation, you may need to blend colours for accuracy. Test your mix on a hidden spot before applying it to the visible scratch.
3. Apply the Wax
Once you’ve found the right shade, it’s time to fill the scratch:
- Heat the melting knife as directed in the kit to soften the wax.
- Start with a lighter shade as a base layer.
- Add darker shades gradually, blending them for a natural match.
- Work in small amounts so the wax settles evenly into the scratch.
4. Smooth the Surface
Now it’s time to make the repair blend in:
- Clean the melting knife to avoid contaminating the repair with leftover wax.
- Use the filler applicator to gently scrape away excess wax.
- Keep the surface level with the rest of the floor—remove just enough, not too much.
5. Final Touches & Blending
To perfect the repair:
- Clean the grooves with a soft brush or dry microfiber cloth.
- If needed, apply a darker tint around the edges to mimic the floor’s natural grain.
6. Polish & Finish
Finally, bring back the natural sheen of your laminate:
- Use the grey pad from the kit to remove greasy residue.
- The white pad reduces shine for a matte finish, while the green pad buffs to a glossy look.
- Work gently to match the repaired spot with the rest of your flooring.
Pro tip: Keep a repair kit at home if you have laminate flooring. Scratches happen, but with the right tools, they can disappear just as quickly.
Laminate Floorboard Repairs – How to Replace a Damaged Plank
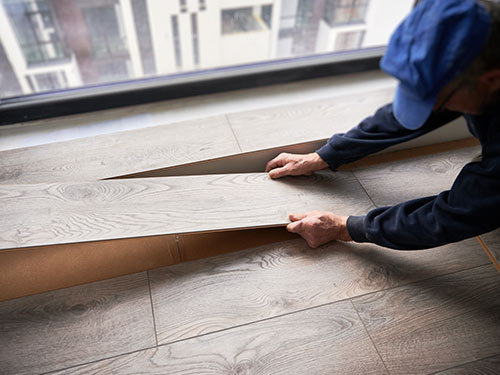 Laminate flooring is tough, but even the most durable floors can suffer from water damage, deep scratches, or dents from heavy furniture. Many homeowners wonder if a damaged plank can be sanded or repaired like wood. The short answer is no — laminate cannot be sanded. But here’s the good news: you can replace a single damaged plank yourself with just a few tools and some patience. Follow this step-by-step guide to bring back a seamless finish without professional help.
Step 1: Mark the Cutting Area
Careful preparation is the key to success. Before cutting, measure and mark the damaged area so your replacement fits perfectly.
- Draw a rectangle around the damaged board using a ruler and pencil, leaving about 5 cm (2 inches) from the plank’s edges.
- Drill four relief holes (approx. 2 cm / 0.8 inches in diameter) at the rectangle’s corners. These make removal easier and prevent accidental damage to neighbouring boards.
Pro Tip: If you’re replacing several planks, stagger the cuts to keep the floor’s natural pattern intact.
Step 2: Remove the Damaged Board
With your cutting area marked, it’s time to carefully take out the old plank.
- Use a circular saw to cut along the marked rectangle, starting from the centre and working outwards toward the relief holes. Don’t cut too deep — you don’t want to damage the subfloor.
- Pry out the damaged section gently. If it sticks, make small extra cuts until it comes free.
- Remove any remaining parts of the tongue-and-groove locking system with a chisel or utility knife.
Pro Tip: Take your time. A rushed removal risks chipping nearby boards, leaving you with a less-than-perfect finish.
Step 3: Prepare the Replacement Board
A fresh plank won’t slot in without modification — you’ll need to trim it for a proper fit.
- Trim the bottom groove and one side of the new board with a saw or utility knife.
- Remove the top tongue but keep the bottom tongue intact, so the plank slides neatly into place.
- Dry-fit the board before gluing to check the alignment. Sand down any rough edges if needed.
Pro Tip: If your laminate comes with an attached underlayment, cut only the plank — leave the underlayment in place for a secure fit.
Step 4: Install the New Board
Once prepared, the replacement board can be installed and secured.
- Apply wood glue sparingly along the tongues of adjacent boards. Too much glue may seep out and cause issues.
- Slide the new plank into the gap, pressing down to lock it in place.
- Wipe away excess glue with a damp cloth before it dries.
- Place a heavy object (like books) on the board to ensure firm bonding while it dries.
Pro Tip: Allow the glue to set for at least 24 hours before walking on the repaired area or moving furniture back.
And that’s it! You’ve successfully replaced a damaged laminate plank, restoring your floor’s clean, seamless look without needing professional installation. To avoid future damage, use protective pads under heavy furniture and maintain your laminate regularly. With the right care, your floor can stay looking new for years to come.
Conclusion: Keep Your Laminate Floors Looking Their Best
Laminate flooring may not have the refinishing flexibility of hardwood, but with the right repair methods, you can easily deal with scratches, chips, or damaged planks. From using a wax repair kit for surface marks to replacing entire boards, these fixes allow you to extend the life of your laminate and keep it looking as good as new. Combine this with regular cleaning and protective pads under furniture, and you’ll enjoy a stylish, durable floor for years to come.
FAQ: Laminate Floor Repairs
- Can scratches on laminate floors be repaired? Yes — minor scratches can be fixed with a wax-based repair kit like the Quickstep Repair Kit.
- Can laminate flooring be sanded? No. Laminate cannot be sanded or refinished. Deep damage usually requires board replacement.
- How do you replace a damaged laminate plank? Mark and cut out the damaged board, prepare a replacement plank by trimming its edges, and glue it into place.
- What if my laminate floor warps from water? Unfortunately, warped laminate cannot be repaired. The affected planks must be replaced.
- How can I prevent laminate damage? Use felt pads under furniture, avoid prolonged moisture exposure, and clean with products designed for laminate flooring.