Back to DIY Advice
How to Refinish Hardwood Floors: A Step-by-Step Guide
 Hardwood floors are a timeless and elegant choice for homes across the UK. However, with time and wear, the once-glossy finish can dull, scratch, and fade. Whether you're a hands-on DIY enthusiast, a design-conscious young professional, or a seasoned tradesperson, learning how to refinish hardwood floors will help you restore their original charm and extend their life for years to come.
Refinishing hardwood may feel like a daunting task, but with the right tools, patience, and guidance, you can achieve stunning results without needing to hire costly professionals. In this guide, we’ll walk you through everything you need to know—from prep work and sanding to staining and sealing. Let’s bring those floors back to life!
Why Refinish Hardwood Floors?
Hardwood floors endure heavy foot traffic, furniture scratches, spills, and UV exposure, all of which can lead to visible wear and tear. Over time, they may lose their shine and develop deep scratches, dull patches or even water damage.
Refinishing your floors not only restores their aesthetic appeal, it also offers practical benefits, such as protecting the wood beneath from further damage and improving your home's resale value. It’s a sustainable option too, as it eliminates the need for full floor replacements and reduces material waste.
For homeowners aiming to create a stylish interior with character, refinishing allows you to change the colour or sheen of your flooring to suit evolving tastes. Whether you’re after a rich walnut tone for a warm, traditional vibe, or a pale ash finish for Scandi-style modern minimalism, this process puts you in control.
What You’ll Need
Before you start the refinishing process, it’s essential to gather the correct tools and materials. You can source most of these from your local Home Depot store or tool hire service.
- Drum or orbital floor sander
- Edge sander
- Sandpaper (various grits: 36, 60, 80, 120)
- Vacuum cleaner and tack cloth
- Wood filler (optional)
- Floor stain (optional – based on your preferred colour)
- Polyurethane floor finish (water-based or oil-based)
- Paint brushes and foam applicators
- Protective gear (dust mask, safety glasses, ear protection)
If you’re unsure whether to go for a drum sander or an orbital one, consider your skill level. Orbital sanders are easier for beginners and great for avoiding gouging the floor, while drum sanders offer faster results for confident users.
Step 1: Prepare the Room
Begin by completely clearing the room. Remove all furniture, rugs, curtains and any hanging art. Take off doors if necessary to ensure unrestricted access. Cover vents, light fixtures, and nearby doorways with plastic sheeting to prevent dust from spreading.
Next, clean the floor thoroughly. Sweep up debris and vacuum to eliminate fine dust particles. Any nails or staples sticking up from the floorboards must be hammered down or removed, as they can damage sanding tools and cause injury.
If you have any damaged boards, consider replacing them now. Similarly, address any gapping between the boards if needed. You want the surface as flat and even as possible before sanding begins.
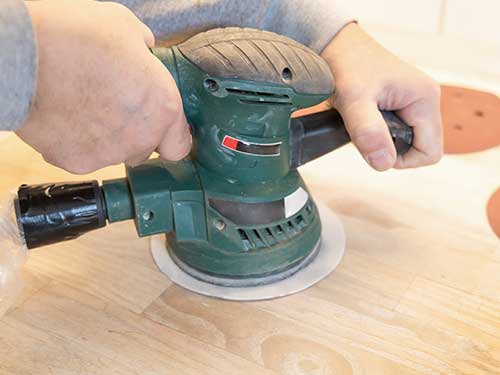
Step 2: Sand the Floor
Floor sanding is arguably the most labour-intensive part of refinishing a hardwood floor, but it is crucial for a smooth and flawless result. Begin with the lowest grit sandpaper (36 or 40) to remove the old finish, scratches, and surface damage.
Start at one end of the room and work in smooth, overlapping rows, moving with the grain of the wood. Keep the sander moving to avoid creating grooves or uneven patches. You’ll need to do several passes, moving up through medium (60-80) and fine grit (100-120) sandpaper for the best finish.
Use an edge sander or hand sander to reach corners and along skirting boards. Be patient—this part can take time, especially if it's your first try. The goal is to achieve a clean, even surface across the entire room.
Once sanding is complete, vacuum every inch of the floor thoroughly and wipe with a tack cloth to remove dust. You may want to repeat this process a couple of times to ensure a completely clean surface for staining and sealing.
Step 3: Apply Wood Filler (Optional)
If your floor has gaps, cracks or nail holes, now's the time to use a suitable wood filler. Choose a product that’s compatible with your wood type and finish. Use a putty knife to apply filler to all visible imperfections.
After drying, lightly sand the patched areas with fine sandpaper (120-grit) to blend them into the surrounding boards. Then vacuum and wipe the surface again to eliminate all dust before applying your finish.
Step 4: Stain the Floors (Optional)
Want to switch up the look of your floors? Applying wood stain is your chance to customise the colour and tone. Choose a stain that complements your interior style and test it on a hidden corner of the floor to preview the result.
Apply the stain evenly using a clean cloth, foam brush or lambswool applicator, working along the grain. Be consistent in your coverage and avoid overlapping strokes, as this can lead to a patchy appearance.
Let the stain penetrate for the recommended time listed on the product, typically 5–15 minutes, then wipe away the excess with a clean cloth. Allow the floor to dry thoroughly—24 hours is usually ideal—before proceeding to sealing.
Step 5: Seal and Protect with Topcoat
Once the stain is dry, it’s time to apply a protective finish. Polyurethane is the most popular sealing agent, and it comes in two types: oil-based and water-based. Here’s a quick comparison:
| Type |
Drying Time |
Durability |
Appearance |
VOC Levels |
| Oil-Based |
8–24 hours between coats |
Very durable |
Warm, amber finish |
Higher |
| Water-Based |
2–4 hours between coats |
Durable |
Clear, natural tone |
Low |
Apply your chosen topcoat using a high-quality applicator pad or synthetic bristle brush. Work in small sections, following the grain of the wood, and maintain a wet edge to avoid lap marks. Plan for at least two to three coats, allowing proper drying and a light sanding between applications for best results.
Step 6: Let It Cure and Move Back In
After the final coat, your floor needs time to cure. While it may be dry to the touch in under a day, full hardness can take up to seven days, depending on environmental conditions and the type of finish used.
Try to wait at least 24–48 hours before walking on the floor in socks, and avoid moving back furniture for 4–7 days. When replacing furniture, use felt pads on the base to prevent scratching, and hold off on placing rugs for at least two weeks to allow the finish to breathe and cure fully.
Final Thoughts
Refinishing your hardwood floors is a worthwhile weekend project that delivers long-lasting results and enhances the character of your home. With proper preparation, patience, and attention to detail, you can achieve professional-quality outcomes on your terms—and for a fraction of the cost.
If you're ever in doubt, consult with flooring experts at FlooringFirst! or explore tool hire options to make the job easier. Whether you’re refreshing a space for resale or creating your dream interior, refinished hardwood floors provide a strong, stylish foundation for your next chapter.