Back to DIY Advice
DIY Laminate Flooring Mistakes You Must Avoid
Laminate flooring looks great, doesn’t break the bank, and can fool your friends into thinking you’ve splurged on real hardwood. But here’s the catch: installing it yourself isn’t as foolproof as snapping Lego bricks together. One wrong cut, one skipped step, and suddenly you’re living with gaps big enough to swallow crumbs for eternity—or worse, planks that warp like a bad special effect in a B-movie. Yikes! But don’t worry, we’ve got your back. In this guide, we’ll reveal the 10 most common laminate flooring installation mistakes (the ones DIYers always regret) and show you how to sidestep them like a pro. So grab your measuring tape, your sense of humour, and maybe a knee pad or two—it’s time to learn how to lay your laminate without losing your sanity or your floor.
Skipping Acclimation – The Rookie Mistake
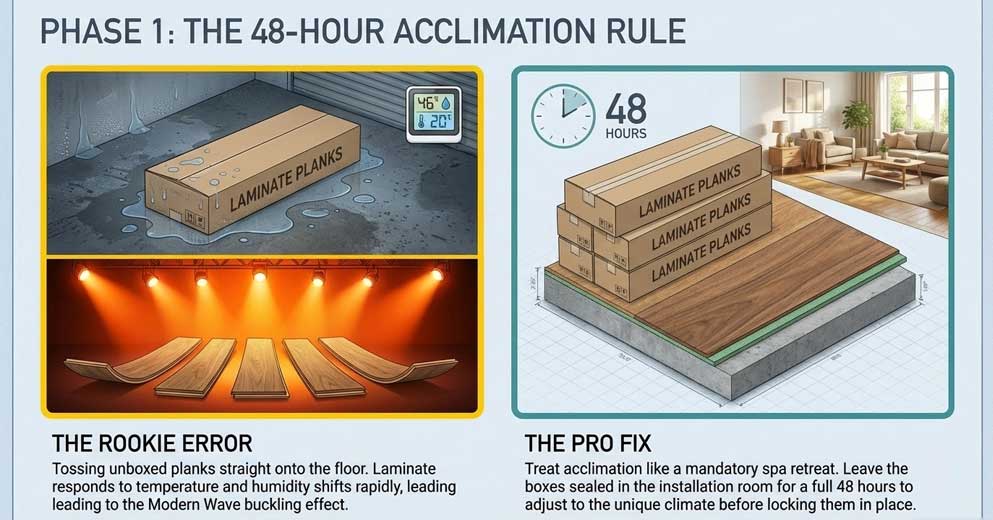
Here’s a secret: laminate planks are a bit like houseguests—they need time to settle in before they feel comfortable. One of the biggest DIY laminate flooring mistakes is tossing those planks straight onto the floor without giving them a chance to acclimate. Manufacturers recommend leaving the sealed boxes in the installation room for about 48 hours. Think of it as a mini spa retreat for your flooring.
Why does this matter? Because laminate responds to temperature and humidity like a diva to stage lights—too much change too quickly and it starts to warp, buckle, or leave awkward gaps big enough to trap every crumb from last night’s pizza. Acclimation helps the boards adjust to the room’s climate before you lock them in place, so they behave themselves long-term.
Pro Tip: Don’t rip the boxes open too soon. Keep them sealed while they acclimate so they don’t soak up excess moisture. Skip this step and you’ll be calling it “DIY Modern Wave Flooring” when the boards start curving like surfboards.
Wrong Tools = Wrong Results
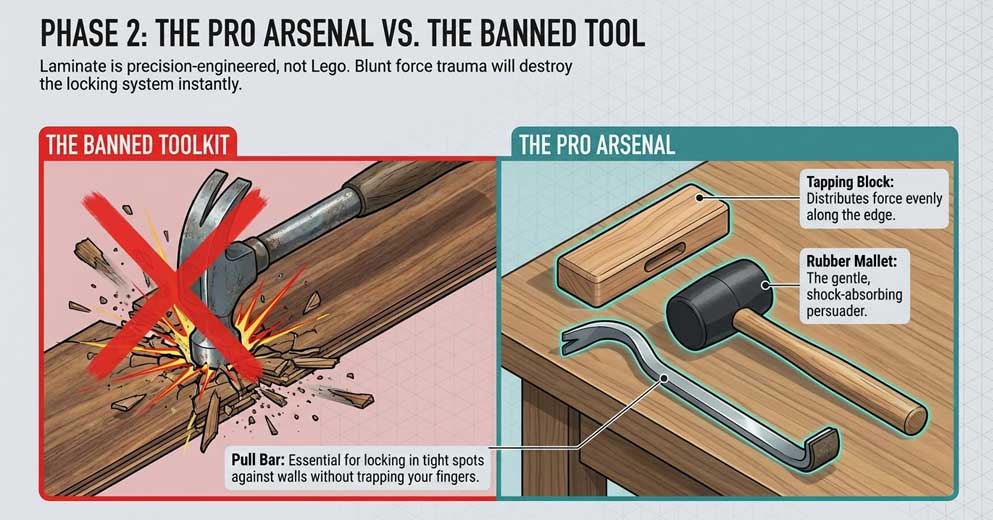
Let’s be real—installing laminate flooring isn’t rocket science, but it’s also not Lego. The fastest way to ruin your shiny new planks is by grabbing the wrong tools. Spoiler: your hammer is not invited to this party. Smacking planks directly will crack their delicate locking systems faster than you can say “oops.”
Instead, keep it gentle with a tapping block. This little hero lets you nudge the planks together without destroying the edges. A rubber mallet is also welcome—just think of it as the “kindergarten-friendly” version of your hammer. And when it comes to tight spots? That’s where the pull bar comes in, saving your fingers and your sanity.
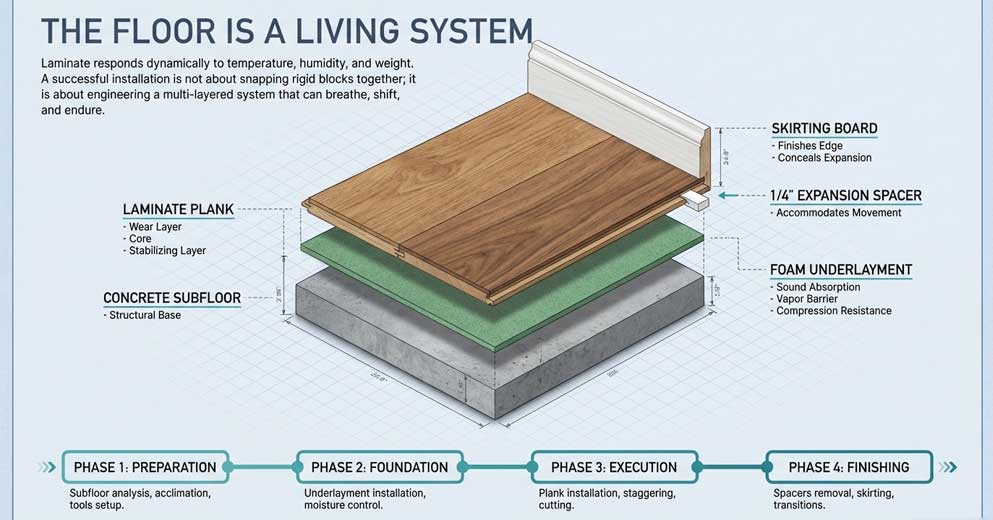
Underlayment matters too. Think cork, felt, or foam—the comfy mattress for your floors. They smooth out imperfections, hush footsteps, and protect against moisture. Paper or plastic sheets? Nope. That’s like using cling film as a raincoat—totally useless. And don’t forget spacers. They’re the unsung heroes keeping that all-important 1/4–1/2 inch expansion gap neat and tidy, so your floor doesn’t buckle like a bad rollercoaster.
Bottom line: The right tools make your DIY laminate project a breeze. The wrong ones? They turn it into an expensive comedy sketch you definitely don’t want to star in.
The Great Underlayment Oops
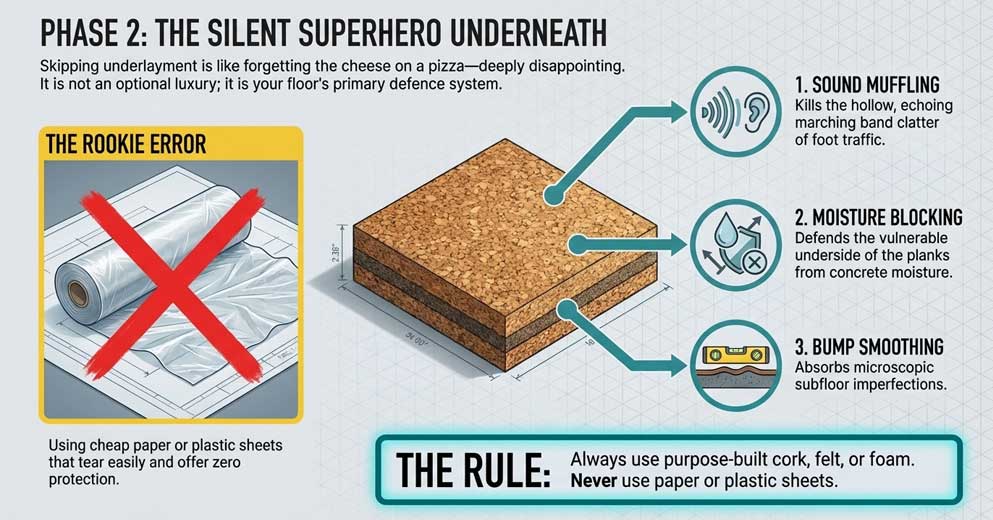
In the excitement of laying down your shiny new laminate, it’s tempting to rip open the boxes and get started right away. But here’s the thing: skipping underlayment is like forgetting the cheese in a pizza—technically edible, but deeply disappointing. Underlayment isn’t a luxury add-on; it’s the silent superhero of laminate flooring.
What does it do? Oh, just a few small things like: blocking sneaky moisture, muffling noisy footsteps, and smoothing out those tiny subfloor bumps that would otherwise make your planks look like they’re riding waves. Without it, every creak, clunk, and chair shuffle will echo through your house like a bad soundtrack. And don’t even get us started on what happens when concrete decides to send a little moisture surprise upwards—hello warped planks!
Think of underlayment as the comfy mattress your laminate deserves. Foam, felt, cork—whatever you choose, it’s the difference between floors that sound solid and floors that announce every step like a marching band. Pro tip: never treat underlay as optional. Lay it down first, and you’ll thank yourself every single time you walk across your new, whisper-quiet floor.
The Wobbly Floor Disaster
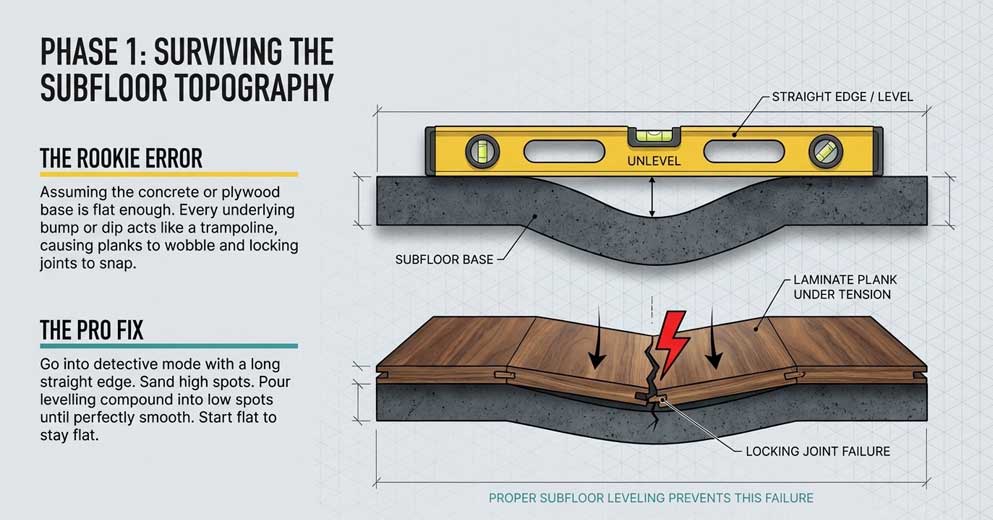
Imagine walking across your brand-new laminate floor and suddenly feeling like you’re on a trampoline. Not ideal, right? That’s what happens when you install over an uneven subfloor. Every dip, bump, and hump underneath will show up on the surface, making your planks wobble, gap, or even pop apart like they’re trying to escape.
Checking for a level subfloor isn’t glamorous, but it’s absolutely critical. Grab a long straight edge or level and go detective-mode, hunting down high and low spots on your concrete or plywood base. High points? Sand or grind them down. Low points? Fill them up with a leveling compound until everything is smooth and flat.
Skipping this step is like building a castle on quicksand—things look good at first, then the gaps, squeaks, and drama begin. Start with a flat foundation and your laminate will stay locked, lovely, and wobble-free for years to come. Trust us: five minutes of leveling now saves you from a lifetime of tripping hazards later.
The Great Expansion Gap Escape
Picture this: you’ve just installed your laminate floors, they look flawless, you’re ready to show them off… and a few weeks later, the boards start rising up like they’re auditioning for a wave pool. The usual suspect? No expansion gaps. Laminate planks need breathing room. Without it, they’ll push against the walls, buckle, and throw a very expensive tantrum.
Here’s the golden rule: leave at least a 1/4 inch gap around the entire perimeter. Some manufacturers even recommend going up to 3/8 or 1/2 inch. Use spacers like a pro—tuck them neatly against walls, door frames, and cabinets so your floor has space to stretch its legs when humidity and temperature change.
Forget this rule, and your floors will warp, pop apart, or buckle so badly you’ll swear they’re trying to escape the house. Leave the gap, save the floor, and avoid explaining to guests why your “flat” floor now looks like a ski slope.
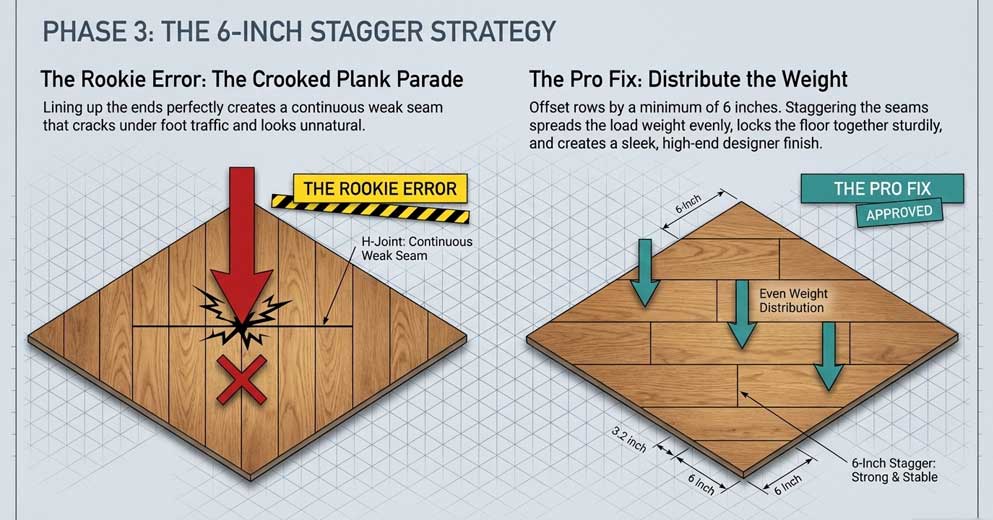
The Crooked Plank Parade
Laminate flooring looks its best when everything is lined up neatly. But skip proper alignment and suddenly your “modern new floor” looks like it was installed during an earthquake. One of the most common rookie mistakes is failing to stagger the seams. Remember: the ends of the planks in one row should never line up perfectly with the ends in the next row. Offset them by at least 6 inches to keep things strong and stylish.
Why? Because lining up those joints creates weak spots that love to split apart. Staggering the rows spreads weight evenly, making your floor sturdier and way less prone to cracking under pressure (literally). Uneven alignment also ruins the look—especially with patterned or tile-style laminate. Instead of a sleek designer finish, you’ll end up with a floor that looks like it had too much coffee and couldn’t sit straight.
Pro tip: Always double-check that the tongue and groove edges are snugly clicked in, and use spacers to keep rows arrow-straight. Take your time—precision here means your floor will look like it came from a pro, not a “Pinterest DIY fail” compilation.
Skip the Spacers, Invite the Chaos
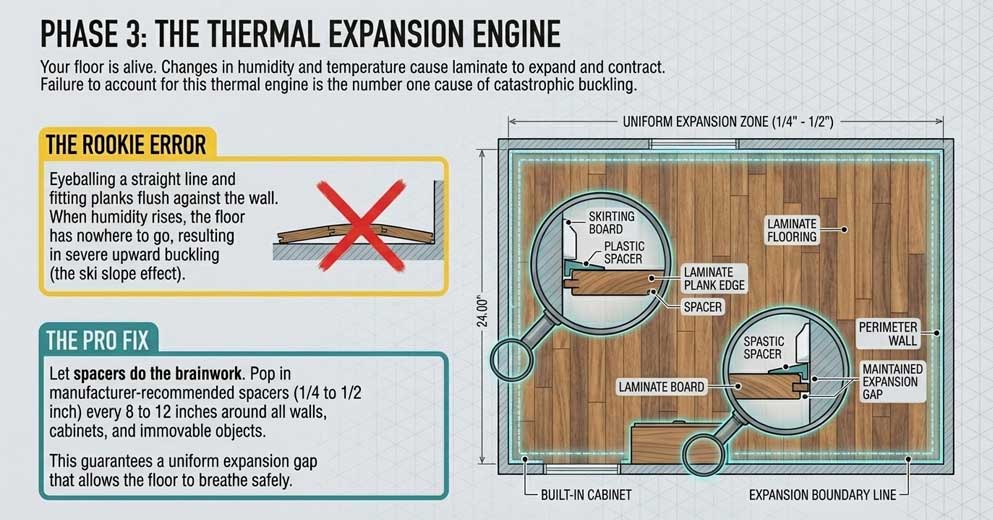
Spacers may look like tiny, boring pieces of plastic, but trust us—they’re the unsung heroes of laminate flooring. Plenty of DIYers think, “Pfft, I can eyeball a straight line.” Spoiler: you can’t. Without spacers, your expansion gap will look like it was designed by a toddler with a ruler—too tight in some spots, way too wide in others.
Here’s why it matters: too-narrow gaps mean your boards have no room to expand, so when humidity strikes, they’ll buckle like a bad soufflé. Too-wide gaps look sloppy, and worse, they become perfect little highways for crumbs, dust, and that one Lego piece you’ll never find again.
Spacers make all of this painless. Pop them in every 8 to 12 inches around the perimeter, at walls, cabinets, door frames—anywhere your boards meet something immovable. Use the size your manufacturer recommends (usually 1/4 or 1/2 inch) and let the spacers do the brainwork. That way, when you’re finished, your floor will look sleek and pro-installed—without you breaking a sweat over measuring every single plank.
Doorways: The Bermuda Triangle of Laminate Floors
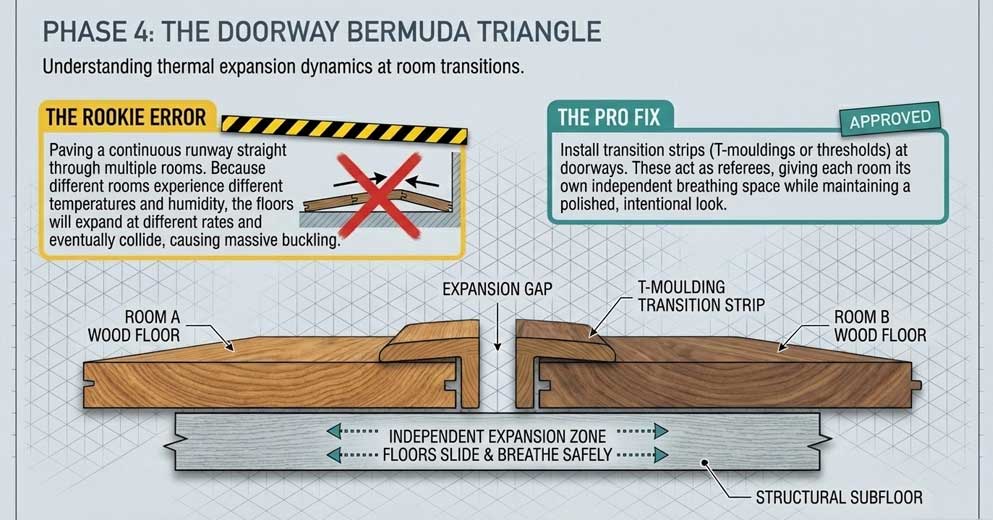
Here’s a rookie mistake: laying your laminate straight through multiple rooms like you’re paving a runway. Sounds efficient, right? Wrong. Laminate planks need space to do their little seasonal dance—expanding when it’s humid, contracting when it’s dry. If you ignore this, your floor will eventually throw a tantrum in the form of buckling, gaps, or planks playing peekaboo with each other.
The secret weapon? Transition strips. Whether it’s T-moldings, threshold strips, or other trims, these clever little pieces act like referees between rooms. They give each section of floor its own breathing space while still looking polished and intentional. Think of them as Switzerland: neutral, stylish, and keeping the peace.
Pro tip: plan ahead. Measure your doorways and grab enough transitions before you start the installation party. Trust us, mid-project “emergency runs” to the DIY store with dust in your hair are not the vibe. Install those transition pieces properly and your laminate floors will stay calm, cool, and buckle-free for years.
Glue Gremlins: Keep Adhesive Off Your Planks
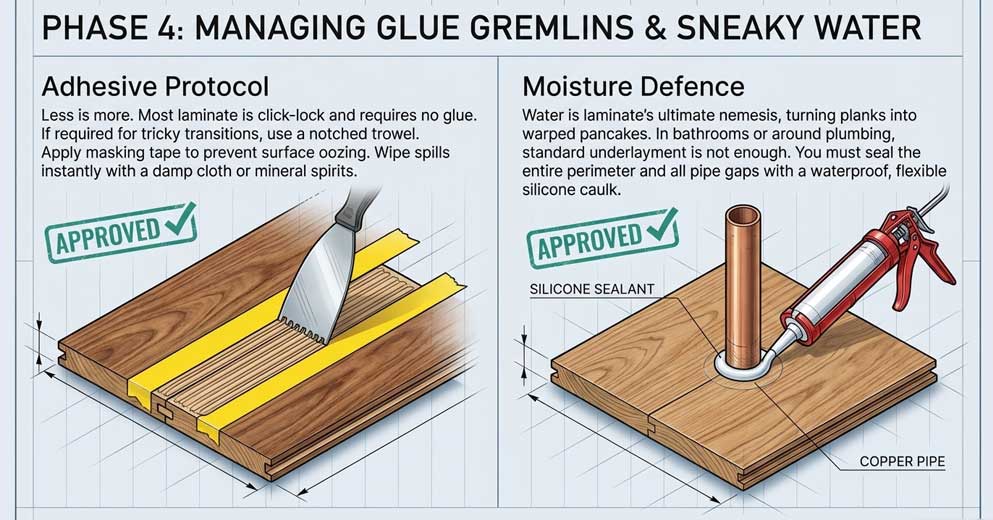
Laminate floors and glue have a complicated relationship. A little in the right place? Perfect. A blob on the plank surface? Disaster. If you’re using adhesive—say, in kitchens or around tricky doorways—remember: less is more. Spread a thin, even layer with a notched trowel, not a “let’s see what happens if I pour” approach.
Accidentally dropped some glue? Don’t panic. Grab a damp cloth and wipe it up immediately before it decides to set up camp forever. If you missed a spot and it dried, a little mineral spirit can usually save the day. Pro tip: slap on some masking tape along edges where oozing is likely—it’s like training wheels for glue control.
Always check each plank for sticky surprises before locking in the next row. Adhesive in the wrong place can mess up the finish, stop planks from clicking together properly, and even leave permanent blotches. Work slow, clean as you go, and don’t let the glue gremlins ruin your shiny new floor.
Water’s Sneaky Side Hustle: Don’t Skip Sealing
If laminate floors had a nemesis, it would be water. Forget capes and villains—moisture is the silent saboteur that creeps in under sinks, showers, and tubs, turning perfect planks into warped pancakes. And the crime scene? Almost always a DIY-er who skipped sealing.
Here’s the fix: grab a flexible silicone caulk and seal around pipes, cabinets, and any spot where water might stage a sneak attack. Think of it as giving your floor its own waterproof raincoat. In bathrooms, go the extra mile—apply a waterproof sealant around the perimeter, especially at the expansion gaps. Don’t assume your underlayment can save the day; it’s not a superhero, just a sidekick.
The beauty of sealing? If a puddle shows up later (looking at you, overenthusiastic bath splashers), you’ll have time to mop it up before disaster strikes. No panic, no warped boards, no regrets. So seal it up, and keep moisture where it belongs—in the tub, not under your brand-new floor.
The Final Word: Floors That Last (and Don’t Buckle)
Installing laminate flooring yourself can be a rewarding project—if you dodge the classic pitfalls. From forgetting underlayment to skipping expansion gaps, each mistake can turn your dream floor into a squeaky, warped nightmare. But with the right tools, patience, and a sprinkle of common sense, your laminate floors can look as sleek as a professional job without draining your wallet. Take your time, follow the rules, and remember: spacers are your friends, water is not, and rushing never ends well. Nail it (well, not literally), and you’ll be walking on perfection for years to come.
FAQ: DIY Laminate Flooring Edition
- Do I really need underlayment? Yes—unless you enjoy noisy floors that feel like cardboard. Underlayment is essential for sound, comfort, and moisture protection.
- How long should laminate planks acclimate? At least 48 hours in the installation room. Keep them sealed in their boxes during this time so they don’t soak up excess humidity.
- Can I install laminate in bathrooms? You can, but you must seal edges and wet areas with silicone. Otherwise, moisture will find its way under the planks faster than you can say “warped floor.”
- What’s the most common DIY mistake? Forgetting expansion gaps. Without them, your floor will buckle and make you wish you’d called in the pros.
- Should I glue laminate planks? Not usually. Most laminate uses click-lock systems. Glue is only for special cases, like stubborn transitions or manufacturer instructions.