Back to DIY Advice
Can You Replace Just One Damaged Floorboard? Here’s How
 If you’ve noticed a single floorboard that’s scratched, cracked, or stained, you might be wondering if it’s possible to fix just that one board—without tearing up the entire floor. The good news? In many cases, yes, you can replace just one damaged floorboard.
Whether it’s the result of water damage, furniture movement, or general wear and tear, isolated floorboard issues don’t always require a full flooring overhaul. In this guide, we’ll explain when single-board replacement is possible, what tools you’ll need, and how to carry out the process step by step.
When Is It Possible to Replace Just One Floorboard?
Replacing just one floorboard is a practical option, but it depends on a few key factors. Understanding whether your flooring type and situation are suitable for this repair is the first step.
- Type of Flooring: Solid wood and engineered wood floors are generally easier to repair board by board. Laminate and LVT floors can also be repaired individually, especially if they use a click-lock system.
- Extent of the Damage: If the damage is limited to one or two boards and there’s no underlying subfloor issue, a localised repair is usually possible.
- Installation Method: Floating or click-lock floors allow easier board removal. Glued-down or nailed floors may be more complex but still repairable with care.
- Availability of Matching Boards: You’ll need a spare or replacement board that matches in size, colour, and finish. Without this, the repair might be visually obvious.
If your floor meets these conditions, you’re likely a good candidate for a single-board replacement. In the next section, we’ll walk through what you’ll need to complete the job successfully.
Tools & Materials You’ll Need
Before you begin replacing a floorboard, it’s important to gather all the tools and materials you’ll need. This ensures the process goes smoothly and reduces the risk of damaging nearby boards.
- Replacement floorboard: Ideally from the original batch for a perfect match in size and finish.
- Oscillating multi-tool or circular saw: For cutting and removing the damaged board.
- Pry bar or chisel: To help lift the board after cutting.
- Wood adhesive or glue: Needed for glue-down floors or tongue-and-groove joints.
- Hammer and nails or clips: Depending on your installation method (nail-down or floating systems).
- Stain or finish: To blend the new board with the existing floor, if required.
- Measuring tape: For accurate cutting and fitting.
- Safety gear: Dust mask, safety goggles, and work gloves for protection during cutting and handling.
Once you have the right tools ready, you can move on to the step-by-step replacement process.
Step-by-Step Guide to Replacing a Single Damaged Floorboard
With the right tools in hand, replacing a single damaged board can be a manageable task. Follow these steps to repair effectively and safely:
1. Identify the Type of Installation
Before starting, determine how your floor was installed. Is it floating, glued down, nailed, or using a click-lock system? This will guide how you remove and replace the damaged board. Click-lock systems are the easiest to work with, while glued or nailed floors may require more care.
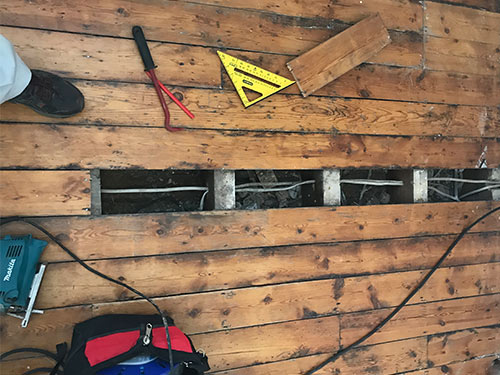
2. Remove the Damaged Board
Use an oscillating multi-tool or circular saw to carefully cut along the length of the damaged board. Be cautious not to cut into the boards on either side. Once the board is loosened, use a chisel or pry bar to gently lift it out. For glue-down floors, you may also need a scraper to remove any adhesive left underneath.
3. Prepare the Area
Clear out any debris or leftover glue from the space where the board was removed. Check the subfloor for damage or moisture issues before continuing. If the area isn’t clean and level, the new board may not fit properly.
4. Fit the New Board
Trim the replacement board as needed to match the space. Apply wood glue to the edges if required, then insert the new board into place. For click-lock floors, you may need to angle the board or modify the joints slightly for a seamless fit. Once in place, press firmly or use clamps if needed while the adhesive sets.
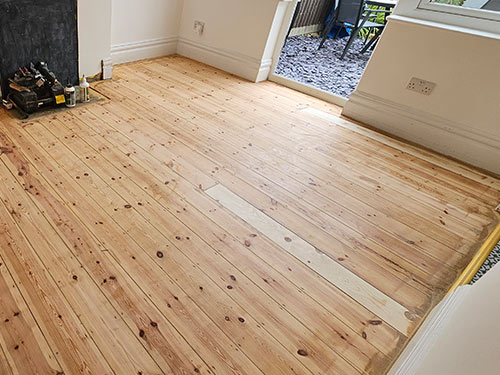
After installation, wipe away any excess glue and allow the floor to settle before walking on it. If the new board isn’t pre-finished, you may need to apply a matching stain or topcoat.
Matching the Replacement Board
 One of the biggest challenges in single-board replacement is finding a floorboard that matches the original floor in size, colour, and finish. A mismatch can make the repair obvious and affect the overall appearance of the room.
- Use leftover boards: If you or your installer saved extra boards from the original installation, these are your best option for an exact match.
- Contact the supplier or manufacturer: They may still stock the same batch or product line, especially for engineered or popular flooring brands.
- Consider reclaimed boards: For older or discontinued floors, salvage yards or specialist suppliers might offer reclaimed boards that closely resemble your existing floor.
- Blend the finish if needed: If an exact match isn’t available, you may need to lightly sand and refinish the new board so it blends better with the surrounding area. Choose a finish (oil, lacquer, or stain) that matches the rest of the floor.
Taking the time to find a close match will make the repair virtually invisible and maintain the aesthetic value of your floor.
When to Call a Professional
While replacing a single floorboard can be a DIY-friendly project, some situations call for professional help to ensure the repair is safe, seamless, and long-lasting.
- Widespread damage: If multiple boards are affected or there are signs of deeper issues like moisture damage or subfloor problems, a professional inspection is recommended.
- Difficult installation types: Glued-down or nailed floors can be tricky to repair without causing damage to surrounding boards, especially if they’re tongue-and-groove.
- Precision required: If you’re unsure how to make clean cuts or properly fit the replacement board, an experienced flooring specialist can save you time and prevent costly mistakes.
- Matching the finish: Blending stains or applying finish coatings evenly can be difficult for DIYers, particularly on high-traffic or visible areas.
Getting professional help ensures that the repair blends in beautifully with the rest of the floor and that the structural integrity remains intact.
Final Tips for a Seamless Repair
To ensure your floorboard replacement looks professional and lasts for years, keep these final tips in mind:
- Work slowly and carefully: Precision is key—rushing can damage neighbouring boards or leave visible gaps.
- Double-check measurements: Measure the replacement board and cut accurately to avoid a loose or tight fit.
- Use the right adhesive: For glue-down floors, always use a recommended wood flooring adhesive for strong and long-lasting bonding.
- Blend finishes thoughtfully: If staining or refinishing, test the colour on a scrap piece first to ensure it matches.
- Let the new board acclimatise: Allow the board to sit in the room for at least 24–48 hours to adapt to the humidity and temperature before fitting it.
By following these tips, you’ll reduce the risk of visible seams, movement, or long-term issues and maintain the beauty of your flooring.
Conclusion
Yes, you can replace just one damaged floorboard—if the floor type, installation method, and damage level make it feasible. With the right tools, some patience, and a matching board, it’s possible to restore your floor without needing a full replacement.
However, when the job feels too complex or the finish is difficult to match, it’s always wise to bring in an expert. Our team has the tools and experience to carry out precise wood floor repairs that blend perfectly with your existing flooring.
Need help with a damaged floorboard? Book a free site visit or contact us today to speak with one of our flooring specialists.