Floor Sanding & Fitting
Book Free Visit Price Guide 020 88309782
Monday - Friday 07:30 - 17:30, Saturday 07:30 - 16:00
cs@flooringfirst.co.uk
020 88309782
Monday - Friday 07:30 - 17:30, Saturday 07:30 - 16:00
cs@flooringfirst.co.uk
  • Book Free Visit
  • Home
  • Floor Sanding
  • Floor Fitting
  • Floor Repairs
  • Aftercare
    • Wooden Floors
    • Cleaning & Polishing
    • Re-Oiling Wooden Floors
    • Vinyls & Linoleum
    • Vinyl Floor Polishing
    • Get a Quote...
  • For Businesses
  • Gallery
  • Service Guide
  • Shop
  • Book Free Visit

See Few Examples of Our Works

Floor Sanding, Solid, Parquet & Laminate Floor Fitting

Gallery

See Our Floor Works

WHY CHOOSE US
CASE STUDIES
PRICE GUIDE
OFFERS
GALLERY
ASK EXPERT
WHY CHOOSE US
CASE STUDIES
PRICE GUIDE
OFFERS
GALLERY
ASK EXPERT

Floor Sanding & Fitting Project Gallery

All Projects Renovations Installations

8  |   North Finchley  |   November 2022

Our team recently completed this stunning parquet flooring project in North Finchley, and we're confident that it will provide years of enjoyment for its owners.

Case studies
  • Parquet Floor Installation in North Finchley 7
  • Parquet Floor Installation in North Finchley
  • Parquet Floor Installation in North Finchley 1
  • Parquet Floor Installation in North Finchley 2
  • Parquet Floor Installation in North Finchley 3
  • Parquet Floor Installation in North Finchley 4
  • Parquet Floor Installation in North Finchley 5
  • Parquet Floor Installation in North Finchley 6

Project Overview

This project in North Finchley involved a herringbone parquet floor installation using Elka Honey Smoked Oak Herringbone Engineered Flooring. Parquet fitting is one of the more technically demanding floor installation jobs, requiring careful subfloor preparation, precise layout planning, and experience with the pattern. Parquet fitting typically costs between £70 and £100 per square metre, reflecting the additional skill and time involved compared to straight plank installation.

Parquet Floor Installation in North Finchley

The Challenge

Parquet floor installation is a complex process that should only be carried out by experienced professionals. The first step is preparing the subfloor, which must be clean, level, and free of any defects before any boards go down. Any movement, softness, or variation in level across the subfloor will show up in a herringbone pattern far more than in a straight-run floor — the geometry makes inconsistencies immediately obvious. Getting this preparation right before laying a single block is what separates a clean result from one that looks wrong.

Parquet Floor Installation in North Finchley 1

Our Approach

  • Subfloor assessment and preparation: The subfloor was checked across its full area for level, moisture content, and structural integrity. Any issues were addressed before work started. Moisture readings were taken to ensure the subfloor was within acceptable limits for a glue-down installation.
  • Layout planning: Herringbone requires careful planning of the starting point and direction of the pattern to ensure the layout sits correctly within the room and that cuts at the perimeter are balanced.
  • Adhesive and board laying: Boards were adhered to the subfloor using the correct adhesive for the product, laid in the herringbone pattern from the datum line outward. Each board was pressed firmly and checked for alignment before the adhesive set.
  • Perimeter cuts and fitting: Boards at the edges and around door frames were cut accurately to follow the room's shape while maintaining the pattern's geometry.
  • Finishing and trims: Beading and thresholds were fitted to complete the installation and protect the expansion gap around the perimeter.

Parquet Floor Installation in North Finchley 2

The Result

Elka Honey Smoked Oak Herringbone Engineered Flooring adds a touch of character to this North Finchley home. The honey smoked oak colouring works well in both period and contemporary interiors, and the herringbone pattern gives the floor a visual depth that straight planks simply cannot match. The floor will perform well for many years — engineered boards are stable across humidity changes and the smoked finish is pre-applied at the factory to a consistent standard.

Frequently Asked Questions

Q: Why does parquet floor fitting cost more than standard plank installation?
A: The main factors are time and skill. Laying a herringbone or chevron pattern requires more cutting, more precise alignment, and a slower pace than a straight plank run. Any mistakes in the early stages compound through the whole floor, so there is no room for shortcuts. The additional cost reflects the expertise and time genuinely required.

Q: Is engineered parquet suitable for underfloor heating?
A: Most quality engineered parquet products are compatible with underfloor heating, including the Elka range used here. It is important to follow the manufacturer's guidance on maximum surface temperatures and to acclimatise the boards before fitting. We check compatibility for every product before installation.

Q: How long does a parquet installation take?
A: A room of typical size — around 20 to 25 square metres — generally takes two to three days for a herringbone installation, including subfloor preparation and fitting all trims. Complex room shapes or larger areas will take longer.

Have a similar project? Call us on 020 88309782 or Book a Free Site Visit

Close
6  |   Charlton  |   September 2022

Existing flooring in Charlton, SE7 was replaced with new herringbone parquet, set out with precision to achieve a clean, balanced pattern. The finished surface delivers a sharp, structured look with a durable finish suited for everyday use.

Case studies

Project Overview

This project involved the professional installation of herringbone parquet flooring at a property in Charlton, SE7. The client required a quality floor that would stand up to daily use and complement their interior. Our fitting team assessed the subfloor condition, carried out any necessary preparation work, and fitted the new floor to a high standard.

Before the Work

Prior to installation, the existing floor covering was inspected and the subfloor was prepared to ensure it was flat, dry, and suitable for the new herringbone parquet. Any existing floor covering was lifted and disposed of cleanly before the fitting work began.

Survey photos showing the floor condition before work:

Floor condition before work at SE7 Floor condition before work at SE7 Floor condition before work at SE7

Our Approach

The following services were carried out as part of this project:

  • Lift & Dispose Carpets or Laminates
  • Subfloor Preparation (SLC)
  • Thresholds & Fitting (inc. materials)
  • TimberTech Elite Plus Flooring Underlay, 3 mm, 10 sq.m.
  • Kitchen Subfloor Chipboard Lift & Dispose ( 22sqm)
  • Kitchen Tiles- Lift & Dispose ( 22 sqm)
  • Laminate Floor- Herringbone Pattern Installation ( 43 sqm)
  • Door Frames Trimming Only ( 5 frames)

The Result

The completed herringbone parquet installation looked clean and finished throughout. Joins are tight, edges are neat, and the floor sits flat and stable. Beading and threshold strips were fitted where required to complete the job properly. The client was pleased with both the quality of the work and the appearance of the new floor.

Photos of the completed work:

Herringbone Parquet floor after fitting work in SE7 Herringbone Parquet floor after fitting work in SE7 Herringbone Parquet floor after fitting work in SE7

Frequently Asked Questions

How long does herringbone parquet installation take?
Most fitting jobs are completed within one to two days. Larger areas or more detailed layouts such as herringbone patterns take longer due to the additional cutting and positioning involved.

Do I need underlay?
Yes, underlay is required for most floor types and helps with insulation, sound deadening, and levelling minor subfloor imperfections. We can supply and fit appropriate underlay as part of the installation.

How much does floor fitting cost in London?
Fitting costs typically range from £70 to £100 per square metre depending on floor type and complexity. We provide a full written quote before starting any work.

Have a similar project? Call us on 020 88309782 or Book a Free Site Visit

Close
9  |   Woolwich  |   August 2022

We have recently completed this Woolwich project that involved the installation of a beautiful laminate floor that brings comfort and beauty in the home of our clients.

Case studies
  • Laminate Floor Installation in Woolwich 8
  • Laminate Floor Installation in Woolwich
  • Laminate Floor Installation in Woolwich 2
  • Laminate Floor Installation in Woolwich 3
  • Laminate Floor Installation in Woolwich 4
  • Laminate Floor Installation in Woolwich 5
  • Laminate Floor Installation in Woolwich 6
  • Laminate Floor Installation in Woolwich 7
  • Laminate Floor Installation in Woolwich 9

Project Overview

This project in Woolwich involved the installation of a laminate floor as part of a home improvement. Laminate is a practical choice for clients who want the appearance of a wood floor at a more manageable cost. It is durable, hard-wearing, and available in a wide range of finishes. Laminate floor fitting typically costs between £35 and £55 per square metre, including underlayment and all trims.

Laminate Floor Installation in Woolwich

The Challenge

Laminate flooring is often overlooked in favour of real wood, but the two are closer in terms of appearance and performance than many people expect. Laminate is not made from solid timber — it is designed to replicate the look of wood — but it delivers genuine durability and an attractive finish at a lower cost. It is also resistant to scratching and fading in a way that makes it well-suited to busy households. This Woolwich project gave us the opportunity to demonstrate what a well-executed laminate installation can look like.

Laminate Floor Installation in Woolwich 2

Our Approach

  • Subfloor inspection: The most important first step in any floor installation is checking the condition of the subfloor. For laminate to sit properly and perform well over time, the subfloor must be dry, level, and free of imperfections. We checked moisture levels and addressed any variations in level before proceeding.
  • Underlayment installation: A quality underlay was fitted across the subfloor. The underlay acts as a moisture barrier and provides a cushioning layer underfoot. Good underlay also improves the acoustic performance of the floor, reducing the hollow sound that can occur with laminate if a cheap or absent underlay is used.
  • Laminate installation: Boards were clicked into place working from one wall outward. Expansion gaps were maintained at the perimeter to allow for movement with changes in humidity.
  • Trims and finishing: Beading and threshold strips were fitted to complete the edges and transitions, giving the installation a clean, finished appearance.

Laminate Floor Installation in Woolwich 3

The Result

Once the subfloor was right, the underlayment was down, and the laminate boards were installed, the difference in the room was immediate. Laminate gives the look of a wood floor at a budget that works for many more households, and when it is installed correctly it holds up very well over time. The Woolwich client now has a practical, attractive floor that is easy to maintain and will handle daily use without showing significant wear for many years.

Frequently Asked Questions

Q: Is laminate flooring suitable for kitchens and bathrooms?
A: Standard laminate is not recommended for wet rooms or bathrooms due to the risk of moisture getting between the joints. However, there are water-resistant and fully waterproof laminate products available that are suitable for kitchens and utility rooms. We discuss the right product for the specific area when quoting.

Q: Can laminate flooring be repaired if a board gets damaged?
A: Individual planks can be replaced if they are badly damaged, though this is easier in a floating installation than in one where boards have been glued. Minor surface scratches can sometimes be filled with a matching repair kit. Keeping a few spare boards from the original installation is always a good idea.

Q: How long does laminate floor installation take?
A: Most rooms can be completed within a day, including subfloor preparation, underlayment, and fitting all the trims. Larger areas or rooms with complex shapes take longer. We give a specific timeframe when we visit to measure up and quote.

Have a similar project? Call us on 020 88309782 or Book a Free Site Visit

Close
9  |   West Ealing  |   August 2022

If you want to invest in a beautiful and practical floor for your home, consider laminate. It's a cost-effective solution that will bring the style into any space with ease! Check out our recent laminate floor installation in West Ealing.

Case studies
  • Laminate floor installation in West Ealing 7
  • Laminate floor installation in West Ealing
  • Laminate floor installation in West Ealing 1
  • Laminate floor installation in West Ealing 2
  • Laminate floor installation in West Ealing 3
  • Laminate floor installation in West Ealing 4
  • Laminate floor installation in West Ealing 5
  • Laminate floor installation in West Ealing 6
  • Laminate floor installation in West Ealing 8

Project Overview

This West Ealing project involved installing a laminate floor with appropriate underlayment and all necessary finishing accessories. One of the more important decisions we make before a laminate installation is the choice of underlay, which depends on the moisture conditions of the specific room. Laminate fitting generally costs between £35 and £55 per square metre, with the total varying based on room size, subfloor condition, and the product selected.

Laminate floor installation in West Ealing

The Challenge

The first step on any laminate job is checking the subfloor. If it is clean and smooth, installation can start relatively quickly. If there are issues — unevenness, damp, old adhesive residue — these need addressing before any boards go down. For this West Ealing property, we checked the moisture level during our first visit. The moisture content of the room directly affects which underlayment is appropriate. Rooms with higher humidity need a thicker rubber underlayment — typically over 4mm — to absorb any residual moisture. Where humidity is above acceptable levels, the right approach is to deal with the source first before installing a floor. For this project, the conditions were suitable to proceed once the correct underlay was in place.

Laminate floor installation in West Ealing 1

Our Approach

  • Subfloor assessment: We checked the level, cleanliness, and moisture content of the subfloor before selecting the right underlayment for the room.
  • Underlayment selection and fitting: Based on the moisture reading, we selected an appropriate underlay thickness. This step is often underestimated — the underlay affects how the finished floor feels and how long it performs without problems.
  • Laminate board installation: Boards were fitted using a click system, working from a straight starting line and cutting to fit around door frames, architraves, and any fixed features in the room.
  • Expansion gaps: Gaps were maintained around the perimeter and at fixed obstacles to allow the laminate to expand and contract with temperature and humidity changes.
  • Accessories and finishing: The right flooring accessories — beading, threshold strips, and door trims — were fitted to complete the look. These details are what give a floor installation a finished, professional quality.

Laminate floor installation in West Ealing 2

The Result

Installing laminate flooring is a relatively quick process once the subfloor is correctly prepared. Once the laminate boards were in place, the accessories were fitted to give the space a clean, considered finish. Laminate is an honest, cost-effective flooring option that performs well when it is installed properly. The West Ealing client now has a floor that looks the part and will handle everyday life without needing much attention beyond regular cleaning.

Frequently Asked Questions

Q: What underlayment thickness should I use for laminate?
A: The standard recommendation for most rooms is a 2mm to 3mm foam or combination underlay. For rooms with higher moisture levels — ground floor, over concrete — a thicker rubber underlay of 4mm or more is preferable as it provides better moisture resistance. We always check the room conditions before recommending an underlay.

Q: Does laminate flooring need to acclimatise before fitting?
A: Yes. Most laminate manufacturers recommend leaving the boards in the room for at least 48 hours before installation so they can adjust to the ambient temperature and humidity. Fitting without acclimatisation increases the risk of the boards expanding or contracting noticeably after installation.

Q: Can laminate be installed over underfloor heating?
A: Some laminate products are approved for use over underfloor heating, but not all. The surface temperature must be kept below 27 degrees Celsius and the heating should be turned down gradually before installation and brought back up slowly afterwards. We check the product specification and the heating setup when quoting for this type of job.

Have a similar project? Call us on 020 88309782 or Book a Free Site Visit

Close
5  |   East London  |   August 2022

Engineered wood flooring in East London, E1W was laid with careful board alignment and accurate spacing throughout. The finished surface has a smooth, consistent appearance with a stable structure designed for everyday use.

Case studies

Project Overview

This project involved the professional installation of engineered wood flooring at a property in East London, E1W. The client required a quality floor that would stand up to daily use and complement their interior. Our fitting team assessed the subfloor condition, carried out any necessary preparation work, and fitted the new floor to a high standard.

Before the Work

Prior to installation, the existing floor covering was inspected and the subfloor was prepared to ensure it was flat, dry, and suitable for the new engineered wood. Any existing floor covering was lifted and disposed of cleanly before the fitting work began.

Survey photos showing the floor condition before work:

Floor condition before work at E1W Floor condition before work at E1W

Our Approach

The following services were carried out as part of this project:

  • Beading Installation (incl. materials)
  • Doors Plus Frame Trimming (per door)
  • Engineered Flooring Installation
  • Furniture Moving
  • Lift & Dispose Carpets or Laminates
  • Thresholds & Fitting (inc. materials)

The Result

The completed engineered wood installation looked clean and finished throughout. Joins are tight, edges are neat, and the floor sits flat and stable. Beading and threshold strips were fitted where required to complete the job properly. The client was pleased with both the quality of the work and the appearance of the new floor.

Photos of the completed work:

Engineered Wood floor after fitting work in E1W Engineered Wood floor after fitting work in E1W Engineered Wood floor after fitting work in E1W

Frequently Asked Questions

How long does engineered wood installation take?
Most fitting jobs are completed within one to two days. Larger areas or more detailed layouts such as herringbone patterns take longer due to the additional cutting and positioning involved.

Do I need underlay?
Yes, underlay is required for most floor types and helps with insulation, sound deadening, and levelling minor subfloor imperfections. We can supply and fit appropriate underlay as part of the installation.

How much does floor fitting cost in London?
Fitting costs typically range from £35 to £60 per square metre depending on floor type and complexity. We provide a full written quote before starting any work.

Have a similar project? Call us on 020 88309782 or Book a Free Site Visit

Close
7  |   Hornchurch  |   July 2022

This particular chevron flooring installation in Hornchurch was quite challenging due to the irregular shape of the room, but our team of experts managed to create a beautiful and seamless finish that looks absolutely amazing. We are extremely proud of the end result and we know that our clients are too!

Case studies
  • Chevron Flooring Installation in Hornchurch, RM12 - 5
  • Chevron Flooring Installation in Hornchurch, RM12
  • Chevron Flooring Installation in Hornchurch, RM12 - 1
  • Chevron Flooring Installation in Hornchurch, RM12 - 2
  • Chevron Flooring Installation in Hornchurch, RM12 - 3
  • Chevron Flooring Installation in Hornchurch, RM12 - 4
  • Chevron Flooring Installation in Hornchurch, RM12 - 6

Project Overview

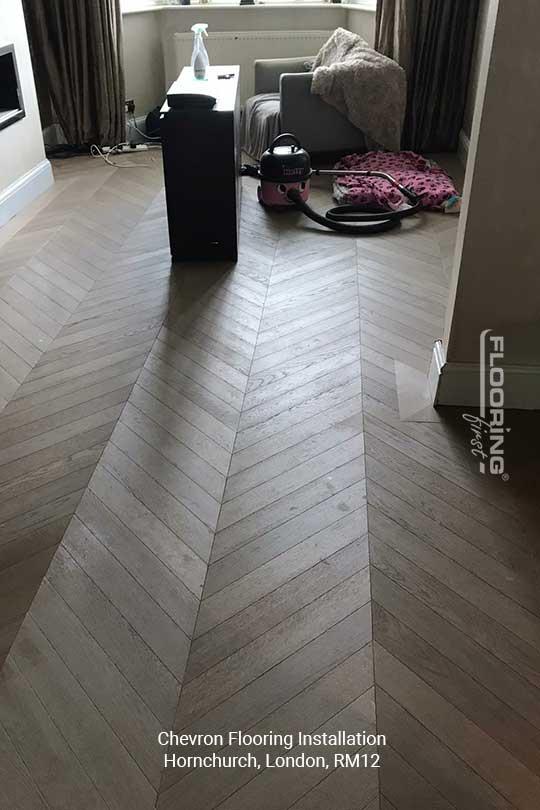
This project in Hornchurch involved the installation of a chevron parquet floor — one of the more demanding jobs in the wood flooring trade. Chevron is a pointed-end pattern where each board cuts to a precise angle so that the rows meet in a continuous arrow or V-shape across the floor. Getting this right requires experience, careful subfloor preparation, and exact cutting and laying technique. Chevron and herringbone parquet fitting typically costs between £70 and £100 per square metre, reflecting the time and skill involved.

Chevron Flooring Installation in Hornchurch, RM12

The Challenge

Chevron floor installation is considered one of the most complex jobs in the wood flooring industry. This pattern requires extra craftsmanship, experience, and knowledge compared to a standard plank or herringbone layout. The cut angle on each board must be exact and consistent, otherwise the pattern will not align cleanly as it progresses across the room. Our team of experienced professionals provides parquet floor installation services across London and the surrounding areas, and this Hornchurch project was completed to a high standard.

Chevron Flooring Installation in Hornchurch, RM12 - 1

Our Approach

  • Subfloor preparation: Before a single chevron board was laid, we made sure the subfloor was completely dry, level, and clean. This stage is non-negotiable for any parquet installation — a chevron pattern will show even small variations in flatness far more clearly than a straight plank floor. The subfloor was checked for moisture content, levelled where needed, and primed for adhesive.
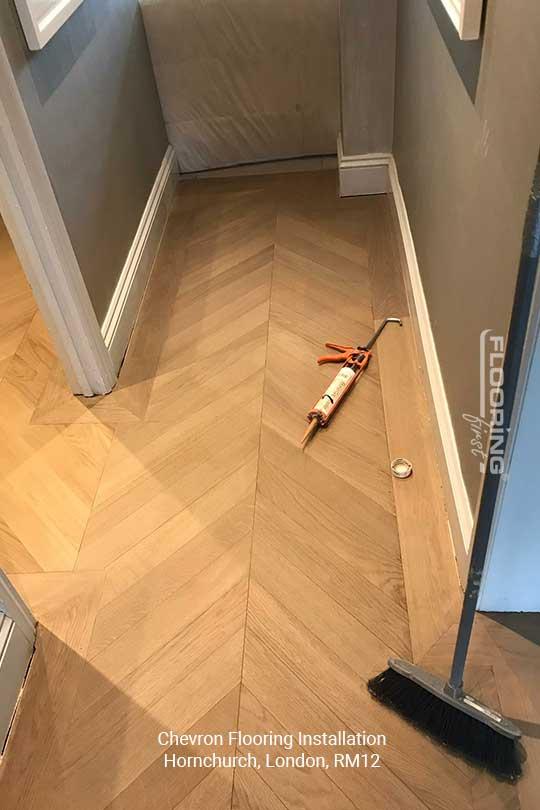
  • Layout planning: The starting point and central axis of the chevron pattern were carefully worked out relative to the room shape. The room in Hornchurch had an irregular shape, which added to the complexity of getting the layout to look balanced.
  • Chevron floor fitting: Boards were adhered to the prepared subfloor starting from the datum line, working outward in both directions to keep the pattern expanding symmetrically. Each board was pressed into the adhesive and checked for alignment before moving to the next.
  • Perimeter cuts: Cutting chevron boards to fit the room's edges requires precision — particularly at angles and around door frames — to keep the pattern readable right to the boundary of the floor.
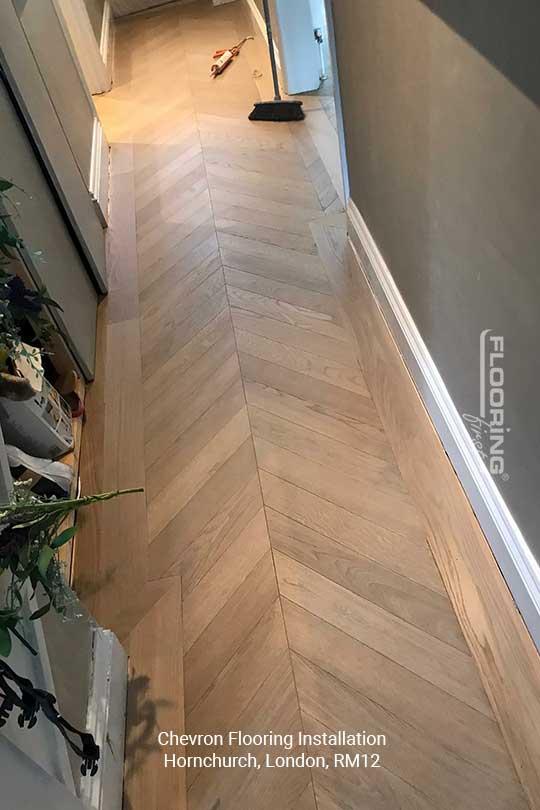
  • Flooring accessories: Once all boards were laid and the adhesive had cured, we fitted all the finishing accessories — thresholds, beading, and door trims — to complete the installation.

Chevron Flooring Installation in Hornchurch, RM12 - 2

The Result

In order to ensure the durability of the parquet floor, we began with thorough subfloor preparation — confirming it was completely dry, levelled, and clean before installation. Once the subfloor was in the right condition, the chevron fitting began. Parquet floors are available in a wide range of patterns, and chevron is one of the most striking. We finished the installation by fitting all flooring accessories to give the floor a complete, polished appearance. The Hornchurch client now has a distinctive, high-quality floor that is well-fitted and properly finished.

Frequently Asked Questions

Q: What is the difference between chevron and herringbone parquet?
A: In a herringbone pattern, each rectangular board is laid at 90 degrees to the adjacent one, creating a zigzag effect with square-cut ends. In a chevron pattern, the ends of the boards are cut at a precise angle so that when two boards meet, they form a clean V or arrow point. Chevron has a sharper, more geometric look and is generally considered the more challenging pattern to lay correctly.

Q: Can chevron parquet be fitted in any room shape?
A: Yes, though irregular or non-rectangular rooms add complexity to the layout planning and the perimeter cuts. The key is establishing the correct datum line at the start. Our team assessed the room shape in Hornchurch before starting and planned the layout accordingly to make sure the pattern sat correctly within the space.

Q: Do chevron floors need to be sanded after installation?
A: This depends on the product. Pre-finished engineered chevron boards come with the factory finish already applied and do not require sanding after fitting. Unfinished boards need sanding and finishing on-site after installation. We advise on the right product and process during the quoting stage.

Have a similar project? Call us on 020 88309782 or Book a Free Site Visit

Close
5  |   Barnet  |   July 2022

We installed engineered wood flooring in Barnet, HA8, arranging the boards with precise alignment and neat edge detailing. The finished floor has a smooth, consistent appearance with a stable structure suited for everyday use.

Case studies

Project Overview

This project involved the professional installation of engineered wood flooring at a property in Barnet, HA8. The client required a quality floor that would stand up to daily use and complement their interior. Our fitting team assessed the subfloor condition, carried out any necessary preparation work, and fitted the new floor to a high standard.

Before the Work

Prior to installation, the existing floor covering was inspected and the subfloor was prepared to ensure it was flat, dry, and suitable for the new engineered wood. Any existing floor covering was lifted and disposed of cleanly before the fitting work began.

Survey photos showing the floor condition before work:

Floor condition before work at HA8 Floor condition before work at HA8 Floor condition before work at HA8

Our Approach

The following services were carried out as part of this project:

  • Beading Installation (incl. materials)
  • Doors Plus Frame Trimming (per door)
  • Engineered Flooring Installation
  • Lift & Dispose Carpets or Laminates
  • Stairs Step Fitting (Wooden Floors)
  • Thresholds & Fitting (inc. materials)
  • Vinyl Installation
  • Duralay Timbermate Excel Silver Wood Floor & Laminate Underlay
  • QuickStep Comfort Underlay for Livyn Flooring, 1.15 mm, 15 sqm
  • QuickStep Livyn Alpha Click Pure Oak Blush Vinyl Flooring
  • Tradition Engineered Oak Flooring, Rustic, Brushed & Oiled, 190x20x2200mm
  • Unfinished Solid Oak Stair Nosing, 80 x 20 mm, 0.9 m
  • Lift & Dispose Lino

The Result

The completed engineered wood installation looked clean and finished throughout. Joins are tight, edges are neat, and the floor sits flat and stable. Beading and threshold strips were fitted where required to complete the job properly. The client was pleased with both the quality of the work and the appearance of the new floor.

Photos of the completed work:

Engineered Wood floor after fitting work in HA8 Engineered Wood floor after fitting work in HA8 Engineered Wood floor after fitting work in HA8

Frequently Asked Questions

How long does engineered wood installation take?
Most fitting jobs are completed within one to two days. Larger areas or more detailed layouts such as herringbone patterns take longer due to the additional cutting and positioning involved.

Do I need underlay?
Yes, underlay is required for most floor types and helps with insulation, sound deadening, and levelling minor subfloor imperfections. We can supply and fit appropriate underlay as part of the installation.

How much does floor fitting cost in London?
Fitting costs typically range from £35 to £60 per square metre depending on floor type and complexity. We provide a full written quote before starting any work.

Have a similar project? Call us on 020 88309782 or Book a Free Site Visit

Close
5  |   Bayswater, Paddington  |   July 2022

We installed parquet flooring in Bayswater, W2, setting out the pattern with precision and ensuring tight, consistent joins. The finished floor has a sharp, well-defined look with a durable surface suited for everyday use.

Case studies

Project Overview

This project involved the professional installation of parquet flooring at a property in Bayswater, W2. The client required a quality floor that would stand up to daily use and complement their interior. Our fitting team assessed the subfloor condition, carried out any necessary preparation work, and fitted the new floor to a high standard.

Before the Work

Prior to installation, the existing floor covering was inspected and the subfloor was prepared to ensure it was flat, dry, and suitable for the new parquet. Any existing floor covering was lifted and disposed of cleanly before the fitting work began.

Survey photos showing the floor condition before work:

Floor condition before work at W2 Floor condition before work at W2 Floor condition before work at W2

Our Approach

The following services were carried out as part of this project:

  • Doors Plus Frame Trimming (per door)
  • Lift & Dispose Carpets or Laminates
  • Parquet Floor Fitting - No Border
  • Skirting Board Removal
  • Thresholds & Fitting (inc. materials)

The Result

The completed parquet installation looked clean and finished throughout. Joins are tight, edges are neat, and the floor sits flat and stable. Beading and threshold strips were fitted where required to complete the job properly. The client was pleased with both the quality of the work and the appearance of the new floor.

Photos of the completed work:

Parquet floor after fitting work in W2 Parquet floor after fitting work in W2 Parquet floor after fitting work in W2

Frequently Asked Questions

How long does parquet installation take?
Most fitting jobs are completed within one to two days. Larger areas or more detailed layouts such as herringbone patterns take longer due to the additional cutting and positioning involved.

Do I need underlay?
Yes, underlay is required for most floor types and helps with insulation, sound deadening, and levelling minor subfloor imperfections. We can supply and fit appropriate underlay as part of the installation.

How much does floor fitting cost in London?
Fitting costs typically range from £70 to £100 per square metre depending on floor type and complexity. We provide a full written quote before starting any work.

Have a similar project? Call us on 020 88309782 or Book a Free Site Visit

Close
3  |   Waterloo  |   July 2022

Chevron parquet flooring in Waterloo, SE1 was installed with precise layout planning to achieve a sharp, symmetrical pattern. The finished surface presents a clean, structured look with tight joins and a durable finish suited for everyday use.

Case studies

Project Overview

This project involved the professional installation of chevron parquet flooring at a property in Waterloo, SE1. The client required a quality floor that would stand up to daily use and complement their interior. Our fitting team assessed the subfloor condition, carried out any necessary preparation work, and fitted the new floor to a high standard.

Before the Work

Prior to installation, the existing floor covering was inspected and the subfloor was prepared to ensure it was flat, dry, and suitable for the new chevron parquet. Any existing floor covering was lifted and disposed of cleanly before the fitting work began.

Our Approach

The following services were carried out as part of this project:

  • Beading Installation (incl. materials)
  • Lift & Dispose Rubbish
  • Doors Plus Frame Trimming & Thresholds & Fitting (inc. materials)
  • Subfloor Preparation
  • Parquet Floor Fitting - Chevron Pattern without Border
  • Congestion Charge

The Result

The completed chevron parquet installation looked clean and finished throughout. Joins are tight, edges are neat, and the floor sits flat and stable. Beading and threshold strips were fitted where required to complete the job properly. The client was pleased with both the quality of the work and the appearance of the new floor.

Photos of the completed work:

Chevron Parquet floor after fitting work in SE1 Chevron Parquet floor after fitting work in SE1 Chevron Parquet floor after fitting work in SE1

Frequently Asked Questions

How long does chevron parquet installation take?
Most fitting jobs are completed within one to two days. Larger areas or more detailed layouts such as herringbone patterns take longer due to the additional cutting and positioning involved.

Do I need underlay?
Yes, underlay is required for most floor types and helps with insulation, sound deadening, and levelling minor subfloor imperfections. We can supply and fit appropriate underlay as part of the installation.

How much does floor fitting cost in London?
Fitting costs typically range from £70 to £100 per square metre depending on floor type and complexity. We provide a full written quote before starting any work.

Have a similar project? Call us on 020 88309782 or Book a Free Site Visit

Close
8  |   Buckhurst Hill  |   June 2022

Our engineered floor installation team is highly skilled and experienced in the latest methods for fitting this advanced and beneficial type of real wood flooring. Check out the stunning results they have achieved at the end of this engineered floor installation project we have recently completed in Buckhurst Hill.

Case studies
  • Engineered wood flooring installation in Buckhurst Hill 7
  • Engineered wood flooring installation in Buckhurst Hill
  • Engineered wood flooring installation in Buckhurst Hill 2
  • Engineered wood flooring installation in Buckhurst Hill 3
  • Engineered wood flooring installation in Buckhurst Hill 4
  • Engineered wood flooring installation in Buckhurst Hill 5
  • Engineered wood flooring installation in Buckhurst Hill 6
  • Engineered wood flooring installation in Buckhurst Hill 8

Project Overview

This project in Buckhurst Hill involved the installation of engineered wood flooring with a quality underlay, using correct preparation and installation procedures throughout. Engineered flooring is one of the most popular choices for residential properties — it offers the look and feel of solid wood with better stability across humidity changes. Fitting typically costs between £35 and £60 per square metre, depending on the floor size and the complexity of the job.

Engineered wood flooring installation in Buckhurst Hill

The Challenge

Engineered flooring installation is a process that should be carried out by a professional to achieve the best long-term results. Quality materials and correct installation procedures are both essential. One product used on this project was the Duralay Timbermate Excel Silver Wood Floor and Laminate Underlay, which has good acoustic and thermal properties and is suited to both residential and commercial settings. Selecting the right underlay is part of specifying the job correctly, not an afterthought.

Engineered wood flooring installation in Buckhurst Hill 2

Our Approach

  • Subfloor preparation: We started by preparing the subfloor thoroughly — cleaning the surface, checking for level, and removing any debris or old fixings. The subfloor was checked for moisture content before any underlay or flooring was brought in. A dry, clean, level base is the foundation that everything else relies on.
  • Underlay installation: The Duralay Timbermate Excel Silver underlay was fitted across the prepared subfloor. This product provides a barrier against moisture rising from below and adds thermal and acoustic benefits. It also takes out minor surface imperfections in the subfloor that could otherwise transmit through to the finished floor.
  • Engineered flooring installation: Boards were laid following the manufacturer's instructions, with the correct expansion gaps maintained at walls and fixed obstacles. The installation sequence and starting point were planned before work began to ensure the layout balanced well within the room.
  • Acclimation period: The flooring was allowed to acclimate to the room for 24 hours before installation commenced. This allows the boards to adjust to the ambient temperature and humidity, reducing movement after fitting.
  • Trims and finishing: Beading, thresholds, and door trims were fitted to complete the job.

Engineered wood flooring installation in Buckhurst Hill 3

The Result

When installing engineered flooring, preparation of the subfloor is the single most important factor. Once the subfloor was clean, level, and within the correct moisture range, the underlay was installed to provide protection and cushioning. Following the manufacturer's instructions at each stage and allowing the floor to settle properly before furniture was moved in meant the Buckhurst Hill client ended up with a floor that will perform well for many years. Engineered wood is a sound long-term choice for most residential properties, and this installation was carried out to the standard that makes it last.

Frequently Asked Questions

Q: What is the difference between engineered wood and solid wood flooring?
A: Solid wood is cut from a single piece of timber throughout its full thickness. Engineered wood has a real wood wear layer on the surface bonded to multiple layers of ply or HDF below. This construction makes engineered wood more stable across changes in temperature and humidity, which is why it is often the preferred choice for properties with underfloor heating or concrete subfloors.

Q: Can engineered wood be fitted over underfloor heating?
A: Yes, most engineered wood products are compatible with underfloor heating. The key requirements are that the surface temperature does not exceed 27 degrees Celsius and that the heating system is run at low temperatures for a period before installation to condition the subfloor. We check compatibility with each specific product before fitting.

Q: How long should engineered wood acclimatise before fitting?
A: Manufacturers typically recommend 24 to 48 hours in the room where the floor will be installed. The boards should be left in their packaging or stacked loosely to allow air circulation. Installing without acclimatisation can lead to boards moving or gapping after fitting, particularly if the room temperature or humidity differs significantly from the storage conditions.

Have a similar project? Call us on 020 88309782 or Book a Free Site Visit

Close

  • 1
  • 2
  • 3
  • 4
  • 5
  • 6
  • 7
  • 8
  • 9
  • 10
  • 11
  • 12
  • 13
  • 14
  • 15
  • 16
  • 17
  • 18
  • 19
  • 20
  • 21
  • 22
  • 23
  • 24

Have a similar project?

Call us on 020 88309782 or book a free site visit

Book Free Site Visit

Our Flooring Company

Contacts & Showroom Book Free Site Survey About Our Flooring Company Join Our Team Work as a Contractor

Service Information

Terms of Service Terms of Sales Deliveries & Charges Cookie Settings Returns Policy Privacy Policy

Help

FAQs Case Studies Sitemap Glossary
𝕏
FlooringFirst! Services
158 Coles Green Road
London, NW2 7HW
T: 020 88309782
Floor Sanding Services: Central London, East London, Near London, North London, Northwest London, Southeast London, Southwest London, West London
Wood Floor Installation Service: Central London, East London, Near London, North London, Northwest London, Southeast London, Southwest London, West London

  • Flooring Services
  • Floor Sanding
    • Wood Floor Staining
    • Wood Floor Gap Filling
    • Commercial Floor Sanding
    • Engineered Floor Sanding & Refinishing
  • Wood Floor Fitting
    • Parquet Floor Installation
    • Laminate Floor Installation
    • Engineered Wood Floor Installation - Supply & Fit
    • Solid Wood Floor Fitting - Supply & Fit
    • LVT Floor Installation - Supply & Fit
  • Floor Repairs
    • Parquet Floor Repair and Restoration
    • Engineered Wood Floor Repairs
    • Wood Floor Scratch Repair
    • Floorboards Replacement
  • Care & Maintenance
    • Re-Oiling & Recoating Oiled Floors
    • Vinyl & Linoleum Cleaning
    • Hardwood Floor Buffing
    • Wood Floor Polishing
  • Shop
  • Shop
  • Gallery
  • Service Guide
  • Bookings
  • Book Free Survey
  • Service Advice
  • Product Advice