Floor Sanding & Fitting
Book Free Visit Price Guide 020 88309782
Monday - Friday 07:30 - 17:30, Saturday 07:30 - 16:00
cs@flooringfirst.co.uk
020 88309782
Monday - Friday 07:30 - 17:30, Saturday 07:30 - 16:00
cs@flooringfirst.co.uk
  • Book Free Visit
  • Home
  • Floor Sanding
  • Floor Fitting
  • Floor Repairs
  • Aftercare
    • Wooden Floors
    • Cleaning & Polishing
    • Re-Oiling Wooden Floors
    • Vinyls & Linoleum
    • Vinyl Floor Polishing
    • Get a Quote...
  • For Businesses
  • Gallery
  • Service Guide
  • Shop
  • Book Free Visit

See Few Examples of Our Works

Floor Sanding, Solid, Parquet & Laminate Floor Fitting

Gallery

See Our Floor Works

WHY CHOOSE US
CASE STUDIES
PRICE GUIDE
OFFERS
GALLERY
ASK EXPERT
WHY CHOOSE US
CASE STUDIES
PRICE GUIDE
OFFERS
GALLERY
ASK EXPERT

Floor Sanding & Fitting Project Gallery

All Projects Renovations Installations

5  |   Buckhurst Hill  |   November 2020

An existing floor in Buckhurst Hill, IG9 was upgraded with newly installed engineered wood flooring, bringing a fresh and practical finish to the space. The installation was carried out with accurate board placement, tidy edges, and careful detailing throughout for a durable result.

Case studies

Project Overview

This project involved the professional installation of engineered wood flooring at a property in Buckhurst Hill, IG9. The client required a quality floor that would stand up to daily use and complement their interior. Our fitting team assessed the subfloor condition, carried out any necessary preparation work, and fitted the new floor to a high standard.

Before the Work

Prior to installation, the existing floor covering was inspected and the subfloor was prepared to ensure it was flat, dry, and suitable for the new engineered wood. Any existing floor covering was lifted and disposed of cleanly before the fitting work began.

Survey photos showing the floor condition before work:

Floor condition before work at IG9 Floor condition before work at IG9

Our Approach

The following services were carried out as part of this project:

  • Door Frame Trimming
  • Doors Plus Frame Trimming (per door)
  • Engineered Flooring Installation
  • Lift & Dispose Carpets or Laminates
  • Skirting Board Removal
  • Skirting Boards Installation (excl. materials)
  • Thresholds & Fitting (inc. materials)
  • One Day Delay

The Result

The completed engineered wood installation looked clean and finished throughout. Joins are tight, edges are neat, and the floor sits flat and stable. Beading and threshold strips were fitted where required to complete the job properly. The client was pleased with both the quality of the work and the appearance of the new floor.

Photos of the completed work:

Engineered Wood floor after fitting work in IG9 Engineered Wood floor after fitting work in IG9 Engineered Wood floor after fitting work in IG9

Frequently Asked Questions

How long does engineered wood installation take?
Most fitting jobs are completed within one to two days. Larger areas or more detailed layouts such as herringbone patterns take longer due to the additional cutting and positioning involved.

Do I need underlay?
Yes, underlay is required for most floor types and helps with insulation, sound deadening, and levelling minor subfloor imperfections. We can supply and fit appropriate underlay as part of the installation.

How much does floor fitting cost in London?
Fitting costs typically range from £35 to £60 per square metre depending on floor type and complexity. We provide a full written quote before starting any work.

Have a similar project? Call us on 020 88309782 or Book a Free Site Visit

Close
5  |   Southall  |   November 2020

A new laminate floor was installed in Southall, UB1, giving the space a fresh and practical update. The installation was carried out with precise board placement, tidy edges, and careful finishing to achieve a durable and well-balanced result.

Case studies

Project Overview

This project involved the professional installation of laminate flooring at a property in Southall, UB1. The client required a quality floor that would stand up to daily use and complement their interior. Our fitting team assessed the subfloor condition, carried out any necessary preparation work, and fitted the new floor to a high standard.

Before the Work

Prior to installation, the existing floor covering was inspected and the subfloor was prepared to ensure it was flat, dry, and suitable for the new laminate. Any existing floor covering was lifted and disposed of cleanly before the fitting work began.

Survey photos showing the floor condition before work:

Floor condition before work at UB1 Floor condition before work at UB1

Our Approach

The following services were carried out as part of this project:

  • Doors Plus Frame Trimming (per door)
  • Furniture Moving
  • Laminate Floor Installation
  • Lift & Dispose Carpets or Laminates

The Result

The completed laminate installation looked clean and finished throughout. Joins are tight, edges are neat, and the floor sits flat and stable. Beading and threshold strips were fitted where required to complete the job properly. The client was pleased with both the quality of the work and the appearance of the new floor.

Photos of the completed work:

Laminate floor after fitting work in UB1 Laminate floor after fitting work in UB1 Laminate floor after fitting work in UB1

Frequently Asked Questions

How long does laminate installation take?
Most fitting jobs are completed within one to two days. Larger areas or more detailed layouts such as herringbone patterns take longer due to the additional cutting and positioning involved.

Do I need underlay?
Yes, underlay is required for most floor types and helps with insulation, sound deadening, and levelling minor subfloor imperfections. We can supply and fit appropriate underlay as part of the installation.

How much does floor fitting cost in London?
Fitting costs typically range from £35 to £60 per square metre depending on floor type and complexity. We provide a full written quote before starting any work.

Have a similar project? Call us on 020 88309782 or Book a Free Site Visit

Close
12  |   Buckhurst Hill  |   November 2020

These days, there is no more innovative and advanced product in the industry than engineered wood flooring. Check out this recent installation project we have accomplished in Buckhurst Hill.

Case studies
  • Engineered wood flooring installation in Buckhurst Hill 10
  • Engineered wood flooring installation in Buckhurst Hill
  • Engineered wood flooring installation in Buckhurst Hill 1
  • Engineered wood flooring installation in Buckhurst Hill 2
  • Engineered wood flooring installation in Buckhurst Hill 3
  • Engineered wood flooring installation in Buckhurst Hill 4
  • Engineered wood flooring installation in Buckhurst Hill 5
  • Engineered wood flooring installation in Buckhurst Hill 6
  • Engineered wood flooring installation in Buckhurst Hill 7
  • Engineered wood flooring installation in Buckhurst Hill 8
  • Engineered wood flooring installation in Buckhurst Hill 9
  • Engineered wood flooring installation in Buckhurst Hill 11

Project Overview

This Buckhurst Hill property needed new flooring installed across the main living areas. The client had opted for engineered wood as their preferred choice, primarily because the house had some areas with potential for moisture variation, including a room over an unventilated crawl space. Engineered wood's layered construction makes it considerably more stable in these conditions than solid hardwood, which was the right call for this particular property. The installation covered the living room, dining area, and hallway.

Subfloor before engineered flooring installation in Buckhurst Hill

The Challenge

The room over the crawl space had shown slightly higher moisture readings in the past, and the subfloor in that area needed careful assessment before any flooring went down. Fitting engineered boards over a subfloor with unresolved moisture issues can lead to cupping, where the boards bow upward at their edges as they absorb moisture, or to the adhesive failing if the boards are glued down. The hallway subfloor also had an old adhesive residue from a previous floor covering that needed removing before a clean installation base was available.

Engineered boards before fitting, Buckhurst Hill

Our Approach

Subfloor Assessment and Preparation

We carried out moisture testing across all subfloor areas. The room over the crawl space had a slightly elevated reading, which we addressed with a moisture barrier membrane before installation began. The adhesive residue in the hallway was mechanically removed and the surface levelled and cleaned.

Acclimatisation

The engineered boards were delivered to the property and left to acclimatise for the manufacturer's recommended period before fitting. This allowed the boards to reach equilibrium with the temperature and humidity of the space, reducing the risk of movement after installation.

Engineered wood flooring installation in Buckhurst Hill

Installation

The boards were fitted using a combination of floating and glued methods, chosen according to the subfloor type in each area. The floating method was used in the main rooms for ease of future access, and a direct glue-down method was used in the hallway where there was less room for expansion and a firmer fix was preferable. All expansion gaps at perimeters were correctly maintained throughout.

Accessories and Finishing

Matching beading, threshold strips, and reducer bars were fitted at all walls and transitions. The product specifications were matched to the board profile to give a neat, factory-finished appearance at all edges.

The Result

The finished floor runs consistently throughout the property, with clean transitions between areas and all accessories properly fitted. The engineered boards have held their position well since installation with no movement or cupping, which confirms the subfloor preparation work was effective. Engineered floor fitting in Essex and the surrounding areas typically costs from £35 to £60 per square metre for supply and fit, depending on the board specification and subfloor preparation required.

Frequently Asked Questions

Why is engineered wood better than solid wood in a property with moisture concerns?
Engineered wood is constructed from multiple layers of timber bonded together at different grain directions, which gives it much greater dimensional stability than a solid plank. Where solid wood can expand, contract, cup, or bow significantly in response to moisture changes, engineered boards move far less and are far less likely to develop problems in areas where moisture control is not perfect.

What is the best installation method for engineered wood - floating or glue-down?
Both methods work well, and the best choice depends on the subfloor type and the property layout. Floating is quicker to install and easier to replace in sections if needed. Glue-down gives a more solid underfoot feel and is better in narrower spaces or areas with limited room for expansion. Many installations use both methods in different areas of the same property.

How thick should an engineered board be for a standard domestic installation?
Most domestic engineered floor installations use boards between 12mm and 20mm total thickness. The total thickness affects the underfoot feel and the height change at doorway transitions. The veneer thickness is also important as it determines how many times the floor can be sanded in the future. A 3mm or 4mm veneer is generally recommended for a floor you want to be able to refinish.

Have a similar project? Call us on 020 88309782 or Book a Free Site Visit

Close
7  |   Northwood  |   October 2020

A hardwood floor installation project of unfinished floorboards allows for a lot more creativity and achieving a really unique style of wood floor that perfectly suits the interior of the given home. This recent hardwood fitting project in Northwood is now part of our portfolio of outstanding projects.

Case studies
  • Hardwood floor installation and sanding in Northwood 6
  • Hardwood floor installation and sanding in Northwood
  • Hardwood floor installation and sanding in Northwood 1
  • Hardwood floor installation and sanding in Northwood 2
  • Hardwood floor installation and sanding in Northwood 3
  • Hardwood floor installation and sanding in Northwood 4
  • Hardwood floor installation and sanding in Northwood 5

Project Overview

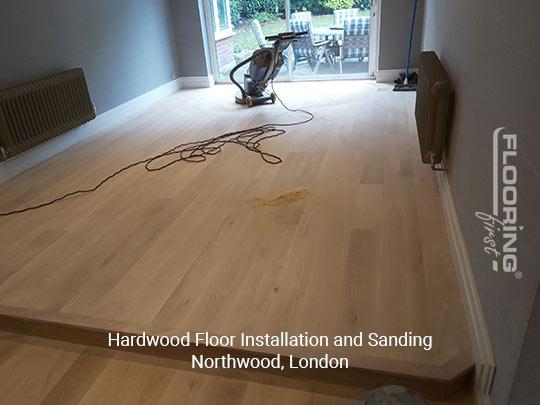
This Northwood property had a new hardwood floor installed and sanded as a complete project. The client had chosen unfinished solid oak boards for the main reception room, wanting a traditional solid wood floor that could be sanded and finished on site to their exact specification. The installation, on-site sanding, and oil finish were all handled as a single project, from subfloor preparation through to final coat.

Subfloor before hardwood installation in Northwood

The Challenge

Installing solid hardwood floors requires more subfloor preparation and care than engineered boards. Solid wood is more sensitive to moisture and will move significantly if the subfloor is not completely dry, the room is not at a stable temperature and humidity, or the boards are not given sufficient time to acclimatise before fitting. Getting the subfloor condition right is not optional with solid wood. Skipping or rushing these steps is the most common cause of problems after installation. The room in this property also had a bay window area that required careful planning to keep the floor pattern consistent around the projection without leaving awkward cut pieces in the most visible part of the room.

Hardwood boards before fitting, Northwood

Our Approach

Subfloor Preparation

The subfloor was thoroughly checked for levelness, moisture content, and structural soundness. A plywood overlay was installed to provide a stable, flat base for the hardwood boards. This is standard practice when laying solid wood over an older concrete or suspended timber subfloor, as it provides a consistent nailing or stapling surface and helps buffer any residual moisture variation in the subfloor below.

Acclimatisation

The solid oak boards were delivered to the property and left in the room where they would be fitted for the full manufacturer-recommended acclimatisation period. This is a step we take seriously, as the amount of movement in a solid wood floor post-installation is directly related to how well the boards were acclimatised before fitting.

Hardwood floor installation in progress, Northwood

Board Installation

The boards were installed using a secret-nail method, working from the straightest wall and using a board straightener to keep each run tight and aligned. The bay window area was planned from the outset to keep the board layout symmetrical and avoid cuts at the focal points of the room.

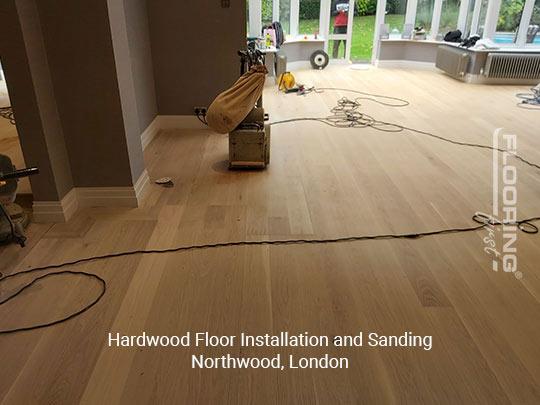
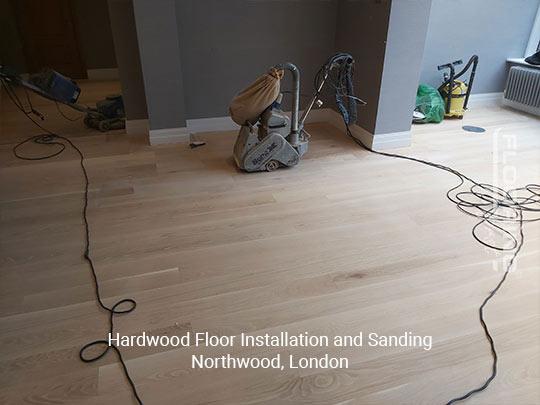
On-Site Sanding and Finishing

Once installed and allowed to settle, the floor was sanded through a multi-stage programme starting with a levelling grit and finishing with a fine grit ready for the oil application. A natural hardwax oil was applied in two coats, buffed between each, giving the oak a warm, open-grained finish that suits the character of the room well.

The Result

The finished floor is a significant improvement to the reception room. The solid oak has a warmth and depth that suits the property, the grain reads well across the space, and the oil finish gives good protection without adding any artificial sheen. The client was particularly pleased with the bay window layout, which came out cleanly and consistently. Solid hardwood floor installation and sanding in the Northwood area typically costs from around £50 to £80 per square metre for supply, fit, sand, and finish, depending on the timber species and the finish specification.

Frequently Asked Questions

How long does solid wood need to acclimatise before fitting?
The standard recommendation is a minimum of three to five days in the room where the floor will be fitted, with the boards stacked so air can circulate around them. In older properties with older heating systems or in winter months when heating cycles are more pronounced, a longer acclimatisation period is advisable. We always recommend erring on the longer side rather than rushing this step.

Can a solid wood floor be installed in a kitchen or bathroom?
We generally advise against solid wood in kitchens and bathrooms due to the exposure to moisture. Engineered wood is a far better choice in these rooms and can be specified to look identical to solid wood from above. Solid wood is best used in rooms where moisture and temperature are well controlled, such as living rooms and bedrooms.

How many times can a solid hardwood floor be sanded in its lifetime?
This depends on the thickness of the boards and the amount removed with each sand. A 20mm solid oak board, for example, can typically be sanded four to six times over its lifetime before the tongue is approached. This makes solid hardwood one of the most long-lasting flooring options available, with a potential lifespan of many decades when maintained correctly.

Have a similar project? Call us on 020 88309782 or Book a Free Site Visit

Close
3  |   Cricklewood  |   October 2020

Engineered wood flooring was installed in Cricklewood, NW2, giving the property a clean, modern upgrade. Our installers carried out the work with precise board placement, tidy edges, and careful finishing to achieve a durable and well-balanced result.

Case studies

Project Overview

This project involved the professional installation of engineered wood flooring at a property in Cricklewood, NW2. The client required a quality floor that would stand up to daily use and complement their interior. Our fitting team assessed the subfloor condition, carried out any necessary preparation work, and fitted the new floor to a high standard.

Before the Work

Prior to installation, the existing floor covering was inspected and the subfloor was prepared to ensure it was flat, dry, and suitable for the new engineered wood. Any existing floor covering was lifted and disposed of cleanly before the fitting work began.

Survey photos showing the floor condition before work:

Floor condition before work at NW2 Floor condition before work at NW2

Our Approach

The following services were carried out as part of this project:

  • Beading Installation (incl. materials)
  • Doors Plus Frame Trimming (per door)
  • Engineered Flooring Installation
  • Furniture Moving
  • Thresholds & Fitting (inc. materials)
  • Duralay Timbermate Excel Silver Wood Floor & Laminate Underlay
  • Evolve American Engineered Oak Flooring, Natural, Smoked Brushed & Lacquered, 190x15x1900 mm

The Result

The completed engineered wood installation looked clean and finished throughout. Joins are tight, edges are neat, and the floor sits flat and stable. Beading and threshold strips were fitted where required to complete the job properly. The client was pleased with both the quality of the work and the appearance of the new floor.

Photos of the completed work:

Engineered Wood floor after fitting work in NW2 Engineered Wood floor after fitting work in NW2 Engineered Wood floor after fitting work in NW2

Frequently Asked Questions

How long does engineered wood installation take?
Most fitting jobs are completed within one to two days. Larger areas or more detailed layouts such as herringbone patterns take longer due to the additional cutting and positioning involved.

Do I need underlay?
Yes, underlay is required for most floor types and helps with insulation, sound deadening, and levelling minor subfloor imperfections. We can supply and fit appropriate underlay as part of the installation.

How much does floor fitting cost in London?
Fitting costs typically range from £35 to £60 per square metre depending on floor type and complexity. We provide a full written quote before starting any work.

Have a similar project? Call us on 020 88309782 or Book a Free Site Visit

Close
8  |   Fulham  |   September 2020

Laminate flooring grows more and more in popularity because of its elegant beauty, mimicking real wood’s appearance and texture perfectly. Add the great and reasonable price of laminate to the mix and you will get satisfied customers like those in this laminate fitting project in Fulham.

Case studies
  • Laminate floor fitting in Fulham 6
  • Laminate floor fitting in Fulham
  • Laminate floor fitting in Fulham 1
  • Laminate floor fitting in Fulham 2
  • Laminate floor fitting in Fulham 3
  • Laminate floor fitting in Fulham 4
  • Laminate floor fitting in Fulham 5
  • Laminate floor fitting in Fulham 7

Old floor lifted and subfloor exposed before laminate fitting in Fulham Subfloor preparation stage during laminate installation in Fulham

Project Overview

This laminate floor fitting project was completed at a flat in Fulham, West London. The client was renovating their living room and kitchen area and wanted a floor that would look great, stand up to daily use, and not cost a fortune. Laminate flooring was the natural choice. Modern laminate has come an enormous distance from the flimsy products sold in the 1990s. Today's boards are thick, stable, and convincingly replicate the look and texture of real wood, including brushed finishes, hand-scraped effects, and natural grain variation. For a professional supply and fit, clients in London should expect to pay in the region of £35 to £60 per square metre, depending on the grade of laminate selected.

The Challenge

The room had an old carpet and underlay over a concrete subfloor that needed to be lifted before any fitting could begin. Concrete subfloors are unforgiving: any high spots or hollow areas will cause laminate boards to flex, click, and potentially crack at the joints over time. The concrete in this property had a few raised areas near a previous plumbing repair and some uneven dips near the wall. Getting this flat enough for floating laminate installation required careful grinding and levelling before the boards went down. Door frame clearances also needed to be checked, as the new floor raised the finished height by about twelve millimetres.

Our Approach

  1. Strip-out: We lifted and disposed of the existing carpet, gripper rods, and underlay, clearing the subfloor completely before starting any prep work.
  2. Subfloor preparation: The concrete was swept, vacuumed, and inspected for high spots. Raised areas were ground back with a belt sander and a self-levelling compound was poured over the low areas and feathered out to create a flat, smooth base.
  3. Damp-proof membrane: A polyethylene damp-proof membrane was laid over the concrete to prevent any residual moisture from migrating into the laminate boards and causing swelling or joint lift.
  4. Underlay installation: A quality foam underlay with a built-in moisture barrier was rolled out over the membrane. A good underlay is critical for reducing the hollow sound laminate can produce underfoot and for improving thermal insulation at floor level.
  5. Laminate fitting: The boards were fitted in a staggered brick-bond pattern, leaving the manufacturer-recommended expansion gap around the perimeter. Door frames were undercut to allow the boards to slide beneath, giving a clean finish without the need for ugly architrave trims.
  6. Finishing details: Scotia beading was fitted around the perimeter and colour-matched threshold strips were installed at every doorway to complete the job neatly.

Completed laminate floor installation in Fulham living room

The Result

The finished room looked clean, modern, and well-put-together. The laminate chosen had a natural oak tone with a lightly textured surface that worked well with the existing decor. The client commented that it looked far more like real wood than they had expected. The floor is now warm underfoot, quiet to walk on, and straightforward to keep clean. With normal care, a good quality laminate floor installed over a properly prepared subfloor will last fifteen to twenty-five years before replacement becomes necessary.

Frequently Asked Questions

Do I need underlay under laminate flooring?

Yes, always. Underlay cushions the boards, reduces the hollow sound laminate can make underfoot, and helps with thermal insulation. Over a concrete subfloor, an underlay with an integrated damp-proof membrane is particularly important. Some laminate boards come with underlay pre-attached, but a separate, higher-quality underlay generally gives better results.

Can laminate be fitted over underfloor heating?

Many modern laminate products are compatible with underfloor heating, but the system temperature must not exceed 27 degrees Celsius at the surface and the floor should be allowed to acclimatise to the room for at least 48 hours before fitting. Always check the manufacturer's specifications for the laminate you are using.

How do I deal with gaps between laminate and skirting boards?

The expansion gap between the laminate and the wall is deliberate and necessary. It is covered by the skirting board or by a separate Scotia bead fitted over it. Never fill this gap with sealant or fix anything into it, as this prevents the floor from expanding and can cause buckling.

Have a similar project? Call us on 020 88309782 or Book a Free Site Visit

Close
5  |   Fulham  |   September 2020

A new laminate floor was installed in Fulham, SW6, giving the space a clean and practical update. Our installers carried out the work with precise board placement, tidy edges, and careful finishing for a durable, everyday-ready result.

Case studies

Project Overview

This project involved the professional installation of laminate flooring at a property in Fulham, SW6. The client required a quality floor that would stand up to daily use and complement their interior. Our fitting team assessed the subfloor condition, carried out any necessary preparation work, and fitted the new floor to a high standard.

Before the Work

Prior to installation, the existing floor covering was inspected and the subfloor was prepared to ensure it was flat, dry, and suitable for the new laminate. Any existing floor covering was lifted and disposed of cleanly before the fitting work began.

Survey photos showing the floor condition before work:

Floor condition before work at SW6 Floor condition before work at SW6 Floor condition before work at SW6

Our Approach

The following services were carried out as part of this project:

  • Beading Installation (incl. materials)
  • Doors Plus Frame Trimming (per door)
  • Laminate Floor Installation
  • Lift & Dispose Carpets or Laminates
  • Thresholds & Fitting (inc. materials)
  • Duralay Timbermate Excel Silver Wood Floor & Laminate Underlay
  • QuickStep ELIGNA Natural Varnished Oak Laminate Flooring 8 mm

The Result

The completed laminate installation looked clean and finished throughout. Joins are tight, edges are neat, and the floor sits flat and stable. Beading and threshold strips were fitted where required to complete the job properly. The client was pleased with both the quality of the work and the appearance of the new floor.

Photos of the completed work:

Laminate floor after fitting work in SW6 Laminate floor after fitting work in SW6 Laminate floor after fitting work in SW6

Frequently Asked Questions

How long does laminate installation take?
Most fitting jobs are completed within one to two days. Larger areas or more detailed layouts such as herringbone patterns take longer due to the additional cutting and positioning involved.

Do I need underlay?
Yes, underlay is required for most floor types and helps with insulation, sound deadening, and levelling minor subfloor imperfections. We can supply and fit appropriate underlay as part of the installation.

How much does floor fitting cost in London?
Fitting costs typically range from £35 to £60 per square metre depending on floor type and complexity. We provide a full written quote before starting any work.

Have a similar project? Call us on 020 88309782 or Book a Free Site Visit

Close
5  |   Greenwich  |   August 2020

A new engineered wood floor was installed in Greenwich, SE10, giving the property a stylish and practical upgrade. Our fitters completed the work with accurate board placement, neat edges, and careful finishing throughout for a durable result.

Case studies

Project Overview

This project involved the professional installation of engineered wood flooring at a property in Greenwich, SE10. The client required a quality floor that would stand up to daily use and complement their interior. Our fitting team assessed the subfloor condition, carried out any necessary preparation work, and fitted the new floor to a high standard.

Before the Work

Prior to installation, the existing floor covering was inspected and the subfloor was prepared to ensure it was flat, dry, and suitable for the new engineered wood. Any existing floor covering was lifted and disposed of cleanly before the fitting work began.

Survey photos showing the floor condition before work:

Floor condition before work at SE10 Floor condition before work at SE10 Floor condition before work at SE10

Our Approach

The following services were carried out as part of this project:

  • Door Frame Trimming
  • Engineered Flooring Installation
  • Thresholds & Fitting (inc. materials)

The Result

The completed engineered wood installation looked clean and finished throughout. Joins are tight, edges are neat, and the floor sits flat and stable. Beading and threshold strips were fitted where required to complete the job properly. The client was pleased with both the quality of the work and the appearance of the new floor.

Photos of the completed work:

Engineered Wood floor after fitting work in SE10 Engineered Wood floor after fitting work in SE10 Engineered Wood floor after fitting work in SE10

Frequently Asked Questions

How long does engineered wood installation take?
Most fitting jobs are completed within one to two days. Larger areas or more detailed layouts such as herringbone patterns take longer due to the additional cutting and positioning involved.

Do I need underlay?
Yes, underlay is required for most floor types and helps with insulation, sound deadening, and levelling minor subfloor imperfections. We can supply and fit appropriate underlay as part of the installation.

How much does floor fitting cost in London?
Fitting costs typically range from £35 to £60 per square metre depending on floor type and complexity. We provide a full written quote before starting any work.

Have a similar project? Call us on 020 88309782 or Book a Free Site Visit

Close
7  |   North Finchley  |   July 2020

It’s easy to understand why so many people are in love with the contemporary beauty and amazing durability and functionality of engineered wood flooring. Check out this recent engineered wood floor installation we have finished in North Finchley.

Case studies
  • Engineered wood floor fitting in North Finchley 6
  • Engineered wood floor fitting in North Finchley
  • Engineered wood floor fitting in North Finchley 1
  • Engineered wood floor fitting in North Finchley 2
  • Engineered wood floor fitting in North Finchley 3
  • Engineered wood floor fitting in North Finchley 4
  • Engineered wood floor fitting in North Finchley 5

Subfloor preparation before engineered wood floor fitting in North Finchley Existing floor lifted and subfloor inspected prior to engineered wood installation

Project Overview

This engineered wood floor fitting project took place at a detached house in North Finchley, North London. The client was upgrading from a worn fitted carpet in their living room and dining room and wanted a real wood floor that would be durable, easy to maintain, and suitable for a home with young children and a dog. Engineered wood was the right choice on all counts. It has a genuine hardwood surface layer, is more stable than solid wood, and can handle the humidity and temperature variation that comes with a busy family home. For a professional supply and fit, engineered wood floor installation in London generally runs between £35 and £60 per square metre.

The Challenge

The two rooms shared a doorway, and getting the boards to run continuously through both spaces without a threshold strip at the door was something the client specifically wanted. This required careful planning of the board layout from the start, as the run direction had to work visually in both rooms simultaneously. The subfloor was a combination of chipboard sheets over joists, and one section near the bay window had developed some bounce that needed to be addressed before fitting. A bouncy subfloor puts stress on click joints and can cause boards to pop apart over time if not sorted at the outset.

Our Approach

  1. Carpet removal: We lifted and removed the existing carpets, gripper rods, and underlay from both rooms, disposing of all waste off-site.
  2. Subfloor inspection and repair: The chipboard was checked for movement, squeaks, and high spots. Two boards near the bay window were screwed back down firmly to eliminate the bounce, and a couple of raised edges were planed flat.
  3. Acclimatisation: The engineered boards were left flat in the rooms for 48 hours before fitting to allow them to adjust to the temperature and humidity of the space. Skipping this step is a common cause of gapping or cupping after installation.
  4. Underlay: A high-quality foam underlay with a built-in damp-proof membrane was laid in both rooms, overlapping at seams and taped securely.
  5. Fitting: The boards were installed using a floating click system, laid in a staggered pattern for structural strength. The run direction was planned to pass through the doorway without interruption, giving the open-plan feel the client was after.
  6. Finishing: Expansion gaps were covered with matching skirting boards, and any door frames that needed undercutting for clearance were dealt with cleanly so the boards tucked underneath rather than butting up against them.

Completed engineered wood floor installation in North Finchley living room

The Result

The finished floor looked excellent. The boards ran cleanly through both rooms without any interruption at the doorway, which made the space feel larger and more connected. The engineered oak chosen had a brushed natural finish that worked well with the existing furniture and decor. The client was pleased with how practical it already felt, noting that marks from the dog could be wiped off instantly, which was not the case with the old carpet. Engineered wood installed over a well-prepared subfloor and maintained correctly should last 25 to 30 years before any remedial work is needed.

Frequently Asked Questions

Does engineered wood flooring need to acclimatise before fitting?

Yes. Engineered boards should be left flat in the room where they will be fitted for at least 48 hours before installation. This allows the wood to adjust to the ambient temperature and humidity and reduces the risk of post-installation gapping or warping caused by boards that go in at a different moisture content from the room environment.

Can engineered wood be fitted over underfloor heating?

Most engineered wood products are compatible with underfloor heating, making them a much better choice than solid wood in these situations. The key is to ensure the surface temperature does not exceed 27 degrees Celsius and that the system is ramped up and down gradually rather than switched on at full power in a cold room. Always check the specific product's guidelines before installation.

What is the difference between floating and glued engineered wood fitting?

Floating fitting means the boards click together and rest on the underlay without being fixed to the subfloor. It is quick, allows some movement, and can be taken up if needed. Gluing the boards down is more permanent and reduces any residual movement or sound, but is harder to reverse. For most domestic projects over a chipboard or concrete subfloor, floating fitting is perfectly adequate.

Have a similar project? Call us on 020 88309782 or Book a Free Site Visit

Close
14  |   West Ealing  |   July 2020

Modern Mosaic Oak Flooring comes in easy-to-install panels with a pre-assembled parquet pattern, which cuts the installation time significantly. With this type of flooring, you can achieve truly amazing results like the ones of this West Ealing project.

Case studies
  • Mosaic oak parquet flooring installation, sanding and lacquering in West Ealing 13
  • Mosaic oak parquet flooring installation, sanding and lacquering in West Ealing
  • Mosaic oak parquet flooring installation, sanding and lacquering in West Ealing 1
  • Mosaic oak parquet flooring installation, sanding and lacquering in West Ealing 2
  • Mosaic oak parquet flooring installation, sanding and lacquering in West Ealing 3
  • Mosaic oak parquet flooring installation, sanding and lacquering in West Ealing 4
  • Mosaic oak parquet flooring installation, sanding and lacquering in West Ealing 5
  • Mosaic oak parquet flooring installation, sanding and lacquering in West Ealing 6
  • Mosaic oak parquet flooring installation, sanding and lacquering in West Ealing 7
  • Mosaic oak parquet flooring installation, sanding and lacquering in West Ealing 8
  • Mosaic oak parquet flooring installation, sanding and lacquering in West Ealing 9
  • Mosaic oak parquet flooring installation, sanding and lacquering in West Ealing 10
  • Mosaic oak parquet flooring installation, sanding and lacquering in West Ealing 11
  • Mosaic oak parquet flooring installation, sanding and lacquering in West Ealing 12

Room before mosaic oak parquet installation in West Ealing Subfloor preparation stage prior to mosaic parquet fitting

Project Overview

This project in West Ealing involved the supply, fitting, sanding, and lacquering of modern mosaic oak parquet flooring in a ground-floor reception room. The client wanted the classic look of a traditional herringbone parquet floor but had a budget that made individual block laying impractical. Mosaic oak finger panels offered the perfect answer. These panels come with a pre-arranged parquet pattern already assembled on a backing, which cuts the installation time significantly compared to laying individual blocks. The result is visually indistinguishable from a traditionally laid parquet floor once sanded and finished. Mosaic parquet installation with finishing typically falls in the £70 to £100 per square metre range.

The Challenge

The main challenge with mosaic parquet panels is that the backing material needs to be completely removed before sanding can begin. The panels arrive glued to a hessian or paper backing for ease of installation, but this backing must be fully stripped and the adhesive residue removed to get a true, consistent sand across the surface. Any residue left on the surface will clog sanding belts and prevent the finish from bonding properly. In addition, the panels had to be laid so that the finger pattern aligned correctly across the full width of the room. Getting this layout right at the start is critical because any misalignment is very obvious once the floor is finished.

Our Approach

  1. Subfloor preparation: We removed the existing floor covering and prepared the subfloor, ensuring it was clean, flat, and dry. Any high spots were sanded back and low areas were filled with a levelling compound.
  2. Layout planning: We dry-laid the first few rows across the room to establish the correct alignment and confirm the panel orientation before any adhesive was applied.
  3. Panel fitting: The panels were glued down using a flexible floor adhesive, working from the centre of the room out to the walls. The backing was pressed firmly into the adhesive and any air pockets worked out before the adhesive set.
  4. Backing removal: Once the adhesive had cured, we dampened the backing with water and carefully peeled it away. Any remaining adhesive residue was scraped and sanded off before the main sanding run began.
  5. Sanding: The surface was sanded diagonally in two directions, as with traditional herringbone parquet, progressing through coarse, medium, and fine grits to achieve a flat, smooth result. Edge work was completed with a detail sander and hand tools in tight corners.
  6. Lacquering: Three coats of a hard gloss lacquer were applied, with light sanding between coats. A stain was applied before the final coat to give the oak a richer, warmer tone that the client preferred over the natural pale colour of the raw wood.

Finished mosaic oak parquet floor after sanding and lacquering in West Ealing

The Result

The finished floor looked exactly like a traditional parquet installation. The pattern was sharp, the surface smooth, and the stained lacquer gave the oak a warm, amber depth that complemented the period feel of the room. The client was genuinely surprised at how authentic it looked compared to the raw panels they had seen before fitting. This is a floor that will hold up well in a family home and, being solid oak at the surface, can be re-sanded and refinished in the future should it ever need attention.

Frequently Asked Questions

What is mosaic oak parquet and how does it differ from traditional parquet?

Mosaic parquet uses small oak finger blocks pre-assembled on a backing panel. Traditional parquet involves each block being laid individually. The visual result is essentially the same. Mosaic panels install faster and at lower labour cost, making the classic parquet look accessible at a more reasonable price point.

Can mosaic oak parquet be sanded and refinished like a standard parquet floor?

Yes. Once the backing has been removed and the floor is sanded and finished, it behaves exactly like any other solid wood parquet floor. It can be re-sanded and refinished multiple times over its lifespan.

What finish works best on mosaic oak parquet?

Lacquer is the most popular choice because it is hard-wearing and easy to clean. If you prefer a more natural look, a hardwax oil is a good alternative, though it requires more frequent maintenance. Staining before the final coat allows the colour of the floor to be adjusted to suit your interior.

Have a similar project? Call us on 020 88309782 or Book a Free Site Visit

Close

  • 1
  • 2
  • 3
  • 4
  • 5
  • 6
  • 7
  • 8
  • 9
  • 10
  • 11
  • 12
  • 13
  • 14
  • 15
  • 16
  • 17
  • 18
  • 19
  • 20
  • 21
  • 22
  • 23
  • 24

Have a similar project?

Call us on 020 88309782 or book a free site visit

Book Free Site Visit

Our Flooring Company

Contacts & Showroom Book Free Site Survey About Our Flooring Company Join Our Team Work as a Contractor

Service Information

Terms of Service Terms of Sales Deliveries & Charges Cookie Settings Returns Policy Privacy Policy

Help

FAQs Case Studies Sitemap Glossary
𝕏
FlooringFirst! Services
158 Coles Green Road
London, NW2 7HW
T: 020 88309782
Floor Sanding Services: Central London, East London, Near London, North London, Northwest London, Southeast London, Southwest London, West London
Wood Floor Installation Service: Central London, East London, Near London, North London, Northwest London, Southeast London, Southwest London, West London

  • Flooring Services
  • Floor Sanding
    • Wood Floor Staining
    • Wood Floor Gap Filling
    • Commercial Floor Sanding
    • Engineered Floor Sanding & Refinishing
  • Wood Floor Fitting
    • Parquet Floor Installation
    • Laminate Floor Installation
    • Engineered Wood Floor Installation - Supply & Fit
    • Solid Wood Floor Fitting - Supply & Fit
    • LVT Floor Installation - Supply & Fit
  • Floor Repairs
    • Parquet Floor Repair and Restoration
    • Engineered Wood Floor Repairs
    • Wood Floor Scratch Repair
    • Floorboards Replacement
  • Care & Maintenance
    • Re-Oiling & Recoating Oiled Floors
    • Vinyl & Linoleum Cleaning
    • Hardwood Floor Buffing
    • Wood Floor Polishing
  • Shop
  • Shop
  • Gallery
  • Service Guide
  • Bookings
  • Book Free Survey
  • Service Advice
  • Product Advice