Floor Sanding & Fitting
Book Free Visit Price Guide 020 88309782
Monday - Friday 07:30 - 17:30, Saturday 07:30 - 16:00
cs@flooringfirst.co.uk
020 88309782
Monday - Friday 07:30 - 17:30, Saturday 07:30 - 16:00
cs@flooringfirst.co.uk
  • Book Free Visit
  • Home
  • Floor Sanding
  • Floor Fitting
  • Floor Repairs
  • Aftercare
    • Wooden Floors
    • Cleaning & Polishing
    • Re-Oiling Wooden Floors
    • Vinyls & Linoleum
    • Vinyl Floor Polishing
    • Get a Quote...
  • For Businesses
  • Gallery
  • Service Guide
  • Shop
  • Book Free Visit

See Few Examples of Our Works

Floor Sanding, Solid, Parquet & Laminate Floor Fitting

Gallery

See Our Floor Works

WHY CHOOSE US
CASE STUDIES
PRICE GUIDE
OFFERS
GALLERY
ASK EXPERT
WHY CHOOSE US
CASE STUDIES
PRICE GUIDE
OFFERS
GALLERY
ASK EXPERT

Floor Sanding & Fitting Project Gallery

All Projects Renovations Installations

2  |   Holborn  |   March 2021

A new parquet floor was installed in Holborn, EC1M, adding character and style to the space. The work was carried out with precise block placement, tidy edges, and careful finishing for a durable, well-balanced result.

Case studies

Project Overview

This project involved the professional installation of parquet flooring at a property in Holborn, EC1M. The client required a quality floor that would stand up to daily use and complement their interior. Our fitting team assessed the subfloor condition, carried out any necessary preparation work, and fitted the new floor to a high standard.

Before the Work

Prior to installation, the existing floor covering was inspected and the subfloor was prepared to ensure it was flat, dry, and suitable for the new parquet. Any existing floor covering was lifted and disposed of cleanly before the fitting work began.

Our Approach

The following services were carried out as part of this project:

  • Congestion & ULEZ Charge ( per day)
  • Engineered Parquet Flooring Installation ( single border) 28sqm

The Result

The completed parquet installation looked clean and finished throughout. Joins are tight, edges are neat, and the floor sits flat and stable. Beading and threshold strips were fitted where required to complete the job properly. The client was pleased with both the quality of the work and the appearance of the new floor.

Photos of the completed work:

Parquet floor after fitting work in EC1M Parquet floor after fitting work in EC1M Parquet floor after fitting work in EC1M

Frequently Asked Questions

How long does parquet installation take?
Most fitting jobs are completed within one to two days. Larger areas or more detailed layouts such as herringbone patterns take longer due to the additional cutting and positioning involved.

Do I need underlay?
Yes, underlay is required for most floor types and helps with insulation, sound deadening, and levelling minor subfloor imperfections. We can supply and fit appropriate underlay as part of the installation.

How much does floor fitting cost in London?
Fitting costs typically range from £70 to £100 per square metre depending on floor type and complexity. We provide a full written quote before starting any work.

Have a similar project? Call us on 020 88309782 or Book a Free Site Visit

Close
4  |   Walthamstow  |   March 2021

A new engineered wood floor was installed in Walthamstow, E17, providing a smart and practical upgrade to the property. The installation was completed with accurate board placement, tidy edges, and careful finishing for a durable, well-balanced result.

Case studies

Project Overview

This project involved the professional installation of engineered wood flooring at a property in Walthamstow, E17. The client required a quality floor that would stand up to daily use and complement their interior. Our fitting team assessed the subfloor condition, carried out any necessary preparation work, and fitted the new floor to a high standard.

Before the Work

Prior to installation, the existing floor covering was inspected and the subfloor was prepared to ensure it was flat, dry, and suitable for the new engineered wood. Any existing floor covering was lifted and disposed of cleanly before the fitting work began.

Survey photos showing the floor condition before work:

Floor condition before work at E17 Floor condition before work at E17 Floor condition before work at E17

Our Approach

The following services were carried out as part of this project:

  • Beading Installation (incl. materials)
  • Door Frame Trimming
  • Doors Plus Frame Trimming (per door)
  • Engineered Flooring Installation
  • Furniture Moving
  • Skirting Board Removal
  • Skirting Boards Installation (incl. materials)
  • Thresholds & Fitting (inc. materials)

The Result

The completed engineered wood installation looked clean and finished throughout. Joins are tight, edges are neat, and the floor sits flat and stable. Beading and threshold strips were fitted where required to complete the job properly. The client was pleased with both the quality of the work and the appearance of the new floor.

Photos of the completed work:

Engineered Wood floor after fitting work in E17 Engineered Wood floor after fitting work in E17 Engineered Wood floor after fitting work in E17

Frequently Asked Questions

How long does engineered wood installation take?
Most fitting jobs are completed within one to two days. Larger areas or more detailed layouts such as herringbone patterns take longer due to the additional cutting and positioning involved.

Do I need underlay?
Yes, underlay is required for most floor types and helps with insulation, sound deadening, and levelling minor subfloor imperfections. We can supply and fit appropriate underlay as part of the installation.

How much does floor fitting cost in London?
Fitting costs typically range from £35 to £60 per square metre depending on floor type and complexity. We provide a full written quote before starting any work.

Have a similar project? Call us on 020 88309782 or Book a Free Site Visit

Close
3  |   March 2021

A new engineered wood floor was installed in Berkhamsted, HP4, bringing a stylish and practical upgrade to the property. The installation was completed with accurate board placement, neat edges, and careful finishing throughout for a durable, well-balanced result.

Case studies

Project Overview

This project involved the professional installation of engineered wood flooring at a property in Berkhamsted, HP4. The client required a quality floor that would stand up to daily use and complement their interior. Our fitting team assessed the subfloor condition, carried out any necessary preparation work, and fitted the new floor to a high standard.

Before the Work

Prior to installation, the existing floor covering was inspected and the subfloor was prepared to ensure it was flat, dry, and suitable for the new engineered wood. Any existing floor covering was lifted and disposed of cleanly before the fitting work began.

Survey photos showing the floor condition before work:

Floor condition before work at HP4 Floor condition before work at HP4 Floor condition before work at HP4

Our Approach

The following services were carried out as part of this project:

  • Beading Installation (incl. materials)
  • Doors Plus Frame Trimming (per door)
  • Engineered Flooring Installation
  • Lift & Dispose Carpets or Laminates
  • Thresholds & Fitting (inc. materials)
  • Duralay Timbermate Excel Silver Wood Floor & Laminate Underlay

The Result

The completed engineered wood installation looked clean and finished throughout. Joins are tight, edges are neat, and the floor sits flat and stable. Beading and threshold strips were fitted where required to complete the job properly. The client was pleased with both the quality of the work and the appearance of the new floor.

Photos of the completed work:

Engineered Wood floor after fitting work in HP4 Engineered Wood floor after fitting work in HP4 Engineered Wood floor after fitting work in HP4

Frequently Asked Questions

How long does engineered wood installation take?
Most fitting jobs are completed within one to two days. Larger areas or more detailed layouts such as herringbone patterns take longer due to the additional cutting and positioning involved.

Do I need underlay?
Yes, underlay is required for most floor types and helps with insulation, sound deadening, and levelling minor subfloor imperfections. We can supply and fit appropriate underlay as part of the installation.

How much does floor fitting cost in London?
Fitting costs typically range from £35 to £60 per square metre depending on floor type and complexity. We provide a full written quote before starting any work.

Have a similar project? Call us on 020 88309782 or Book a Free Site Visit

Close
10  |   Walthamstow  |   March 2021

Our engineered wood floor installation team is trained in the latest methods for fitting this advanced and beneficial type of real wood flooring. Check out the stunning results they have achieved at the end of this engineered floor fitting project we have recently undertaken in Walthamstow.

Case studies
  • Engineered flooring and accessories installation in Walthamstow 9
  • Engineered flooring and accessories installation in Walthamstow
  • Engineered flooring and accessories installation in Walthamstow 1
  • Engineered flooring and accessories installation in Walthamstow 2
  • Engineered flooring and accessories installation in Walthamstow 3
  • Engineered flooring and accessories installation in Walthamstow 4
  • Engineered flooring and accessories installation in Walthamstow 5
  • Engineered flooring and accessories installation in Walthamstow 6
  • Engineered flooring and accessories installation in Walthamstow 7
  • Engineered flooring and accessories installation in Walthamstow 8

Project Overview

This Walthamstow property needed a new floor fitted across the ground floor, with the client choosing engineered wood as the preferred option. The installation included all floor accessories, beading and threshold strips to complete the finish throughout. The client had chosen their board specification in advance and wanted a clean, straightforward installation with minimal disruption.

Subfloor preparation before engineered flooring installation in Walthamstow

The Challenge

The subfloor in this property had a slight variation in level across the room, which is common in older London terraces. Before any boards go down, the subfloor must be within the manufacturer's tolerance for levelness, otherwise boards will flex, joints will open, and the floor will develop a hollow sound underfoot. There was also a question about the best installation method given the layout of the space and the direction of natural light, which affects how the grain of the boards reads in a finished room.

Engineered boards before laying, Walthamstow

Our Approach

Subfloor Preparation

We started with a full inspection and measurement of the subfloor. Where the level was outside tolerance, we used a self-levelling compound to bring the surface into an acceptable range before any boarding work began. This step takes time but is what separates a floor that stays flat and tight over years from one that starts showing problems within months.

Acclimatisation

The engineered boards were left in the property for the recommended period before fitting. Engineered wood is more stable than solid hardwood, but it still responds to the temperature and humidity of the space it will be installed in. Skipping this step is a common cause of gaps appearing after fitting.

Engineered flooring installation in progress, Walthamstow

Board Installation

The boards were fitted using a floating method, which is well suited to this type of subfloor and allows the floor to move slightly with seasonal changes in the home environment. We worked from the most visible wall, keeping the layout symmetrical and the board direction aligned to the length of the room. Expansion gaps were maintained at all perimeters.

Finishing and Accessories

Once all boards were down, we fitted skirting beading to cover the expansion gaps and installed threshold strips at all doorways and transitions. These finishing details are what make the installation look complete and professional rather than rushed.

The Result

The finished floor runs cleanly through the ground floor of the property, with all accessories neatly fitted and consistent throughout. The client was happy with the layout decision and the way the boards read in the natural light of the space. Engineered floor fitting in London is typically priced between £35 and £60 per square metre for supply and fit, depending on the board specification and the condition of the existing subfloor.

Frequently Asked Questions

How long does engineered floor fitting take for a ground floor?
For a typical two to three room ground floor in a London terrace, fitting usually takes one to two days, depending on the complexity of the layout and the amount of subfloor preparation needed. Larger areas or more complicated layouts will take longer.

Can engineered flooring be sanded and refinished?
Yes, most engineered boards have a wear layer thick enough to be lightly sanded and refinished at least once during their lifetime. The number of times depends on the thickness of the veneer layer, which varies between products. We can advise on this when specifying the boards.

Is engineered wood suitable for properties with underfloor heating?
Engineered wood is one of the best options for use over underfloor heating. Its layered construction gives it much greater dimensional stability than solid wood when exposed to the heat cycles of a UFH system. We check the specific product compatibility and maximum temperature tolerances for each installation.

Have a similar project? Call us on 020 88309782 or Book a Free Site Visit

Close
13  |   Streatham Hill  |   March 2021

Check out this recent laminate fitting project in Streatham Hill and tell us – can you even tell any difference or does high-quality laminate really look like real wood floor?

Case studies
  • QuickStep Impressive Ultra Classic Oak Natural laminate flooring installation in Streatham Hill 11
  • QuickStep Impressive Ultra Classic Oak Natural laminate flooring installation in Streatham Hill, SW16
  • QuickStep Impressive Ultra Classic Oak Natural laminate flooring installation in Streatham Hill 1
  • QuickStep Impressive Ultra Classic Oak Natural laminate flooring installation in Streatham Hill 2
  • QuickStep Impressive Ultra Classic Oak Natural laminate flooring installation in Streatham Hill 3
  • QuickStep Impressive Ultra Classic Oak Natural laminate flooring installation in Streatham Hill 4
  • QuickStep Impressive Ultra Classic Oak Natural laminate flooring installation in Streatham Hill 5
  • QuickStep Impressive Ultra Classic Oak Natural laminate flooring installation in Streatham Hill 6
  • QuickStep Impressive Ultra Classic Oak Natural laminate flooring installation in Streatham Hill 7
  • QuickStep Impressive Ultra Classic Oak Natural laminate flooring installation in Streatham Hill 8
  • QuickStep Impressive Ultra Classic Oak Natural laminate flooring installation in Streatham Hill 9
  • QuickStep Impressive Ultra Classic Oak Natural laminate flooring installation in Streatham Hill 10
  • QuickStep Impressive Ultra Classic Oak Natural laminate flooring installation in Streatham Hill 12

Project Overview

The client at this Streatham Hill SW16 property had selected QuickStep Impressive Ultra Classic Oak Natural laminate flooring and needed it fitted throughout the ground floor. QuickStep Impressive Ultra is one of the better-performing laminate products on the market, with a realistic wood texture and a scratch-resistant surface layer. The installation covered the living room, hallway, and a connecting dining area.

Subfloor before laminate installation in Streatham Hill SW16

The Challenge

The main challenge on this project was the subfloor condition. The property had an older concrete screed base in the hallway and a timber subfloor in the living and dining areas, which meant we were dealing with two different subfloor types in a continuous installation. These different surfaces behave slightly differently, and getting the joint between them right, with consistent levelness on both sides, required careful preparation work before any boards went down. There was also a slight damp reading in one section of the concrete subfloor, which needed addressing before fitting to avoid any issues with the boards over time.

QuickStep Impressive Ultra boards ready for fitting, Streatham Hill

Our Approach

Subfloor Preparation

The concrete areas were checked with a damp meter and treated with a damp-proof membrane where the readings were above the acceptable threshold. Both the concrete and the timber subfloor sections were levelled to within the tolerance required by the QuickStep installation guidelines. Getting this right before the boards go down prevents movement, hollow spots, and joint separation later.

Underlayment

A foam underlayment with built-in vapour barrier was laid across the full floor area. This provides additional sound insulation, a slight cushion underfoot, and a secondary barrier against any residual moisture from the subfloor below.

Laminate flooring installation in progress, Streatham Hill SW16

Board Installation

The boards were fitted using a floating click system, which is the standard installation method for QuickStep Impressive Ultra. We planned the layout to avoid having very narrow cuts at either side of the room and aligned the boards with the main light source to make the most of the grain texture. Expansion gaps were maintained at all walls and fixed elements throughout.

Finishing

All expansion gaps were covered with matching QuickStep beading and threshold strips. The finish details at doorways were given particular attention, as these transitions are where a laminate installation most often looks unfinished if not done carefully.

The Result

The finished floor runs cleanly throughout the ground floor, with a consistent look across both subfloor types. The QuickStep boards have a natural, realistic texture that suits the property well. The client was happy with the result and the level of disruption, which was kept to a single working day for the fitting itself. Laminate floor fitting typically costs between £35 and £55 per square metre for supply and fit of a mid-range product.

Frequently Asked Questions

How does QuickStep Impressive Ultra compare to cheaper laminate products?
The main differences are in the surface texture, wear layer thickness, and the quality of the click joint. Impressive Ultra has a more realistic embossed texture that closely matches the feel of real wood, a thicker wear layer for greater scratch resistance, and a tighter joint that is less prone to movement or separation over time. It is worth the higher cost in a high-traffic area.

Can laminate flooring be repaired if individual boards are damaged?
On a floating installation, individual boards can be replaced without lifting the whole floor, as long as you have spare boards of the same product. This is one of the advantages of a click-fit floating floor. We always recommend keeping a small number of spare boards from the original batch for this reason.

Is laminate suitable for a hallway with a front door?
Laminate can work well in a hallway, but the area directly inside a front door is exposed to more moisture and grit than the rest of the floor. A good underlayment, a moisture-resistant laminate product like Impressive Ultra, and sensible use of a door mat will all extend the life of the floor significantly in this area.

Have a similar project? Call us on 020 88309782 or Book a Free Site Visit

Close
6  |   Brent Cross  |   February 2021

A new LVT floor was installed in Brent Cross, NW2, giving the space a clean and practical upgrade. The installation was carried out with accurate fitting, tidy edges, and careful finishing for a durable, everyday-ready result.

Case studies

Project Overview

This project involved the professional installation of vinyl flooring at a property in Brent Cross, NW2. The client required a high-quality floor that would withstand daily use and complement their interior. Our fitting team assessed the subfloor condition, carried out any necessary preparation work, and fitted the new floor to a high standard.

Before the Work

Prior to installation, the existing floor covering was inspected and the subfloor was prepared to ensure it was flat, dry, and suitable for the new vinyl. Any existing floor covering was lifted and disposed of cleanly before the fitting work began.

Survey photos showing the floor condition before work:

Floor condition before work at NW2 Floor condition before work at NW2 Floor condition before work at NW2

Our Approach

The following services were carried out as part of this project:

  • Door Frame Trimming
  • Vinyl Installation
  • Subfloor Floorboards refitting ( if required ) per linear meter

The Result

The completed vinyl installation looked clean and finished throughout. Joins are tight, edges are neat, and the floor sits flat and stable. Beading and threshold strips were fitted where required to complete the job properly. The client was pleased with both the quality of the work and the appearance of the new floor.

Photos of the completed work:

Vinyl floor after fitting work in NW2 Vinyl floor after fitting work in NW2 Vinyl floor after fitting work in NW2

Frequently Asked Questions

How long does vinyl installation take?
Most fitting jobs are completed within one to two days. Larger areas or more detailed layouts such as herringbone patterns take longer due to the additional cutting and positioning involved.

Do I need underlay?
Yes, underlay is required for most floor types and helps with insulation, sound deadening, and levelling minor subfloor imperfections. We can supply and fit appropriate underlay as part of the installation.

How much does floor fitting cost in London?
Fitting costs typically range from £35 to £60 per square metre depending on floor type and complexity. We provide a full written quote before starting any work.

Have a similar project? Call us on 020 88309782 or Book a Free Site Visit

Close
6  |   Streatham  |   February 2021

An existing floor in Streatham, SW16 was replaced with newly installed laminate flooring, giving the space a fresh and practical update. The installation was carried out with precise board placement, tidy edges, and careful finishing to achieve a durable, well-balanced result.

Case studies

Project Overview

This project involved the professional installation of laminate flooring at a property in Streatham, SW16. The client required a quality floor that would stand up to daily use and complement their interior. Our fitting team assessed the subfloor condition, carried out any necessary preparation work, and fitted the new floor to a high standard.

Before the Work

Prior to installation, the existing floor covering was inspected and the subfloor was prepared to ensure it was flat, dry, and suitable for the new laminate. Any existing floor covering was lifted and disposed of cleanly before the fitting work began.

Survey photos showing the floor condition before work:

Floor condition before work at SW16 Floor condition before work at SW16 Floor condition before work at SW16

Our Approach

The following services were carried out as part of this project:

  • Beading Installation (incl. materials)
  • Door Frame Trimming
  • Furniture Moving
  • Laminate Floor Installation
  • Lift & Dispose Carpets/ Flooring

The Result

The completed laminate installation looked clean and finished throughout. Joins are tight, edges are neat, and the floor sits flat and stable. Beading and threshold strips were fitted where required to complete the job properly. The client was pleased with both the quality of the work and the appearance of the new floor.

Photos of the completed work:

Laminate floor after fitting work in SW16 Laminate floor after fitting work in SW16 Laminate floor after fitting work in SW16

Frequently Asked Questions

How long does laminate installation take?
Most fitting jobs are completed within one to two days. Larger areas or more detailed layouts such as herringbone patterns take longer due to the additional cutting and positioning involved.

Do I need underlay?
Yes, underlay is required for most floor types and helps with insulation, sound deadening, and levelling minor subfloor imperfections. We can supply and fit appropriate underlay as part of the installation.

How much does floor fitting cost in London?
Fitting costs typically range from £35 to £60 per square metre depending on floor type and complexity. We provide a full written quote before starting any work.

Have a similar project? Call us on 020 88309782 or Book a Free Site Visit

Close
14  |   Clapton  |   February 2021

A complete makeover of your home can start with a wood floor installation, repair, and renovation project. A new oak wood floor will add so much beauty and comfort to your home, while taking care of the existing wooden floor will improve its quality, like the results we’ve achieved with this Clapton project.

Case studies
  • Oak parquet floor installation, sanding and refinishing in Clapton, E5 12
  • Oak parquet floor installation, sanding and refinishing in Clapton, E5
  • Oak parquet floor installation, sanding and refinishing in Clapton, E5 1
  • Oak parquet floor installation, sanding and refinishing in Clapton, E5 2
  • Oak parquet floor installation, sanding and refinishing in Clapton, E5 3
  • Oak parquet floor installation, sanding and refinishing in Clapton, E5 4
  • Oak parquet floor installation, sanding and refinishing in Clapton, E5 5
  • Oak parquet floor installation, sanding and refinishing in Clapton, E5 6
  • Oak parquet floor installation, sanding and refinishing in Clapton, E5 7
  • Oak parquet floor installation, sanding and refinishing in Clapton, E5 8
  • Oak parquet floor installation, sanding and refinishing in Clapton, E5 9
  • Oak parquet floor installation, sanding and refinishing in Clapton, E5 10
  • Oak parquet floor installation, sanding and refinishing in Clapton, E5 11
  • Oak parquet floor installation, sanding and refinishing in Clapton, E5 13

Project Overview

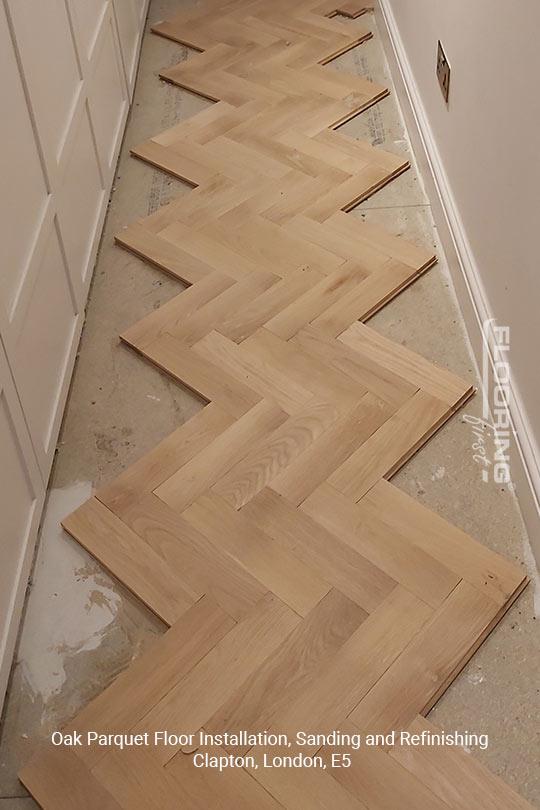
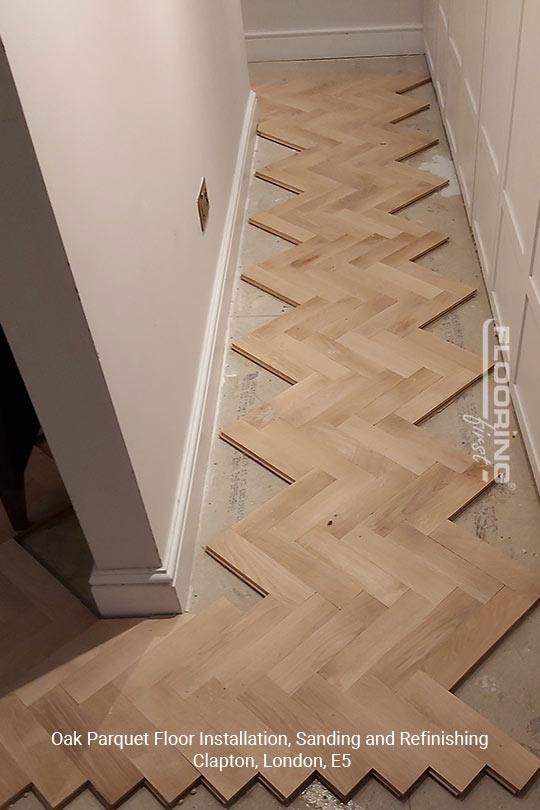
This Clapton E5 project combined a new oak parquet floor installation with full sanding and refinishing of the laid floor. The client was having a new herringbone parquet floor put down in the main ground floor reception room, and wanted the installation, sanding, and finishing all handled as a single project. Oak parquet blocks were specified, laid in the traditional herringbone pattern, then sanded and finished to a natural lacquer once the adhesive had fully cured.

Subfloor preparation before parquet installation in Clapton E5

The Challenge

Installing and then sanding a new parquet floor involves careful sequencing. The blocks must be fully bonded to the subfloor before any sanding takes place, otherwise the sanding process can lift blocks or cause them to move and leave gaps. The adhesive cure time needs to be respected rather than rushed, which means the project takes longer than either installation or sanding alone. The subfloor in this property also needed plywood overlay work to bring it up to the flatness required for a glued parquet installation. Parquet is far less forgiving of subfloor irregularities than a floating engineered board, so this preparation stage could not be skipped.

Oak parquet blocks before installation, Clapton

Our Approach

Subfloor Preparation

We installed a plywood subfloor overlay across the full room, secured and flat, to provide the base needed for a glued parquet installation. The surface was checked with a long straight edge at multiple points to confirm it was within the tolerance required.

Parquet Block Installation

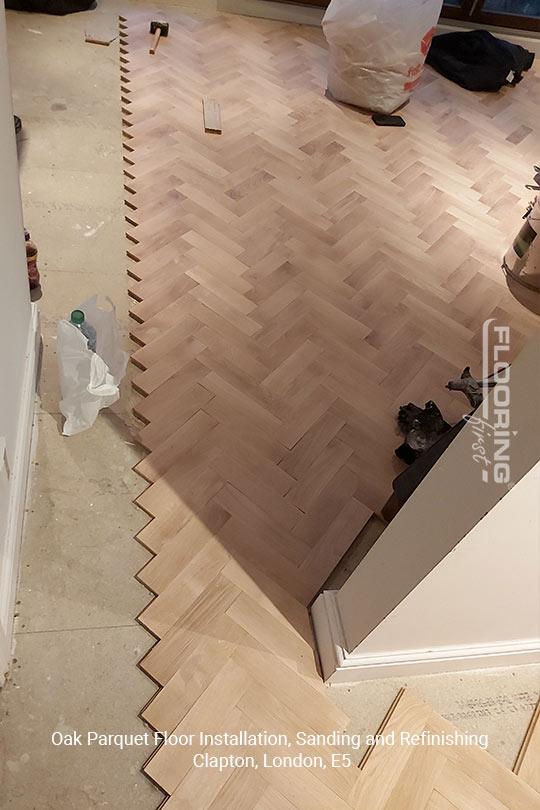
The herringbone pattern was set out from the centre of the room to ensure the pattern sits symmetrically. Oak parquet blocks were bonded to the prepared subfloor using a flexible wood floor adhesive, which provides the bond needed while allowing a small degree of movement as the timber responds to changes in room conditions. The full room was completed before the floor was left to cure.

Parquet floor installation in progress, Clapton E5

Sanding the New Floor

Once the adhesive had fully cured, we sanded the floor following the correct diagonal approach for herringbone parquet. New parquet blocks often have slight height variations between individual pieces, so the initial sanding pass works to level the surface before the finishing passes refine it. The result is a flat, consistent surface across the whole room.

Finishing

A natural-tone hardwearing lacquer was applied in three coats to protect the new oak floor. The finish was chosen to let the natural colour and grain of the oak read clearly without adding any artificial tint.

The Result

The finished herringbone floor is a significant upgrade to the room. The pattern reads well in the space, the oak colour is warm and consistent, and the finish provides good protection for daily use. The client was pleased with the quality of the work and the way the installation was managed as a single cohesive project. Parquet installation and sanding in London typically costs from £70 to £100 per square metre for supply, fit, sand, and finish, reflecting the additional skill and time required compared to a straightforward strip board installation.

Frequently Asked Questions

How long does new parquet adhesive need to cure before sanding?
This depends on the specific adhesive product used, the ambient temperature, and the subfloor conditions. Most wood floor adhesives require a minimum of 24 to 48 hours before sanding can begin, and some two-component adhesives need longer. We always follow the manufacturer's guidance and will not rush this stage.

Is new parquet more expensive than engineered boards?
Parquet installation is generally at the higher end of wood floor pricing because of the additional skill required in laying the pattern, the adhesive bonding process, and the specialist sanding approach. For a herringbone oak parquet installed, sanded, and finished, you can expect to pay from around £70 to £100 per square metre as a guide.

How should a new oak parquet floor be maintained long term?
Regular sweeping and occasional damp mopping with a wood-compatible cleaner is sufficient for day-to-day maintenance. Avoid excess water on the surface. Felt pads under furniture legs prevent scratches. The floor should be refinished when the lacquer shows signs of wear, typically every five to ten years depending on use.

Have a similar project? Call us on 020 88309782 or Book a Free Site Visit

Close
11  |   Willesden  |   February 2021

Vinyl flooring has gone a long way from being tacky and cheap to looking perfect and being extra durable nowadays. Check out the outstanding results you can enjoy if you consider a project like this vinyl flooring installation in Willesden.

Case studies
  • Vinyl flooring installation in Willesden 10
  • Vinyl flooring installation in Willesden
  • Vinyl flooring installation in Willesden 1
  • Vinyl flooring installation in Willesden 2
  • Vinyl flooring installation in Willesden 3
  • Vinyl flooring installation in Willesden 4
  • Vinyl flooring installation in Willesden 5
  • Vinyl flooring installation in Willesden 6
  • Vinyl flooring installation in Willesden 7
  • Vinyl flooring installation in Willesden 8
  • Vinyl flooring installation in Willesden 9

Project Overview

This Willesden property needed new flooring fitted in the kitchen and hallway. The client had chosen luxury vinyl plank flooring, which offers the appearance of real wood with much greater resistance to moisture and heavy use. The existing floor covering was removed as part of the project, the subfloor was prepared, and the new vinyl planks were installed throughout both areas.

Subfloor before vinyl flooring installation in Willesden

The Challenge

The kitchen and hallway in this property presented a couple of practical challenges. First, the existing floor covering had left behind adhesive residue in places, which needed to be removed before a new floor could be laid on top. Second, the transition between the kitchen and hallway had a slight level difference, which needed to be addressed to avoid an obvious bump or lip in the finished floor. Modern luxury vinyl planks are thinner than most other floor types, which means subfloor imperfections can telegraph through to the surface more readily if the base is not properly prepared.

Existing floor before vinyl fitting, Willesden

Our Approach

Removal of Existing Covering and Subfloor Preparation

The old flooring was removed and the subfloor was cleaned down to remove all adhesive residue and debris. The level difference between the two rooms was addressed using a self-levelling compound to create a continuous, flat base. Once the levelling compound had set and been checked, the subfloor was in the condition needed to proceed.

Moisture Assessment

Before installation, we tested for moisture levels in the concrete subfloor. Vinyl planks are highly moisture resistant on their surface, but excess moisture rising through a concrete subfloor can cause adhesion problems or allow mould to develop under the floor if not managed correctly. Readings were within the acceptable range and no additional treatment was required.

Vinyl flooring installation in progress, Willesden

Vinyl Plank Installation

The vinyl planks were installed using a floating click system, which allows the floor to be fitted quickly without adhesive and makes future replacement of individual damaged planks straightforward. The layout was planned to avoid narrow cut pieces at the visible entry points and to run the boards in the direction of the main light source.

Finishing

Matching threshold strips and end trims were fitted at all transitions and doorways to give the installation a clean, finished appearance. Trim details make a significant visual difference to the finished result.

The Result

The finished floor looks clean and consistent across the kitchen and hallway, with a good visual transition between the two spaces. The luxury vinyl plank product chosen gives a convincing wood-look result at a fraction of the cost of real wood, and its performance in a kitchen environment will outlast most alternative options. Vinyl floor fitting is typically one of the more cost-effective flooring options available, generally falling between £35 and £55 per square metre for supply and fit of a mid-grade luxury vinyl product.

Frequently Asked Questions

How does luxury vinyl plank compare to laminate in a kitchen?
The main advantage of vinyl over laminate in a kitchen or any wet area is its full waterproofing. Laminate products, even moisture-resistant ones, can swell or delaminate if they are regularly exposed to water. Luxury vinyl planks are completely waterproof and will handle spills, splashes, and cleaning without any risk of damage.

Can vinyl flooring be fitted over existing tiles?
In most cases, yes. As long as the existing tiles are firmly bonded and the surface is reasonably level, vinyl planks can be fitted directly over the top. This can save the cost and disruption of tile removal. The existing tile surface does need to be checked carefully for any proud grout lines or uneven areas that could show through.

How long does luxury vinyl plank flooring last?
A good quality luxury vinyl plank with a proper wear layer should last fifteen to twenty years or more under normal domestic use. The wear layer thickness is the key specification to check when selecting a product. A 0.3mm wear layer is adequate for light use; 0.5mm or above is recommended for kitchens, hallways, and other high-traffic areas.

Have a similar project? Call us on 020 88309782 or Book a Free Site Visit

Close
4  |   Streatham  |   January 2021

A new engineered wood floor was installed in Streatham, SW16, providing a smart and practical upgrade to the space. The installation was carried out with precise board placement, tidy edges, and careful finishing for a durable, well-balanced result.

Case studies

Project Overview

This project involved the professional installation of engineered wood flooring at a property in Streatham, SW16. The client required a quality floor that would stand up to daily use and complement their interior. Our fitting team assessed the subfloor condition, carried out any necessary preparation work, and fitted the new floor to a high standard.

Before the Work

Prior to installation, the existing floor covering was inspected and the subfloor was prepared to ensure it was flat, dry, and suitable for the new engineered wood. Any existing floor covering was lifted and disposed of cleanly before the fitting work began.

Survey photos showing the floor condition before work:

Floor condition before work at SW16 Floor condition before work at SW16

Our Approach

The following services were carried out as part of this project:

  • Engineered Flooring Installation
  • Subfloor Preparation (SLC)
  • Thresholds & Fitting (inc. materials)

The Result

The completed engineered wood installation looked clean and finished throughout. Joins are tight, edges are neat, and the floor sits flat and stable. Beading and threshold strips were fitted where required to complete the job properly. The client was pleased with both the quality of the work and the appearance of the new floor.

Photos of the completed work:

Engineered Wood floor after fitting work in SW16 Engineered Wood floor after fitting work in SW16 Engineered Wood floor after fitting work in SW16

Frequently Asked Questions

How long does engineered wood installation take?
Most fitting jobs are completed within one to two days. Larger areas or more detailed layouts such as herringbone patterns take longer due to the additional cutting and positioning involved.

Do I need underlay?
Yes, underlay is required for most floor types and helps with insulation, sound deadening, and levelling minor subfloor imperfections. We can supply and fit appropriate underlay as part of the installation.

How much does floor fitting cost in London?
Fitting costs typically range from £35 to £60 per square metre depending on floor type and complexity. We provide a full written quote before starting any work.

Have a similar project? Call us on 020 88309782 or Book a Free Site Visit

Close

  • 1
  • 2
  • 3
  • 4
  • 5
  • 6
  • 7
  • 8
  • 9
  • 10
  • 11
  • 12
  • 13
  • 14
  • 15
  • 16
  • 17
  • 18
  • 19
  • 20
  • 21
  • 22
  • 23
  • 24

Have a similar project?

Call us on 020 88309782 or book a free site visit

Book Free Site Visit

Our Flooring Company

Contacts & Showroom Book Free Site Survey About Our Flooring Company Join Our Team Work as a Contractor

Service Information

Terms of Service Terms of Sales Deliveries & Charges Cookie Settings Returns Policy Privacy Policy

Help

FAQs Case Studies Sitemap Glossary
𝕏
FlooringFirst! Services
158 Coles Green Road
London, NW2 7HW
T: 020 88309782
Floor Sanding Services: Central London, East London, Near London, North London, Northwest London, Southeast London, Southwest London, West London
Wood Floor Installation Service: Central London, East London, Near London, North London, Northwest London, Southeast London, Southwest London, West London

  • Flooring Services
  • Floor Sanding
    • Wood Floor Staining
    • Wood Floor Gap Filling
    • Commercial Floor Sanding
    • Engineered Floor Sanding & Refinishing
  • Wood Floor Fitting
    • Parquet Floor Installation
    • Laminate Floor Installation
    • Engineered Wood Floor Installation - Supply & Fit
    • Solid Wood Floor Fitting - Supply & Fit
    • LVT Floor Installation - Supply & Fit
  • Floor Repairs
    • Parquet Floor Repair and Restoration
    • Engineered Wood Floor Repairs
    • Wood Floor Scratch Repair
    • Floorboards Replacement
  • Care & Maintenance
    • Re-Oiling & Recoating Oiled Floors
    • Vinyl & Linoleum Cleaning
    • Hardwood Floor Buffing
    • Wood Floor Polishing
  • Shop
  • Shop
  • Gallery
  • Service Guide
  • Bookings
  • Book Free Survey
  • Service Advice
  • Product Advice