Back to Parquet Fitting
How to Lay Herringbone Flooring — The Complete Step-by-Step Guide
Herringbone is one of the most timeless and visually striking floor patterns you can choose. When it's laid well, it transforms a room — adding depth, movement, and a sense of craftsmanship that no straight-laid floor can match. When it's laid poorly, every misaligned joint is impossible to ignore.
This guide walks you through the complete process of laying solid wood herringbone parquet blocks using the glue-down method. It's thorough, honest, and based on over 20 years of experience laying parquet floors across London. Whether you're planning to tackle this yourself or simply want to understand what's involved before hiring a professional, this is everything you need to know.
What Is Herringbone Flooring?
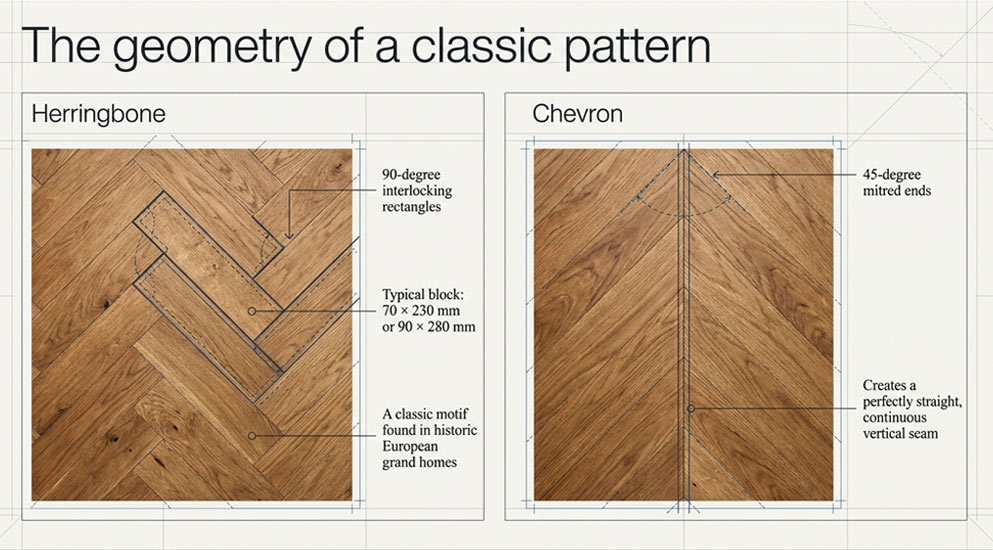
Herringbone flooring is a form of parquet where individual rectangular timber blocks are laid at 90-degree angles to one another, creating a distinctive interlocking V-shape pattern. The name comes from the resemblance to the skeleton of a herring fish.
It's one of the oldest flooring patterns in Europe — found in grand Georgian townhouses, Victorian terraces, and French châteaux alike — and it remains one of the most sought-after styles in London homes today.
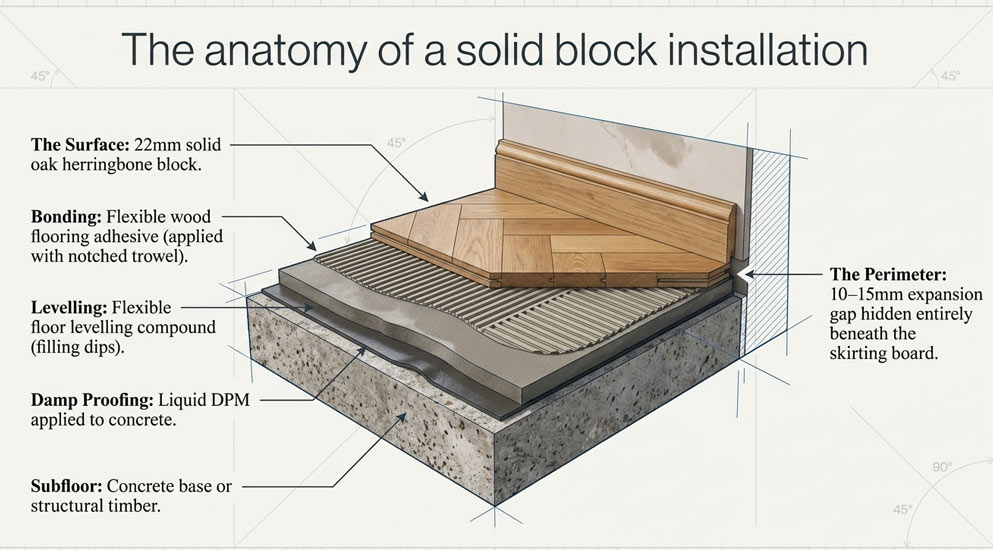
The most common block size for traditional solid oak herringbone is 70 × 230 mm or 90 × 280 mm, with a thickness of around 20–22 mm.
Before You Start: Is This a DIY Job?
Laying solid wood herringbone parquet is one of the most technically demanding flooring installations you can attempt. Unlike click-together laminate, there is no margin for error — each block is glued directly to the subfloor, and once the adhesive cures, mistakes are permanent.
That said, an experienced DIYer with patience, the right tools, and a level subfloor can achieve excellent results. The key word is preparation. Experienced professional fitters will tell you that 70% of the job is done before a single block is glued down.
If at any point this guide makes the process feel daunting, that's not an accident — it genuinely is a complex task. Our team at FlooringFirst! offer free on-site surveys and can give you an honest assessment of your subfloor and a no-obligation quote. Book a free visit here.
Tools and Materials You Will Need
Tools
- Tape measure and chalk line
- Large set square (at least 600 mm)
- Notched trowel (check adhesive manufacturer recommendation — typically B2 or A2 notch)
- Pull bar and tapping block
- Rubber mallet
- Circular saw or mitre saw
- Floor roller (50–75 kg) — essential for solid parquet
- Pencil and marking gauge
- Knee pads (non-negotiable)
- Spirit level and feeler gauges
Materials
- Solid wood herringbone parquet blocks (add 10–12% for waste and cuts)
- Flexible wood flooring adhesive (e.g. Bona R848, Sika T55, Uzin MK 92S)
- Moisture barrier / DPM if required
- Plywood or screed levelling compound if subfloor needs preparation
- Expansion gap spacers (typically 10–15 mm)
- Painter's tape
- Cleaning solvent (for adhesive residue)
Step 1: Acclimatise Your Flooring

Solid wood is a natural material that expands and contracts with changes in temperature and humidity. Before laying a single block, your flooring must acclimatise to the room conditions.
How to do it: Unbox the blocks and store them flat in the room where they'll be laid. Stack them in small cross-piles to allow air circulation. Leave them for a minimum of 7 days — ideally 14 days for rooms with underfloor heating or particularly dry or damp conditions.
The room temperature should be between 18°C and 22°C, and relative humidity between 45% and 65% during acclimatisation and throughout the life of the floor.
Why it matters: If you skip this step and lay a floor that hasn't acclimatised, the blocks will expand or contract after installation, causing gaps, cupping, or buckling — none of which are covered by any warranty.
Step 2: Prepare the Subfloor
This is the most critical stage of the entire installation. A herringbone floor is only as good as the surface beneath it.
Subfloor requirements
For a glue-down solid parquet installation, your subfloor must be:
- Level: No more than 3 mm deviation over a 1.8-metre straightedge. Use a long spirit level or straightedge and feeler gauges to check this systematically across the entire floor.
- Dry: Relative Humidity (RH) should be below 75% for wood subfloors (anhydrite/screed: below 75% RH, or below 0.5% CM for calcium sulphate screeds). Always use a calibrated hygrometer or CM moisture meter — a pin-type meter is not sufficient.
- Structurally sound: No hollow sections, soft spots, or loose sheets.
- Clean: Free from dust, grease, old adhesive, paint, or wax.
Levelling
High spots should be ground down. Low spots and dips should be filled with a flexible floor levelling compound — never standard filler or sand-and-cement. Allow levelling compound to cure fully before proceeding (check manufacturer guidance; typically 24 hours).
Damp proofing
If moisture readings are elevated, a liquid applied DPM (damp-proof membrane) must be applied before the adhesive. This is particularly common in London properties with solid concrete ground floors or older suspended floors that have been boarded over.
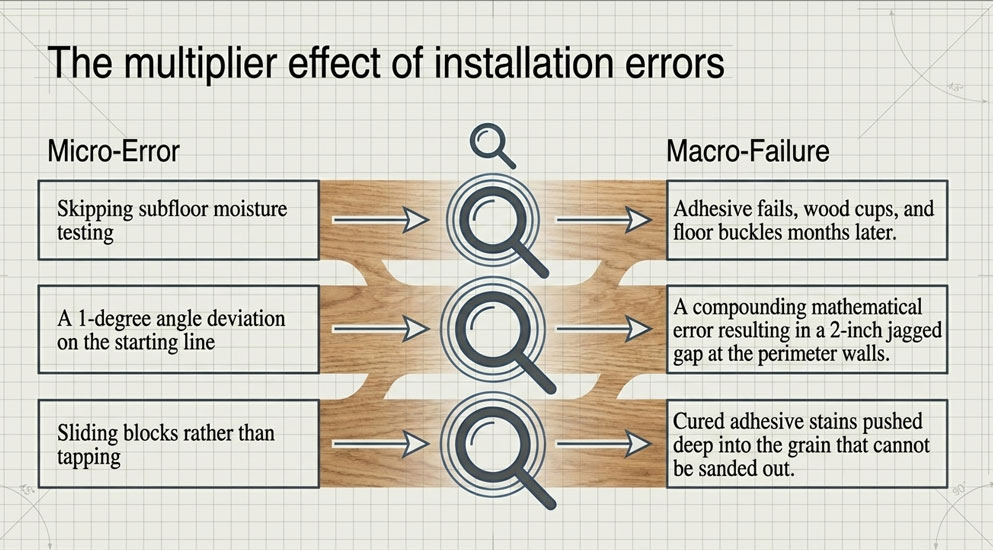
Common mistake: Many DIYers skip proper moisture testing and proceed with installation, only to find the floor moving, staining, or coming unglued within months. This is the single most expensive mistake in flooring installation.
Step 3: Plan Your Layout
This is where herringbone separates itself from simpler patterns. Getting the layout right requires careful planning before any adhesive is opened.
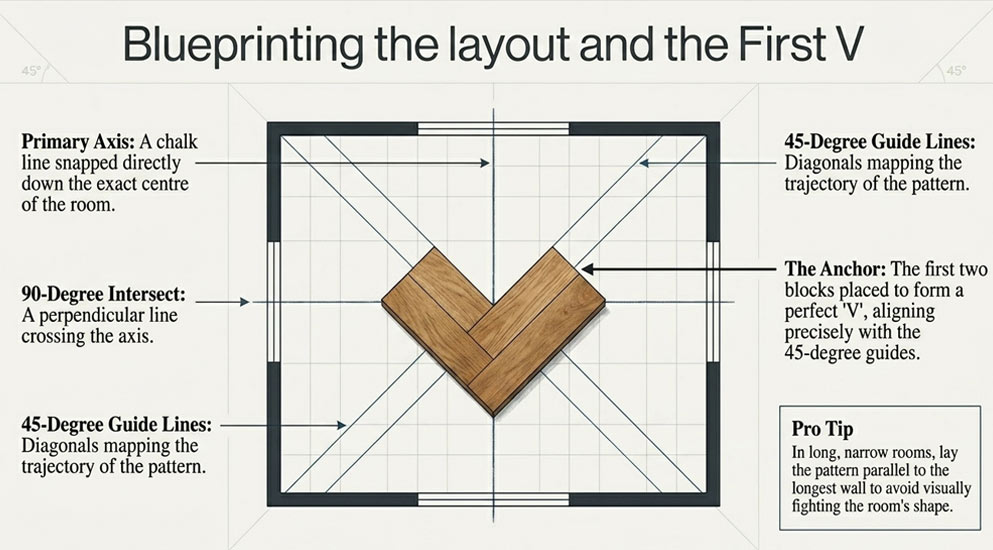
Finding the centre line
Start by finding the centre of the room. Measure and mark the midpoint of two opposite walls, then snap a chalk line between them. This is your primary axis — the spine of the entire installation.
Setting the herringbone angle
Herringbone blocks are laid at 45 degrees to the walls in most installations (though some rooms suit a layout parallel to the main wall — more on this below). From your centre line, use a large set square to mark a second line at exactly 90 degrees.
Now draw your 45-degree guide lines from the intersection of these two lines. These diagonal lines will guide the alignment of your first row of blocks.
Dry laying
Before any adhesive is mixed, dry lay at least 5–6 rows from your starting point outward in all directions. This allows you to:
- Check the pattern looks balanced when viewed from the main doorway or entrance point
- See how the cuts will fall at the walls — if you're left with a sliver of less than 50 mm at a wall, shift the centre line slightly to create better cuts
- Identify any subfloor issues you may have missed
- Confirm your block size suits the room proportions
Pro tip: In a long, narrow room such as a hallway, it's often better to lay herringbone parallel to the longest wall rather than at 45 degrees. This avoids the pattern visually "fighting" the room shape.
Mark your starting line
Once you're happy with the dry layout, mark your starting line clearly on the subfloor using a chalk line. This is your anchor — every block in the room relates back to this line.
Step 4: Lay the Starting Row
The first row sets the geometry for the entire floor. Take your time here.
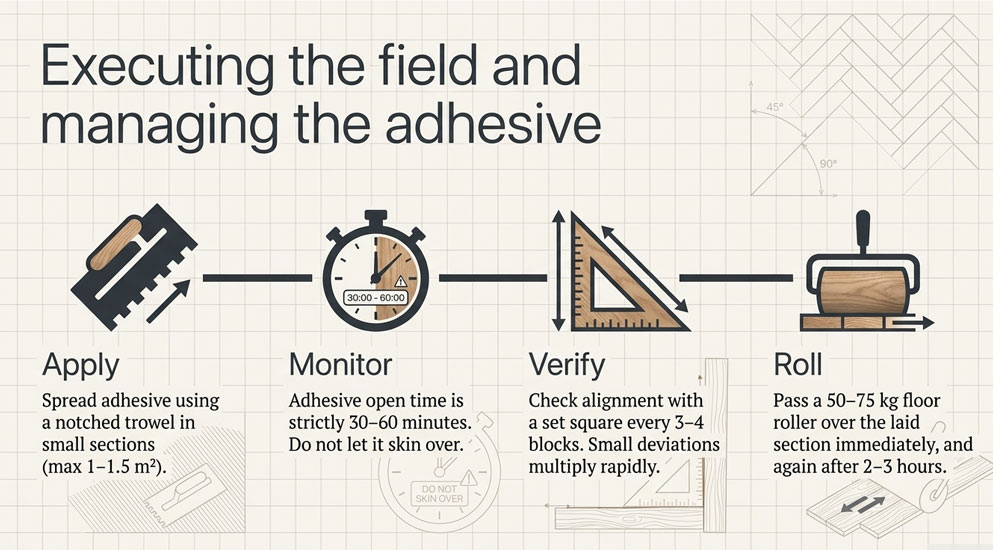
Using your notched trowel, apply adhesive to a small section of the subfloor — no more than 1–1.5 m² at a time to prevent it skinning over before the blocks are placed. Check the adhesive manufacturer's open time (typically 30–60 minutes depending on conditions).
Place your first block precisely on the starting line, pressing it firmly into the adhesive with a slight twisting motion to ensure full contact. Use a rubber mallet and tapping block to bed it down fully — you should not be able to rock the block at all.
Place the second block at 90 degrees to the first, forming the first "V" of the herringbone. Check alignment with your set square.
Continue building out from the starting row, working outward from the centre rather than from a wall. Check your alignment with the set square every 3–4 blocks. Any small deviation here multiplies across the floor.
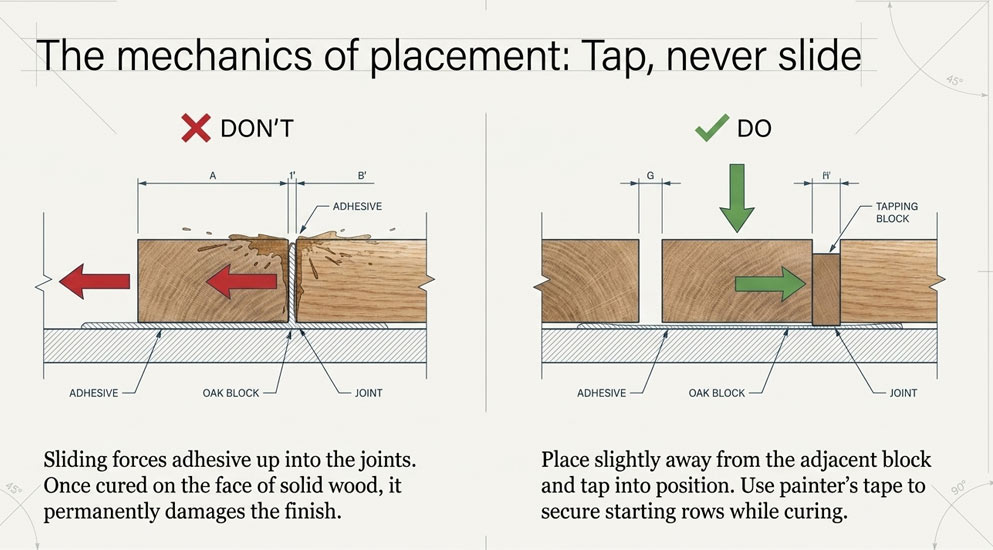
Use painter's tape to hold blocks in position while the adhesive cures — particularly at the start, where there are no surrounding blocks to provide lateral support.
Step 5: Continue the Field Installation
Once your starting row is secure and confirmed square, you can work more efficiently across the floor. A rhythm develops: apply adhesive to a manageable section, lay blocks, tap down, check alignment, tape if needed, move on.
Key rules to follow throughout
- Never slide blocks into position — always place them slightly away from the target position and tap them in. Sliding forces adhesive up into the joints.
- Check for square frequently — use your set square every 6–8 blocks. Don't trust your eye alone.
- Keep joints tight — herringbone should have minimal gaps between blocks. Use a pull bar and tapping block to close any gaps as you go.
- Keep the surface clean — wipe off any adhesive squeeze-up immediately with the appropriate solvent. Once cured, adhesive on the face of solid wood blocks is extremely difficult to remove without damaging the surface.
- Roll the floor — use the floor roller over each section once laid. For solid parquet, two passes are recommended: once immediately after laying, and once after 2–3 hours when the adhesive has begun to grab. A floor roller is not optional — without adequate pressure, bond strength is significantly reduced.
Working around obstacles
At doorways, hearths, and built-in furniture, mark the block for cutting using a marking gauge or paper template. For curved cuts around pipes or architraves, use a jigsaw with a fine-tooth blade. Always dry fit the cut before applying adhesive.
Step 6: Cutting the Border and Perimeter Blocks
The perimeter cuts are where a herringbone floor either looks finished and professional or slightly amateurish. These diagonal cuts require careful measurement and a precise saw.
For each border block:
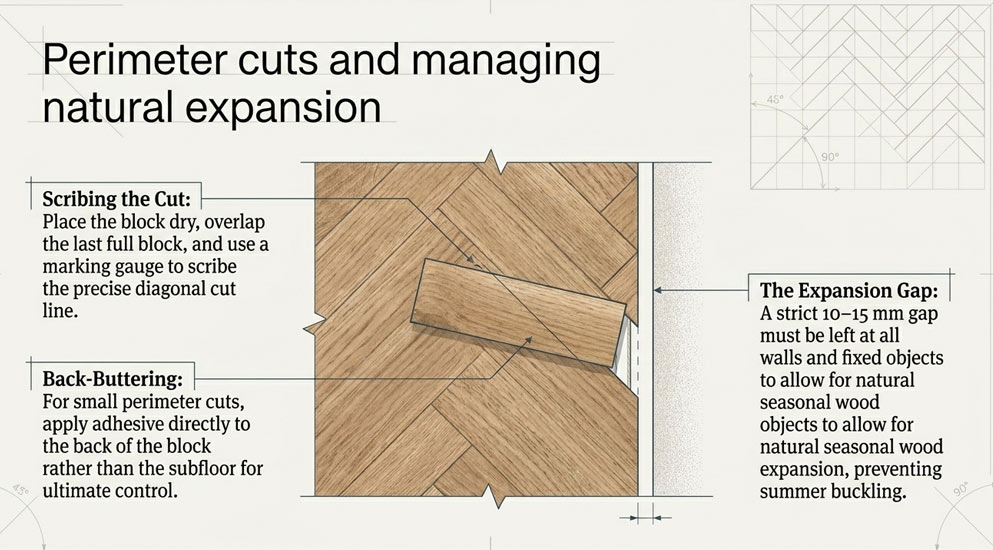
- Place the block in position (dry, no adhesive) overlapping the last full block
- Use a marking gauge or offcut to scribe the cut line
- Cut with a mitre saw set to the correct angle (typically 45 degrees, but measure rather than assume)
- Dry fit before gluing
- Apply adhesive to the block back (back-buttering) rather than the subfloor for small cut pieces, as this gives more control
Leave the expansion gap at all walls, doorframes, and fixed objects. For solid wood parquet blocks, this should be 10–15 mm minimum. This gap will be concealed by skirting boards or a matching beading.
Step 7: Allow Adhesive to Cure Fully
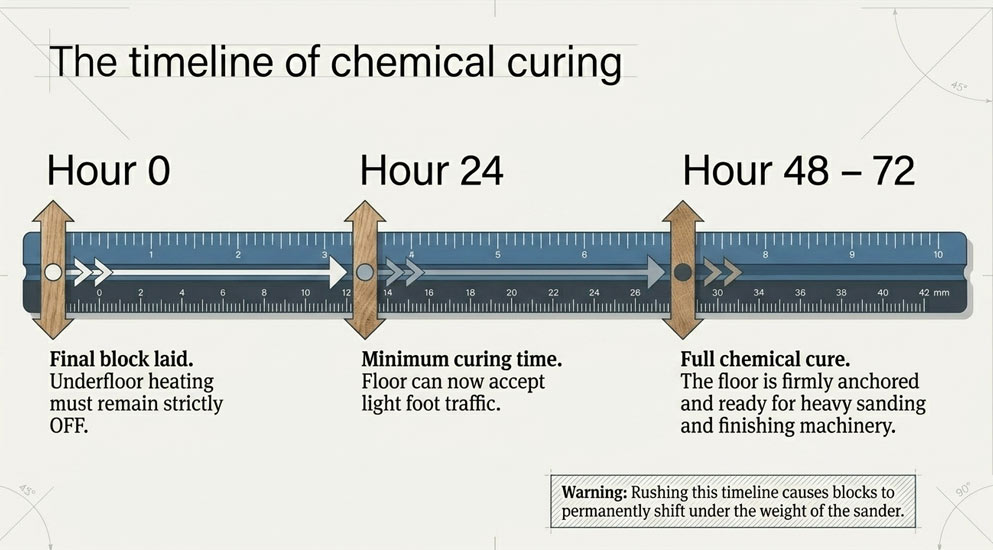
Once all blocks are laid, the floor must cure undisturbed before any sanding, finishing, or foot traffic.
Minimum curing time: 24 hours before any foot traffic Full cure before sanding/finishing: 48–72 hours (check your specific adhesive datasheet)
Keep the room at stable temperature and humidity throughout curing. Do not turn underfloor heating on until the adhesive has fully cured.
Step 8: Sanding and Finishing
Once cured, your herringbone floor will need sanding and finishing before it's truly complete. This is a separate — and equally skilled — process.
Sanding sequence
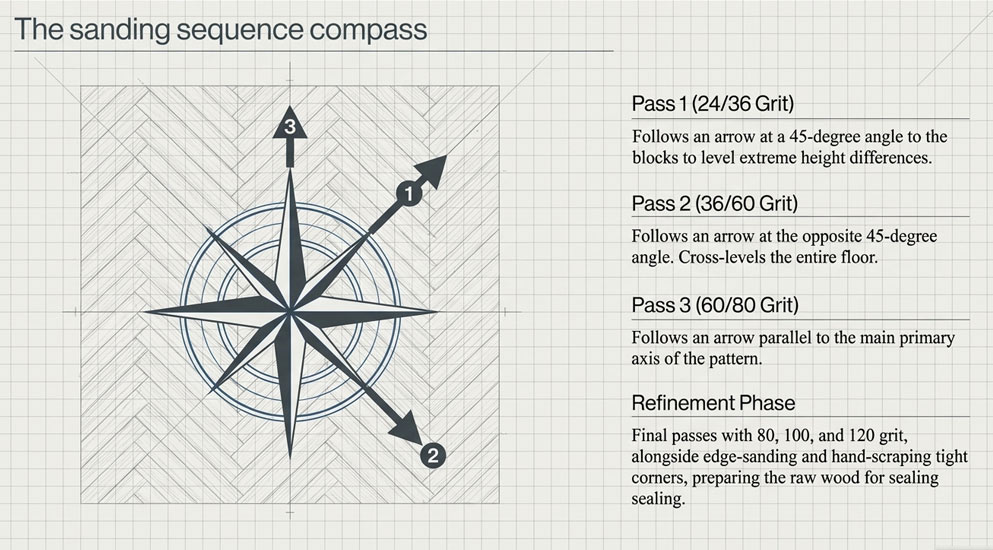
For new solid wood parquet, a typical sanding sequence is:
- First pass: 24 or 36 grit (belt sander or drum sander) at 45 degrees to the blocks to level any height differences
- Second pass: 36 or 60 grit at 45 degrees in the opposite direction
- Third pass: 60 or 80 grit, parallel to the main axis of the pattern
- Edging: Edge sander for all perimeter areas the main machine cannot reach
- Detail sanding: Hand scraper or detail sander for corners and tight areas
- Final passes: 80, then 100, then 120 grit for a smooth finish ready for sealing
Choosing your finish
For solid oak herringbone parquet, the main options are:
- Hardwax oil (e.g. Osmo Polyx, Bona Craft Oil): Penetrates the wood, enhances natural grain and colour, easy to spot-repair in future, requires periodic re-oiling. The most popular choice for period London properties.
- Water-based lacquer (e.g. Bona Traffic HD, Loba 2K Invisible): Creates a surface film, extremely durable, very low sheen options available, harder to repair locally. Best for high-traffic areas.
- Oil-modified lacquer: A hybrid that combines some of the warmth of oil with the protection of lacquer.
Apply finish according to manufacturer instructions. Most require 2–3 coats with light sanding (180 grit) between coats.
Common Mistakes to Avoid
These are the errors we see most often when inspecting DIY herringbone installations:
- Skipping moisture testing — the most expensive mistake in flooring
- Not acclimatising the wood — causes movement after installation
- Poor subfloor preparation — any imperfection will telegraph through to the finished surface
- Starting from a wall instead of the centre — the pattern will look lopsided from the doorway
- Not using a floor roller — reduces bond strength and can cause hollow spots
- Sliding blocks rather than placing them — forces adhesive into joints
- Not leaving an adequate expansion gap — causes buckling in summer months
- Rushing the curing time — walking on or sanding an uncured floor can shift blocks
- Underestimating waste — herringbone typically requires 10–12% more material than the room area
- DIYing the sanding — even a well-laid floor can be ruined by improper sanding technique
How Much Does It Cost to Lay Herringbone Flooring Professionally?
For solid wood herringbone parquet installed by a professional in London, you can expect:
| Service |
Typical cost |
| Supply & fit (solid oak parquet blocks) |
£85 – £130/m² |
| Fit only (your own materials) |
£35 – £55/m² |
| Sanding & finishing (new floor) |
£25 – £45/m² |
| Subfloor preparation (levelling) |
£15 – £30/m² |
Prices vary depending on room size, subfloor condition, block size, and finish type. Smaller rooms cost more per square metre due to the higher proportion of cutting and border work.
Is Professional Installation Worth It?

For solid wood herringbone parquet, our honest answer is: usually, yes.
The pattern amplifies every imperfection. A slightly off-square starting line is immediately visible. An uneven subfloor shows as ripple through the whole floor. Sanding errors are permanent — you cannot un-scratch solid wood.
What you get with a professional installation:
- Subfloor moisture testing with calibrated equipment
- Correct product specification for your specific conditions
- Experienced geometry and layout planning
- Access to professional-grade dust-free sanding machinery
- Manufacturer-certified finish application
- A guaranteed result
At FlooringFirst!, we offer a free on-site visit anywhere in London. We'll assess your subfloor, discuss your options, and give you a clear, itemised quote with no obligation. Book your free visit here.
Frequently Asked Questions
How long does it take to lay herringbone flooring? For a typical living room (25–35 m²), an experienced professional team of two will take 2–3 days, including subfloor preparation, installation, and sanding/finishing. A careful DIYer should budget 4–6 days.
Can herringbone flooring be laid over underfloor heating? Solid wood parquet can be laid over underfloor heating, but requires careful management of the heating system during and after installation. The floor must be acclimatised with the heating running at normal levels, and the heating must be turned off during adhesive curing. We recommend a hardwax oil finish over lacquer for UFH installations, as it allows slightly more movement in the wood.
Can herringbone be sanded and refinished in future? Yes — one of the great advantages of solid wood parquet is that it can be sanded and refinished multiple times over its lifetime. Typical solid oak blocks (20 mm thick) can be sanded 4–6 times before the wood is too thin to refinish.
What's the difference between herringbone and chevron flooring? Both create a V-pattern, but they achieve it differently. In herringbone, the blocks are rectangular and meet at 90 degrees — the ends of one block meet the sides of the next. In chevron, the blocks are cut at an angle so both sides of the V align perfectly, creating a sharper, more precise arrow shape. Chevron is generally considered more difficult and expensive to lay.
Do I need to remove skirting boards before laying herringbone? Ideally, yes. Removing skirting boards allows the floor to run underneath them and the boards to be re-fitted on top, covering the expansion gap cleanly. If removal is not practical, you can use matching beading or quad instead, fitted after the floor is complete.
FlooringFirst! has been installing and restoring wood floors across London since 2004. Our team are Bona-certified and Junckers-approved contractors, with experience on everything from Georgian townhouses to modern commercial offices. For a free on-site assessment and quote, call us on 020 8830 9782 or book a free visit online.