Floor Sanding & Fitting
Book Free Visit Price Guide 020 88309782
Monday - Friday 07:30 - 17:30, Saturday 07:30 - 16:00
cs@flooringfirst.co.uk
020 88309782
Monday - Friday 07:30 - 17:30, Saturday 07:30 - 16:00
cs@flooringfirst.co.uk
  • Book Free Visit
  • Home
  • Floor Sanding
  • Floor Fitting
  • Floor Repairs
  • Aftercare
    • Wooden Floors
    • Cleaning & Polishing
    • Re-Oiling Wooden Floors
    • Vinyls & Linoleum
    • Vinyl Floor Polishing
    • Get a Quote...
  • For Businesses
  • Gallery
  • Service Guide
  • Shop
  • Book Free Visit

Our Wood Flooring Resource

Find Your Way Around...

Floor Sanding Case Studies

See how FlooringFirst solved flooring challenges

WHY CHOOSE US
CASE STUDIES
PRICE GUIDE
OFFERS
GALLERY
ASK EXPERT
WHY CHOOSE US
CASE STUDIES
PRICE GUIDE
OFFERS
GALLERY
ASK EXPERT
  • Home
  • Case Studies
Engineered Floor Buffing and Re-oiling in Whitechapel — Full Case Study

Project Overview This engineered wooden flooring buffing and re-oiling project was carried out at a residential property in Whitechapel, East London. The project covered the main living area floor and also extended to the staircase, which had developed similar surface wear. The engineered floor had been down for several years and was looking tired: the oil finish had broken down in the main traff...
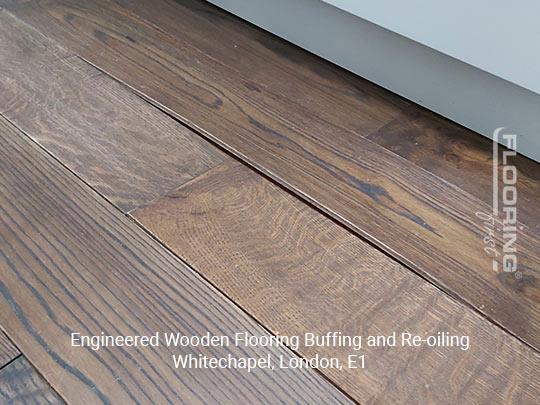
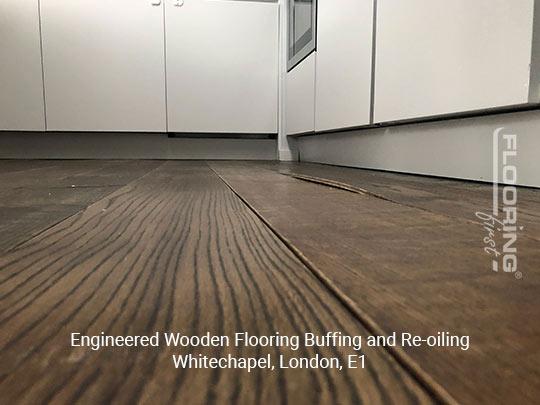
Engineered floor showing wear and large cracks before buffing and re-oiling in Whitechapel Close-up of gap and surface dullness on engineered floor before treatment

Project Overview

This engineered wooden flooring buffing and re-oiling project was carried out at a residential property in Whitechapel, East London. The project covered the main living area floor and also extended to the staircase, which had developed similar surface wear. The engineered floor had been down for several years and was looking tired: the oil finish had broken down in the main traffic areas, large cracks had opened up in some of the board joints, and the colour had faded unevenly. Rather than a full sand, which would have removed more of the engineered veneer than was necessary, a surface buff and re-oil approach was used to refresh the finish while preserving the maximum wood thickness for future treatments. Buffing and re-oiling an engineered floor typically falls in the lower end of the sanding price range, around £25 to £35 per square metre.

The Challenge

The main complications on this job were the gap filling and the staircase. The cracks in the floor were not the small hairline gaps that come from seasonal wood movement. Several were wide enough to have collected years of dirt and debris, and one section near the window had boards that had moved enough to create a visible step between the edges. The gap filling needed to be done thoroughly, working the filler into the full depth of the crack rather than just skimming the surface, otherwise the filler would shrink back and the gaps would reappear quickly. The staircase presented its own challenge in that each tread had to be assessed individually, as the buffing machine cannot be used on the staircase, and all the work there was done by hand.

Our Approach

  1. Gap assessment and filling: We cleaned all the cracks thoroughly to remove trapped dirt and debris before any filling work began. A flexible two-part resin filler tinted to match the floor colour was packed into each gap under pressure and levelled flush with the surrounding surface. The filler was left to cure fully overnight.
  2. Surface buffing: Using a buffing machine with a medium-grit abrasive pad, we worked across the floor systematically to strip the old oil finish and lightly abrade the surface without removing significant wood depth. This technique is ideal for engineered floors with a thinner veneer.
  3. Fine buffing: A finer pad pass completed the preparation, leaving the surface clean, smooth, and receptive to the new oil.
  4. Staircase hand sanding: Each staircase tread was hand-sanded with a progression of grits, working with the grain. The nosings were smoothed carefully to maintain their profile. The risers were cleaned and any old paint or finish was removed where it had started to peel.
  5. First oil coat: A hardwax oil was applied to the floor and staircase in a single session to ensure colour consistency across both areas. The oil was worked into the grain generously and any excess removed before it dried.
  6. Second oil coat: After a 24-hour cure, a second thinner coat was applied and buffed to an even finish. This second coat builds the level of protection and gives a consistent sheen across the whole area.
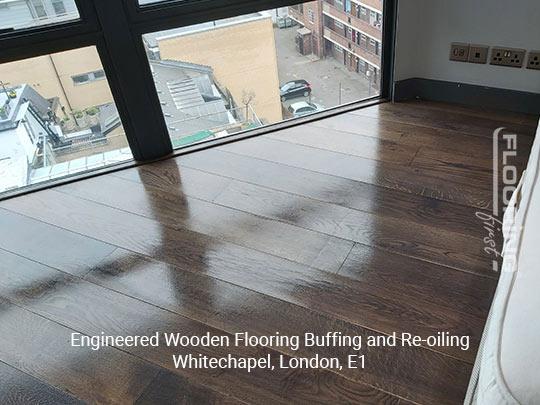
Engineered floor and staircase after buffing and re-oiling in Whitechapel

The Result

The floor looked noticeably brighter and more consistent after treatment. The gaps were filled and no longer visible, the patchy worn areas were gone, and the re-oiled surface had a fresh, even colour that matched well across the floor and staircase. The client noted that the staircase in particular had gone from looking very tired to being a genuinely attractive feature of the entrance to the flat. The oil finish on both surfaces is now fully refreshed and will provide good protection for the next three to five years before any further maintenance is needed.

Frequently Asked Questions

When should you buff and re-oil rather than do a full sand?

Buffing and re-oiling is the right choice when the floor's surface finish has worn but the wood itself is still in good structural condition, without deep scratches, heavy staining, or significant cupping. It is also the preferred approach for engineered floors with thinner veneers where preserving wood thickness for future treatments is important.

How do you fill large gaps in an engineered floor?

Large gaps need cleaning out thoroughly before filling, as a surface-only fill will shrink back once the debris below it compresses. A flexible resin filler is pressed into the full depth of the crack, allowed to cure, and then sanded flush. In cases where the boards have moved significantly, it may be necessary to close the gap mechanically first by re-securing the boards before filling.

Can the staircase and floor be finished at the same time to ensure a colour match?

Yes, and this is the recommended approach. Applying the same oil product in the same session to both surfaces is the best way to ensure a consistent colour and sheen level. Finishing them at different times or with different batches of product can result in a slight but visible difference in tone between the floor and the stairs.

Have a similar project? Call us on 020 88309782 or Book a Free Site Visit

Show more
Wood Floor Sanding, Buffing and Lacquering in Richmond — Full Case Study

Project Overview This project involved sanding, buffing and lacquering an engineered wood floor across several rooms of a residential property in Richmond. The owners wanted a full surface refresh ahead of spring, bringing back the original warmth of the wood without replacement. The floor had lost its sheen through years of normal use and heavy foot traffic. Our team handled the furniture remova...

Project Overview

This project involved sanding, buffing and lacquering an engineered wood floor across several rooms of a residential property in Richmond. The owners wanted a full surface refresh ahead of spring, bringing back the original warmth of the wood without replacement. The floor had lost its sheen through years of normal use and heavy foot traffic. Our team handled the furniture removal, the full sanding sequence, buffing, and two coats of lacquer, then reinstated the furniture on completion.

Engineered wood floor before sanding in Richmond

The Challenge

Engineered wood requires careful attention during sanding. Sand too aggressively and you risk cutting through the wear layer, which on engineered boards is typically between 3mm and 6mm thick. The floor in this Richmond home had a few stubborn scratches and a patchy area near the window where the old lacquer had worn away completely, leaving bare wood that had started to dry out and discolour. Matching the finish across the whole floor required precise preparation and consistent buffing before any lacquer was applied.

Our Approach

We followed a structured sequence to protect the wear layer and deliver an even finish.

  • Furniture removal: We cleared the rooms before starting so there was no risk of damage and no areas we had to work around.
  • Initial sanding: We used a drum sander with a medium-grit paper to strip the old lacquer and level any surface irregularities, working along the grain throughout.
  • Edge sanding: A dedicated edge sander addressed the perimeter of each room and any corners the drum machine could not reach.
  • Buffing: Once the surface was fully stripped, we buffed with a fine-grit disc to open up the grain evenly and prepare a smooth base for the lacquer.
  • Lacquering: Two coats of water-based lacquer were applied, with a light key-sand between coats. This builds a hard-wearing, clear finish that reflects light well and protects the wood for years of daily use.
  • Reinstatement: Furniture was moved back in and the rooms were left clean and ready to use.

Floor sanding in progress in Richmond

The Result

The finished floor looked like a new installation. The discoloured patch near the window had been fully corrected and the lacquer brought up a consistent, glossy surface across the whole area. The clients were pleased with both the quality of the work and the tidiness of our team throughout. For a floor in this condition, sanding and relacquering is a far better option than replacement -- the cost typically runs between £25 and £45 per square metre depending on floor condition and the number of coats required, which is a fraction of what new engineered boards would cost.

Engineered wood floor after lacquering in Richmond

Frequently Asked Questions

How many times can an engineered wood floor be sanded?
It depends on the thickness of the wear layer. Most engineered boards with a 3mm layer can be lightly sanded once or twice. Boards with a 6mm wear layer can usually take three or four full sanding cycles over their lifetime.

How long does the lacquer take to dry before we can walk on the floor?
Water-based lacquer is touch-dry within a couple of hours. We recommend light foot traffic after four hours and returning furniture after 24 hours. Full cure takes around seven days, during which it is best to avoid placing rugs over the surface.

Do you carry out work in Richmond regularly?
Yes. Richmond is one of our regular working areas. We cover the whole of south-west London and can usually schedule a survey within a few days of your enquiry.

Have a similar project? Call us on 020 88309782 or Book a Free Site Visit

Show more
Floor Sanding and Restoration in Homerton, E9 — Full Case Study

Project Overview This project involved the professional sanding and restoration of an existing wood floor at a property in Homerton, E9. The floor had seen years of daily wear and was in need of attention to bring it back to a quality finish. Our team carried out a full assessment before starting work, checking for any boards that needed attention alongside the main sanding and finishing work. B...

Project Overview

This project involved the professional sanding and restoration of an existing wood floor at a property in Homerton, E9. The floor had seen years of daily wear and was in need of attention to bring it back to a quality finish. Our team carried out a full assessment before starting work, checking for any boards that needed attention alongside the main sanding and finishing work.

Before the Work

Before work began, the floor showed typical signs of wear. Surface scratches, dull patches, and general finish deterioration were present. A thorough survey was carried out to plan the correct sanding depth, assess board condition, and choose the most appropriate finish for the space.

Our Approach

The following services were carried out as part of this project:

  • Second Stage

The Result

Once the sanding and finishing process was complete, the floor was transformed. The wood grain was opened up and brought back to life, the surface was smooth and even, and the new finish provided lasting protection. The client was left with a floor that looked, and performed, as good as new.

Photos of the completed work:

Wood Floor floor after sanding work in E9 Wood Floor floor after sanding work in E9 Wood Floor floor after sanding work in E9

Frequently Asked Questions

How long does floor sanding in Homerton, E9 take?
Most residential sanding jobs are completed in one to two days, depending on floor size and condition. Lacquering or oiling adds further drying and curing time, which we factor into the job schedule.

Do I need to vacate the property during sanding in Homerton, E9?
Modern dustless sanding equipment keeps dust to a minimum, but we recommend keeping pets and young children clear of the area during the work. Most clients remain in their property throughout.

How much does floor sanding cost in Homerton, E9?
Prices typically range from £25 to £45 per square metre depending on floor condition, finish type, and any repair work required. Gap filling and board replacement are priced separately if needed.

Have a similar project? Call us on 020 88309782 or Book a Free Site Visit

Show more
Engineered Wood Sanding and Restoration in Clapham, SW9 — Full Case Study

Project Overview This project involved the professional sanding and restoration of an existing wood floor at a property in Clapham, SW9. The floor had seen years of daily wear and needed attention to restore its quality finish. Our team carried out a full assessment before starting work, checking for any boards that needed attention alongside the main sanding and finishing work. Before the Work ...

Project Overview

This project involved the professional sanding and restoration of an existing wood floor at a property in Clapham, SW9. The floor had seen years of daily wear and needed attention to restore its quality finish. Our team carried out a full assessment before starting work, checking for any boards that needed attention alongside the main sanding and finishing work.

Before the Work

Before work began, the floor showed typical signs of wear. Surface scratches, dull patches, and general finish deterioration were present. A thorough survey was conducted to determine the correct sanding depth, assess board condition, and select the most appropriate finish for the space.

Our Approach

The following services were carried out as part of this project:

  • Engineered - Sand, Buff & Lacquer
  • Furniture Moving
  • Gap Filling
  • Repairs

The Result

Once the sanding and finishing process was complete, the floor was transformed. The wood grain was opened up and brought back to life, the surface was smooth and even, and the new finish provided lasting protection. The client was left with a floor that looked, and performed, as good as new.

Photos of the completed work:

Engineered Wood floor after sanding work in SW9 Engineered Wood floor after sanding work in SW9 Engineered Wood floor after sanding work in SW9

Frequently Asked Questions

How long does floor sanding in Clapham, SW9 take?
Most residential sanding jobs are completed in one to two days, depending on floor size and condition. Lacquering or oiling adds further drying and curing time, which we factor into the job schedule.

Do I need to vacate the property during sanding in Clapham, SW9?
Modern dustless sanding equipment keeps dust to a minimum, but we recommend keeping pets and young children clear of the area during the work. Most clients remain in their property throughout.

How much does floor sanding cost in Clapham, SW9?
Prices typically range from £25 to £45 per square metre depending on floor condition, finish type, and any repair work required. Gap filling and board replacement are priced separately if needed.

Have a similar project? Call us on 020 88309782 or Book a Free Site Visit

Show more
Floor Sanding and Restoration in St Albans, AL9 — Full Case Study

Project Overview This project involved the professional sanding and restoration of an existing wood floor at a property in St Albans, AL9. The floor had seen years of daily wear and was in need of attention to bring it back to a quality finish. Our team carried out a full assessment before starting work, checking for any boards that needed attention alongside the main sanding and finishing work. ...

Project Overview

This project involved the professional sanding and restoration of an existing wood floor at a property in St Albans, AL9. The floor had seen years of daily wear and was in need of attention to bring it back to a quality finish. Our team carried out a full assessment before starting work, checking for any boards that needed attention alongside the main sanding and finishing work.

Before the Work

Before work began, the floor showed typical signs of wear. Surface scratches, dull patches, and general finish deterioration were present. A thorough survey was carried out to plan the correct sanding depth, assess board condition, and choose the most appropriate finish for the space.

Survey photos showing the floor condition before work:

Floor condition before work at AL9 Floor condition before work at AL9

Our Approach

The following services were carried out as part of this project:

  • CIS Labour Cost
  • CIS Materials Cost

The Result

Once the sanding and finishing process was complete, the floor was transformed. The wood grain was opened up and brought back to life, the surface was smooth and even, and the new finish provided lasting protection. The client was left with a floor that looked, and performed, as good as new.

Photos of the completed work:

Wood Floor floor after sanding work in AL9 Wood Floor floor after sanding work in AL9 Wood Floor floor after sanding work in AL9

Frequently Asked Questions

How long does floor sanding in St Albans, AL9 take?
Most residential sanding jobs are completed in one to two days, depending on floor size and condition. Lacquering or oiling adds further drying and curing time, which we factor into the job schedule.

Do I need to vacate the property during sanding in St Albans, AL9?
Modern dustless sanding equipment keeps dust to a minimum, but we recommend keeping pets and young children clear of the area during the work. Most clients remain in their property throughout.

How much does floor sanding cost in St Albans, AL9?
Prices typically range from £25 to £45 per square metre depending on floor condition, finish type, and any repair work required. Gap filling and board replacement are priced separately if needed.

Have a similar project? Call us on 020 88309782 or Book a Free Site Visit

Show more
Engineered Wood Sanding and Restoration in Hendon, NW4 — Full Case Study

Project Overview This project involved the professional sanding and restoration of an existing wood floor at a property in Hendon, NW4. The floor had seen years of daily wear and was in need of attention to bring it back to a quality finish. Our team carried out a full assessment before starting work, checking for any boards that needed attention alongside the main sanding and finishing work. Be...

Project Overview

This project involved the professional sanding and restoration of an existing wood floor at a property in Hendon, NW4. The floor had seen years of daily wear and was in need of attention to bring it back to a quality finish. Our team carried out a full assessment before starting work, checking for any boards that needed attention alongside the main sanding and finishing work.

Before the Work

Before work began, the floor showed typical signs of wear. Surface scratches, dull patches, and general finish deterioration were present. A thorough survey was carried out to plan the correct sanding depth, assess board condition, and choose the most appropriate finish for the space.

Survey photos showing the floor condition before work:

Floor condition before work at NW4 Floor condition before work at NW4 Floor condition before work at NW4

Our Approach

The following services were carried out as part of this project:

  • Beading Installation (incl. materials)
  • Doors Plus Frame Trimming (per door)
  • Floorboards - Replacement (incl. materials)
  • Furniture Moving
  • Hardwood Installation
  • Skirting Boards Installation (incl. materials)
  • Subfloor Preparation (ply 12 mm)
  • Subfloor Preparation (ply 18 mm)
  • Thresholds & Fitting (inc. materials)
  • QuickStep Castello Havana Smoked Oak Engineered Flooring, Matt Lacquered, 145x3x14 mm
  • QuickStep Cleaning Kit

The Result

Once the sanding and finishing process was complete, the floor was transformed. The wood grain was opened up and brought back to life, the surface was smooth and even, and the new finish provided lasting protection. The client was left with a floor that looked, and performed, as good as new.

Photos of the completed work:

Engineered Wood floor after sanding work in NW4 Engineered Wood floor after sanding work in NW4 Engineered Wood floor after sanding work in NW4

Frequently Asked Questions

How long does floor sanding take?
Most residential sanding jobs are completed in one to two days, depending on floor size and condition. Lacquering or oiling adds further drying and curing time, which we factor into the job schedule.

Do I need to vacate the property during sanding?
Modern dustless sanding equipment keeps dust to a minimum, but we recommend keeping pets and young children clear of the area during the work. Most clients remain in their property throughout.

How much does floor sanding cost in London?
Prices typically range from £25 to £45 per square metre depending on floor condition, finish type, and any repair work required. Gap filling and board replacement are priced separately if needed.

Have a similar project? Call us on 020 88309782 or Book a Free Site Visit

Show more
Replacement and Fitting of Engineered Wood in Bethnal Green, E1 — Full Case Study

Project Overview This project involved the professional installation of engineered wood flooring at a property in Bethnal Green, E1. The client required a quality floor that would stand up to daily use and complement their interior. Our fitting team assessed the subfloor condition, carried out any necessary preparation work, and fitted the new floor to a high standard. Before the Work Prior to ...

Project Overview

This project involved the professional installation of engineered wood flooring at a property in Bethnal Green, E1. The client required a quality floor that would stand up to daily use and complement their interior. Our fitting team assessed the subfloor condition, carried out any necessary preparation work, and fitted the new floor to a high standard.

Before the Work

Prior to installation, the existing floor covering was inspected and the subfloor was prepared to ensure it was flat, dry, and suitable for the new engineered wood. Any existing floor covering was lifted and disposed of cleanly before the fitting work began.

Survey photos showing the floor condition before work:

Floor condition before work at E1 Floor condition before work at E1

Our Approach

The following services were carried out as part of this project:

  • Doors Plus Frame Trimming (per door)
  • Engineered Flooring Installation
  • Furniture Moving
  • Kitchen Plinths Trimming
  • Lift & Dispose Hardwood Flooring
  • Skirting Board Removal
  • Skirting Boards Installation (incl. materials)
  • Subfloor Preparation (SLC)
  • Thresholds & Fitting (inc. materials)
  • Duralay Timbermate Excel Silver Wood Floor & Laminate Underlay
  • Tradition Engineered Oak Flooring, Rustic, Lacquered, 150x5x18 mm

The Result

The completed engineered wood installation looked clean and finished throughout. Joins are tight, edges are neat, and the floor sits flat and stable. Beading and threshold strips were fitted where required to complete the job properly. The client was pleased with both the quality of the work and the appearance of the new floor.

Photos of the completed work:

Engineered Wood floor after fitting work in E1 Engineered Wood floor after fitting work in E1 Engineered Wood floor after fitting work in E1

Frequently Asked Questions

How long does engineered wood installation take?
Most fitting jobs are completed within one to two days. Larger areas or more detailed layouts such as herringbone patterns take longer due to the additional cutting and positioning involved.

Do I need underlay?
Yes, underlay is required for most floor types and helps with insulation, sound deadening, and levelling minor subfloor imperfections. We can supply and fit appropriate underlay as part of the installation.

How much does floor fitting cost in London?
Fitting costs typically range from £35 to £60 per square metre depending on floor type and complexity. We provide a full written quote before starting any work.

Have a similar project? Call us on 020 88309782 or Book a Free Site Visit

Show more
Engineered Wood Sanding and Restoration in Richmond, SW13 — Full Case Study

Project Overview This project involved the professional sanding and restoration of an existing wood floor at a property in Richmond, SW13. The floor had seen years of daily wear and was in need of attention to bring it back to a quality finish. Our team carried out a full assessment before starting work, checking for any boards that needed attention alongside the main sanding and finishing work. ...

Project Overview

This project involved the professional sanding and restoration of an existing wood floor at a property in Richmond, SW13. The floor had seen years of daily wear and was in need of attention to bring it back to a quality finish. Our team carried out a full assessment before starting work, checking for any boards that needed attention alongside the main sanding and finishing work.

Before the Work

Before work began, the floor showed typical signs of wear. Surface scratches, dull patches, and general finish deterioration were present. A thorough survey was carried out to plan the correct sanding depth, assess board condition, and choose the most appropriate finish for the space.

Survey photos showing the floor condition before work:

Floor condition before work at SW13 Floor condition before work at SW13

Our Approach

The following services were carried out as part of this project:

  • Engineered - Sand, Buff & Lacquer
  • Furniture Moving

The Result

Once the sanding and finishing process was complete, the floor was transformed. The wood grain was opened up and brought back to life, the surface was smooth and even, and the new finish provided lasting protection. The client was left with a floor that looked, and performed, as good as new.

Photos of the completed work:

Engineered Wood floor after sanding work in SW13 Engineered Wood floor after sanding work in SW13 Engineered Wood floor after sanding work in SW13

Frequently Asked Questions

How long does floor sanding take?
Most residential sanding jobs are completed in one to two days, depending on floor size and condition. Lacquering or oiling adds further drying and curing time, which we factor into the job schedule.

Do I need to vacate the property during sanding?
Modern dustless sanding equipment keeps dust to a minimum, but we recommend keeping pets and young children clear of the area during the work. Most clients remain in their property throughout.

How much does floor sanding cost in London?
Prices typically range from £25 to £45 per square metre depending on floor condition, finish type, and any repair work required. Gap filling and board replacement are priced separately if needed.

Have a similar project? Call us on 020 88309782 or Book a Free Site Visit

Show more
Hardwood Sanding and Restoration in Wandsworth, SW15 — Full Case Study

Project Overview This project involved the professional sanding and restoration of an existing wood floor at a property in Wandsworth, SW15. The floor had seen years of daily wear and was in need of attention to bring it back to a quality finish. Our team carried out a full assessment before starting work, checking for any boards that needed attention alongside the main sanding and finishing work...

Project Overview

This project involved the professional sanding and restoration of an existing wood floor at a property in Wandsworth, SW15. The floor had seen years of daily wear and was in need of attention to bring it back to a quality finish. Our team carried out a full assessment before starting work, checking for any boards that needed attention alongside the main sanding and finishing work.

Before the Work

Before work began, the floor showed typical signs of wear. Surface scratches, dull patches, and general finish deterioration were present. A thorough survey was carried out to plan the correct sanding depth, assess board condition, and choose the most appropriate finish for the space.

Survey photos showing the floor condition before work:

Floor condition before work at SW15 Floor condition before work at SW15

Our Approach

The following services were carried out as part of this project:

  • Beading Installation (incl. materials)
  • Hardwood - Sand, Buff & Lacquer
  • Threshold - Sand & Lacquer

The Result

Once the sanding and finishing process was complete, the floor was transformed. The wood grain was opened up and brought back to life, the surface was smooth and even, and the new finish provided lasting protection. The client was left with a floor that looked, and performed, as good as new.

Photos of the completed work:

Hardwood floor after sanding work in SW15 Hardwood floor after sanding work in SW15 Hardwood floor after sanding work in SW15

Frequently Asked Questions

How long does floor sanding take?
Most residential sanding jobs are completed in one to two days, depending on floor size and condition. Lacquering or oiling adds further drying and curing time, which we factor into the job schedule.

Do I need to vacate the property during sanding?
Modern dustless sanding equipment keeps dust to a minimum, but we recommend keeping pets and young children clear of the area during the work. Most clients remain in their property throughout.

How much does floor sanding cost in London?
Prices typically range from £25 to £45 per square metre depending on floor condition, finish type, and any repair work required. Gap filling and board replacement are priced separately if needed.

Have a similar project? Call us on 020 88309782 or Book a Free Site Visit

Show more
Hardwood Floor and Skirting Board Installation in Hendon — Full Case Study

Project Overview This was one of our more comprehensive fitting jobs in Hendon, covering the full removal of old floorboards, the installation of new hardwood flooring, new skirting boards and beading throughout. The property had worn, tired boards that had become uneven in places, and the skirting had seen better days. The clients wanted a complete upgrade rather than a repair, and chose a quali...

Project Overview

This was one of our more comprehensive fitting jobs in Hendon, covering the full removal of old floorboards, the installation of new hardwood flooring, new skirting boards and beading throughout. The property had worn, tired boards that had become uneven in places, and the skirting had seen better days. The clients wanted a complete upgrade rather than a repair, and chose a quality solid hardwood board to complement the character of the house.

Old flooring before removal in Hendon

The Challenge

The main difficulty with this project was the state of the existing subfloor once the old boards were lifted. Several areas required levelling before the new hardwood could go down, and some of the fixing points for the skirting needed making good. Getting the subfloor right before fitting is essential -- if the base is not level, even the best hardwood boards will creak and flex over time. We also had to carefully measure and cut the skirting and beading around several doorframes and chimney breast alcoves, which required precise mitring on site.

Our Approach

  • Strip out: Old floorboards were carefully removed and the subfloor was cleaned back and inspected.
  • Subfloor preparation: Any high spots were planed down and low areas filled with a self-levelling compound, which was allowed to cure fully before fitting began.
  • Hardwood installation: New hardwood boards were laid and secret-nailed along the length of each room, working from a straight baseline. Boards were staggered for strength and visual consistency.
  • Skirting and beading: New skirting boards were fitted to all walls, cut and mitred at corners. Beading was run along the floor-to-skirting junction to give a clean finish and allow for natural board movement.
  • Final finishing: The floor was given a light sand and a coat of protective oil to bring out the grain and protect the surface from day one.

Hardwood floor being fitted in Hendon

The Result

The transformation was striking. What had been a tired and uneven floor became a well-fitted, fresh hardwood installation with clean skirting lines throughout. The clients said the rooms felt completely different -- brighter and much more in keeping with the age of the property. Hardwood floor fitting in London typically costs between £35 and £60 per square metre for supply and fit, depending on board species and room complexity. This project came in well within that range and delivered a finish the clients were very happy with.

Completed hardwood floor and skirting in Hendon

Frequently Asked Questions

Do you remove the old flooring as part of the fitting service?
Yes. Strip-out of the existing floor is included in most of our fitting quotes. We also deal with responsible disposal of the old materials.

Does hardwood flooring work with underfloor heating?
Many hardwood species are compatible with underfloor heating systems, provided the boards are properly acclimatised and the floor temperature does not exceed the recommended maximum. We can advise on suitable species at the survey stage.

Do you fit skirting boards as a standalone service?
Yes, we can fit and finish skirting boards independently of a flooring project. Get in touch and we will arrange a visit to measure up and provide a quote.

Have a similar project? Call us on 020 88309782 or Book a Free Site Visit

Show more
  • 1
  • 2
  • 3
  • 4
  • 5
  • 6
  • 7
  • 8
  • 9
  • 10
  • 11
  • 12
  • 13
  • 14
  • 15
  • 16
  • 17
  • 18
  • 19
  • 20
  • 21
  • 22
  • 23
  • 24
  • 25
  • 26
  • 27
  • 28
  • 29
  • 30
  • 31
  • 32
  • 33
  • 34
  • 35
  • 36
  • 37
  • 38
  • 39
  • 40
  • 41
  • 42
  • 43
  • 44
  • 45
  • 46
  • 47
  • 48
  • 49
  • 50
  • 51
  • 52
  • 53
  • 54
  • 55
  • 56
  • 57
  • 58
  • 59
  • 60
  • 61
  • 62
  • 63
  • 64
  • 65
  • 66

Our Flooring Company

Contacts & Showroom Book Free Site Survey About Our Flooring Company Join Our Team Work as a Contractor

Service Information

Terms of Service Terms of Sales Deliveries & Charges Cookie Settings Returns Policy Privacy Policy

Help

FAQs Case Studies Sitemap Glossary
𝕏
FlooringFirst! Services
158 Coles Green Road
London, NW2 7HW
T: 020 88309782
Floor Sanding Services: Central London, East London, Near London, North London, Northwest London, Southeast London, Southwest London, West London
Wood Floor Installation Service: Central London, East London, Near London, North London, Northwest London, Southeast London, Southwest London, West London

  • Flooring Services
  • Floor Sanding
    • Wood Floor Staining
    • Wood Floor Gap Filling
    • Commercial Floor Sanding
    • Engineered Floor Sanding & Refinishing
  • Wood Floor Fitting
    • Parquet Floor Installation
    • Laminate Floor Installation
    • Engineered Wood Floor Installation - Supply & Fit
    • Solid Wood Floor Fitting - Supply & Fit
    • LVT Floor Installation - Supply & Fit
  • Floor Repairs
    • Parquet Floor Repair and Restoration
    • Engineered Wood Floor Repairs
    • Wood Floor Scratch Repair
    • Floorboards Replacement
  • Care & Maintenance
    • Re-Oiling & Recoating Oiled Floors
    • Vinyl & Linoleum Cleaning
    • Hardwood Floor Buffing
    • Wood Floor Polishing
  • Shop
  • Shop
  • Gallery
  • Service Guide
  • Bookings
  • Book Free Survey
  • Service Advice
  • Product Advice