Floor Sanding & Fitting
Book Free Visit Price Guide 020 88309782
Monday - Friday 07:30 - 17:30, Saturday 07:30 - 16:00
cs@flooringfirst.co.uk
020 88309782
Monday - Friday 07:30 - 17:30, Saturday 07:30 - 16:00
cs@flooringfirst.co.uk
  • Book Free Visit
  • Home
  • Floor Sanding
  • Floor Fitting
  • Floor Repairs
  • Aftercare
    • Wooden Floors
    • Cleaning & Polishing
    • Re-Oiling Wooden Floors
    • Vinyls & Linoleum
    • Vinyl Floor Polishing
    • Get a Quote...
  • For Businesses
  • Gallery
  • Service Guide
  • Shop
  • Book Free Visit

Our Wood Flooring Resource

Find Your Way Around...

Floor Sanding Case Studies

See how FlooringFirst solved flooring challenges

WHY CHOOSE US
CASE STUDIES
PRICE GUIDE
OFFERS
GALLERY
ASK EXPERT
WHY CHOOSE US
CASE STUDIES
PRICE GUIDE
OFFERS
GALLERY
ASK EXPERT
  • Home
  • Case Studies
Engineered Wood Sanding and Restoration in Stanwell, TW19 — Full Case Study

Project Overview This project involved the professional sanding and restoration of an existing wood floor at a property in Stanwell, TW19. The floor had seen years of daily wear and was in need of attention to bring it back to a quality finish. Our team carried out a full assessment before starting work, checking for any boards that needed attention alongside the main sanding and finishing work. ...

Project Overview

This project involved the professional sanding and restoration of an existing wood floor at a property in Stanwell, TW19. The floor had seen years of daily wear and was in need of attention to bring it back to a quality finish. Our team carried out a full assessment before starting work, checking for any boards that needed attention alongside the main sanding and finishing work.

Before the Work

Before work began, the floor showed typical signs of wear. Surface scratches, dull patches, and general finish deterioration were present. A thorough survey was carried out to plan the correct sanding depth, assess board condition, and choose the most appropriate finish for the space.

Survey photos showing the floor condition before work:

Floor condition before work at TW19 Floor condition before work at TW19

Our Approach

The following services were carried out as part of this project:

  • Engineered - Sand, Buff & Lacquer

The Result

Once the sanding and finishing process was complete, the floor was transformed. The wood grain was opened up and brought back to life, the surface was smooth and even, and the new finish provided lasting protection. The client was left with a floor that looked, and performed, as good as new.

Photos of the completed work:

Engineered Wood floor after sanding work in TW19 Engineered Wood floor after sanding work in TW19 Engineered Wood floor after sanding work in TW19

Frequently Asked Questions

How long does floor sanding take?
Most residential sanding jobs are completed in one to two days, depending on floor size and condition. Lacquering or oiling adds further drying and curing time, which we factor into the job schedule.

Do I need to vacate the property during sanding?
Modern dustless sanding equipment keeps dust to a minimum, but we recommend keeping pets and young children clear of the area during the work. Most clients remain in their property throughout.

How much does floor sanding cost in London?
Prices typically range from £25 to £45 per square metre depending on floor condition, finish type, and any repair work required. Gap filling and board replacement are priced separately if needed.

Have a similar project? Call us on 020 88309782 or Book a Free Site Visit

Show more
Hardwood Sanding and Restoration in Hackney, N1 — Full Case Study

Project Overview This project involved the professional sanding and restoration of an existing wood floor at a property in Hackney, N1. The floor had seen years of daily wear and was in need of attention to bring it back to a quality finish. Our team carried out a full assessment before starting work, checking for any boards that needed attention alongside the main sanding and finishing work. Be...

Project Overview

This project involved the professional sanding and restoration of an existing wood floor at a property in Hackney, N1. The floor had seen years of daily wear and was in need of attention to bring it back to a quality finish. Our team carried out a full assessment before starting work, checking for any boards that needed attention alongside the main sanding and finishing work.

Before the Work

Before work began, the floor showed typical signs of wear. Surface scratches, dull patches, and general finish deterioration were present. A thorough survey was carried out to plan the correct sanding depth, assess board condition, and choose the most appropriate finish for the space.

Survey photos showing the floor condition before work:

Floor condition before work at N1

Our Approach

The following services were carried out as part of this project:

  • Gap Filling
  • Hardwood - Sand, Buff & Lacquer
  • Staining

The Result

Once the sanding and finishing process was complete, the floor was transformed. The wood grain was opened up and brought back to life, the surface was smooth and even, and the new finish provided lasting protection. The client was left with a floor that looked, and performed, as good as new.

Photos of the completed work:

Hardwood floor after sanding work in N1 Hardwood floor after sanding work in N1 Hardwood floor after sanding work in N1

Frequently Asked Questions

How long does floor sanding take?
Most residential sanding jobs are completed in one to two days, depending on floor size and condition. Lacquering or oiling adds further drying and curing time, which we factor into the job schedule.

Do I need to vacate the property during sanding?
Modern dustless sanding equipment keeps dust to a minimum, but we recommend keeping pets and young children clear of the area during the work. Most clients remain in their property throughout.

How much does floor sanding cost in London?
Prices typically range from £25 to £45 per square metre depending on floor condition, finish type, and any repair work required. Gap filling and board replacement are priced separately if needed.

Have a similar project? Call us on 020 88309782 or Book a Free Site Visit

Show more
Floorboards Sanding and Restoration in Ealing, W5 — Full Case Study

Project Overview This project involved the professional sanding and restoration of an existing wood floor at a property in Ealing, W5. The floor had seen years of daily wear and was in need of attention to bring it back to a quality finish. Our team carried out a full assessment before starting work, checking for any boards that needed attention alongside the main sanding and finishing work. Bef...

Project Overview

This project involved the professional sanding and restoration of an existing wood floor at a property in Ealing, W5. The floor had seen years of daily wear and was in need of attention to bring it back to a quality finish. Our team carried out a full assessment before starting work, checking for any boards that needed attention alongside the main sanding and finishing work.

Before the Work

Before work began, the floor showed typical signs of wear. Surface scratches, dull patches, and general finish deterioration were present. A thorough survey was carried out to plan the correct sanding depth, assess board condition, and choose the most appropriate finish for the space.

Our Approach

The following services were carried out as part of this project:

  • Floorboard Repairs

The Result

Once the sanding and finishing process was complete, the floor was transformed. The wood grain was opened up and brought back to life, the surface was smooth and even, and the new finish provided lasting protection. The client was left with a floor that looked, and performed, as good as new.

Photos of the completed work:

Floorboards floor after sanding work in W5 Floorboards floor after sanding work in W5 Floorboards floor after sanding work in W5

Frequently Asked Questions

How long does floor sanding take?
Most residential sanding jobs are completed in one to two days, depending on floor size and condition. Lacquering or oiling adds further drying and curing time, which we factor into the job schedule.

Do I need to vacate the property during sanding?
Modern dustless sanding equipment keeps dust to a minimum, but we recommend keeping pets and young children clear of the area during the work. Most clients remain in their property throughout.

How much does floor sanding cost in London?
Prices typically range from £25 to £45 per square metre depending on floor condition, finish type, and any repair work required. Gap filling and board replacement are priced separately if needed.

Have a similar project? Call us on 020 88309782 or Book a Free Site Visit

Show more
Hardwood Floor Sanding and Repair in Leytonstone — Full Case Study

Project Overview This hardwood floor sanding, repair, and re-oiling project was completed at a terraced property in Leytonstone, East London. The client had lived in the house for several years and the floor, a solid oak strip floor, had accumulated damage in several areas: a few boards had split along the grain, one had a deep gouge from furniture removal, and the oil finish throughout had becom...
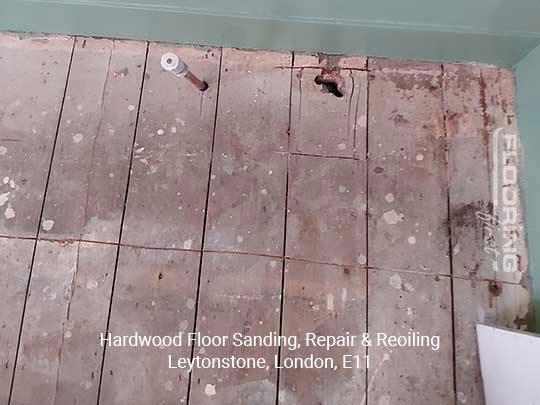
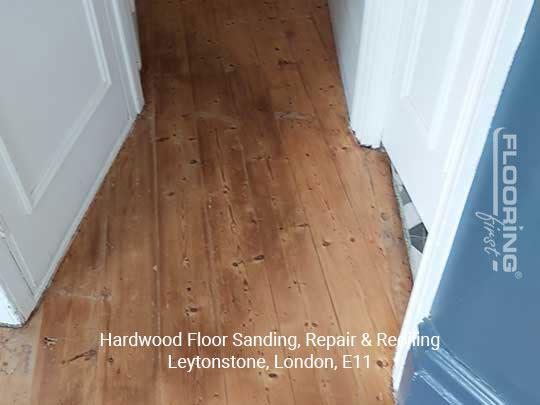
Damaged hardwood floorboards before repair and sanding in Leytonstone Close-up of floorboard damage requiring replacement before restoration

Project Overview

This hardwood floor sanding, repair, and re-oiling project was completed at a terraced property in Leytonstone, East London. The client had lived in the house for several years and the floor, a solid oak strip floor, had accumulated damage in several areas: a few boards had split along the grain, one had a deep gouge from furniture removal, and the oil finish throughout had become dry and patchy. Rather than replacing the entire floor, we carried out targeted board replacement in the worst-affected areas and then sanded and re-oiled the whole floor to bring everything back to a consistent, good condition. Spot repair plus sanding on a hardwood floor of this type typically costs in the range of £25 to £45 per square metre for the sanding element, with board replacement priced per board.

The Challenge

The key challenge in any spot repair project is making the new boards blend with the old ones. Fresh oak boards will always be paler and brighter than boards that have aged over years in a finished room. The fit-and-forget approach of simply swapping damaged boards and sanding straight over them often leaves the repair area looking obvious for some time. Getting a good colour match requires careful selection of replacement stock, appropriate staining or tinting of the oil finish, and thorough sanding across the whole floor rather than just the repaired patches. The client also wanted the floor to look as natural as possible after the work was done, which meant avoiding a heavy lacquer finish in favour of an oil that would blend the old and new wood tones naturally.

Our Approach

  1. Board assessment: We walked the floor and identified each board that needed replacing. In total, five boards were beyond economical repair and were marked for removal.
  2. Board removal: The damaged boards were carefully cut out using a circular saw set to the exact board thickness, then removed without disturbing the neighbouring boards.
  3. New board fitting: Replacement oak boards selected to match the existing profile were glued and secret-nailed into place, then left to cure before sanding began.
  4. Full floor sanding: The entire floor was sanded in sequence: coarse pass to strip the old finish and flatten the surface, medium pass to remove the scratch marks, fine pass to prepare for the oil finish. Sanding all the old and new boards together at this stage is what allows the final finish to read as one uniform surface.
  5. Oil application: We applied a hardwax oil tinted slightly amber to help the new boards blend with the aged tone of the original floor. Two coats were applied with a buffing pass between them.
  6. Final buff: A final light buff brought the oil to an even sheen across the whole floor.
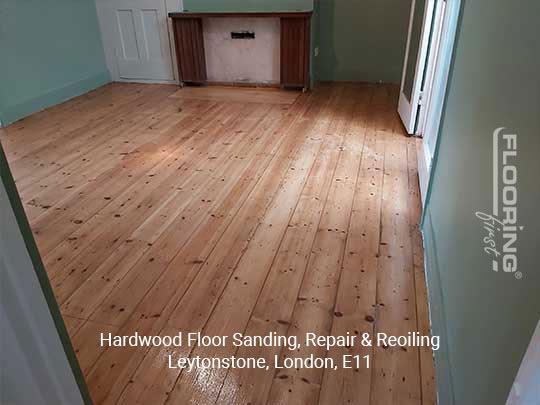
Hardwood floor after repair, sanding and re-oiling in Leytonstone

The Result

The repaired sections blended well with the rest of the floor. The slight tint in the oil helped to even out the colour difference between old and new boards, and within a few months of normal use the whole floor looked consistent. The client was pleased not just with the visual result but also with the cost saving compared to a full replacement, which would have been three to four times the price. The oil finish gives the floor a natural, matt look that suits the character of the house and is easy to maintain with occasional re-oiling of any areas that start to look dry.

Frequently Asked Questions

How do you match replacement floorboards to the existing ones?

We try to source replacement boards in the same wood species, width, and thickness as the originals. Exact matches are not always possible, particularly for older or non-standard boards, but working with the same species and then finishing old and new together minimises the visible difference. Tinted oils or stains can further close the gap in colour.

Is an oil finish as hardwearing as lacquer?

Oil finishes are less resistant to surface scratching than lacquer, but they are much easier to maintain. Scratches in an oiled floor tend to blend in naturally, whereas lacquer scratches show clearly as white marks. Worn areas in an oiled floor can be re-oiled without sanding the whole floor, which makes maintenance straightforward and low-cost.

How often does an oiled hardwood floor need maintenance?

In a normal domestic setting, a full re-oiling is typically needed every three to five years. Between re-oiling, using a suitable wood floor cleaner and a maintenance oil product on heavy-wear areas every few months will extend the time between full treatments considerably.

Have a similar project? Call us on 020 88309782 or Book a Free Site Visit

Show more
Engineered Wood Floor Fitting in Greenwich — Full Case Study

Project Overview This engineered wood flooring installation was completed at a flat in Greenwich, South East London. The client had recently purchased the property and wanted to replace the existing old carpet throughout the open-plan living and kitchen area with a real wood floor. Engineered wood was chosen for several practical reasons: the flat was on the ground floor with a concrete subfloor,...

Room before engineered wood floor fitting in Greenwich Subfloor inspection and preparation before engineered floor installation

Project Overview

This engineered wood flooring installation was completed at a flat in Greenwich, South East London. The client had recently purchased the property and wanted to replace the existing old carpet throughout the open-plan living and kitchen area with a real wood floor. Engineered wood was chosen for several practical reasons: the flat was on the ground floor with a concrete subfloor, some areas were below the damp-proof course level, and the client had underfloor heating in the kitchen zone. Engineered wood handles all of these conditions better than solid wood. For a professional supply and fit, clients typically pay between £35 and £60 per square metre.

The Challenge

The concrete subfloor had two complications. First, moisture readings taken with a damp meter showed levels that were slightly above the threshold for direct fitting, so additional damp-proof measures were required before any boards could go down. Second, the floor was not level. There was a gradual slope of about eight millimetres across the room that would have been noticeable once the boards were laid and could have caused joint stress over time. Levelling a concrete floor to the tolerances required for a floating engineered floor is not a quick job, but it is essential for a lasting result.

Our Approach

  1. Carpet removal: The existing carpet and underlay were lifted and removed, along with any gripper rods and tack strips.
  2. Moisture control: A two-part epoxy damp-proof membrane was applied directly to the concrete and allowed to cure fully. This creates a reliable moisture barrier that will protect the engineered boards for the life of the floor.
  3. Levelling: A self-levelling compound was poured across the concrete and spread to bring the floor within two millimetres of level over the two-metre span specified in the engineered floor manufacturer's fitting guidelines. The compound was allowed to cure for 24 hours before any further work proceeded.
  4. Acclimatisation: The engineered boards were laid flat in the room for 48 hours to adjust to the room's humidity and temperature before fitting.
  5. Underlay: A suitable underlay compatible with the underfloor heating was laid across the concrete. The thermal resistance rating was kept within the limits specified for the heating system.
  6. Board installation: The boards were installed using a floating click system in a staggered pattern. Expansion gaps were maintained around the perimeter and at any fixed objects such as pipe runs and island units.
  7. Finishing: Matching skirting was fitted to cover the expansion gaps, and colour-matched threshold strips were installed at the kitchen entrance and doorways.

Completed engineered wood floor installation in Greenwich flat

The Result

The finished floor completely transformed the flat. The open-plan space now had a consistent, warm floor surface running from the entrance hallway through the living area and into the kitchen. The boards were clean and level, the joints tight, and the colour, a natural brushed oak, worked well with the client's furniture. The floor also performed well with the underfloor heating, warming up evenly without any creaking or movement at the joints. This is a floor that, properly maintained, should give 25 to 30 years of good service.

Frequently Asked Questions

Why is levelling the subfloor so important before fitting engineered wood?

Engineered boards are rigid, and if they span an uneven subfloor, the joints take the strain. Over time, this can cause the click joints to crack or the boards to develop a slight rocking motion underfoot. Most manufacturers specify a maximum of two millimetres deviation over two metres for their floating floor products.

Is a damp-proof membrane always needed under engineered wood on concrete?

It depends on the moisture readings in the concrete. If readings are within acceptable limits, a standard underlay with an integrated moisture barrier is often sufficient. If moisture levels are elevated, a dedicated epoxy or sheet membrane is necessary. We always test moisture levels before recommending a course of action.

How do you handle expansion gaps around kitchen islands and fixed objects?

The standard approach is to maintain the required expansion gap around all fixed objects and cover it with a suitable trim or threshold strip. In some kitchen installations, the island units are sited on top of the finished floor rather than fixed to the subfloor, which removes the need for a gap around them entirely.

Have a similar project? Call us on 020 88309782 or Book a Free Site Visit

Show more
Fitting Engineered Wood in Greenwich, SE7 — Full Case Study

Project Overview This project involved the professional installation of engineered wood flooring at a property in Greenwich, SE7. The client required a quality floor that would stand up to daily use and complement their interior. Our fitting team assessed the subfloor condition, carried out any necessary preparation work, and fitted the new floor to a high standard. Before the Work Prior to ins...

Project Overview

This project involved the professional installation of engineered wood flooring at a property in Greenwich, SE7. The client required a quality floor that would stand up to daily use and complement their interior. Our fitting team assessed the subfloor condition, carried out any necessary preparation work, and fitted the new floor to a high standard.

Before the Work

Prior to installation, the existing floor covering was inspected and the subfloor was prepared to ensure it was flat, dry, and suitable for the new engineered wood. Any existing floor covering was lifted and disposed of cleanly before the fitting work began.

Our Approach

The following services were carried out as part of this project:

  • Door Frame Trimming
  • Engineered Flooring Installation

The Result

The completed engineered wood installation looked clean and finished throughout. Joins are tight, edges are neat, and the floor sits flat and stable. Beading and threshold strips were fitted where required to complete the job properly. The client was pleased with both the quality of the work and the appearance of the new floor.

Photos of the completed work:

Engineered Wood floor after fitting work in SE7 Engineered Wood floor after fitting work in SE7 Engineered Wood floor after fitting work in SE7

Frequently Asked Questions

How long does engineered wood installation take?
Most fitting jobs are completed within one to two days. Larger areas or more detailed layouts such as herringbone patterns take longer due to the additional cutting and positioning involved.

Do I need underlay?
Yes, underlay is required for most floor types and helps with insulation, sound deadening, and levelling minor subfloor imperfections. We can supply and fit appropriate underlay as part of the installation.

How much does floor fitting cost in London?
Fitting costs typically range from £35 to £60 per square metre depending on floor type and complexity. We provide a full written quote before starting any work.

Have a similar project? Call us on 020 88309782 or Book a Free Site Visit

Show more
Hardwood Sanding and Restoration in Leytonstone, E11 — Full Case Study

Project Overview This project involved the professional sanding and restoration of an existing wood floor at a property in Leytonstone, E11. The floor had seen years of daily wear and was in need of attention to bring it back to a quality finish. Our team carried out a full assessment before starting work, checking for any boards that needed attention alongside the main sanding and finishing work...

Project Overview

This project involved the professional sanding and restoration of an existing wood floor at a property in Leytonstone, E11. The floor had seen years of daily wear and was in need of attention to bring it back to a quality finish. Our team carried out a full assessment before starting work, checking for any boards that needed attention alongside the main sanding and finishing work.

Before the Work

Before work began, the floor showed typical signs of wear. Surface scratches, dull patches, and general finish deterioration were present. A thorough survey was carried out to plan the correct sanding depth, assess board condition, and choose the most appropriate finish for the space.

Survey photos showing the floor condition before work:

Floor condition before work at E11 Floor condition before work at E11 Floor condition before work at E11

Our Approach

The following services were carried out as part of this project:

  • Floorboards - Fireplace Heart Removal
  • Floorboards - Replacement (incl. materials)
  • Floorboards - Sand, Buff & Lacquer
  • Gap Filling
  • Lift & Dispose Hardwood Flooring
  • Stairs - Sand & Seal
  • Floorboards Installation ( Incl. materials)

The Result

Once the sanding and finishing process was complete, the floor was transformed. The wood grain was opened up and brought back to life, the surface was smooth and even, and the new finish provided lasting protection. The client was left with a floor that looked, and performed, as good as new.

Photos of the completed work:

Hardwood floor after sanding work in E11 Hardwood floor after sanding work in E11 Hardwood floor after sanding work in E11

Frequently Asked Questions

How long does floor sanding take?
Most residential sanding jobs are completed in one to two days, depending on floor size and condition. Lacquering or oiling adds further drying and curing time, which we factor into the job schedule.

Do I need to vacate the property during sanding?
Modern dustless sanding equipment keeps dust to a minimum, but we recommend keeping pets and young children clear of the area during the work. Most clients remain in their property throughout.

How much does floor sanding cost in London?
Prices typically range from £25 to £45 per square metre depending on floor condition, finish type, and any repair work required. Gap filling and board replacement are priced separately if needed.

Have a similar project? Call us on 020 88309782 or Book a Free Site Visit

Show more
Engineered Wood Sanding and Restoration in Poplar, E14 — Full Case Study

Project Overview This project involved the professional sanding and restoration of an existing wood floor at a property in Poplar, E14. The floor had seen years of daily wear and was in need of attention to bring it back to a quality finish. Our team carried out a full assessment before starting work, checking for any boards that needed attention alongside the main sanding and finishing work. Be...

Project Overview

This project involved the professional sanding and restoration of an existing wood floor at a property in Poplar, E14. The floor had seen years of daily wear and was in need of attention to bring it back to a quality finish. Our team carried out a full assessment before starting work, checking for any boards that needed attention alongside the main sanding and finishing work.

Before the Work

Before work began, the floor showed typical signs of wear. Surface scratches, dull patches, and general finish deterioration were present. A thorough survey was carried out to plan the correct sanding depth, assess board condition, and choose the most appropriate finish for the space.

Survey photos showing the floor condition before work:

Floor condition before work at E14 Floor condition before work at E14 Floor condition before work at E14

Our Approach

The following services were carried out as part of this project:

  • Beading Installation (incl. materials)
  • Engineered - Sand, Buff & Lacquer
  • Staining
  • Plank Repair

The Result

Once the sanding and finishing process was complete, the floor was transformed. The wood grain was opened up and brought back to life, the surface was smooth and even, and the new finish provided lasting protection. The client was left with a floor that looked, and performed, as good as new.

Photos of the completed work:

Engineered Wood floor after sanding work in E14 Engineered Wood floor after sanding work in E14 Engineered Wood floor after sanding work in E14

Frequently Asked Questions

How long does floor sanding take?
Most residential sanding jobs are completed in one to two days, depending on floor size and condition. Lacquering or oiling adds further drying and curing time, which we factor into the job schedule.

Do I need to vacate the property during sanding?
Modern dustless sanding equipment keeps dust to a minimum, but we recommend keeping pets and young children clear of the area during the work. Most clients remain in their property throughout.

How much does floor sanding cost in London?
Prices typically range from £25 to £45 per square metre depending on floor condition, finish type, and any repair work required. Gap filling and board replacement are priced separately if needed.

Have a similar project? Call us on 020 88309782 or Book a Free Site Visit

Show more
Floor Sanding and Restoration in Kilburn, NW6 — Full Case Study

Project Overview This project involved the professional sanding and restoration of an existing wood floor at a property in Kilburn, NW6. The floor had seen years of daily wear and was in need of attention to bring it back to a quality finish. Our team carried out a full assessment before starting work, checking for any boards that needed attention alongside the main sanding and finishing work. B...

Project Overview

This project involved the professional sanding and restoration of an existing wood floor at a property in Kilburn, NW6. The floor had seen years of daily wear and was in need of attention to bring it back to a quality finish. Our team carried out a full assessment before starting work, checking for any boards that needed attention alongside the main sanding and finishing work.

Before the Work

Before work began, the floor showed typical signs of wear. Surface scratches, dull patches, and general finish deterioration were present. A thorough survey was carried out to plan the correct sanding depth, assess board condition, and choose the most appropriate finish for the space.

Survey photos showing the floor condition before work:

Floor condition before work at NW6

Our Approach

The following services were carried out as part of this project:

  • Floorboards - Sand, Buff & Lacquer
  • Gap Filling
  • Lift & Dispose Carpets or Laminates
  • Staining

The Result

Once the sanding and finishing process was complete, the floor was transformed. The wood grain was opened up and brought back to life, the surface was smooth and even, and the new finish provided lasting protection. The client was left with a floor that looked, and performed, as good as new.

Photos of the completed work:

Laminate floor after sanding work in NW6 Laminate floor after sanding work in NW6 Laminate floor after sanding work in NW6

Frequently Asked Questions

How long does floor sanding take?
Most residential sanding jobs are completed in one to two days, depending on floor size and condition. Lacquering or oiling adds further drying and curing time, which we factor into the job schedule.

Do I need to vacate the property during sanding?
Modern dustless sanding equipment keeps dust to a minimum, but we recommend keeping pets and young children clear of the area during the work. Most clients remain in their property throughout.

How much does floor sanding cost in London?
Prices typically range from £25 to £45 per square metre depending on floor condition, finish type, and any repair work required. Gap filling and board replacement are priced separately if needed.

Have a similar project? Call us on 020 88309782 or Book a Free Site Visit

Show more
Parquet Floor Fitting in Peckham — Full Case Study

Project Overview This parquet floor fitting project was completed at a Victorian terrace in Peckham, South East London. The client had recently renovated the ground floor of the property and wanted a parquet floor to run through the hallway and front reception room. A traditional herringbone pattern in solid oak was chosen to suit the period character of the house. Parquet fitting is a skilled jo...

Subfloor preparation before parquet floor fitting in Peckham Room cleared and subfloor checked prior to parquet installation

Project Overview

This parquet floor fitting project was completed at a Victorian terrace in Peckham, South East London. The client had recently renovated the ground floor of the property and wanted a parquet floor to run through the hallway and front reception room. A traditional herringbone pattern in solid oak was chosen to suit the period character of the house. Parquet fitting is a skilled job that takes considerably longer than fitting straight-run boards, which is reflected in the price. For a professionally fitted, sanded, and finished solid parquet floor in London, clients should budget in the region of £70 to £100 per square metre, depending on the pattern chosen and the complexity of the layout.

The Challenge

The main technical challenge on this project was the subfloor condition. The hallway had a suspended timber subfloor that had a slight spring to it, while the front room sat on a solid concrete base. Fitting parquet across two different subfloor types requires a consistent base level between them, which meant the junction between the hallway and the reception room needed careful attention. Any height difference would have been immediately visible as a step in the finished floor. The hallway joists also needed reinforcing in one section where they had dropped slightly, creating a low spot that would have produced a hollow sound underfoot had it been left.

Our Approach

  1. Subfloor assessment: We checked the level across both rooms and at the junction, measured the deflection in the timber subfloor, and identified the section with the dropped joist.
  2. Joist repair: A new noggin was fitted between the affected joists to restore support and eliminate the movement. The chipboard deck was re-screwed at closer centres to reduce flex to an acceptable level.
  3. Level transition: The concrete in the front room was slightly higher than the finished timber deck height. We used a thin ply packing layer on the timber side to bring both surfaces to exactly the same level at the junction.
  4. Pattern layout: Before any blocks were glued, we dry-laid the herringbone pattern across both rooms to confirm the alignment and ensure the pattern met correctly at the doorway between the two spaces.
  5. Block fitting: The parquet blocks were glued down with a flexible wood adhesive, starting from the centreline of the doorway and working outwards. Each block was pressed firmly and checked for level as it went down.
  6. Sanding and finishing: Once the adhesive had fully cured over 48 hours, the floor was sanded diagonally in two directions through three grit stages, then finished with three coats of a satin lacquer.

Completed herringbone parquet floor after fitting and lacquering in Peckham

The Result

The finished floor ran through both rooms with a consistent, tight herringbone pattern and no visible transition at the junction between the two subfloor types. The satin lacquer gave the oak a warm, slightly understated finish that suited the renovation style. The client commented that the floor was the centrepiece of the whole ground-floor renovation. Parquet fitted over a correctly prepared subfloor and finished with a quality lacquer will look good for decades and can be re-sanded and refinished when it eventually shows wear.

Frequently Asked Questions

How long does it take to fit a parquet floor?

The fitting stage for a single room of average size typically takes one to two days, depending on the pattern complexity and the number of cuts required. Subfloor preparation adds time, as does the 48-hour adhesive cure period before sanding can begin. A complete parquet project from start to finish, including fitting, sanding, and three-coat lacquering, generally takes five to seven working days.

Can parquet be fitted over a suspended timber floor?

Yes, provided the timber floor is structurally sound and has minimal deflection. A suspended floor that flexes significantly underfoot is not a good base for glued parquet, as the movement can break the adhesive bond over time. Reinforcing the subfloor before fitting is a worthwhile investment that prevents problems later.

What is the best pattern for a small hallway?

Herringbone is the most popular choice for hallways because the diagonal lines draw the eye down the length of the space, making it feel longer. A straight-run or square-set parquet pattern can work well in wider hallways or where a simpler look is preferred. The scale of the block also matters: smaller blocks suit narrower hallways better than larger ones.

Have a similar project? Call us on 020 88309782 or Book a Free Site Visit

Show more
  • 1
  • 2
  • 3
  • 4
  • 5
  • 6
  • 7
  • 8
  • 9
  • 10
  • 11
  • 12
  • 13
  • 14
  • 15
  • 16
  • 17
  • 18
  • 19
  • 20
  • 21
  • 22
  • 23
  • 24
  • 25
  • 26
  • 27
  • 28
  • 29
  • 30
  • 31
  • 32
  • 33
  • 34
  • 35
  • 36
  • 37
  • 38
  • 39
  • 40
  • 41
  • 42
  • 43
  • 44
  • 45
  • 46
  • 47
  • 48
  • 49
  • 50
  • 51
  • 52
  • 53
  • 54
  • 55
  • 56
  • 57
  • 58
  • 59
  • 60
  • 61
  • 62
  • 63
  • 64
  • 65
  • 66

Our Flooring Company

Contacts & Showroom Book Free Site Survey About Our Flooring Company Join Our Team Work as a Contractor

Service Information

Terms of Service Terms of Sales Deliveries & Charges Cookie Settings Returns Policy Privacy Policy

Help

FAQs Case Studies Sitemap Glossary
𝕏
FlooringFirst! Services
158 Coles Green Road
London, NW2 7HW
T: 020 88309782
Floor Sanding Services: Central London, East London, Near London, North London, Northwest London, Southeast London, Southwest London, West London
Wood Floor Installation Service: Central London, East London, Near London, North London, Northwest London, Southeast London, Southwest London, West London

  • Flooring Services
  • Floor Sanding
    • Wood Floor Staining
    • Wood Floor Gap Filling
    • Commercial Floor Sanding
    • Engineered Floor Sanding & Refinishing
  • Wood Floor Fitting
    • Parquet Floor Installation
    • Laminate Floor Installation
    • Engineered Wood Floor Installation - Supply & Fit
    • Solid Wood Floor Fitting - Supply & Fit
    • LVT Floor Installation - Supply & Fit
  • Floor Repairs
    • Parquet Floor Repair and Restoration
    • Engineered Wood Floor Repairs
    • Wood Floor Scratch Repair
    • Floorboards Replacement
  • Care & Maintenance
    • Re-Oiling & Recoating Oiled Floors
    • Vinyl & Linoleum Cleaning
    • Hardwood Floor Buffing
    • Wood Floor Polishing
  • Shop
  • Shop
  • Gallery
  • Service Guide
  • Bookings
  • Book Free Survey
  • Service Advice
  • Product Advice