Floor Sanding & Fitting
Book Free Visit Price Guide 020 88309782
Monday - Friday 07:30 - 17:30, Saturday 07:30 - 16:00
cs@flooringfirst.co.uk
020 88309782
Monday - Friday 07:30 - 17:30, Saturday 07:30 - 16:00
cs@flooringfirst.co.uk
  • Book Free Visit
  • Home
  • Floor Sanding
  • Floor Fitting
  • Floor Repairs
  • Aftercare
    • Wooden Floors
    • Cleaning & Polishing
    • Re-Oiling Wooden Floors
    • Vinyls & Linoleum
    • Vinyl Floor Polishing
    • Get a Quote...
  • For Businesses
  • Gallery
  • Service Guide
  • Shop
  • Book Free Visit

Our Wood Flooring Resource

Find Your Way Around...

Floor Sanding Case Studies

See how FlooringFirst solved flooring challenges

WHY CHOOSE US
CASE STUDIES
PRICE GUIDE
OFFERS
GALLERY
ASK EXPERT
WHY CHOOSE US
CASE STUDIES
PRICE GUIDE
OFFERS
GALLERY
ASK EXPERT
  • Home
  • Case Studies
Fitting Parquet in Peckham, SE15 — Full Case Study

Project Overview This project involved the professional installation of parquet flooring at a property in Peckham, SE15. The client required a quality floor that would stand up to daily use and complement their interior. Our fitting team assessed the subfloor condition, carried out any necessary preparation work, and fitted the new floor to a high standard. Before the Work Prior to installation...

Project Overview

This project involved the professional installation of parquet flooring at a property in Peckham, SE15. The client required a quality floor that would stand up to daily use and complement their interior. Our fitting team assessed the subfloor condition, carried out any necessary preparation work, and fitted the new floor to a high standard.

Before the Work

Prior to installation, the existing floor covering was inspected and the subfloor was prepared to ensure it was flat, dry, and suitable for the new parquet. Any existing floor covering was lifted and disposed of cleanly before the fitting work began.

Our Approach

The following services were carried out as part of this project:

  • Door Frame Trimming
  • Parquet Floor Fitting - With Border
  • Subfloor Preparation (ply 9 mm)
  • Thresholds & Fitting (inc. materials)

The Result

The completed parquet installation looked clean and finished throughout. Joins are tight, edges are neat, and the floor sits flat and stable. Beading and threshold strips were fitted where required to complete the job properly. The client was pleased with both the quality of the work and the appearance of the new floor.

Photos of the completed work:

Parquet floor after fitting work in SE15 Parquet floor after fitting work in SE15 Parquet floor after fitting work in SE15

Frequently Asked Questions

How long does parquet installation take?
Most fitting jobs are completed within one to two days. Larger areas or more detailed layouts such as herringbone patterns take longer due to the additional cutting and positioning involved.

Do I need underlay?
Yes, underlay is required for most floor types and helps with insulation, sound deadening, and levelling minor subfloor imperfections. We can supply and fit appropriate underlay as part of the installation.

How much does floor fitting cost in London?
Fitting costs typically range from £70 to £100 per square metre depending on floor type and complexity. We provide a full written quote before starting any work.

Have a similar project? Call us on 020 88309782 or Book a Free Site Visit

Show more
Parquet Sanding and Restoration in Bromley, BR1 — Full Case Study

Project Overview This project involved the professional sanding and restoration of an existing wood floor at a property in Bromley, BR1. The floor had seen years of daily wear and was in need of attention to bring it back to a quality finish. Our team carried out a full assessment before starting work, checking for any boards that needed attention alongside the main sanding and finishing work. B...

Project Overview

This project involved the professional sanding and restoration of an existing wood floor at a property in Bromley, BR1. The floor had seen years of daily wear and was in need of attention to bring it back to a quality finish. Our team carried out a full assessment before starting work, checking for any boards that needed attention alongside the main sanding and finishing work.

Before the Work

Before work began, the floor showed typical signs of wear. Surface scratches, dull patches, and general finish deterioration were present. A thorough survey was carried out to plan the correct sanding depth, assess board condition, and choose the most appropriate finish for the space.

Our Approach

The following services were carried out as part of this project:

  • Gap Filling
  • Parquet - Sand, Buff & Lacquer

The Result

Once the sanding and finishing process was complete, the floor was transformed. The wood grain was opened up and brought back to life, the surface was smooth and even, and the new finish provided lasting protection. The client was left with a floor that looked, and performed, as good as new.

Photos of the completed work:

Parquet floor after sanding work in BR1 Parquet floor after sanding work in BR1 Parquet floor after sanding work in BR1

Frequently Asked Questions

How long does floor sanding take?
Most residential sanding jobs are completed in one to two days, depending on floor size and condition. Lacquering or oiling adds further drying and curing time, which we factor into the job schedule.

Do I need to vacate the property during sanding?
Modern dustless sanding equipment keeps dust to a minimum, but we recommend keeping pets and young children clear of the area during the work. Most clients remain in their property throughout.

How much does floor sanding cost in London?
Prices typically range from £25 to £45 per square metre depending on floor condition, finish type, and any repair work required. Gap filling and board replacement are priced separately if needed.

Have a similar project? Call us on 020 88309782 or Book a Free Site Visit

Show more
Parquet Floor Fitting in Blackheath — Full Case Study

Project Overview This parquet floor fitting project was completed at a large family home in Blackheath, South East London. The client wanted a solid parquet floor fitted in the ground-floor hallway and through into the main reception room. The property was a detached Victorian house with character features throughout, and the new parquet floor was intended to complement the period feel of the spa...

Subfloor preparation before parquet floor fitting in Blackheath Room cleared and moisture barrier preparation during parquet installation

Project Overview

This parquet floor fitting project was completed at a large family home in Blackheath, South East London. The client wanted a solid parquet floor fitted in the ground-floor hallway and through into the main reception room. The property was a detached Victorian house with character features throughout, and the new parquet floor was intended to complement the period feel of the space. A traditional herringbone pattern in solid oak was chosen. The project scope included full subfloor preparation, moisture protection, fitting, sanding, and a final lacquer finish. Parquet fitting with a complete finish in London falls in the £70 to £100 per square metre range.

The Challenge

The ground floor of this property was at or close to ground level in parts, which meant moisture was a concern. A damp meter check of the subfloor confirmed readings above the safe threshold for solid wood installation without additional protection. Fitting a solid parquet floor directly onto a damp subfloor without a moisture barrier risks the blocks absorbing moisture, swelling, and lifting within a few years. This had to be dealt with properly before any timber went down. The hallway also had a slightly uneven concrete base where a previous installation had been removed, leaving patches of adhesive residue and some localised surface damage that needed remediation.

Our Approach

  1. Subfloor preparation: The concrete subfloor was thoroughly cleaned, with all adhesive residue scraped and ground back. The surface was then vacuumed and inspected for level.
  2. Levelling: Low spots and the areas damaged by the previous floor removal were filled with a rapid-set levelling compound and feathered out to achieve a flat base within the manufacturer's tolerance.
  3. Moisture barrier membrane: A DPM-grade polyethylene sheet membrane was laid over the prepared concrete, lapped up the walls by 50 millimetres, and taped at all joints. This creates a complete moisture break between the concrete and the wood above.
  4. Pattern layout: We planned the herringbone layout to centre correctly in both rooms and align through the doorway, dry-laying the first several rows before committing to adhesive.
  5. Block fitting: Parquet blocks were glued down using a flexible wood adhesive suitable for use over membrane. Each block was set level and checked as the pattern built out from the centreline.
  6. Sanding and finishing: After a full 48-hour cure, the floor was sanded diagonally through three grit stages and finished with three coats of hard lacquer, lightly abraded between coats.

Finished herringbone parquet floor after fitting and lacquering in Blackheath

The Result

The floor came out clean and sharp, with the herringbone running correctly through both spaces and meeting neatly at the doorway. The lacquer finish complemented the natural character of the oak and gave the hallway a proper period feel that matched the house. The moisture barrier means the floor has a solid long-term foundation, and the client can expect this parquet to last for many decades without the kind of moisture-related problems that affect poorly installed floors. A well-fitted, lacquer-finished parquet floor maintains its appearance with nothing more than regular sweeping and an occasional damp mop with a suitable wood floor cleaner.

Frequently Asked Questions

Why is a moisture barrier important under parquet flooring?

Solid wood absorbs and releases moisture constantly in response to its environment. When the subfloor is damp, the blocks absorb moisture from below, expand, and eventually lift or cup. A membrane between the concrete and the wood prevents this moisture from reaching the blocks and protects the floor's structural integrity over the long term.

How do you ensure the herringbone pattern aligns correctly through a doorway?

Careful layout planning before any blocks are glued is essential. We establish a centreline that runs through the doorway and use this as the reference point for both rooms. The first few rows are dry-laid without adhesive to confirm the alignment before the permanent fitting begins.

Can parquet flooring be installed in a kitchen or bathroom?

We generally advise against solid parquet in rooms with high or unpredictable humidity, such as kitchens and bathrooms. Solid wood and constant moisture exposure are a poor combination. Engineered wood with a lacquer finish is a much better option for these areas if you want the wood floor look in wetter parts of the house.

Have a similar project? Call us on 020 88309782 or Book a Free Site Visit

Show more
Fitting Parquet in Greenwich, SE3 — Full Case Study

Project Overview This project involved the professional installation of parquet flooring at a property in Greenwich, SE3. The client required a quality floor that would stand up to daily use and complement their interior. Our fitting team assessed the subfloor condition, carried out any necessary preparation work, and fitted the new floor to a high standard. Before the Work Prior to installatio...

Project Overview

This project involved the professional installation of parquet flooring at a property in Greenwich, SE3. The client required a quality floor that would stand up to daily use and complement their interior. Our fitting team assessed the subfloor condition, carried out any necessary preparation work, and fitted the new floor to a high standard.

Before the Work

Prior to installation, the existing floor covering was inspected and the subfloor was prepared to ensure it was flat, dry, and suitable for the new parquet. Any existing floor covering was lifted and disposed of cleanly before the fitting work began.

Survey photos showing the floor condition before work:

Floor condition before work at SE3 Floor condition before work at SE3 Floor condition before work at SE3

Our Approach

The following services were carried out as part of this project:

  • Damp Proofing - Liquid DPM
  • Door Frame Trimming
  • Parquet Floor Fitting - No Border
  • Thresholds & Fitting (inc. materials)
  • Border Around Fireplace

The Result

The completed parquet installation looked clean and finished throughout. Joins are tight, edges are neat, and the floor sits flat and stable. Beading and threshold strips were fitted where required to complete the job properly. The client was pleased with both the quality of the work and the appearance of the new floor.

Photos of the completed work:

Parquet floor after fitting work in SE3 Parquet floor after fitting work in SE3 Parquet floor after fitting work in SE3

Frequently Asked Questions

How long does parquet installation take?
Most fitting jobs are completed within one to two days. Larger areas or more detailed layouts such as herringbone patterns take longer due to the additional cutting and positioning involved.

Do I need underlay?
Yes, underlay is required for most floor types and helps with insulation, sound deadening, and levelling minor subfloor imperfections. We can supply and fit appropriate underlay as part of the installation.

How much does floor fitting cost in London?
Fitting costs typically range from £70 to £100 per square metre depending on floor type and complexity. We provide a full written quote before starting any work.

Have a similar project? Call us on 020 88309782 or Book a Free Site Visit

Show more
Engineered Wood Sanding and Restoration in East London, E1 — Full Case Study

Project Overview This project involved the professional sanding and restoration of an existing wood floor at a property in East London, E1. The floor had seen years of daily wear and was in need of attention to bring it back to a quality finish. Our team carried out a full assessment before starting work, checking for any boards that needed attention alongside the main sanding and finishing work....

Project Overview

This project involved the professional sanding and restoration of an existing wood floor at a property in East London, E1. The floor had seen years of daily wear and was in need of attention to bring it back to a quality finish. Our team carried out a full assessment before starting work, checking for any boards that needed attention alongside the main sanding and finishing work.

Before the Work

Before work began, the floor showed typical signs of wear. Surface scratches, dull patches, and general finish deterioration were present. A thorough survey was carried out to plan the correct sanding depth, assess board condition, and choose the most appropriate finish for the space.

Survey photos showing the floor condition before work:

Floor condition before work at E1 Floor condition before work at E1 Floor condition before work at E1

Our Approach

The following services were carried out as part of this project:

  • Engineered - Buff & Re-Oil
  • Furniture Moving
  • Stairs - Buff & Re-Oil
  • Glue Down/Repair Veneer on Damaged Planks
  • Gap Filling - Large Cracks

The Result

Once the sanding and finishing process was complete, the floor was transformed. The wood grain was opened up and brought back to life, the surface was smooth and even, and the new finish provided lasting protection. The client was left with a floor that looked, and performed, as good as new.

Photos of the completed work:

Engineered Wood floor after sanding work in E1 Engineered Wood floor after sanding work in E1 Engineered Wood floor after sanding work in E1

Frequently Asked Questions

How long does floor sanding take?
Most residential sanding jobs are completed in one to two days, depending on floor size and condition. Lacquering or oiling adds further drying and curing time, which we factor into the job schedule.

Do I need to vacate the property during sanding?
Modern dustless sanding equipment keeps dust to a minimum, but we recommend keeping pets and young children clear of the area during the work. Most clients remain in their property throughout.

How much does floor sanding cost in London?
Prices typically range from £25 to £45 per square metre depending on floor condition, finish type, and any repair work required. Gap filling and board replacement are priced separately if needed.

Have a similar project? Call us on 020 88309782 or Book a Free Site Visit

Show more
Parquet Sanding and Restoration in Westminster, W1S — Full Case Study

Project Overview This project involved the professional sanding and restoration of an existing wood floor at a property in Westminster, W1S. The floor had seen years of daily wear and was in need of attention to bring it back to a quality finish. Our team carried out a full assessment before starting work, checking for any boards that needed attention alongside the main sanding and finishing work...

Project Overview

This project involved the professional sanding and restoration of an existing wood floor at a property in Westminster, W1S. The floor had seen years of daily wear and was in need of attention to bring it back to a quality finish. Our team carried out a full assessment before starting work, checking for any boards that needed attention alongside the main sanding and finishing work.

Before the Work

Before work began, the floor showed typical signs of wear. Surface scratches, dull patches, and general finish deterioration were present. A thorough survey was carried out to plan the correct sanding depth, assess board condition, and choose the most appropriate finish for the space.

Survey photos showing the floor condition before work:

Floor condition before work at W1S Floor condition before work at W1S Floor condition before work at W1S

Our Approach

The following services were carried out as part of this project:

  • Gap Filling
  • Parquet - Repairs (excl. materials)
  • Parquet - Sand, Buff & Lacquer
  • Self Leveling

The Result

Once the sanding and finishing process was complete, the floor was transformed. The wood grain was opened up and brought back to life, the surface was smooth and even, and the new finish provided lasting protection. The client was left with a floor that looked, and performed, as good as new.

Photos of the completed work:

Parquet floor after sanding work in W1S Parquet floor after sanding work in W1S Parquet floor after sanding work in W1S

Frequently Asked Questions

How long does floor sanding take?
Most residential sanding jobs are completed in one to two days, depending on floor size and condition. Lacquering or oiling adds further drying and curing time, which we factor into the job schedule.

Do I need to vacate the property during sanding?
Modern dustless sanding equipment keeps dust to a minimum, but we recommend keeping pets and young children clear of the area during the work. Most clients remain in their property throughout.

How much does floor sanding cost in London?
Prices typically range from £25 to £45 per square metre depending on floor condition, finish type, and any repair work required. Gap filling and board replacement are priced separately if needed.

Have a similar project? Call us on 020 88309782 or Book a Free Site Visit

Show more
Fitting Laminate in Upper Norwood, SE19 — Full Case Study

Project Overview This project involved the professional installation of laminate flooring at a property in Upper Norwood, SE19. The client required a quality floor that would stand up to daily use and complement their interior. Our fitting team assessed the subfloor condition, carried out any necessary preparation work, and fitted the new floor to a high standard. Before the Work Prior to insta...

Project Overview

This project involved the professional installation of laminate flooring at a property in Upper Norwood, SE19. The client required a quality floor that would stand up to daily use and complement their interior. Our fitting team assessed the subfloor condition, carried out any necessary preparation work, and fitted the new floor to a high standard.

Before the Work

Prior to installation, the existing floor covering was inspected and the subfloor was prepared to ensure it was flat, dry, and suitable for the new laminate. Any existing floor covering was lifted and disposed of cleanly before the fitting work began.

Our Approach

The following services were carried out as part of this project:

  • Beading Installation (incl. materials)
  • Doors Plus Frame Trimming (per door)
  • Furniture Moving
  • Laminate Floor Installation
  • Subfloor Preparation (SLC)
  • Thresholds & Fitting (inc. materials)
  • QuickStep Impressive Classic Oak Natural Laminate Flooring, 8 mm
  • Timbertech2 Silver Plus Flooring Underlay, 3 mm, 10 sqm

The Result

The completed laminate installation looked clean and finished throughout. Joins are tight, edges are neat, and the floor sits flat and stable. Beading and threshold strips were fitted where required to complete the job properly. The client was pleased with both the quality of the work and the appearance of the new floor.

Photos of the completed work:

Laminate floor after fitting work in SE19 Laminate floor after fitting work in SE19 Laminate floor after fitting work in SE19

Frequently Asked Questions

How long does laminate installation take?
Most fitting jobs are completed within one to two days. Larger areas or more detailed layouts such as herringbone patterns take longer due to the additional cutting and positioning involved.

Do I need underlay?
Yes, underlay is required for most floor types and helps with insulation, sound deadening, and levelling minor subfloor imperfections. We can supply and fit appropriate underlay as part of the installation.

How much does floor fitting cost in London?
Fitting costs typically range from £35 to £60 per square metre depending on floor type and complexity. We provide a full written quote before starting any work.

Have a similar project? Call us on 020 88309782 or Book a Free Site Visit

Show more
Floorboards Sanding and Restoration in Palmers Green, N13 — Full Case Study

Project Overview This project involved the professional sanding and restoration of an existing wood floor at a property in Palmers Green, N13. The floor had seen years of daily wear and was in need of attention to bring it back to a quality finish. Our team carried out a full assessment before starting work, checking for any boards that needed attention alongside the main sanding and finishing wo...

Project Overview

This project involved the professional sanding and restoration of an existing wood floor at a property in Palmers Green, N13. The floor had seen years of daily wear and was in need of attention to bring it back to a quality finish. Our team carried out a full assessment before starting work, checking for any boards that needed attention alongside the main sanding and finishing work.

Before the Work

Before work began, the floor showed typical signs of wear. Surface scratches, dull patches, and general finish deterioration were present. A thorough survey was carried out to plan the correct sanding depth, assess board condition, and choose the most appropriate finish for the space.

Survey photos showing the floor condition before work:

Floor condition before work at N13 Floor condition before work at N13 Floor condition before work at N13

Our Approach

The following services were carried out as part of this project:

  • Floorboards - Fireplace Heart Removal
  • Floorboards - Replacement (incl. materials)
  • Floorboards - Sand, Buff & Lacquer
  • Gap Filling
  • Staining

The Result

Once the sanding and finishing process was complete, the floor was transformed. The wood grain was opened up and brought back to life, the surface was smooth and even, and the new finish provided lasting protection. The client was left with a floor that looked, and performed, as good as new.

Photos of the completed work:

Floorboards floor after sanding work in N13 Floorboards floor after sanding work in N13 Floorboards floor after sanding work in N13

Frequently Asked Questions

How long does floor sanding take?
Most residential sanding jobs are completed in one to two days, depending on floor size and condition. Lacquering or oiling adds further drying and curing time, which we factor into the job schedule.

Do I need to vacate the property during sanding?
Modern dustless sanding equipment keeps dust to a minimum, but we recommend keeping pets and young children clear of the area during the work. Most clients remain in their property throughout.

How much does floor sanding cost in London?
Prices typically range from £25 to £45 per square metre depending on floor condition, finish type, and any repair work required. Gap filling and board replacement are priced separately if needed.

Have a similar project? Call us on 020 88309782 or Book a Free Site Visit

Show more
Parquet Floor Restoration in Central London — Full Case Study

Project Overview This parquet floor restoration and repair project was carried out at the offices of VOGUE Magazine in Central London. The work focused on the corridor leading to the Board Meeting Room, a high-profile area that sees regular use by staff, visitors, and senior management. The parquet floor in this section had developed gaps between the blocks, the surface finish had dulled and worn...

Parquet floor corridor at VOGUE Magazine HQ before restoration Close-up of parquet surface wear and gap condition prior to treatment

Project Overview

This parquet floor restoration and repair project was carried out at the offices of VOGUE Magazine in Central London. The work focused on the corridor leading to the Board Meeting Room, a high-profile area that sees regular use by staff, visitors, and senior management. The parquet floor in this section had developed gaps between the blocks, the surface finish had dulled and worn, and in a few areas the blocks had begun to lift slightly. Given the setting, the work had to be done to an exceptional standard and with minimal disruption to office operations. Commercial parquet restoration in Central London falls broadly in the £70 to £100 per square metre range, though scope variations affect the final cost.

The Challenge

Working in an occupied commercial environment brings constraints that do not apply in domestic settings. The work had to be scheduled to avoid disrupting key meetings and office hours, which meant phased working and strict dust control were essential. Parquet floor sanding produces fine dust that can travel considerable distances in an air-conditioned office if not contained properly. In addition, the corridor was narrow, which limited the size of equipment that could be used, and any marks or scuffs to the freshly painted walls would have been unacceptable. The floor's herringbone pattern also demanded diagonal sanding technique, as always with parquet, requiring experience and care to avoid any cross-grain damage.

Our Approach

  1. Condition inspection: We carried out a thorough assessment of the corridor floor, noting every loose block, every gap wider than one millimetre, and every section of worn finish before agreeing on the scope of work with the facilities team.
  2. Block re-gluing and replacement: Loose blocks were individually lifted, cleaned, re-glued, and pressed back into position. A small number beyond repair were replaced with matching oak stock.
  3. Gap filling: All significant gaps were filled using a resin and wood-dust mixture matched to the floor's existing colour, producing a natural-looking result rather than a contrasting filler line.
  4. Dust containment: Before sanding began, we sealed the corridor with polythene sheeting at both ends and covered all ventilation grilles. A dust extraction system was connected directly to the sanding machine to keep airborne particles to a minimum.
  5. Sanding: The floor was sanded diagonally through three grit stages using equipment sized to fit the corridor width. Edge sanding was completed carefully to avoid marking the walls or skirting.
  6. Finishing: Two coats of a hard-wearing commercial-grade lacquer were applied, chosen for its quick drying time to minimise disruption. The finish was buffed between coats for a consistently smooth result.

Parquet floor corridor at VOGUE HQ after restoration and lacquering

The Result

The corridor floor looked considerably better after treatment. The gaps were filled, the surface finish was even and clean, and the overall appearance of the space was noticeably improved. The work was completed within the agreed schedule without disruption to the building's operations. Maintaining parquet floors in commercial settings to a high standard requires periodic professional attention, and this project is a good example of how a targeted restoration can significantly extend a floor's useful life without the cost and disruption of replacement.

Frequently Asked Questions

Can parquet floor sanding be done in an occupied commercial building?

Yes, with the right preparation. Dust containment is the main concern. We use direct-extraction sanding equipment and seal off the work area to prevent dust spreading into adjacent offices. Work is typically scheduled outside core business hours or in phases to keep disruption to a minimum.

How often does a commercial parquet floor need professional maintenance?

In a high-traffic commercial corridor, the finish will wear faster than in a domestic setting. A maintenance coat applied every two to three years can extend the time between full sanding and refinishing jobs. Full sanding and refinishing on a well-maintained commercial floor is typically needed every eight to fifteen years.

What type of finish is best for a high-traffic commercial parquet floor?

A commercial-grade lacquer with a hard surface film is generally the most practical choice for high-traffic areas. It provides strong scratch and wear resistance, is easy to clean, and is available in a range of sheen levels from matt to high gloss. Oil finishes, while beautiful, require more frequent maintenance and are less suited to very high-traffic commercial use.

Have a similar project? Call us on 020 88309782 or Book a Free Site Visit

Show more
Laminate Floor Fitting in Crystal Palace — Full Case Study

Project Overview This laminate flooring installation was completed at a terraced house in Crystal Palace, South East London. The client wanted to update their ground-floor rooms with a good-quality laminate that would give the look of real wood without the higher cost or maintenance requirements that come with solid or engineered flooring. Modern laminate has improved dramatically over the past d...
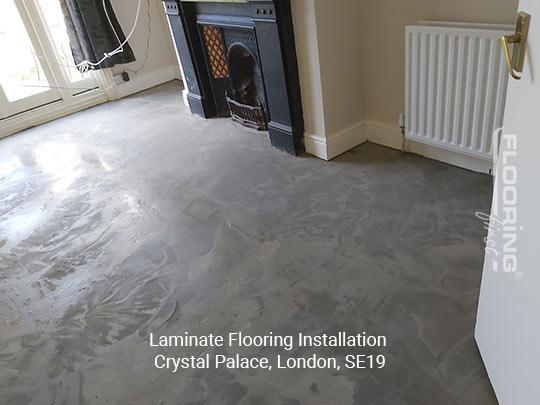
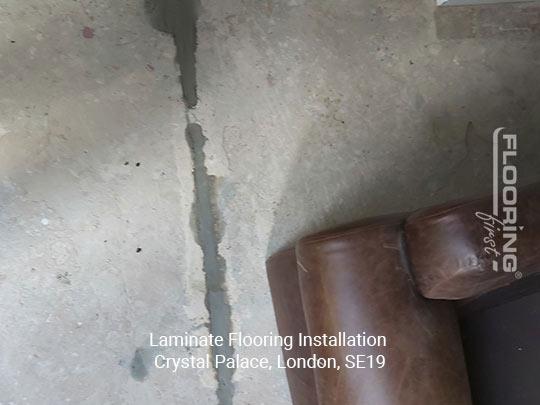
Old flooring removed and subfloor exposed before laminate fitting in Crystal Palace Subfloor condition assessed and prepared prior to laminate installation

Project Overview

This laminate flooring installation was completed at a terraced house in Crystal Palace, South East London. The client wanted to update their ground-floor rooms with a good-quality laminate that would give the look of real wood without the higher cost or maintenance requirements that come with solid or engineered flooring. Modern laminate has improved dramatically over the past decade. Today's products are thicker, more realistic in texture and grain detail, and considerably more hardwearing than the laminate products of twenty years ago. For a professional supply and fit, the typical cost falls between £35 and £60 per square metre, making it the most cost-effective way to get a wood-effect floor in good condition quickly.

The Challenge

The rooms had existing vinyl sheet flooring laid directly over concrete. The vinyl had to come up before the laminate could go down, and removing old glued vinyl from concrete is time-consuming work. In one area, the adhesive had hardened and bonded so firmly that the concrete surface was lightly pitted after removal. These pits needed to be filled before the laminate went down, as any significant surface irregularity beneath a floating laminate floor transmits through the boards as a slight flex that can, over time, stress the click joints. One doorway also had a slightly raised threshold that needed to be reduced to allow the floor to run through the room without a trip hazard at the door.

Our Approach

  1. Vinyl removal: The existing vinyl was carefully cut into strips to make handling manageable, then pulled up. The old adhesive residue on the concrete was scraped and ground back as thoroughly as possible.
  2. Subfloor repair: Any pitting from the adhesive removal was filled with a rapid-set patching compound and feathered smooth. The floor was checked for level and any remaining high spots were ground back.
  3. Door threshold: The raised door threshold was planed down flush with the surrounding floor level so the laminate could run through the doorway cleanly without requiring a raised strip.
  4. Damp-proof membrane: A DPM sheet was laid over the concrete and taped at all joints before the underlay went down, as a precaution against any residual moisture in the slab.
  5. Underlay: A good-quality foam underlay was laid over the membrane. This adds cushioning underfoot, reduces the hollow sound that laminate can produce, and provides a small additional thermal benefit at floor level.
  6. Laminate fitting: The boards were fitted in a staggered pattern, leaving the required expansion gap around all walls and fixed objects. Cuts were made cleanly to fit around door frames and the existing staircase foot.
  7. Finishing: Matching beading was fitted around the perimeter to cover the expansion gap and colour-matched threshold strips were installed at each doorway.
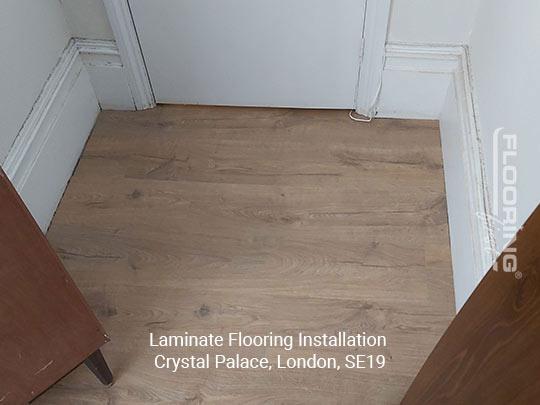
Completed laminate floor installation in Crystal Palace

The Result

The transformation was significant. The tired vinyl was replaced by a clean, warm-toned laminate that immediately brightened the rooms and made them feel more cared for. The client was pleased with how much the floor had improved the overall feel of the ground floor without a major outlay. The laminate chosen had a natural oak look with a subtle brushed texture, which suited the character of the house well. With normal care, a good quality laminate fitted over a properly prepared subfloor will last fifteen to twenty-five years before replacement becomes a consideration.

Frequently Asked Questions

Can laminate be fitted over an existing vinyl floor?

In some cases, laminate can be laid over existing vinyl if the vinyl is firmly bonded, flat, and in good condition, and if the additional height is not a problem at doorways. More often, we recommend removing the old vinyl first to ensure the subfloor is in known good condition and to avoid any unevenness being transmitted through to the new floor.

What thickness of laminate should I choose?

For domestic use, 8mm to 12mm laminate is the usual range. Thicker boards feel more solid underfoot, absorb sound better, and are generally more resistant to dents and damage. 12mm is a good choice for busy family homes. Thinner boards are suitable for lower-traffic rooms or where the floor height gain needs to be minimised.

How do I keep a laminate floor looking good long-term?

Daily sweeping or vacuuming to remove grit is the most important routine, as grit particles underfoot will gradually scratch the surface. For mopping, use a lightly dampened mop rather than a wet one, as standing water can get into the joints and cause swelling. Avoid steam mops entirely, as the high heat and moisture will damage most laminate products.

Have a similar project? Call us on 020 88309782 or Book a Free Site Visit

Show more
  • 1
  • 2
  • 3
  • 4
  • 5
  • 6
  • 7
  • 8
  • 9
  • 10
  • 11
  • 12
  • 13
  • 14
  • 15
  • 16
  • 17
  • 18
  • 19
  • 20
  • 21
  • 22
  • 23
  • 24
  • 25
  • 26
  • 27
  • 28
  • 29
  • 30
  • 31
  • 32
  • 33
  • 34
  • 35
  • 36
  • 37
  • 38
  • 39
  • 40
  • 41
  • 42
  • 43
  • 44
  • 45
  • 46
  • 47
  • 48
  • 49
  • 50
  • 51
  • 52
  • 53
  • 54
  • 55
  • 56
  • 57
  • 58
  • 59
  • 60
  • 61
  • 62
  • 63
  • 64
  • 65
  • 66

Our Flooring Company

Contacts & Showroom Book Free Site Survey About Our Flooring Company Join Our Team Work as a Contractor

Service Information

Terms of Service Terms of Sales Deliveries & Charges Cookie Settings Returns Policy Privacy Policy

Help

FAQs Case Studies Sitemap Glossary
𝕏
FlooringFirst! Services
158 Coles Green Road
London, NW2 7HW
T: 020 88309782
Floor Sanding Services: Central London, East London, Near London, North London, Northwest London, Southeast London, Southwest London, West London
Wood Floor Installation Service: Central London, East London, Near London, North London, Northwest London, Southeast London, Southwest London, West London

  • Flooring Services
  • Floor Sanding
    • Wood Floor Staining
    • Wood Floor Gap Filling
    • Commercial Floor Sanding
    • Engineered Floor Sanding & Refinishing
  • Wood Floor Fitting
    • Parquet Floor Installation
    • Laminate Floor Installation
    • Engineered Wood Floor Installation - Supply & Fit
    • Solid Wood Floor Fitting - Supply & Fit
    • LVT Floor Installation - Supply & Fit
  • Floor Repairs
    • Parquet Floor Repair and Restoration
    • Engineered Wood Floor Repairs
    • Wood Floor Scratch Repair
    • Floorboards Replacement
  • Care & Maintenance
    • Re-Oiling & Recoating Oiled Floors
    • Vinyl & Linoleum Cleaning
    • Hardwood Floor Buffing
    • Wood Floor Polishing
  • Shop
  • Shop
  • Gallery
  • Service Guide
  • Bookings
  • Book Free Survey
  • Service Advice
  • Product Advice