Project Overview
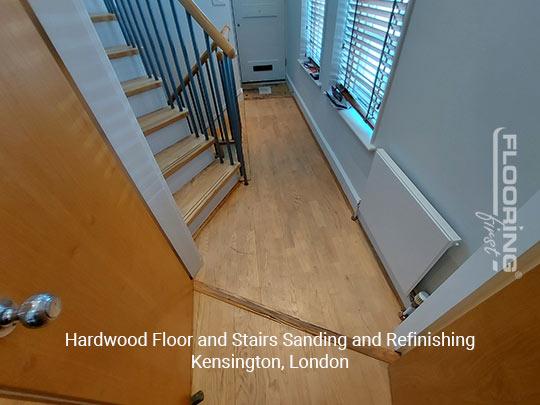
This Kensington property had a substantial hardwood floor throughout the main reception areas along with a wooden staircase running to the upper floors. Both the floor and the stairs had been in the property for many years and were suffering from heavy wear, deep scratches and a finish that had long since given up providing any meaningful protection. Taking on both the floor and the stairs in a single visit meant minimal disruption for the owners and a consistent final appearance throughout. Sanding and refinishing in a high-value London property is always worthwhile because the quality of the underlying wood usually justifies the investment.
The Challenge
The floor itself presented a fairly standard sanding job, but the staircase added significant complexity. Wooden stairs experience more concentrated wear than a floor because every footstep lands on roughly the same spot on each tread. The nosings were particularly worn, with deep grooves in some areas. Sanding stairs requires a completely different set of equipment to floor sanding: smaller drum sanders for the treads, detail sanders and scrapers for the corners and risers, and careful hand work around the spindles and newel posts. Getting an even result across both the horizontal treads and the vertical risers, while working around the staircase fittings, is time-consuming but important for a quality finish.
Our Approach
Structural check. Before any sanding, we tested every tread for movement or squeaking and secured any that needed attention. Loose treads create an uneven surface under the sanding machine and can be a safety issue once the refinishing is complete.
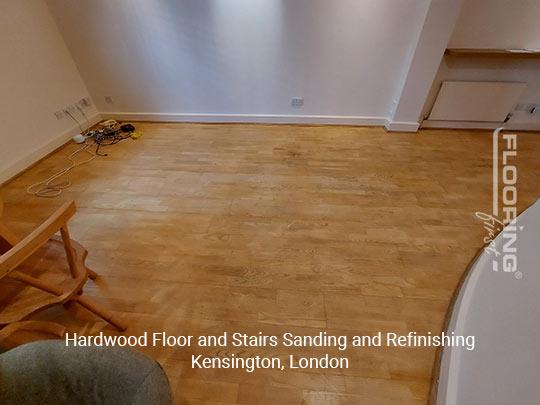
Floor sanding. The floor was sanded in the standard sequence of progressively finer grits, from heavy belt sanding to remove the old finish and deep scratches, through to fine finishing passes. Edging and corners were completed by hand.
Stair sanding. Each tread and riser was sanded individually using appropriate equipment. The nosings, which were the most worn elements, required careful grading to achieve an even surface without creating a visible step between the worn centre and the less-worn edges.
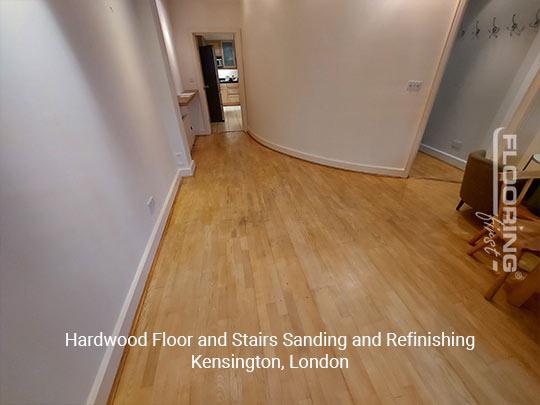
Lacquer application on both surfaces. Two coats of lacquer were applied to the floor and the stairs. The lacquer was allowed to cure fully between coats, and a light buff between applications ensured a very smooth final film.
The Result
The transformation across the whole ground floor was significant. The floor and stairs now matched in finish and colour, giving the space a coherent and well-maintained look. All the deep scratches and worn patches on the treads had been removed, and the lacquer finish gave both surfaces a clear, durable protective coating. The owners were delighted with how the floor and staircase looked together, and the property as a whole benefited from the work.
Frequently Asked Questions
Can wooden stairs be sanded at the same time as the floor?
Yes, and it is usually more efficient to do both in one visit. The same crew and equipment can be used for both, and having a single finish applied across floor and stairs gives a much more consistent result than tackling them at different times.
How long does it take to sand and refinish a flight of stairs?
A standard straight staircase of 12 to 14 treads typically takes a full day to sand and finish properly, assuming the risers and spindle areas are included. The lacquer will then need 24 to 48 hours to harden before the stairs can be walked on.
What finish is best for wooden stairs?
Lacquer is generally the most practical choice for stairs because of its hardness and resistance to concentrated wear. It can take a heavier footfall than oil without showing wear as quickly, which matters a lot on a staircase used by the whole household every day.