Back to Floor Sanding
Essential FAQs for DIY Floor Sanding

Having beautiful, well-maintained wooden floors can greatly enhance the aesthetics and ambience of any space. However, over time, these floors can lose their lustre due to wear and tear, leaving them looking dull, scratched, or discoloured. This is where wood floor sanding comes to the rescue. Wood floor sanding is a process that involves removing the top layer of a wooden floor to reveal a fresh surface, eliminating imperfections, and restoring the natural beauty of the wood. Below, we explore the benefits of floor sanding, whether it's worth considering as a DIY project, and the key factors to keep in mind throughout the process.
What is Floor Sanding?
Floor sanding is an important process in maintaining and enhancing the appearance of wooden floors. It involves the removal of the top surface layer using abrasive materials, such as sandpaper or sanding machines. This process is typically performed to:
- Eliminate imperfections like scratches, dents, and scuffs.
- Remove stains that may have set into the wood over time.
- Prepare the floor for a new finish, allowing for better adhesion and a more uniform appearance.
By sanding the floor, you not only restore its original beauty but also prolong its lifespan. This essential step can make a significant difference in the overall look and feel of your space, making it a worthwhile investment in your home's interior. Whether you're planning a full renovation or just looking to refresh your floors, understanding the fundamentals of floor sanding is key to achieving a professional finish.
How Do I Know If My Floors Need Sanding?
Determining whether your floors require sanding is essential for maintaining their appearance and durability. Here are some key signs to look out for:
- Visible Scratches and Dents: If you notice numerous scratches or dents that are prominent and affect the floor's overall look, it's a strong indication that sanding is needed.
- Discolouration or Fading: Over time, exposure to sunlight and foot traffic can cause wood floors to lose their lustre. If you see uneven discolouration or fading in certain areas, sanding can help restore uniformity.
- Cupping or Warping: Changes in humidity can cause wood to warp or cup. If the edges of the floorboards are raised, it's crucial to sand them down to level the surface.
- Peeling or Flaking Finish: A finish that is peeling or flaking indicates that the protective layer is compromised. Sanding will help remove the damaged finish and prepare the surface for a new coat.
- Gaps Between Floorboards: If gaps are forming between the floorboards, it may be time to sand and refinish to restore the wood's integrity and appearance.
Recognising these signs early can save you time and money, allowing you to maintain the beauty and functionality of your wooden floors effectively. If you're unsure, it's always best to consult a professional for an assessment.
Can I Sand My Floors Myself?
Absolutely! Many homeowners can successfully sand their floors as a DIY project, provided they have the right tools and follow proper techniques. Here are some key points to consider before diving into the project:
- Time and Effort: Sanding floors is time-consuming and requires physical effort. Make sure you allocate sufficient time to complete the project, as rushing can lead to mistakes.
- Skill Level: While many people can handle sanding, it requires a certain level of skill and attention to detail. If you're inexperienced, take the time to research the process and perhaps practice on a small area first.
- Proper Tools: Ensure you have the right tools for the job, including:
- Drum Sander: For large areas.
- Edge Sander: For corners and edges.
- Sandpaper: Various grits to achieve the desired finish.
- Vacuum: To clean up dust between sanding passes.
- Safety Precautions: Sanding can create a lot of dust, so wear protective gear such as a dust mask, goggles, and hearing protection.
- Preparation: Proper preparation is essential. Remove all furniture and clean the floor thoroughly to ensure a smooth sanding process.
Sanding your floors can be a rewarding project, allowing you to achieve a beautiful finish and enhance your home's aesthetic. However, if you feel uncertain or overwhelmed, consulting a professional is always a wise option.
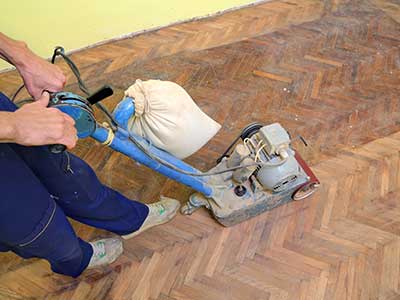
What Tools and Equipment Do I Need?
When embarking on a DIY floor sanding project, having the right tools and equipment is crucial for achieving a professional finish. Here’s a list of the essential tools you’ll need:
- Drum Sander or Orbital Sander:
- A drum sander is best for large, flat areas and can quickly remove the old finish.
- An orbital sander is ideal for a finer finish or smaller spaces.
- Edge Sander:
- This tool is designed for sanding the edges of the floor where the drum sander cannot reach. It ensures a uniform finish throughout the entire floor.
- Sandpaper (Various Grits):
- Start with coarse grit (16 or 24) for initial sanding and progress to finer grits (40, 60, 80, and up to 100) for a smooth finish.
- Vacuum Cleaner with a HEPA Filter:
- A high-quality vacuum will help you keep the workspace clean by removing dust and debris between sanding passes, ensuring a smoother finish.
- Dust Mask and Safety Goggles:
- Protect yourself from harmful dust particles with a dust mask and safety goggles. These are essential for your safety during the sanding process.
- Floor Filler for Repairs:
- Use a high-quality floor filler to repair any gaps, holes, or cracks in the wood before sanding. This ensures an even surface for sanding and finishing.
By gathering these essential tools and equipment, you'll be well-prepared to tackle your DIY floor sanding project and achieve beautiful results!
What Grit of Sandpaper Should I Use?
 Choosing the right grit of sandpaper is essential for achieving a smooth and professional finish when sanding your floors. Here’s a step-by-step guide on how to select the appropriate grit for your project:
- Coarse Grit (16 or 24 Grit):
- Start with coarse grit sandpaper for heavy sanding. This grit is effective for removing old finishes, deep scratches, and imperfections. It’s best for the initial sanding stage, especially if your floors are in poor condition.
- Medium Grit (40 or 60 Grit):
- After addressing major imperfections, switch to medium grit sandpaper. This will help smooth out the surface and prepare it for fine sanding. It’s crucial for eliminating any scratches left by the coarse grit.
- Fine Grit (80 or 100 Grit):
- Finally, use fine grit sandpaper to achieve a smooth finish. This step is essential for polishing the surface and ensuring it feels soft to the touch. Fine grit is also important for preparing the wood for staining or sealing.
By following this progression of sandpaper grits, you’ll ensure a beautifully finished floor that’s ready for its final treatment. Remember to take your time and vacuum between grit changes to maintain a clean workspace!
How Long Does It Take to Sand a Floor?
The duration of the floor sanding process depends on several factors, including the size of the area and the condition of the wood. Here’s a general breakdown to give you an idea of what to expect:
- Small Rooms (e.g., bedrooms):
For smaller spaces, sanding can typically be completed within 1 to 2 days. This includes preparation, sanding, and any necessary finishing.
- Medium-Sized Rooms (e.g., living rooms):
Expect the entire process to take around 2 to 3 days. This time frame accounts for preparing the floor, sanding it with multiple grits, and applying finish or sealant.
- Large Areas (e.g., open-concept spaces):
Larger spaces may require 3 to 5 days or more, especially if extensive repairs are needed before sanding.
Factors Affecting Time
- Condition of the Wood: Floors with significant damage, deep scratches, or multiple layers of finish will take longer to sand.
- Preparation Work: The time spent on preparing the floor (removing furniture, cleaning, filling gaps) will impact the overall duration.
- Finishing Process: Allow additional time for the finish to dry between coats, which can add to the total project timeline.
Planning and being prepared for potential delays will help ensure that your floor sanding project goes smoothly and efficiently!
What Is the Best Way to Finish Sanded Floors?
Once you've successfully sanded your wooden floors, choosing the right finishing option is crucial for achieving the desired look and durability. Here are some of the most common finishing options to consider:
- Varnish:
- Durability: Varnish offers a tough, long-lasting finish that can withstand heavy foot traffic.
- Maintenance: It's low-maintenance, requiring only occasional cleaning.
- Appearance: Varnish can enhance the colour and grain of the wood, providing a polished, glossy look.
- Oil:
- Natural Beauty: Oil finishes penetrate the wood, enhancing its natural beauty and providing a warm, rich appearance.
- Maintenance: While oil finishes are beautiful, they may require more frequent maintenance, including reapplication every few years.
- Feel: They provide a softer, more natural feel underfoot compared to varnish.
- Hard Wax Oil:
- Protection: This finishing option combines the benefits of oil and wax, providing a durable protective layer that enhances the wood’s appearance.
- Easy Maintenance: Hard wax oil is easy to maintain - you can simply reapply it in high-traffic areas without needing to sand the entire floor.
- Finish: It offers a natural finish that allows the wood grain to show through while providing excellent protection against wear.
Selecting the best finish for your sanded floors depends on your aesthetic preferences, maintenance willingness, and the expected wear and tear. By considering these options, you can achieve a stunning and durable finish that will enhance the beauty of your wood floors for years to come!
How Do I Clean the Floors After Sanding?
 Cleaning your floors after sanding is a very important step to achieve a smooth, professional-looking finish. Here’s how to do it effectively:
- Vacuum Thoroughly:
- Use a high-quality vacuum cleaner with a HEPA filter to ensure that all dust and debris are removed. Pay special attention to corners and edges where dust tends to accumulate.
- It’s important to vacuum between sanding passes to eliminate any residual dust that can affect the finish.
- Dusting:
- After vacuuming, use a microfiber cloth or mop to capture any fine dust particles left behind. This step will help ensure that the surface is completely clean and ready for finishing.
- Check for Debris:
- Inspect the floor for any leftover debris, such as bits of wood or sandpaper. Remove any stubborn particles by hand to avoid embedding them in the finish.
- Final Wipe Down:
- If desired, you can lightly dampen a cloth with water and wipe the floor to remove any remaining dust. Ensure the cloth is not soaking wet, as excessive moisture can damage the wood.
By following these steps, you’ll ensure that your floors are impeccably clean after sanding, setting the stage for a smooth and even finish. Taking the time to clean properly will help you achieve a beautiful and long-lasting result!
What Should I Avoid When Sanding My Floors?
When sanding your floors, avoiding common mistakes is crucial for achieving a flawless finish. Here are the key pitfalls to watch out for:
- Skipping Grits:
- Don’t rush the process. Progressing too quickly to finer grits can leave deep scratches and an uneven surface. Always start with coarse grit and gradually move to medium and fine grits for the best results.
- Applying Too Much Pressure:
- Let the tool do the work. Applying excessive pressure can damage the wood, causing uneven sanding and rough patches. Use light, consistent pressure to ensure a smooth finish.
- Failing to Vacuum Between Passes:
- Clean as you go. Neglecting to remove sawdust and debris can result in an uneven surface and interfere with stain absorption. Vacuum thoroughly after each sanding pass to maintain a clean working area.
- Not Allowing Adequate Drying Time for Finishes:
- Be patient. Rushing the drying process can lead to an unsatisfactory finish, such as peeling or cracking. Always follow the manufacturer’s instructions for drying times before applying additional coats.
By steering clear of these common mistakes, you can ensure a successful sanding project and enjoy beautiful, long-lasting results for your wooden floors. Taking the time to follow proper techniques will pay off in the final finish!
What Safety Precautions Should I Take?
 When sanding floors, safety should always be a top priority. Here are essential precautions to keep in mind:
- Wear Safety Goggles and a Dust Mask:
- Protect your eyes from dust and debris that can cause irritation or injury. A dust mask will help prevent inhalation of harmful particles, reducing respiratory risks.
- Ensure Proper Ventilation:
- Adequate airflow is crucial to minimise dust accumulation and maintain a safe working environment. Open windows and doors, or use fans to circulate air and keep dust levels down.
- Use Hearing Protection:
- Power sanders can be quite loud, so consider wearing earplugs or noise-canceling headphones to protect your hearing.
- Check Electrical Equipment:
- Before using any power tools, inspect them for frayed cords or damage. Always use equipment with a grounded outlet to reduce the risk of electric shock.
- Keep the Area Clear:
- Ensure that the workspace is free of clutter and tripping hazards. This includes moving furniture and removing any items from the floor that could pose a risk.
- Wear Appropriate Clothing:
- Opt for long sleeves and pants to protect your skin from dust and splinters. Closed-toe shoes with good grip are recommended to prevent slips and falls.
Do I Need to Hire Professionals?
Deciding whether to hire professionals for floor sanding depends on several factors, including your experience level, the condition of your floors, and the complexity of the job. Here are some considerations to help you make an informed choice:
- Experience and Comfort Level:
- If you're confident in your DIY skills and have experience with power tools, sanding your floors can be a rewarding project. However, if you're inexperienced or uncomfortable with the process, hiring professionals may save you time and stress.
- Condition of the Floors:
- Floors that have significant damage, such as deep scratches, extensive staining, or warping, may require specialised techniques and equipment. In these cases, professionals can provide the expertise needed to achieve a quality finish.
- Type of Wood:
- Some wood types, such as exotic hardwoods or delicate vintage flooring, require specific handling to avoid damage. If your flooring falls into this category, consider consulting professionals who understand the nuances of different wood types.
- Time Constraints:
- DIY floor sanding can take several days, especially if you're balancing other commitments. If you're short on time, hiring professionals may expedite the process and ensure a high-quality finish.
- Cost Considerations:
- While hiring professionals can be more expensive than a DIY project, the investment may be worth it if it ensures a flawless result. Additionally, professionals can help you avoid costly mistakes that might arise from DIY attempts.
Ultimately, the decision to hire professionals should be based on your level of comfort, the condition of your floors, and your project timeline. If you choose to go the DIY route, ensure you are well-prepared and informed to achieve the best results. However, don’t hesitate to seek professional assistance when in doubt, especially for extensive repairs or complex wood types.